DTS migrates an ApsaraDB for MongoDB replica set or standalone instance to another region, supporting full data migration and, for replica sets, incremental data migration.
Supported migration paths
| Source instance type | Full data migration | Incremental data migration |
|---|---|---|
| Standalone instance | Supported | Not supported |
| Replica set instance | Supported | Supported |
| Sharded cluster instance | Not supported. Instead, use mongodump and mongorestore. | Not supported |
Migration types
| Migration type | Description |
|---|---|
| Full data migration | Migrates all existing databases, collections, and indexes from the source to the destination. |
| Incremental data migration | Syncs ongoing changes after full migration completes. Supports create and delete operations on databases, collections, and indexes; create, delete, and update operations on documents. |
Billing
| Migration type | Task configuration fee | Internet traffic fee |
|---|---|---|
| Full data migration | Free | Charged only for Internet-based migration from Alibaba Cloud. Billing overview. |
| Incremental data migration | Charged. Billing overview. | Same as full data migration. Internet traffic fees apply to the entire task when the destination uses a public IP address. Billable items. |
Required permissions
| Database | Full data migration | Incremental data migration |
|---|---|---|
| Source instance | Read permissions on the source database | Read permissions on the source, admin, and local databases |
| Destination instance | Read and write permissions on the destination database | Read and write permissions on the destination database |
To create and authorize a database account, see Manage user permissions on MongoDB databases.
Prerequisites
Before you begin, make sure that:
-
The source instance is a standalone or replica set instance
-
The source instance has a public endpoint. Apply for a public endpoint.
-
The destination instance is created in the target region: Create a standalone instance, Create a replica set instance, or Create a sharded cluster instance.
-
The destination instance has at least 10% more storage than the total data size in the source instance (recommended)
-
The source and destination instances use compatible MongoDB versions and storage engines.
Before you begin
-
Full data migration increases load on both instances. Migrate during off-peak hours.
-
Standalone instances do not support incremental migration. Avoid writing to the source during full migration to ensure data consistency.
-
Concurrent writes to the destination consume 5%–10% more storage than the source data.
-
Ensure the destination has no duplicate primary keys (default:
_id). Duplicates may cause data loss. Clear conflicting data before starting migration without interrupting DTS services. -
ApsaraDB for MongoDB may auto-update the minor version when it expires or leaves the maintenance list, or during version upgrades, data migration, configuration changes, or backup restoration.
Create a migration task
This example migrates a replica set instance from China (Qingdao) to China (Hangzhou).
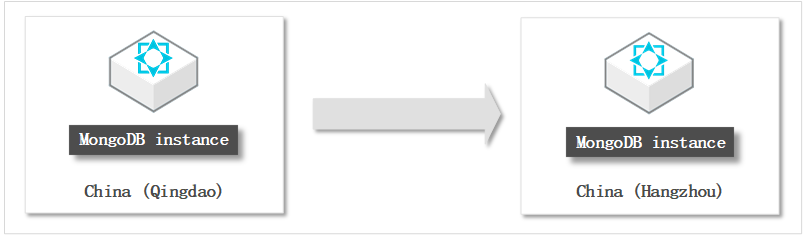
Step 1: Start the migration
-
Log on to the ApsaraDB for MongoDB console.
-
In the left-side navigation pane, click Replica Set Instances or Sharded Cluster Instances.
-
In the upper-left corner, select the resource group and region of the source instance.
-
Click the instance ID of the source instance.
-
In the upper-right corner, click Migrate Databases.
Step 2: Configure the source and destination databases
On the Create Migration Task page, configure the following settings:
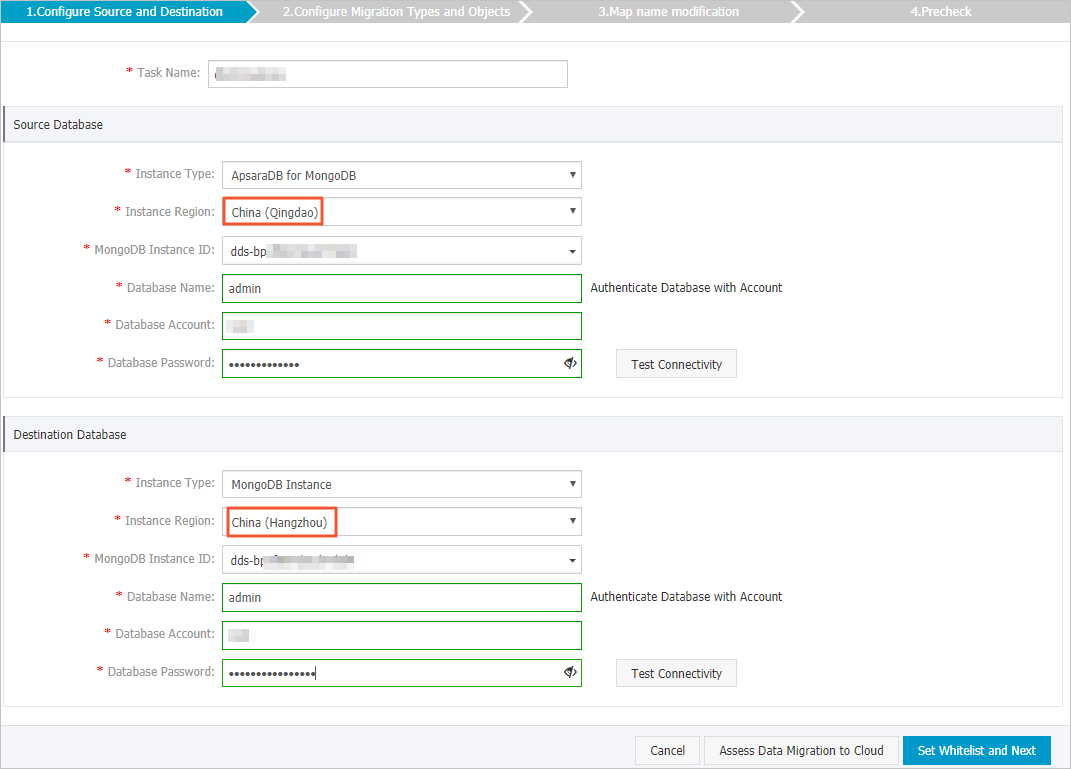
| Section | Parameter | Description |
|---|---|---|
| -- | Task Name | DTS auto-generates a name. Specify a descriptive name for easy identification. Unique names are not required. |
| Source Database | Instance Type | Select ApsaraDB for MongoDB. |
| Instance Region | Select the region of the source instance. In this example, select China (Qingdao). | |
| MongoDB Instance ID | Select the source instance ID. | |
| Database Name | Enter the name of the authentication database. To use the root account, enter admin. |
|
| Database Account | Enter the username for the source instance. For required permissions, see Required permissions. | |
| Database Password | Enter the password. Click Test Connectivity to verify. A Passed message indicates a successful connection. If a Failed message appears, click Check to troubleshoot. | |
| Destination Database | Instance Type | Select MongoDB Instance. |
| Instance Region | Select the region of the destination instance. In this example, select China (Hangzhou). | |
| MongoDB Instance ID | Select the destination instance ID. | |
| Database Name | Enter the name of the authentication database. To use the root account, enter admin. |
|
| Database Account | Enter the username for the destination instance. For required permissions, see Required permissions. | |
| Database Password | Enter the password. Click Test Connectivity to verify. A Passed message indicates a successful connection. If a Failed message appears, click Check to troubleshoot. |
Click Set Whitelist and Next.
DTS automatically or manually adds its CIDR blocks to the instance whitelist or ECS security group rules. Secure your credentials, limit exposed ports, authenticate API calls, and review whitelist entries regularly. Alternatively, connect through Express Connect, VPN Gateway, or Smart Access Gateway (SAG).
Step 3: Select migration types and objects
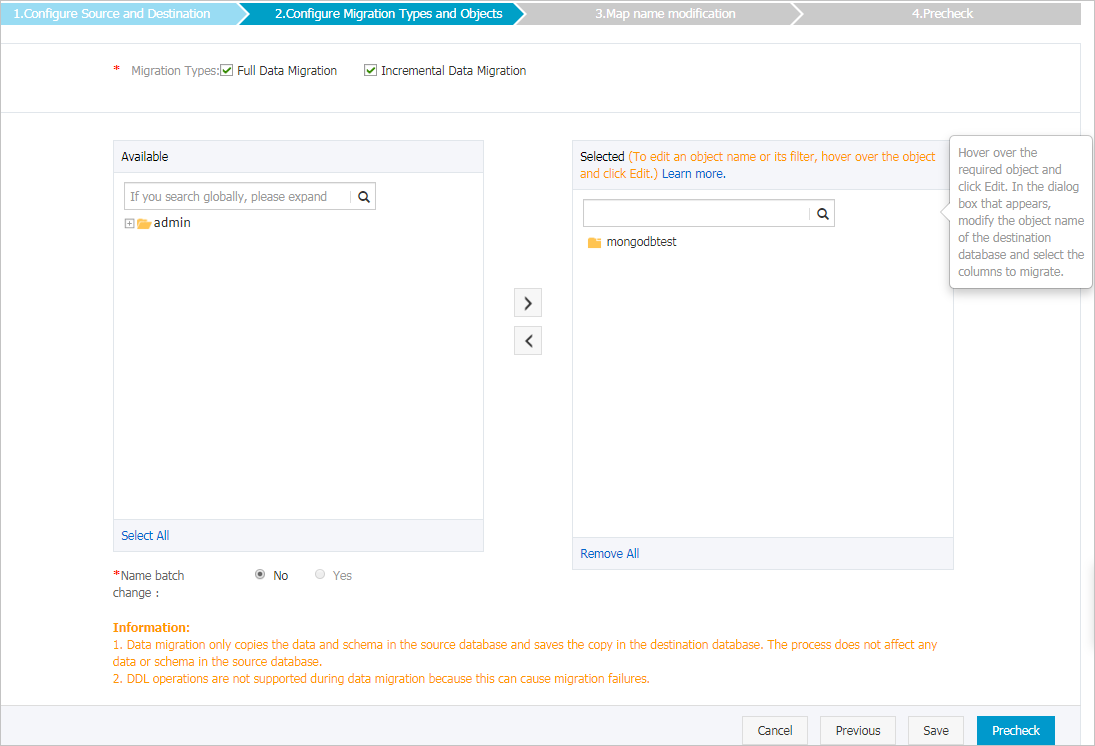
| Setting | Description |
|---|---|
| Select the migration types | Select Full Data Migration only, or select both Full Data Migration and Incremental Data Migration to keep the destination in sync during migration. Note
Standalone instances do not support Incremental Data Migration. If incremental migration is not selected, do not write data to the source during full data migration to maintain data consistency. |
| Select the objects to be migrated | Select objects from the Available section and click the right arrow icon to move them to the Selected section. Note
DTS cannot migrate data from the admin or local database. Migratable objects include databases, collections, and functions. To rename objects in the destination, use the object name mapping feature. |
| Specify whether to rename objects | Rename objects in the destination using object name mapping. |
| Specify the retry time range for a failed connection to the source or destination database | DTS retries failed connections for up to 12 hours by default. Charges apply during retries. Release the DTS instance if the source or destination becomes unavailable. |
Step 4: Run the precheck and start the migration
-
Click Precheck to validate the configuration.
-
If the precheck fails, click View Details next to each failed item, fix the issues, and run the precheck again.
-
Warnings do not block the precheck. Fix or ignore them, but ignoring warnings may affect migration results.
-
-
After the precheck passes, click Next.
-
In the Confirm Settings dialog box, select the Instance Class and accept the Data Transmission Service (Pay-As-You-Go) Service Terms.
-
Click Buy and Start to start the migration task.
Step 5: Monitor the migration and perform the cutover
-
Full data migration: Do not manually stop the task. Wait until it completes automatically.
-
Incremental data migration: The task does not stop automatically. Perform the cutover as follows:
-
Wait until the progress bar shows Incremental Data Migration and the status The migration task is not delayed.
-
Stop writing data to the source instance for a few minutes.
-
Wait until the status returns to The migration task is not delayed.
-
Manually stop the migration task.
-
After the migration completes, switch your workloads to the destination instance.
Verify the migration
After migration, verify the results:
-
Compare document counts between source and destination to check for data loss.
-
Verify that indexes are correctly created in the destination.
-
Test application connectivity to the destination instance.
Next steps
If the source instance is no longer needed, release it:
-
Pay-as-you-go instance: Release the instance directly.
-
Subscription instance: The instance cannot be released before the billing cycle ends.