If a table in your Data Transmission Service (DTS) data synchronization instance reports an error, remove it from the sync scope, clear its data in the destination database, then re-add it.
Prerequisites
Before you begin, make sure that:
-
No business application is reading from the destination database, or applications can tolerate a brief read interruption
-
The source and destination databases are running as expected
-
The data synchronization instance has other objects to synchronize besides the errored table
-
The data synchronization instance is not in the Modifying Objects state
Usage notes
-
Modifying synchronized objects causes the DTS instance to restart automatically. During the restart, brief data inconsistency between the source and destination databases may occur.
-
You must clear the errored table's data in the destination database. Before proceeding, confirm that:
-
Only DTS writes to that table in the destination database, or the table's data can be safely cleared
-
The business that relies on that table is not affected
-
Fix the table error
The fix follows three steps:
-
Remove the errored table from the sync scope
-
Clear the table's data in the destination database
-
Re-add the table to the sync scope
Step 1: Go to the Data Synchronization Tasks page
-
Log on to the Data Management (DMS) console.
-
In the top navigation bar, click Data + AI.
-
In the left-side navigation pane, choose DTS (DTS) > Data Synchronization.
Step 2: Select the region
On the right side of Data Synchronization Tasks, select the region where the data synchronization instance resides.
Step 3: Remove the errored table
How you remove the table depends on how the synchronized object was configured.
Scenario A: The entire database is the synchronized object
If the database containing the errored table was added as the sync object rather than the table individually, follow these steps:
-
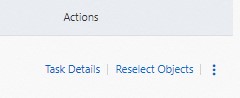
Find the instance and click Reselect Objects in the Actions column.
-
In the Selected Objects section, select the database and click the
 icon to remove it.
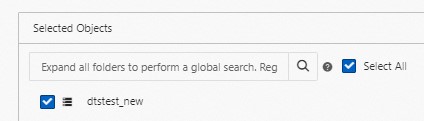
-
In the Source Objects section, select all tables in that database except the errored table, then click the
 icon to add them to the Selected Objects section.
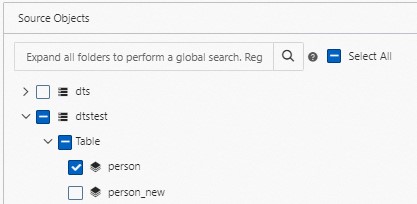
-
Click Next: Advanced Settings, then Next: Save Task Settings and Precheck.
-
Wait until Success Rate reaches 100%, then click Changed. Return.
Scenario B: The table itself is the synchronized object
If the errored table was added directly as a sync object, follow these steps:
-
Find the instance and click Reselect Objects in the Actions column.
-
In the Selected Objects section, select the errored table and click the
icon to remove it. 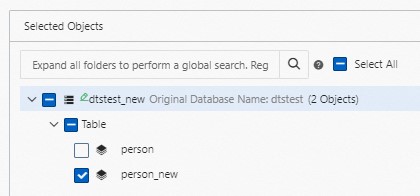
-
Click Next: Advanced Settings, then Next: Save Task Settings and Precheck.
-
Wait until Success Rate reaches 100%, then click Changed. Return.
Step 4: Clear the table data in the destination database
This action permanently deletes the table's data in the destination database. Proceed only after confirming that only DTS writes to this table, or that the data can be safely cleared.
For example, you can execute the following statements to clear the data of a table in a MySQL database. Replace <table_name> with the actual table name.
TRUNCATE TABLE <table_name>;or
DROP TABLE <table_name>;Step 5: Re-add the table to the sync scope
-
Find the instance and click Reselect Objects in the Actions column.
-
In the Source Objects section, select the errored table and click the
icon to add it to the Selected Objects section. 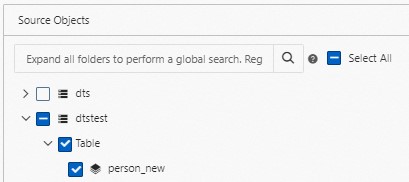
-
Click Next: Advanced Settings, then Next: Save Task Settings and Precheck.
-
Wait until Success Rate reaches 100%, then click Changed. Return.
Step 6: Verify the fix
Wait for the instance to restart, then check whether the error is still reported.