Data Disaster Recovery (DBS) physically backs up self-managed MySQL databases in three modes: full backup, incremental backup, and binary log backup. Use this guide to configure a backup schedule and restore data for disaster recovery or data migration.
Prerequisites
Before you begin, ensure that you have:
-
A self-managed MySQL database running on Linux with one of the following MySQL versions: 8.0, 5.7, 5.6, or 5.5
Supported Linux distributions vary by MySQL version: - MySQL 5.7, 5.6, 5.5: Red Hat Enterprise Linux, CentOS, and Oracle Linux 6, 7, and 8 - MySQL 8.0: Red Hat Enterprise Linux, CentOS, and Oracle Linux 7 only. The minor version must be 8.0.34 or earlier.
-
A backup gateway installed on the server that hosts the source database. See Install a backup gateway.
-
A backup schedule purchased with Data Source Type set to MySQL and Backup Method set to Physical Backup. See Create a backup schedule.
-
A database account with the required backup permissions. See Account permissions.
Configure a backup schedule
-
Log on to the DMS console V5.0.
-
In the top navigation bar, choose Security and Specifications (DBS) > Data Disaster Recovery (DBS) > Backup Plan.
In simple mode, move the pointer over the
 icon in the upper-left corner and choose All Features > Security and Specifications (DBS) > Data Disaster Recovery (DBS) > Backup Plan.
 -
On the Backup Schedules page, find the backup schedule you want to configure and click Configure Backup Schedule in the Actions column.
-
In the Configure Backup Source and Destination step, set the following parameters and click Next.
Section Parameter Description N/A Schedule Name A name for the backup schedule. Data Disaster Recovery generates a name automatically. Enter a descriptive name that is easy to identify. Names do not need to be unique. Backup Source Information Backup Mode The backup method. Defaults to the method selected when you purchased the schedule. In this example, Physical Backup is selected. Backup Type The type of backup. Default: Native physical backup Instance Region The region where the source database resides. The backup gateway and the database instance must be in the same region. Backup Gateway The backup gateway used to back up data. See Install a backup gateway. Database Type The type of the source database. Default: MySQL. Address The IP address used to connect to the source database. Default: 127.0.0.1.Port Number The port used to connect to the source database. Default: 3306.Database Account The username of the account used to connect to the source database. Password The password of the account used to connect to the source database. Compliance warranty regarding cross-border data transfers Read and accept the compliance commitment by selecting the check box. Backup Destination Information Backup Storage Type Where backup data is stored. Options: DBS Storage (recommended) — Data Disaster Recovery stores backup data directly with no Object Storage Service (OSS) bucket required. Charges are based on storage volume. See Storage fees. For large data volumes, purchase a subscription storage plan to reduce costs compared to pay-as-you-go. OSS For User — You must create an OSS bucket in advance. Only the Standard storage class is supported. See Create buckets. OSS Bucket Name The OSS bucket used to store backup data. Displayed only when Backup Storage Type is set to OSS For User. Storage Encryption Whether to encrypt backup data. Encrypted (recommended) — Data Disaster Recovery encrypts data using AES-256. Objects are encrypted on upload and decrypted on download. See Server-side encryption. Non-encrypted — Backup data is stored without encryption. 
-
In the Edit Backup Objects step, Back Up Entire Instance is selected by default. Click Next.
Physical backup always backs up the entire instance, including permissions and stored procedures.
-
In the Configure Backup Time step, set the following parameters and click Next.
Parameter Description Full-scale Backup Frequency The backup frequency. Options: Periodic Backup or Single Backup. Select Periodic Backup to configure recurring backups with incremental and log backup support. Full Data Backup Recurrence The days of the week to run full backups. Select at least one day. Start At The start time for full backups. Schedule during off-peak hours, for example 01:00. If a previous backup is still running at the scheduled start time, Data Disaster Recovery skips that run. Incremental Backup Whether to enable incremental backup. Displayed only when Full-scale Backup Frequency is Periodic Backup. If enabled, make sure binary logging is enabled on the source database. Real-time Log Backup Whether to enable real-time log backup. Displayed only when Full-scale Backup Frequency is Periodic Backup. Maximum Concurrent Threads for Full Data Backup The maximum number of concurrent threads for full backups. Reduce this value to minimize the impact on the source database. The actual maximum varies by backup schedule type. See How do I change the maximum backup speed? Read speed limit The disk I/O limit during backup. Default: 0(no limit).Backup network speed limit The network bandwidth limit during backup. Default: 0(no limit).Transaction Log backup interval The interval between incremental backups, in minutes. For example, set to 10 to back up transaction logs every 10 minutes. Displayed only when Incremental Backup is set to Enable. Enable compression Whether to compress backup data. Enable (recommended) — Reduces storage usage. Disable — Data is stored without compression. Compression algorithm The compression algorithm. Options: GZIP (default) or LZ4. Displayed only when Enable compression is set to Enable. -
In the Edit Lifecycle step, configure the lifecycle for full backup data in the Configure Full Data Backup Lifecycle section. If you enabled Incremental Backup in step 6, also configure the lifecycle for incremental backup data. See How do I manage the lifecycle rules of backup sets?
-
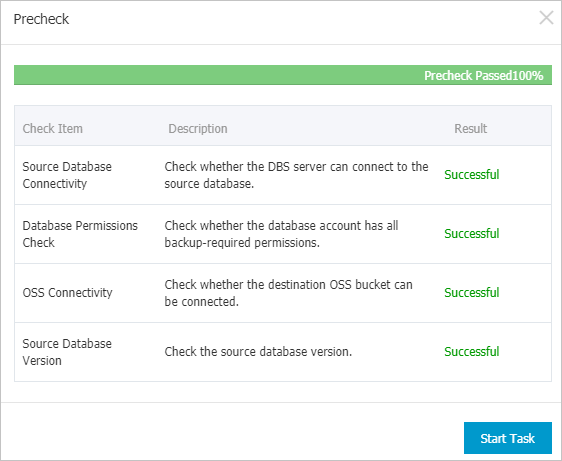
Click Precheck in the lower-right corner.
-
After the Precheck Passed message appears, click Start Task.
- The backup schedule takes effect when its state changes to Running. - If an error occurs when starting the backup schedule, troubleshoot it as soon as possible. See How do I fix errors for an abnormal backup schedule? If the issue persists, contact technical support in the DingTalk group (ID: 35585947).
Restore backup data
Before starting the restore, confirm the following:
-
The destination directory has enough free space — at least 1.3 times the size of the source database, or 5 to 6 times the size of the full backup set. To check the full backup set size, go to Backup Schedules, click the schedule name, and navigate to Backup Tasks > Full Data. See also View a backup schedule.
-
A backup gateway is installed on the destination server.
-
The destination directory must be a Linux absolute path.
-
Log on to the DMS console V5.0.
-
In the top navigation bar, choose Security and Specifications (DBS) > Data Disaster Recovery (DBS) > Backup Plan.
In simple mode, move the pointer over the
icon in the upper-left corner and choose All Features > Security and Specifications (DBS) > Data Disaster Recovery (DBS) > Backup Plan. -
On the Backup Schedules page, find the backup schedule and click Manage in the Actions column.
-
On the Configure Task page, click Restore Database in the upper-right corner.
-
In the Set Time Restored To step of the Create Restore Task wizard, set the following parameters and click Next.
Section Parameter Description N/A Task Name A name for the restore task. Data Disaster Recovery generates a name automatically. Enter a descriptive name to help identify the task. Names do not need to be unique. Set Time Restored To Time Range Available to Restore The range of points in time to which data can be restored — from the first full backup to the latest backup. Restore To The target point in time for restoration. Must be within Time Range Available to Restore. If incremental backup is enabled, you can restore to any point in time from the first full backup to the last incremental backup. If incremental backup is disabled, you can only restore to a point in time when a full backup completed. Configure Destination Database Instance Region The region of the destination server. You can restore to a server in a different region if a backup gateway is installed there. Backup Gateway The backup gateway on the destination server. See Install a backup gateway. Database Type The type of the destination database. Default: MySQL. Destination Directory The directory to restore data to. Must be a Linux absolute path. To ensure enough space, reserve at least 1.3 times the size of the source database or five to six times the size of the full backup set. You can view the full backup set size in the console: go to Backup Schedules, click the backup schedule name, and choose Backup Tasks > Full Data. See View a backup schedule. 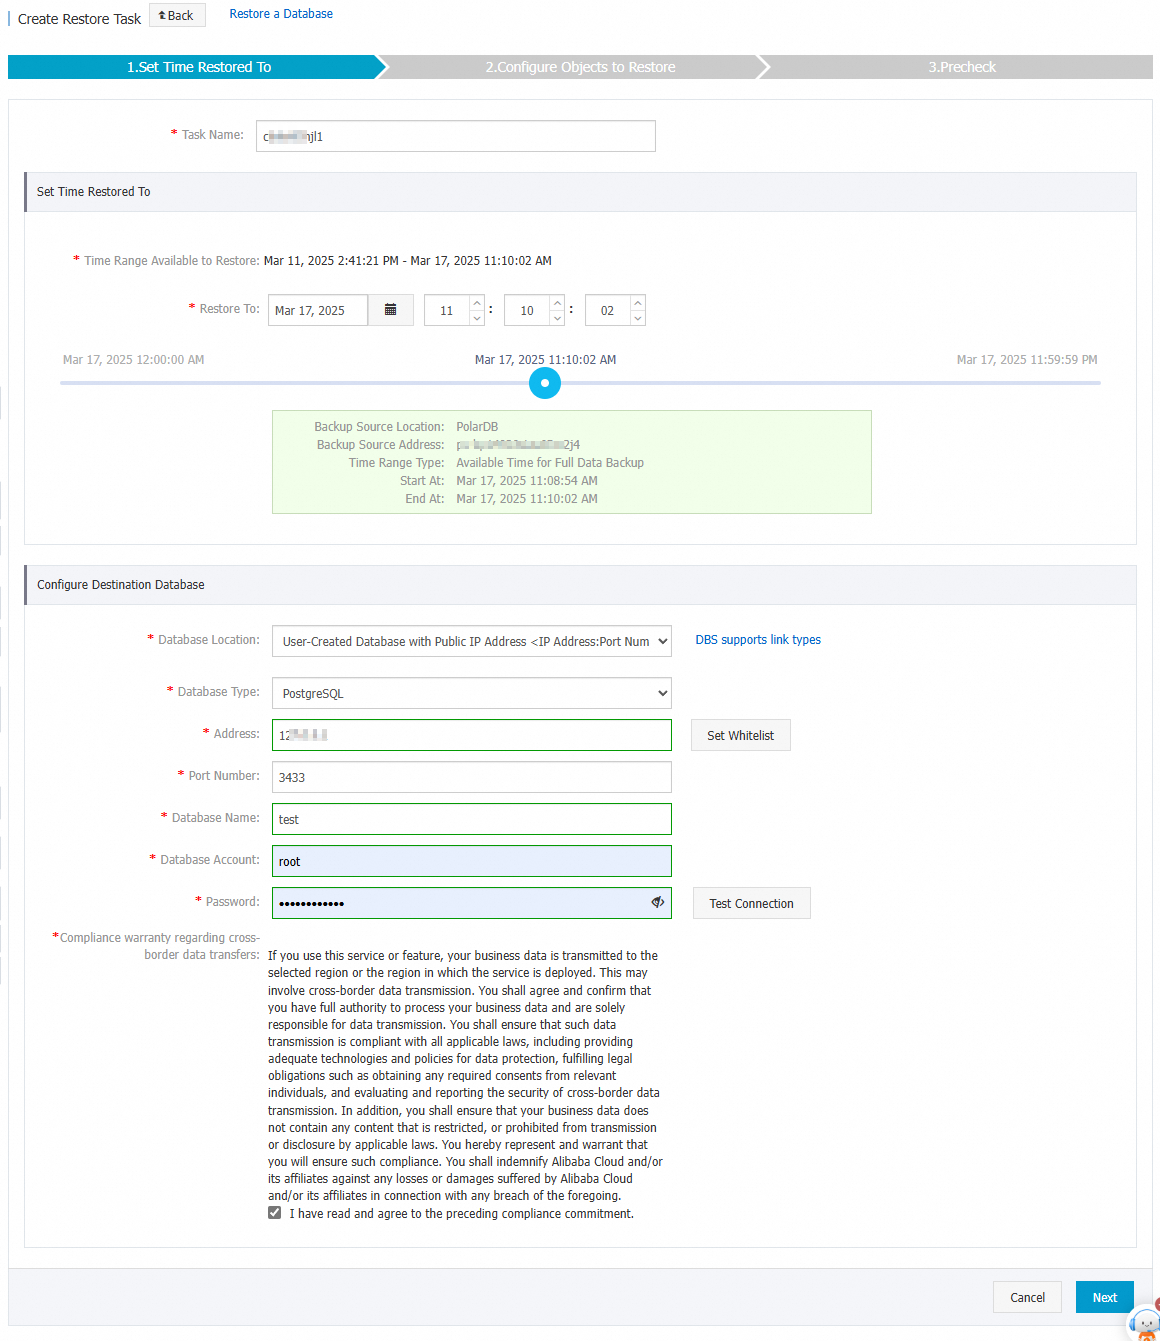
-
In the Configure Objects to Restore step, set Restore Mode to Restore Entire Instance and click Precheck.
To restore a database from a physical backup, you must restore the entire instance.
-
After the Precheck Passed message appears, click Start Task and wait for the restoration to complete.
Restoration time depends on the backup schedule specifications and the database size. See Performance tests on logical backup and physical backup.
-
(Optional) Start the database after restoration.
-
Deploy MySQL on the destination server and set the
datadirparameter inmy.cnfto the restored directory. -
Start the database:
bash service mysqld start
-
What's next
-
View backup schedule details: View a backup schedule
-
Modify backup source, objects, or strategies: Manage a backup plan
-
Create a backup schedule using the API: CreateBackupPlan or CreateAndStartBackupPlan
-
Review charges for your backup schedule: Billing FAQ
-
Pause a backup schedule to reduce costs: Pause or start a backup schedule