Data Disaster Recovery (DBS) supports features for PolarDB for MySQL databases, such as single-table restoration, geo-redundancy, and long-term archiving. This topic describes how to use DBS to automatically back up a PolarDB for MySQL database.
Precautions
-
To perform an incremental backup, ensure that the binary log is enabled for your PolarDB for MySQL instance. This feature is disabled by default. For more information, see Enable binary logging.
-
Do not perform Data Definition Language (DDL) operations that change database or table schemas during a full data backup. Otherwise, the backup task might fail, or the resulting backup data may be unrestorable.
Create a backup schedule
For more information, see Create a backup schedule.
-
When you purchase the backup schedule, select MySQL for Database Type and Logical Backup for Backup Method.
-
To learn about the backup and restore granularity for PolarDB for MySQL databases, see Supported database types and features.
Configure a backup schedule
-
Log on to the Data Management (DMS) 5.0 console.
-
In the top navigation bar, choose .
NoteIf you use the DMS console in simple mode, move the pointer over the
 icon in the upper-left corner of the DMS console and choose .
 On the Backup Schedules page, find the backup schedule that you want to configure and click Configure Backup Schedule in the Actions column.

-
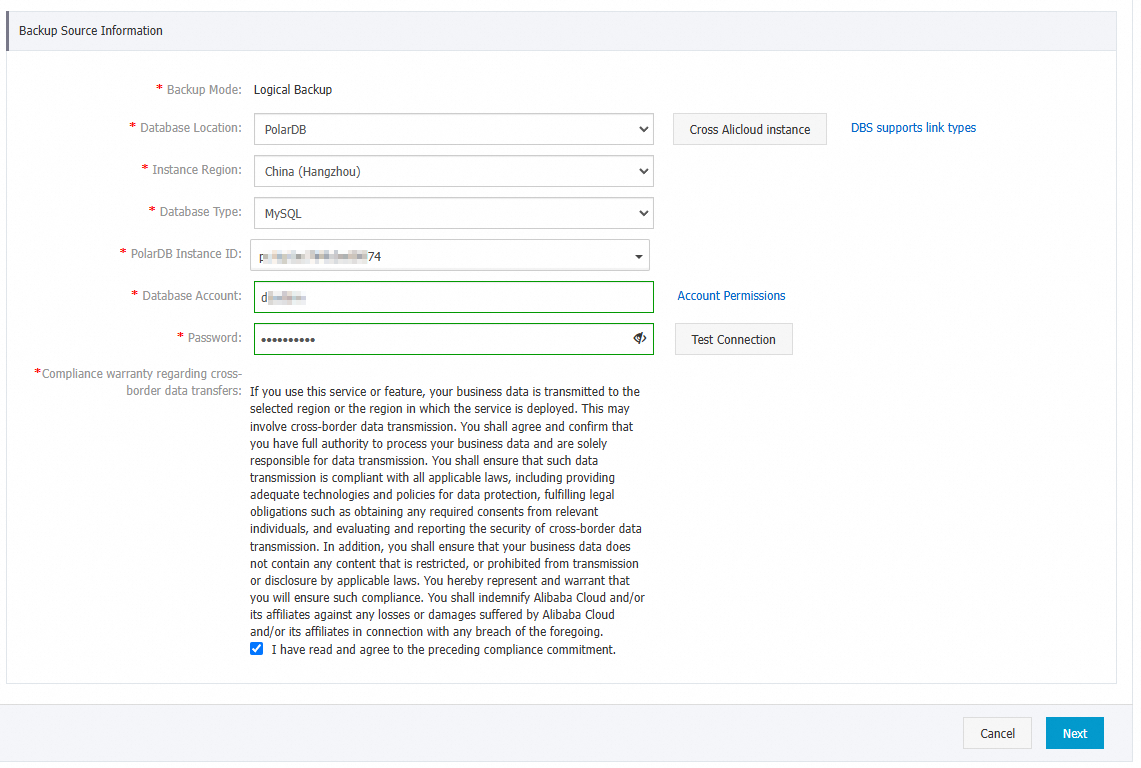
On the Configure Backup Source and Destination page, configure the backup source and destination, and then click Next.
Section
Parameter
Description
N/A
Backup schedule name
The name of the backup schedule. DBS automatically generates a backup schedule name. We recommend that you enter a descriptive name that is easy to identify. Backup schedule names do not need to be unique.
Backup Source Information
Backup method
This parameter is preset to the backup method that you selected when you created the schedule. In this example, the value is Logical Backup.
Database location
The location of the database instance to back up. Select PolarDB.
Instance region
The region in which the source database instance resides.
Database type
The default value is MySQL.
PolarDB instance ID
Select the ID of the PolarDB for MySQL instance that you want to back up.
Database account
Enter the database account that has the required permissions to back up the database. For more information, see Account permissions.
Password
The password of the account that is used to connect to the database that you want to back up.
After you enter the username and password of the database account, click Test Connection next to the password to check whether the information about the database that you want to back up is valid. If the specified parameters are valid, the Test Passed message is displayed. If the Test Failed message is displayed, click Check next to Test Failed. Modify the information about the database that you want to back up based on the check results.
Compliance warranty regarding cross-border data transfers
Read and agree to the compliance commitment by selecting the check box.
Backup Destination Information
Backup storage type
The storage type for the backup data. Valid values:
-
DBS Built-in Storage (Recommended): You do not need to create a storage space. Data is automatically stored in the DBS built-in storage. You are charged based on the amount of data stored. For more information about billing, see Billable items (DMS).
-
OSS For User: You must create an Object Storage Service (OSS) bucket in advance. For more information, see Create a bucket in the console.
Note-
This example uses DBS Built-in Storage. If you select User OSS, you must also configure the OSS Bucket Name parameter. Only the OSS Standard storage class is supported.
-
If you store a large amount of data, we recommend that you purchase a DBS storage plan (subscription) to offset the fees of DBS built-in storage. DBS storage plans are more cost-effective than the pay-as-you-go billing method.
Storage method
Select a storage method. Valid values:
-
Encrypted (Recommended): Uses the industry-standard AES-256 algorithm for encryption.
OSS supports server-side encryption. When you upload an object, OSS encrypts the object and then stores it. When you download the object, OSS automatically decrypts it and returns the original object to you. For more information, see Server-side encryption.
-
Non-encrypted: Encryption is disabled.
-
-
On the Edit Backup Objects page, move the databases or tables that you want to back up to the Selected list, and then click Next.
Note-
You can back up a single table, a single database, or multiple databases. To back up all existing databases, click Select All in the lower-left corner. The supported backup objects vary based on the database engine. For more information, see Supported database types and features.
-
Databases created after the schedule is configured are not backed up by default. To back up a new database, you must add it to the backup schedule configuration. For more information, see Modify backup objects.
-
-
On the Configure Backup Time page, configure the backup time and other settings, and then click Next.
Parameter
Description
Full data backup frequency
The frequency of the backup schedule. Valid values: Periodic Backup and Single Backup.
NoteIf you select Periodic Backup, you must configure the Full Data Backup Recurrence and Start At parameters.
Full data backup schedule
The days of the week on which DBS runs the backup schedule. You can select one or more days of a week. Select at least one day of the week.
Full data backup start time
The start time of the backup. We recommend that you set a point in time within off-peak hours. Example: 01:00.
NoteIf a previous full data backup is not finished at the start time of the next backup, DBS skips the next backup.
Incremental backup
Turn this on to enable incremental backup. If you enable this feature, make sure that the binary log is enabled for your PolarDB for MySQL instance. For more information, see Enable binary logging.
This parameter is displayed only if you set the Full-scale Backup Frequency parameter to Periodic Backup.
Maximum concurrent threads for full data backup
The maximum number of concurrent threads available for a full backup. You can set this parameter to adjust the backup speed. For example, you can reduce the number of backup threads to minimize impacts on the database.
Backup network throttling
The network bandwidth limit. The default value is
0, which indicates no limit. -
On the Edit Lifecycle page, specify the retention period for full data backups in the DBS built-in storage.
If you enabled Incremental Backup in the previous step, you must also configure the retention period for incremental backups. For more information about the lifecycle of backup sets, see Manage lifecycles.
-
After the preceding configurations are complete, click Precheck in the lower-right corner of the page.
-
In the Precheck dialog box, after the precheck passes, click Start Task.
Note-
The backup schedule is successfully configured when its Status changes to Running.
-
If a backup schedule becomes abnormal or an error is reported, troubleshoot and fix the issue promptly. For more information, see Fix an abnormal DBS backup schedule. If the issue persists after you follow the suggestions, contact support through the DBS customer support group (DingTalk group ID: 35585947).
-
Restore data
-
Log on to the Data Management (DMS) 5.0 console.
-
In the top navigation bar, choose .
NoteIf you use the DMS console in simple mode, move the pointer over the
icon in the upper-left corner of the DMS console and choose . On the Backup Schedules page, find the backup schedule that you want to manage and click Manage in the Actions column.
On the Configure Task page, click Restore Database in the upper-right corner.
-
On the Set Time Restored To page, configure the following parameters, and then click Next.
Section
Parameter
Description
N/A
Task Name
The name of the restore task. DBS automatically generates a task name. We recommend that you specify a name that can help you identify the task. Task names do not need to be unique.
Set Time Restored To
Restorable time range
The time range from the point in time when the first full backup set is created to the point in time when the latest full backup set is created. The database can be restored to a point in time within the time range.
Selected restore point
The point in time to which you want to restore the source database. The value must be within the time range that is specified by the Time Range Available to Restore parameter.
Note-
If the incremental backup feature is enabled, DBS allows you to restore the data to a point in time from the completion of the first full backup to the completion of the last incremental backup.
-
If the incremental backup feature is disabled, DBS allows you to restore the data to a point in time when a full backup is complete.
Destination database
Destination database instance type
Select Use Exists. In this example, the backup set is restored to the original PolarDB instance.
Database location
Select PolarDB.
Instance region
Select the region where the destination instance is located.
Database type
The default value is MySQL.
PolarDB instance ID
Select the ID of the destination PolarDB for MySQL instance.
Database account
Enter the account for the destination database instance. This account must have write permissions.
Password
The password of the account that is used to connect to the database that you want to back up.
Compliance warranty regarding cross-border data transfers
Read and agree to the compliance commitment by selecting the check box.
-
-
On the Configure Objects to Restore page, configure the following parameters, and then click Precheck.
Parameter
Description
Conflict handling
The default conflict handling method is to rename the object if a name conflict occurs. For example, if a table to be restored named
job_infoalready exists in the destination, the system renames the restored table tojob_info_dbs_<RestoreTaskID>_<Timestamp>.Objects to restore
In the Source Database Objects list, select the databases or tables that you want to restore, and move them to the Selected Database Objects list.
NoteFor some databases, you can restore at the granularity of a single table or database. This reduces the amount of data to restore and shortens the recovery time objective (RTO). For more information about the supported restore granularity, see Supported database types and features.
-
In the Precheck dialog box, after the Precheck Passed message appears, click Start Task.
You can view the database restore progress on the Restore Tasks tab on the left.
NoteThe time required for a restore depends on the specifications of the backup schedule and the size of the database. Higher specifications result in faster restore speeds. For more information, see Performance tests for logical and physical backups.
Related operations
-
You can also use API operations to create a backup schedule, or to create, configure, and start it. For more information, see CreateBackupPlan or CreateAndStartBackupPlan.
-
To change the backup source, backup objects, or modify the backup policy such as the backup time or backup set retention policy, see Manage a backup schedule.
-
For more information about potential costs associated with backup schedules, see Billing FAQ.
-
If backups are temporarily not required, you can pause the backup schedule to save costs. For more information, see Pause or restart a backup schedule.
FAQ
-
Q: During the precheck, a failure message indicates that the binary log check for the source database failed, as shown in the following figure. What do I do?
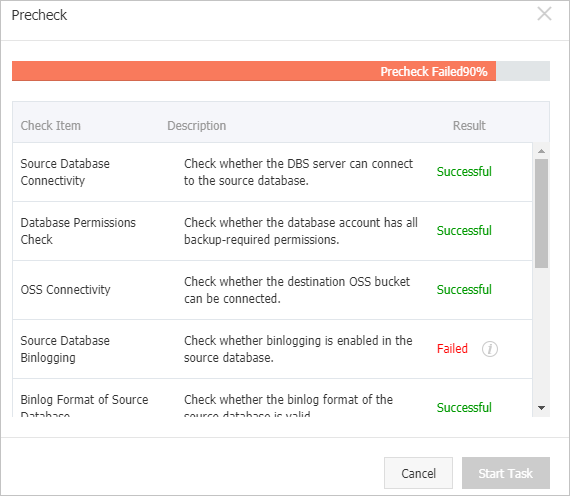
A: This message indicates that the precheck failed because the binary log is not enabled for the PolarDB for MySQL instance. You must enable the binary log in the PolarDB console. For more information, see Enable binary logging.