When your SQL Server database runs on a third-party cloud or a self-managed environment, you need a reliable way to protect it without moving it to Alibaba Cloud first. Data Disaster Recovery (DBS) supports logical backup and restore for these databases, with single-table restoration, geo-redundancy, and long-term archiving.
Limits
-
Each SQL Server database supports only one backup schedule. Adding a second schedule for the same database causes restore exceptions.
-
DBS does not support incremental backup for SQL Server databases. Only full backups are available.
Prerequisites
Before you begin, make sure that you have:
-
A backup schedule purchased with Data Source Type set to SQL Server and Backup Method set to Logical Backup. See Create a backup schedule.
-
A database account with sufficient permissions. Read-only access is enough for backup only. Read/write access is required for backup and restore. See Required permissions for different types of database accounts.
-
(If connecting through a database gateway) A database gateway installed and configured for your self-managed database. See Install a backup gateway.
-
(If using OSS as backup storage) An OSS bucket created in advance with the Standard storage class.
Configure a backup schedule
-
Log on to the Data Management (DMS) console V5.0.
-
In the top navigation bar, choose Security and Specifications (DBS) > Disaster Recovery for Data (DBS) > Backup Plan.
In simple mode, hover over the
 icon in the upper-left corner and choose All Features > Security and Specifications (DBS) > Disaster Recovery for Data (DBS) > Backup Plan.
 -
On the Backup Schedules page, find the backup schedule to configure and click Configure Backup Schedule in the Actions column.
-
In the Configure Backup Source and Destination step, set the parameters below and click Next.
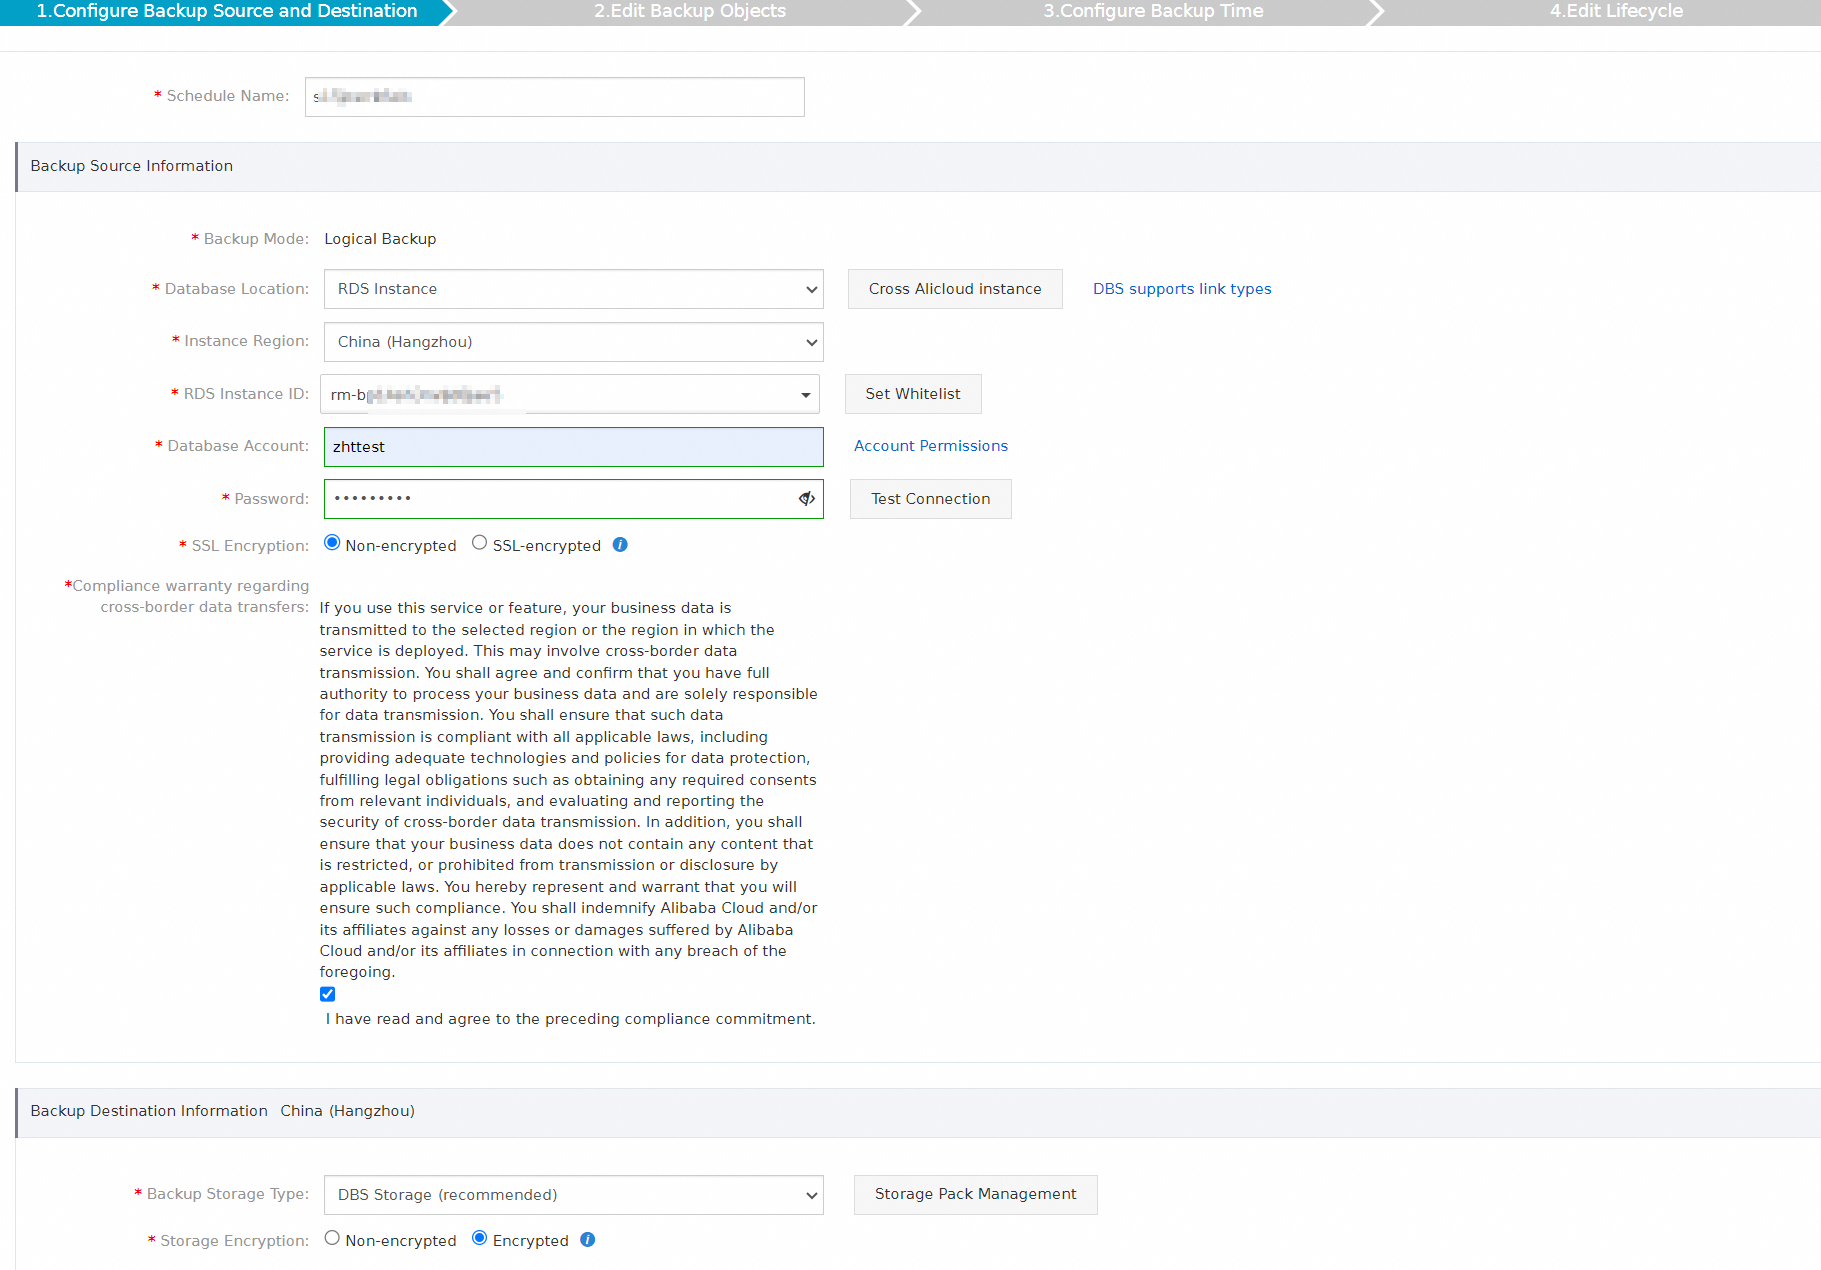
Schedule name
Parameter Description Schedule Name The backup schedule name. DBS auto-generates a name. Enter a descriptive name to make the schedule easy to identify. Names do not need to be unique. Backup source
Parameter Required Description Backup Mode Yes The backup method. Defaults to the method selected at purchase. This example uses Logical Backup. Database Location Yes The network location of the source database. Options: ECS-Hosted Database, User-Created Database with Public IP Address \<IP Address:Port Number\>, Express Connect DB/VPN Gateway/Intelligent Gateway, No public network IP: Port's self-built database (accessed through the database gateway). Instance Region Conditional The region where the source database resides. Displayed only when Database Location is RDS Instance, PolarDB, ECS-Hosted Database, or No public network IP: Port's self-built database (accessed through the database gateway). Database Type Conditional The source database type. Displayed only when Database Location is User-Created Database with Public IP Address \<IP Address:Port Number\>, ECS-Hosted Database, Express Connect DB/VPN Gateway/Intelligent Gateway, or No public network IP: Port's self-built database (accessed through the database gateway). Gateway instance ID Conditional The database gateway ID. Displayed only when Database Location is No public network IP: Port's self-built database (accessed through the database gateway). ECS Instance ID Conditional The ECS instance where the source database is deployed. Displayed only when Database Location is ECS-Hosted Database. Peer VPC Conditional The virtual private cloud (VPC) where the source database resides. Displayed only when Database Location is Express Connect DB/VPN Gateway/Intelligent Gateway. Address Conditional The endpoint used to connect to the source database. If firewall rules are configured on the server, click Set Whitelist to get the DBS CIDR blocks, then add them to the server's whitelist. Displayed only when Database Location is User-Created Database with Public IP Address \<IP Address:Port Number\>, Express Connect DB/VPN Gateway/Intelligent Gateway, or No public network IP: Port's self-built database (accessed through the database gateway). Port Number Conditional The port used to connect to the source database. Displayed only when Database Location is User-Created Database with Public IP Address \<IP Address:Port Number\>, Express Connect DB/VPN Gateway/Intelligent Gateway, or No public network IP: Port's self-built database (accessed through the database gateway). Database Account Yes The username of the account used to connect to the source database. Password Yes The password of the account. After entering credentials, click Test Connection to verify connectivity. A Test Passed message confirms the connection is valid. Compliance warranty regarding cross-border data transfers Yes Select the check box to acknowledge the compliance commitment. Backup destination
Parameter Required Description Backup Storage Type Yes Where backup data is stored. DBS Storage (recommended): Data is stored in DBS — no OSS bucket required. Charged by storage volume. See Storage fees. OSS For User: Backup data is stored in your own OSS bucket (Standard storage class only). Requires a pre-created bucket; configure the OSS Bucket Name parameter. Storage Encryption Yes The encryption method for stored backups. Encrypted (recommended): AES-256 encryption with server-side encryption in OSS. Non-encrypted: Backups are stored without encryption. To offset storage costs for large data volumes, consider purchasing a subscription storage plan, which is more cost-efficient than pay-as-you-go billing.
-
In the Edit Backup Objects step, select the databases or tables to back up from the Available section and click the rightwards arrow to move them to the Selected section. Then click Next.
- DBS supports table-level and database-level backup. Click Select All in the lower-left corner of the Available section to select all databases. Supported backup granularity varies by database type. See Supported database types and features. - Databases created after the backup schedule is set up are not backed up by default. To include them, add the databases on the Configure Task page. See Modify backup objects.
-
In the Configure Backup Time step, set the parameters below and click Next.
Parameter Required Description Full-scale Backup Frequency Yes The backup cadence. Periodic Backup: runs on a recurring schedule (requires Full Data Backup Recurrence and Start At). Single Backup: runs once. Full Data Backup Recurrence Conditional The days of the week on which backups run. Select at least one day. Required when Full-scale Backup Frequency is Periodic Backup. Start At Conditional The backup start time. Set this to off-peak hours to minimize database impact — for example, 01:00. If a previous backup is still running at the scheduled start time, the next backup is skipped. Required when Full-scale Backup Frequency is Periodic Backup. Incremental Backup N/A Not supported for SQL Server databases. Maximum Concurrent Threads for Full Data Backup No The number of concurrent threads for full backups. Reduce this value to limit the backup's impact on database performance. -
In the Edit Lifecycle step, configure the retention period for full backup data in the Configure Full Data Backup Lifecycle section.
Backup sets are retained for 7 to 3,650 days. They are automatically deleted when the retention period expires.
-
Click Precheck.
-
When Precheck Passed appears, click Start Task. The backup schedule status changes to Running when it takes effect.
If the backup schedule shows an error after starting, see How do I fix errors for an abnormal backup schedule?. If the issue persists, contact technical support via DingTalk group (ID: 35585947).
Restore an SQL Server database
-
Log on to the DMS console V5.0.
-
In the top navigation bar, choose Security and Specifications (DBS) > Disaster Recovery for Data (DBS) > Backup Plan.
In simple mode, hover over the
icon in the upper-left corner and choose All Features > Security and Specifications (DBS) > Disaster Recovery for Data (DBS) > Backup Plan. -
On the Backup Schedules page, find the backup schedule and click Manage in the Actions column.
-
On the Configure Task page, click Restore Database in the upper-right corner.
-
In the Set Time Restored To step of the Create Restore Task wizard, set the parameters below and click Next.
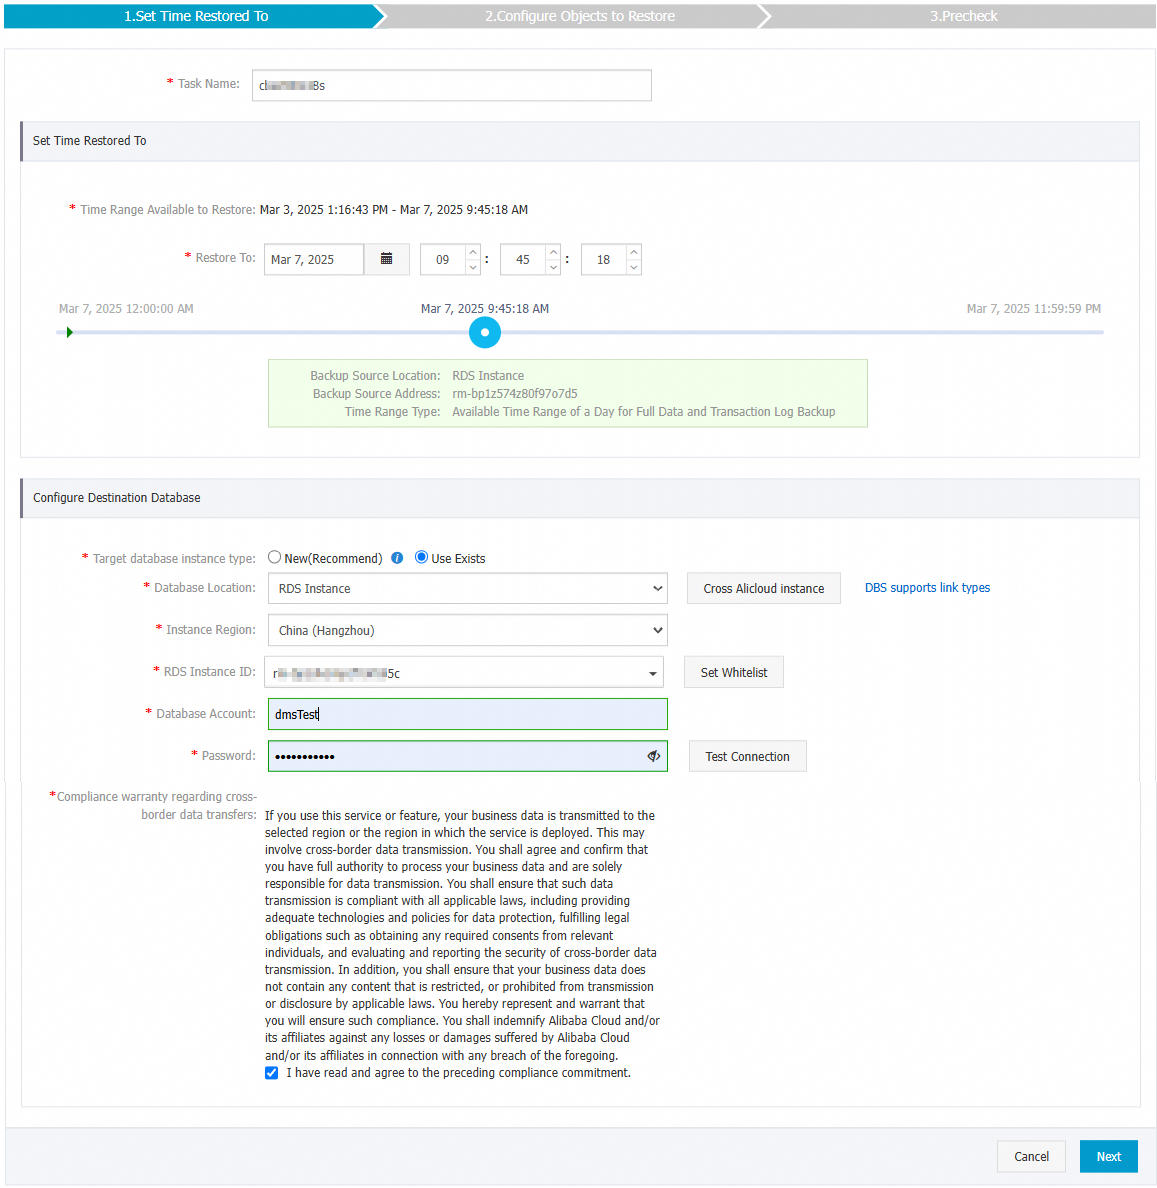
Restore point
Parameter Required Description Task Name Yes The restore task name. DBS auto-generates a name. Enter a descriptive name to identify the task. Names do not need to be unique. Time Range Available to Restore — Read-only. Shows the restorable time range: from the first full backup set to the latest full backup set. Restore To Yes The point in time to restore to. Must fall within the Time Range Available to Restore. Destination database
Parameter Required Description Database Location Yes The location of the destination database. Options: RDS Instance, ECS-Hosted Database, User-Created Database with Public IP Address \<IP Address:Port Number\>, Express Connect DB/VPN Gateway/Intelligent Gateway, No public network IP: Port's self-built database (accessed through the database gateway). This example uses RDS Instance. Instance Region Conditional The region where the destination instance resides. Not displayed when Database Location is User-Created Database with Public IP Address \<IP Address:Port Number\>. RDS Instance ID Conditional The ApsaraDB RDS for SQL Server instance ID. Required only when Database Location is RDS Instance. Database Type Conditional The destination database type. Set to SQL Server. Displayed only when Database Location is No public network IP: Port's self-built database (accessed through the database gateway). Gateway instance ID Conditional The gateway of the server where the self-managed database resides. Displayed only when Database Location is No public network IP: Port's self-built database (accessed through the database gateway). Peer VPC Conditional The VPC where the destination database resides. Displayed only when Database Location is ECS-Hosted Database or Express Connect DB/VPN Gateway/Intelligent Gateway. ECS Instance ID Conditional The ECS instance where the destination database is deployed. Displayed only when Database Location is ECS-Hosted Database. Address Conditional The endpoint used to connect to the destination database. Displayed only when Database Location is User-Created Database with Public IP Address \<IP Address:Port Number\>, ECS-Hosted Database, Express Connect DB/VPN Gateway/Intelligent Gateway, or No public network IP: Port's self-built database (accessed through the database gateway). Port Number Conditional The port used to connect to the destination database. Displayed only when Database Location is No public network IP: Port's self-built database (accessed through the database gateway) or User-Created Database with Public IP Address \<IP Address:Port Number\>. Database Account Yes The username of the account used to connect to the destination database. The account must have write permissions. Password Yes The password of the account. Compliance warranty regarding cross-border data transfers Yes Select the check box to acknowledge the compliance commitment. -
In the Configure Objects to Restore step, set the parameters below and click Precheck.
Parameter Required Description Conflict Handling Yes How to handle naming conflicts when a restored object shares a name with an existing object in the destination database. Default: Rename Object with the Same Name. For example, a restored job_infotable is renamedjob_info_dbs_<Restore task ID>_<Timestamp>.Objects to Restore Yes Select the databases or tables to restore from the Available section and click the rightwards arrow to move them to the Selected section. DBS supports table-level and database-level restore to reduce the amount of data transferred and shorten the recovery time objective (RTO). See Supported database types and features. -
When Precheck Passed appears, click Start Task.
-
To monitor restore progress, click Restore Tasks in the left-side navigation pane.
Restore duration depends on the backup schedule specifications and the size of the database. Higher-specification schedules complete faster. See Select the backup methods and backup schedule specifications.
What's next
-
API operations: Use
CreateBackupPlanto create a backup schedule. To create, configure, and start one in a single call, useCreateAndStartBackupPlan. See CreateBackupPlan and CreateAndStartBackupPlan. -
Manage a backup schedule: Modify backup sources, objects, timing, and retention policies. See Manage a backup schedule.
-
Review billing: Understand charges that apply to your backup schedule. See Billing FAQ.
-
Pause a backup schedule: Suspend a schedule you no longer need to save costs. See Pause or start a backup schedule.