Data Management (DMS) provides row-level access control for all connected non-NoSQL databases. This feature controls which data rows users can access. For example, a sales manager can be restricted to viewing data only for their assigned region.
Prerequisites
The instance must be in Security Collaboration control mode. For more information, see View the control mode.
Background information
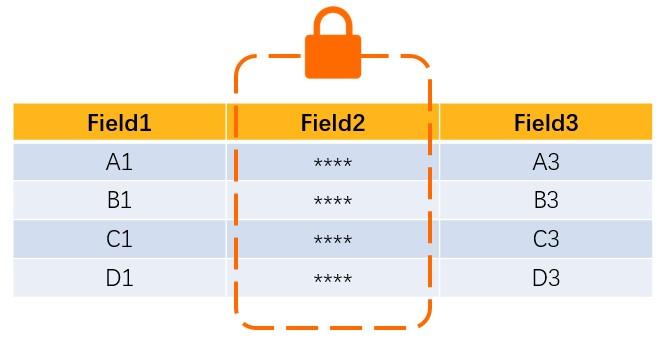
When securing data, there are two primary approaches: vertical and horizontal data protection.
-
Vertical data protection: This is implemented through field-level data protection.
By classifying fields based on sensitivity levels, you can apply full or partial masking to sensitive data. For more information, see Manage sensitive data.
For example, an employee responsible for statistical analysis cannot view customer email addresses in an order table.
-
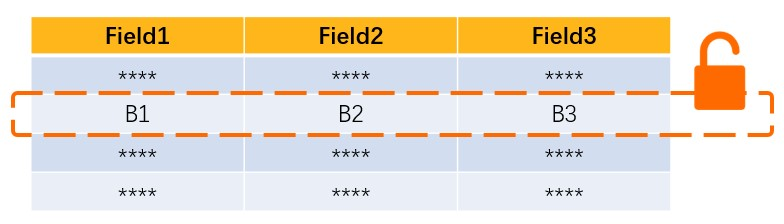
Horizontal data protection: This is implemented through row-level access control.
Rows are filtered based on one or more specific values (control values), allowing you to control access to row-level data.
For example, an employee of a multi-location business can view order data only for their assigned store, not for all locations.
Limitations
-
This feature is available only for relational databases, such as MySQL and PolarDB.
-
This feature is available only for instances in the Security Collaboration control mode.
-
This feature supports only physical databases and does not yet support logical databases.
-
For users without all-row permissions, the following limitations apply to the filter conditions when they query, modify, or delete data in a table with row-level access control:
-
You must specify filter values for the control field, and these values must be within the list of control values.
-
Filter conditions are restricted. For example:
-
The WHERE clause supports only the
=andinoperators. -
Logical operations such as OR, XOR, and NOT are not supported.
-
-
Key concepts
-
Control table, control field, and control value
-
Control table: A table on which you want to configure row-level access control.
-
Control field: The field in a control table used to enforce row-level access control.
-
Control value: A value of the control field.
-
-
Row-level permissions: Permissions that control access to row-level data based on the values of the control field.
-
Single-value row permissions: Control access based on one or more specific control values.
-
All-rows permissions: Grant access to all rows in the control table.
-
-
Control group: Control fields that share the same set of control values can be added to a control group.
For example, if Table A and Table B require row-level access control based on the same control values, you can use a single control group to manage both tables.
Configure row-level access control
Only administrators, DBAs, or security administrators can perform this task. For more information about user roles, see View your system role.
Log in to DMS 5.0.
-
Move the pointer over the
 icon in the upper-left corner and choose . Note
If you use the DMS console in normal mode, choose in the top navigation bar.
-
In the upper-right corner of the page, click Global Sensitive Data to open the sensitive data list page.
-
Click the Row Control tab.
-
Click Create Control Group and name the control group.
-
Add a row configuration and then click Add.
-
Click Add Row Configuration.
-
Search for and select the target database.
-
Select the target table and the control field.
-
Optional: Click Add Row Configuration to add multiple control tables that use the same control values.
After you configure row-level access control, you cannot view data in the target table from the SQL Console until you are granted the required permissions. If you query without a required row filter, DMS intercepts the request and returns an error. For example:
SELECT * FROMtestRLS Access Denied: [test]: You do not have permission for all rows in this table. The WHERE clause must include a filter condition [1] on the control field: name TraceId: 0a032a1516728214824878812ed7f0SELECT * FROM `test` WHERE `name` = 'Xiaohong'; RLS Access Denied: [test]: Access to a table with row-level access control is involved. You do not have permission to access the row: name = Xiaohong. The control value 'Xiaohong' does not exist. To access this value, contact an administrator, DBA, or security administrator to add the value and then apply for the corresponding row-level permissions before retrying. TraceId: 0a032a1d16728216329266611e4b0d -
-
Optional: To grant permissions for specific row values, you must first define those values.
-
In the Actions column of the target control group, click Details.
-
In the Control Value Details panel, click Add Row Value.
-
In the Import Row Value dialog box, choose whether to append or replace the existing row values.
-
Yes: Appends the new row values to the existing ones.
-
No: Replaces all existing row values with the new ones.
-
-
Enter the content for the row value.
NoteYou can add multiple control values to a single row value. Separate the control values with commas (,). Once your request is approved, you gain permission to query all control values within that row value.
For example, if an employee is allowed to view customer data only from Beijing and Shanghai, you can enter
Beijing, Shanghaias the row value content. After the employee's permission request for this row value is approved, they can view customer data from both the Beijing and Shanghai regions.
-
Apply for row-level permissions
Log in to DMS 5.0.
-
Move the pointer over the
icon in the upper-left corner and choose . NoteIf you use the DMS console in normal mode, choose in the top navigation bar.
-
In the upper-right corner of the page, click .
-
Enter the database name.
NoteYou can use the percent sign (%) for fuzzy searches.
-
Select the scope for the row-level permissions.
-
Single: Apply for permissions on individual row values.
Note-
A row value can contain multiple control values. If you have permissions for a row value, you can query, export, or modify data corresponding to all control values it contains.
-
A control value can correspond to multiple rows. If you have permissions for a control value, you can query, export, or modify all data rows corresponding to that value.
-
-
All: Access all rows in the control table.
-
-
Click Search.
-
Select the target row-level permissions and click the
 icon.Note
A hyphen (
-) in the row value column indicates permissions for all rows. -
Select a Permission type, select a validity period, and enter a Reason for the application.
-
Click Submit.
After your ticket is approved, you can query, export, or modify data in the SQL Console. For example, executing
SELECT * FROMin the SQL Console returns only the two records from the order1 table for Zhangsan and Xiaoming, where the region is Beijing. This confirms that row-level access control is working correctly.order1WHERE region = 'Beijing';NoteTo release row-level permissions:
-
To release your own permissions: Go to the View your permissions section to view and release your permissions. For more information, see View your permissions.
-
For an administrator to release permissions: On the page, find the target user and choose in the Actions column to view and release the user's permissions.
-