The EMR+DLF data lake solution combines E-MapReduce (EMR) and Data Lake Formation (DLF) to provide centralized metadata and permission management for data lakes. It also supports data lifecycle management, automatic lake format optimization, and storage analysis. You can write data from various sources to data lakes and perform one-stop data exploration.
Background information
Compared with the traditional EMR data lake solution, the EMR+DLF data lake solution provides the following advantages:
DLF provides a unified, fully managed, and O&M-free metadata service for data lakes across engines.
Visualized metadata management with multi-version management and rollback.
Easy visualized metadata migration.
Full-text metadata retrieval.
Metadata profiling, including file sizes, row counts, access frequency, small file counts, file popularity, and valid file counts.
Support for additional compute engines beyond the open source engines in EMR, such as MaxCompute, Flink, and Hologres.
DLF supports fine-grained data permission management.
Visualized, fine-grained permission management for resources such as data catalogs, databases, data columns, and functions.
Integration with multiple compute engines in EMR, such as Spark, Hive, Presto, and Impala.
Rich data lake management capabilities.
Multi-dimensional data lifecycle management. Data can be automatically archived based on file popularity and update time to reduce storage costs.
Automatic storage optimization policies for the Delta Lake format to reduce storage costs.
Architecture
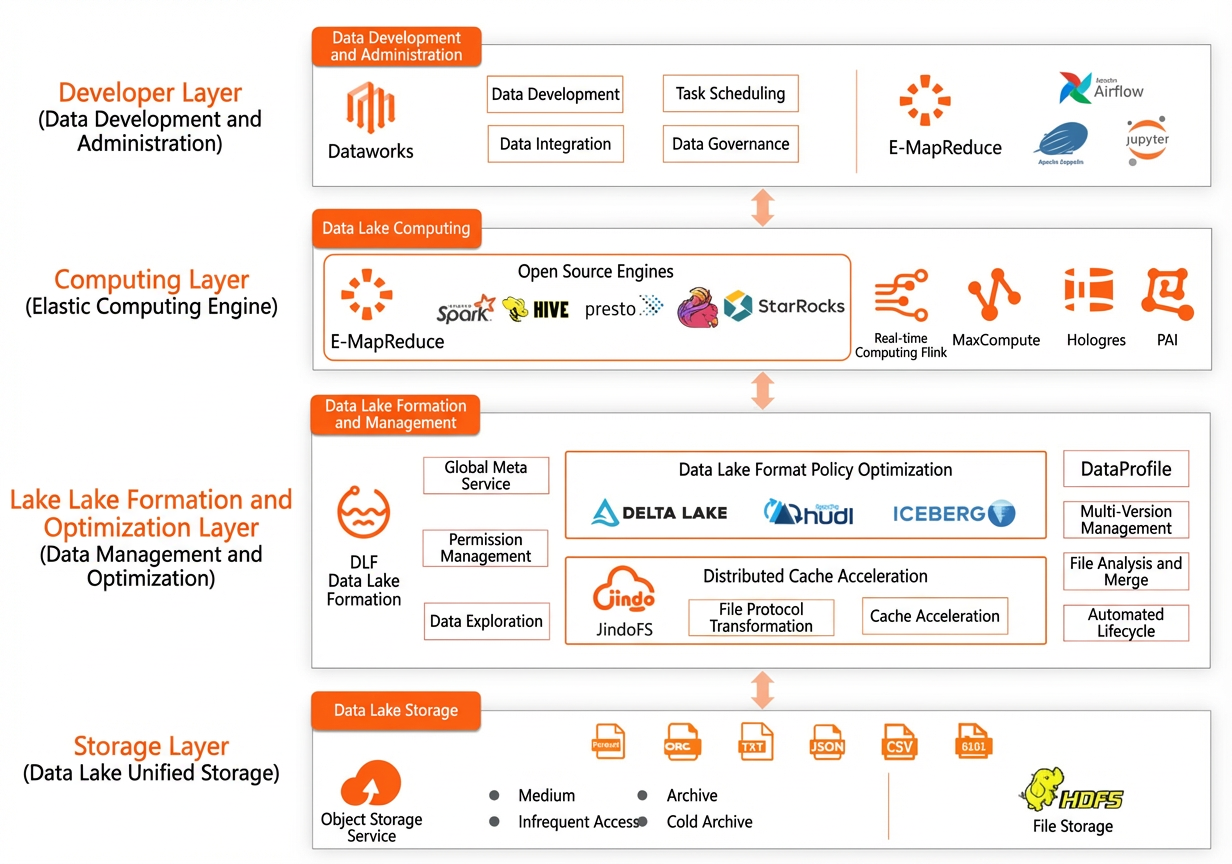
Additional information
For information about the regions in which DLF is supported, see Data Lake Formation: Supported regions and endpoints.
For information about the billing of DLF, see Billing modes.
Procedure
Step 1: Create an EMR DataLake cluster
When you create an EMR DataLake cluster, you must select DLF Unified Metadata for Metadata.
Log on to the EMR console. In the left-side navigation pane, click EMR on ECS.
On the EMR on ECS page, click Create Cluster. On the E-MapReduce on ECS page, configure the following parameters.
Business Scenario: Select Data Lake.
Optional Services (Select One At Least): Hive is required. You can select other services based on your business requirements.
Metadata: Select DLF Unified Metadata.
DLF Catalog: Use the default DLF catalog or create a catalog. If you have not activated DLF, you are prompted to activate DLF first.
Complete the subsequent operations as prompted. For more information, see Create a cluster.
Step 2: Initialize metadata
Use one of the following methods to initialize metadata based on your scenario.
If the metadata of an EMR cluster is stored in a built-in MySQL database or a self-managed ApsaraDB RDS database, you need to migrate metadata to DLF. For more information, see Best practices for EMR metadata migration to DLF.
If no historical metadata is available in a newly created EMR cluster, you can use DLF to create metadata in a visualized manner, or use Hive or Spark SQL to create databases and data tables.
Log on to the DLF console. In the top navigation bar, select the region in which Object Storage Service (OSS) is activated, such as China (Hangzhou).
In the left-side navigation pane, choose .
Click the Database tab. On the tab, click Create Database.
On the Create Database page, configure parameters and click OK.
If data of a newly created EMR cluster is stored in OSS, and no metadata is available, you can use the metadata discovery feature of DLF to extract metadata from OSS to DLF. For more information, see Quick start: Taobao user behavior analysis.
Step 3: Initialize data
Use one of the following methods to initialize data based on your scenario:
If you want to migrate data of an existing EMR cluster, you can use Jindo DistCp to migrate data from the cluster to OSS.
If you want to import data from service systems such as RDS, MySQL, and Kafka, you can use Realtime Compute for Apache Flink to import data to DLF. For more information, see Manage DLF-Legacy catalogs.
Step 4: Query data in a specific DLF table by using Spark or Presto
Log on to the master node -1-1 of the EMR cluster in SSH mode. For more information, see Log on to a cluster.
Use Spark SQL to query data of a specific table.
Run the following command to start Spark SQL:
spark-sqlExecute the following statement to query data in the table:
SELECT * FROM <database>.<table>;
Use Presto to query data in a specific table.
Run the following command to start Presto CLI:
presto --server master-1-1:8889Execute the following statement to query data in the table:
SELECT * FROM <catalog>.<database>.<table>;Parameters in the preceding statement
Parameter
Description
<catalog>The name of the data source to which you want to connect.
You can run the
show catalogs;command to view all catalogs. You can also view all catalogs on the Configure tab of the Presto service page in the EMR console.<database>The name of the database that you want to query.
<table>The name of the table that you want to query.
For example, if you want to query data from the
testtable in the default database of Hive, you can execute theSELECT * FROM hive.default.test;statement.
(Optional) Step 5: Enable data permission management
If your business requires high data security and proper data permission management for data lakes, perform the following steps to enable data permission management:
Enable DLF permission management for your EMR cluster. For more information, see DLF-Auth.
Enable permission management for your data catalogs in DLF. For more information, see Configure permissions.
After permission management is configured, it applies to all data in your EMR cluster. Users must be granted the required permissions to access data in the cluster.
For information about how to grant permissions to users, see Data authorization. For more information, see Unified access control with DLF and EMR.
(Optional) Step 6: Implement lifecycle management
The lifecycle management feature allows you to configure data management rules for databases and tables in a data lake. You can convert the storage class of data in OSS on a regular basis based on partition and table creation time, last modification time, or partition value. This helps reduce data storage costs. For more information, see Lifecycle management.