Database Backup Service (DBS) provides geo-redundant backup, long-term archiving, and single-table recovery for MySQL databases. Learn how to automatically back up and restore an ApsaraDB RDS for MySQL instance by using DBS.
Create a backup schedule
-
When you make the purchase, select MySQL as the database type and Logical Backup as the backup method.
-
MySQL backup and restore granularity is listed in Supported database types and features.
-
This topic covers logical backup configuration for MySQL. DBS also supports physical backups (full, incremental, and binary log) for self-managed MySQL — see Physical backup and restoration for a cross-cloud or self-managed MySQL database and Logical backup, physical backup, and snapshot.
-
During a full backup, do not perform Data Definition Language (DDL) operations that change the schema of a database or table. Otherwise, the backup may fail or the data may be unrecoverable.
Configure a backup schedule
-
Log on to the Data Management (DMS) 5.0 console.
-
In the top navigation bar, choose .
NoteIf you use the DMS console in simple mode, move the pointer over the
 icon in the upper-left corner of the DMS console and choose .
 -
Find the backup schedule that you want to configure and click Configure Backup Schedule in the Actions column.

-
On the Configure Backup Source and Destination page, configure the backup source and destination, and then click Next.
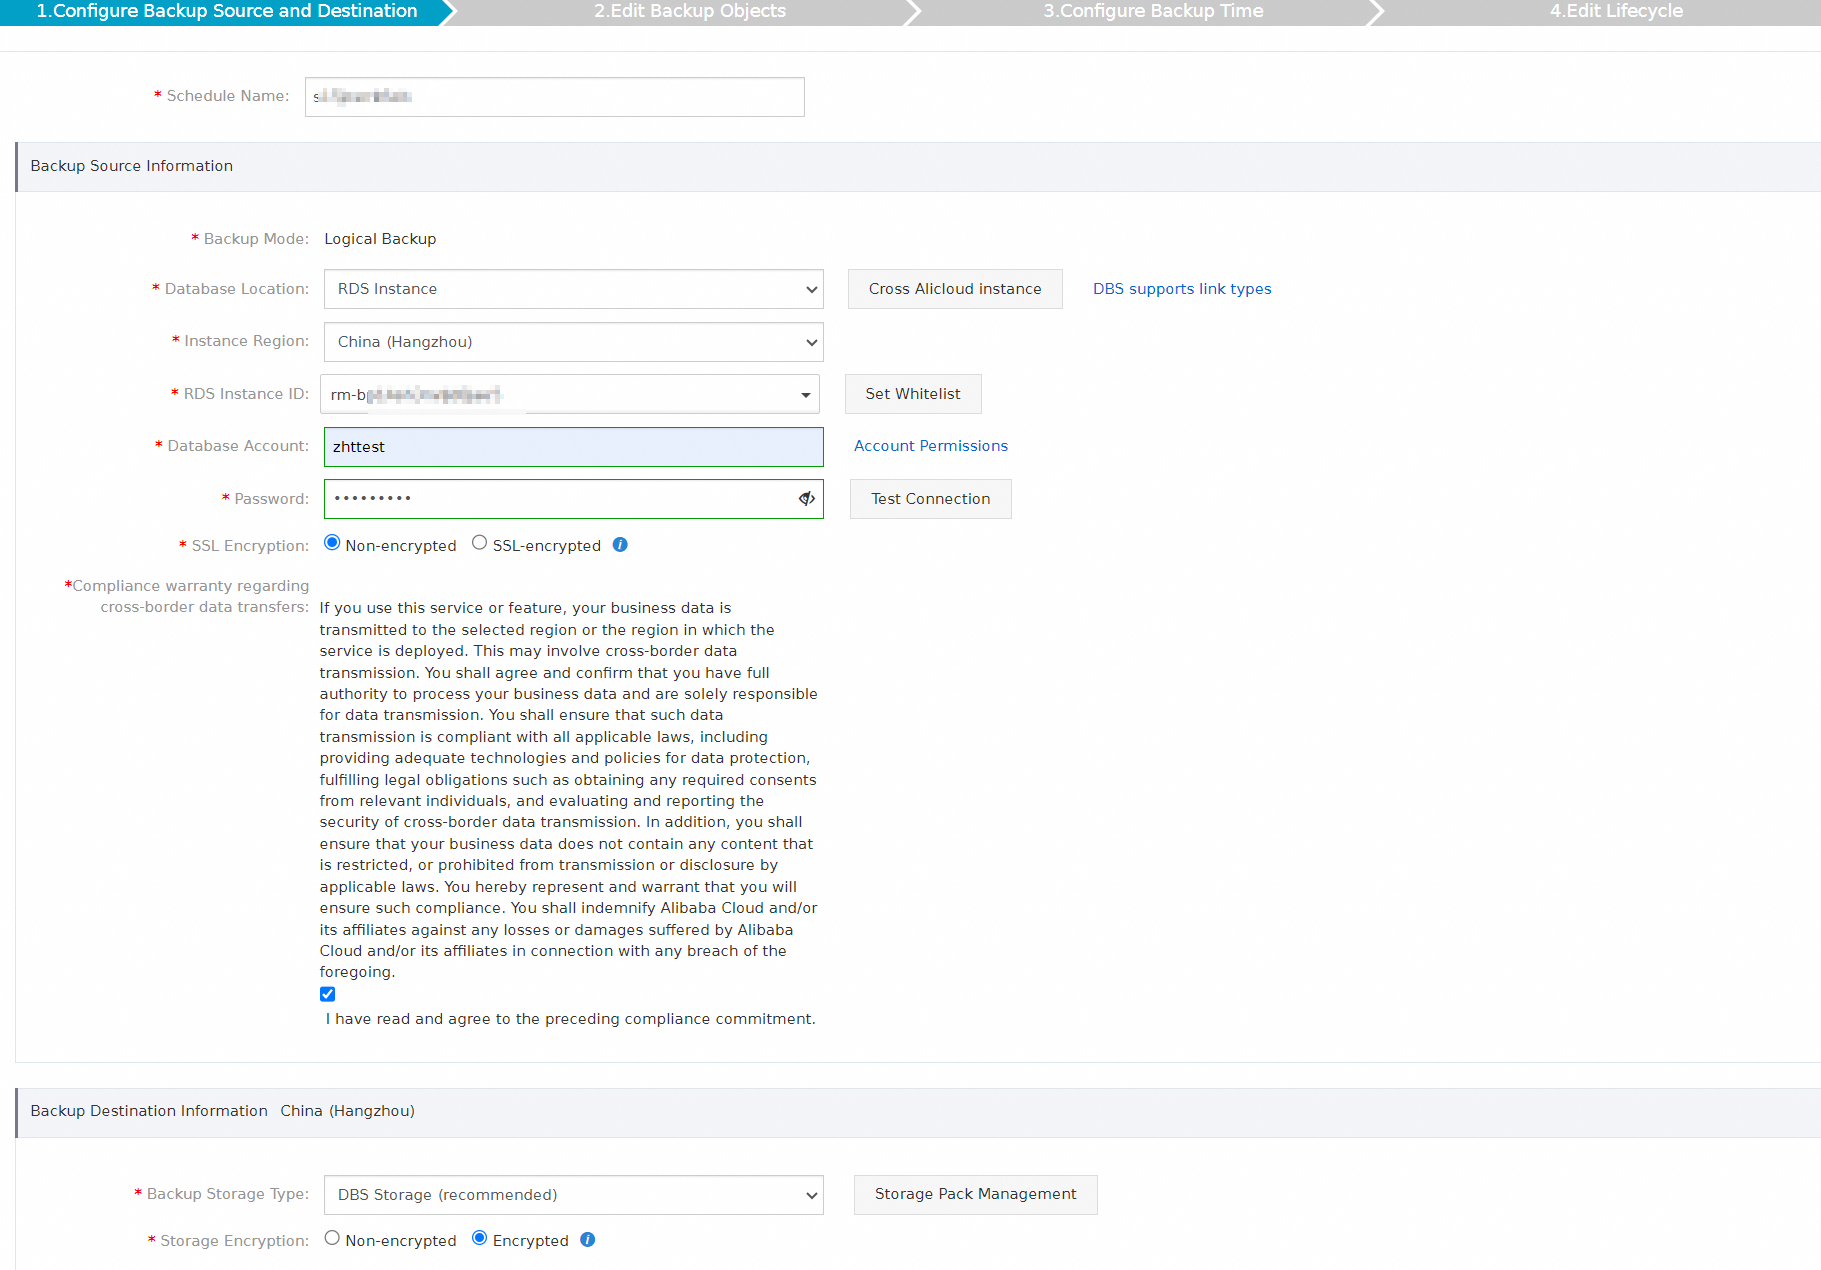
Table 1. Database configuration
Section
Parameter
Description
N/A
Schedule Name
The name of the backup schedule. DBS automatically generates a backup schedule name. We recommend that you enter a descriptive name that is easy to identify. Backup schedule names do not need to be unique.
Backup Source Information
Backup Method
The method selected at purchase. In this example, Logical Backup is selected.
Database Location
RDS Instance
Instance Region
Select the region where the source instance resides.
NoteThis parameter is displayed only when you select RDS Instance, PolarDB, ECS-Hosted Database, or No public network IP: Port's self-built database (accessed through the database gateway).
RDS Instance ID
Select the ApsaraDB RDS instance that you want to back up.
Database Account
Enter the source database username. The account must have the required backup permissions listed in Account permissions.
NoteFor ApsaraDB RDS databases, a read-only account is sufficient for backups, but a read/write account is required for both backups and restores.
Password
Enter the password for the database account.
After entering the credentials, click Test Connection to verify them. If the connection is successful, a "Test Passed" message appears. If the connection fails, click Diagnose next to the failure message and adjust your settings based on the results.
Connection Method
Available connection methods:
-
Non-encrypted
-
SSL-encrypted: Secure Sockets Layer (SSL) encrypts data at the transport layer to improve security and integrity. However, it may increase the response time of the network connection.
NoteBefore you select SSL-encrypted, enable SSL encryption for the RDS instance. Step 1: Enable SSL encryption for an ApsaraDB RDS for MySQL instance.
Compliance warranty regarding cross-border data transfers
Read and agree to the compliance commitment by selecting the check box.
Backup Destination Information
Backup Storage Type
Available storage types:
-
DBS Built-in Storage (Recommended): Backup data is automatically stored in the built-in storage of DBS. No bucket creation is required. You are charged based on the amount of data stored. Billing (DMS).
-
OSS For User: You must create an OSS bucket in advance. Create buckets.
Note-
This example uses DBS Built-in Storage. If you select User-owned OSS bucket, you must also configure the Object Storage OSS Bucket Name parameter. Only the OSS Standard storage class is supported.
-
For large backup volumes, purchase a DBS storage plan (subscription) to reduce costs compared to pay-as-you-go billing.
Storage Method
Available storage methods:
-
Encrypted (Recommended): Uses the industry-standard AES-256 algorithm for server-side encryption at rest.
OSS encrypts objects on upload and decrypts them on download.
-
Non-encrypted: Encryption is disabled.
-
-
On the Edit Backup Objects page, move the databases or tables that you want to back up to the Selected box, and then click Next.
Note-
You can back up a single table, a single database, or multiple databases. Click Select All to select all existing databases. Supported backup objects vary by database type. Supported database types and features.
-
Databases created after schedule configuration are not backed up by default. Add them manually via Modify backup objects.
-
-
On the Configure Backup Time page, configure the backup time and other settings, and then click Next.
Parameter
Description
Full Backup Frequency
Select Periodic Backup or Single Backup as needed.
NoteIf you select Periodic Backup, you must also configure Full Backup Cycle and Full Backup Start Time.
Full Backup Cycle
Select the days of the week to perform the backup. You must select at least one day and can select up to seven days.
Full Backup Start Time
Select a start time, for example, 01:00. Choose an off-peak time.
NoteIf a previous full backup is still in progress at the specified start time, the current backup task is skipped.
Incremental Backup
Specifies whether to enable incremental backup.
NoteIf you enable this feature, make sure that binary log is enabled for the source database. The binary log feature is enabled by default for ApsaraDB RDS for MySQL. For self-managed databases, you must enable it manually.
This parameter is displayed only when Full Backup Frequency is set to Periodic Backup.
Maximum Concurrent Threads for Full Backup
Maximum number of concurrent threads for full backup. Lowering the thread count reduces database load.
Backup Network Throttling
Network bandwidth limit in MB/s. Default: 0 (no limit).
-
On the Edit Lifecycle page, specify the retention period for full backup data in the DBS built-in storage.
If you enabled Incremental Backup in the previous step, also configure the incremental backup retention period. Manage the lifecycle of backup data.
-
After the preceding configurations are complete, click Precheck in the lower-right corner of the page.
-
In the Precheck dialog box, after the precheck passes, click Start Task.
Note-
The backup schedule is configured after its Status changes to Running.
-
If the backup schedule fails or an error is reported, troubleshoot the issue promptly. Troubleshoot an abnormal DBS backup schedule. If the issue persists, join the DBS user support group on DingTalk (ID: 35585947).
-
Restore data
Log in to DMS 5.0.
-
In the top navigation bar, choose .
NoteIf you use the DMS console in simple mode, move the pointer over the
icon in the upper-left corner of the DMS console and choose . On the Backup Schedules page, find the backup schedule that you want to manage and click Manage in the Actions column.
On the Configure Task page, click Restore Database in the upper-right corner.
-
On the Set Time Restored To page, configure the following settings and click Next.
NoteIn this example, the backup set is restored to a new instance. If you select Use Exists, you must configure additional parameters. For parameter descriptions, see the database configuration table above.
Section
Parameter
Description
N/A
Task Name
DBS auto-generates a task name. Specify a descriptive name for easy identification. Uniqueness is not required.
Set Time Restored To
Available Recovery Time Range
Time range available for restore: from the first full backup to the most recent one.
Selected Recovery Time Point
Select the point in time for the restore. The time must be within the Available Recovery Time Range.
Note-
If incremental backup is enabled, DBS supports point-in-time recovery to any time after the first backup.
-
If incremental backup is not enabled, DBS only supports recovery to the point in time of a full backup set.
Destination Database
Destination Database Instance Type
Select New Instance (Recommended) or Use Exists.
NoteIf you select Use Exists, make sure the destination database is running.
Database Location
-
When you set Target Database Instance Type to Create New Instance (Recommended), select RDS Instance.
-
When you set Target Database Instance Type to Use Exists, you can select the following options:
-
No public network IP: Port's self-built database (accessed through the database gateway)
-
User-Created Database with Public IP Address <IP Address:Port Number>
-
ECS-Hosted Database
-
RDS Instance
-
Express Connect DB/VPN Gateway/Intelligent Gateway
-
PolarDB
-
Instance Region
-
The region of the new instance.
-
Select the region of the destination database instance.
Note
VPC
The Virtual Private Cloud (VPC) where the new instance is located.
NoteIf you have not created a VPC, see Create and manage a VPC.
Instance Type
Select an instance type for the new instance from the available options in the console.
NoteWe recommend that you select an instance type that is the same as or better than the source instance.
Storage Space (GB)
Select a storage capacity for the new instance from the available options in the console.
NoteTo ensure sufficient space for recovery, we recommend a storage capacity at least 1.3 times the source instance size or 5 to 6 times the full backup set size, as DBS uses compression.
Database Type
The default value is MySQL.
NoteThis parameter is displayed only when you select User-Created Database with Public IP Address <IP Address:Port Number>, PolarDB, ECS-Hosted Database, Express Connect DB/VPN Gateway/Intelligent Gateway, or No public network IP: Port's self-built database (accessed through the database gateway).
DG Instance ID
Select a Database Gateway (DG) instance.
NoteThis parameter is displayed only if you set the Database Location parameter to Self-managed database without a public endpoint, accessed via Database Gateway (DG).
PolarDB Instance ID
Select the PolarDB instance to which you want to restore data.
RDS Instance ID
Select the RDS instance to which you want to restore data.
ECS Instance ID
Select the ID of the ECS instance to which you want to restore data.
NoteThis parameter is displayed only if you set the Database Location parameter to self-managed database on an ECS instance.
Connection Address
The endpoint of the destination database instance.
Note-
If security settings such as a firewall are configured on your server, you must click Set Whitelist to obtain the CIDR blocks for DBS. Add these CIDR blocks to your server's whitelist to allow access from DBS.
-
This parameter is displayed only when you select No public network IP: Port's self-built database (accessed through the database gateway), Express Connect DB/VPN Gateway/Intelligent Gateway, or User-Created Database with Public IP Address <IP Address:Port Number>.
Port
The connection port of the destination database.
NoteThis parameter is not displayed if you set the Database Location parameter to ApsaraDB for MongoDB.
Database Account
Enter the database username. The account must have the required permissions listed in Account permissions.
NoteFor ApsaraDB RDS databases, a read-only account is sufficient for backups, but a read/write account is required for both backups and restores.
Password
Enter the password for the database account.
NoteAfter you enter the database credentials, you can click Test Connection to verify them. If the connection is successful, a "Test Passed" message appears. If the connection fails, click Diagnose next to the failure message and adjust your settings based on the results.
Connection Method
Available connection methods:
-
Non-encrypted
-
SSL-encrypted: Secure Sockets Layer (SSL) encrypts data at the transport layer to improve security and integrity. However, it may increase the response time of the network connection.
NoteBefore you select SSL-encrypted, enable SSL encryption for the RDS instance. Step 1: Enable SSL encryption for an ApsaraDB RDS for MySQL instance.
Peer VPC
Select the VPC.
NoteThis parameter is displayed only if you set the Database Location parameter to Self-managed database accessed via Express Connect, VPN Gateway, or Smart Access Gateway (SAG).
Cross-border Data Transfer Compliance Commitment
Read and select the compliance statement.
-
-
On the Configure Objects to Restore page, configure the following settings and click Precheck.
Parameter
Description
Conflict Handling
By default, Conflict Handling is set to Rename if an object with the same name exists. For example, when the table
job_infois restored, if a table with the same name already exists, the system renames the new table tojob_info_dbs_<restore_task_ID>_<timestamp>.Objects to Restore
In the Source Database Objects section, select the databases or tables to restore and move them to the Selected Database Objects section.
NoteFor some databases, you can restore a single table or a single database. This reduces the data volume to restore and shortens the recovery time objective (RTO). For a list of supported granularities, see Supported database types and features.
-
In the Precheck dialog box, after the Precheck Passed message appears, click Start Task.
You can view the database recovery progress on the Restore Tasks tab.
NoteRecovery time depends on backup schedule specifications and database size. Higher specifications yield faster recovery. Performance test of logical and physical backups.
Restoring to a new instance takes about 5 to 10 minutes to create the RDS instance. After recovery, find the new instance in the RDS console, or click the restore task ID and then the RDS instance name in Basic Information.
Related operations
-
To change the backup source, objects, or policy (time, retention), use Manage a backup schedule.
-
For cost details, check Billing FAQ.
-
To reduce costs, pause the backup schedule when not needed. Pause or restart a backup schedule.