The FTP Check node periodically checks for the existence of a specific file by using the FTP protocol. If the file exists, the node succeeds and triggers its descendant nodes to run. If the file does not exist, the node continues to check at a configured interval until a stop condition is met. This node is commonly used as a signaling mechanism between the DataWorks scheduling system and external systems. This topic explains how to use the FTP Check node and provides important usage notes.
Notes
-
In the legacy version of DataStudio, FTP Check nodes are deprecated. You should migrate your FTP Check nodes to Check nodes as soon as possible. For more information, see Check node.
-
DataStudio no longer supports FTP Check nodes.
Prerequisites
-
You must have an FTP data source. The FTP Check node does not support an FTP data source that is configured with the
SFTPprotocol and uses key pair authentication. -
You must have a workflow. For more information, see Create a scheduled workflow.
Background
A typical use case for the FTP Check node is when a task in the DataWorks scheduling system needs to access an external database, but the corresponding data write task is not managed by DataWorks. In this scenario, DataWorks cannot determine when the write task is complete and the data is ready for access. If DataWorks reads the data before the write operation is finished, the data may be incomplete or the read operation may fail. To resolve this, you can have the other scheduling system create a file flag in a specified file system after its data write task is complete. For example, the system can generate a .done file to indicate that the task is finished. You can then configure an FTP Check node in DataWorks to periodically check for the existence of this .done file. When the file is detected, it indicates that the data write task in the database is complete, and you can trigger the tasks that need to access the data in that database.
-
You can configure the external scheduling system to generate the marker file in a specific file system.
-
This topic uses a
.donefile as an example. You can customize the format and name of the marker file to fit your needs.
The process is as follows: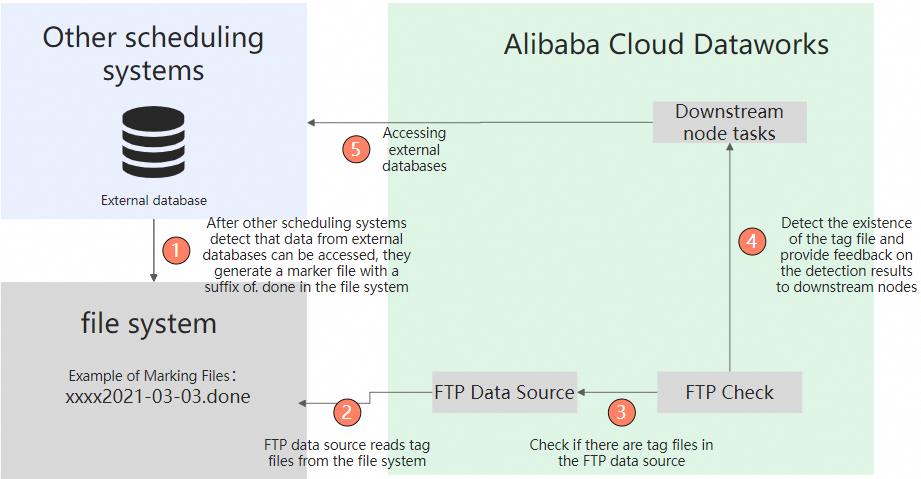
-
An external scheduling system detects that the data in an external database is ready. It then generates a marker file, such as
xxxx2021-03-03.done, in a designated file system. In this example, a file with a.donesuffix is used, but you can define a custom file based on your business requirements. -
The FTP data source provides access to the file system containing the marker file.
-
The FTP Check node polls for the marker file via the FTP data source based on the configured check policy.
-
If the marker file is found, the external data is ready. The FTP Check node succeeds and sends a success status to its descendant nodes.
-
If the marker file is not found, the external data is not ready. The FTP Check node fails for the current attempt and does not trigger its descendant nodes. It continues to check based on its configured policy until the stop condition is met.
For more information about check policies, see Configure the check target and policy in the procedure below.
-
-
The descendant nodes decide whether to run based on the result from the FTP Check node.
-
If the FTP Check node succeeds, the descendant nodes start and access the external database.
-
If the FTP Check node fails, the descendant nodes do not run.
-
-
The descendant nodes access the data in the external database.
External databases can include various database or storage services, such as Oracle, MySQL, and SQL Server.
Limitations
-
Resource groups: FTP Check nodes can run on a serverless resource group (recommended) or a legacy exclusive resource group for scheduling. To purchase and use a serverless resource group, see Use a serverless resource group.
-
Data sources: You cannot use an FTP Check node with an FTP data source that is configured with the
SFTPprotocol and uses key pair authentication. -
If an FTP Check node is scheduled to run by the minute or hour, you cannot set the Policy for Stopping Check to Time for Stopping Check. For these tasks, you must use the Checks Allowed Before Check Node Stops policy.
-
Supported regions: China (Hangzhou), China (Shanghai), China (Beijing), China (Shenzhen), China (Chengdu), China (Hong Kong), Japan (Tokyo), Singapore, Malaysia (Kuala Lumpur), Indonesia (Jakarta), Germany (Frankfurt), UK (London), US (Silicon Valley), and US (Virginia).
Create an FTP Check node
-
Log on to the DataWorks console.
-
On the Data Studio page, hover over the
 icon and choose .
Alternatively, open a workflow, right-click General, and choose .
-
In the Create Node dialog box, enter a Node Name and select a Location for the node.
NoteThe node name must be 128 characters or less and can contain only letters, Chinese characters, digits, underscores (_), and periods (.).
- Click Confirm.
-
In the right-side panel, click Scheduling to configure the scheduling properties for the node.
The properties include General, time properties, Resource Group, and Scheduling Dependency. For more information, see Configure basic properties, Configure time properties, Configure resource properties, and Configure same-cycle scheduling dependencies.
-
Configure the check target and policy.
Configure the following parameters: Select an FTP Data Source, specify the path in the File to Check field, such as
/root/abc, set the Check Interval (Seconds), and choose a check stop policy (check stop time or check stop count).-
From the Select FTP Data Source drop-down list, select the target FTP data source.
You can select an FTP or SFTP data source. If no data sources are available in the list, you must create one. For more information, see Configure an FTP data source.
-
In the File to Check field, specify the path of the file to check. If the file path is dynamic, you can use scheduling parameters to create a variable path. For more information, see Formats of scheduling parameters.
-
In the Check Interval (Seconds) field, configure the time interval between checks.
-
In the Policy for Stopping Check section, select a check stop policy.
-
Time for Stopping Check: The node stops checking at a specific time of day. Specify the time in the 24-hour
hh:mm:ssformat. If a check fails, the node retries at the configured interval until it either finds the file or the stop time is reached. Descendant nodes are triggered only after the check succeeds. If the check repeatedly fails, you can view the logs for details.NoteThe scheduling cycle configuration of an FTP Check node affects the stop policy:
-
If the scheduling cycle is set to minute or Hour, you cannot select Time for Stopping Check. You must use Checks Allowed Before Check Node Stops. For more information, see Configure the check target and policy.
-
If the scheduling cycle is initially set to Day with the policy set to Time for Stopping Check, and you later change the cycle to minute or Hour, the Time for Stopping Check option becomes invalid. You must change the policy to Checks Allowed Before Check Node Stops before you can commit the node.
-
-
Checks Allowed Before Check Node Stops: The node stops checking after a specified number of attempts. If a check fails, the node retries at the configured interval until it either finds the file or the maximum number of checks is reached. Descendant nodes are triggered only after the check succeeds. If the check repeatedly fails, you can view the logs for details.
-
-
-
Save and commit the node.
NoteYou must configure the Rerun attribute and Parent Nodes properties before you can commit the node.
-
In the top toolbar, click the
 icon to save the node.
 -
Click the
 icon in the top toolbar.
 -
In the Commit Node dialog box, enter a Change Description.
-
Click OK.
If your workspace is in standard mode, you must deploy the node after committing it. Click Deploy in the upper-right corner. For more information, see Deploy nodes.
-
- Perform O&M operations on the node. For more information, see Basic O&M for auto-triggered nodes.