Workspace management
A workspace is the fundamental unit for managing projects, members, data sources, and quotas in DataV-Board 7.0 (Dashboard). All project development occurs within a specific workspace. You can create workspaces, adjust quotas, add members with permissions, and manage workspace settings.
Basic operations of workspaces
The following table lists the primary workspace operations.
|
Operation |
Section |
|
After you activate DataV-Board 7.0, a default workspace is provided. To isolate project data across different business areas, you can create additional workspaces. |
|
|
After creating a workspace, you can view the workspace identity and configure quotas as needed. |
|
|
To use RAM users (sub-accounts) for collaborative development, add them as workspace members and grant the appropriate permissions. |
|
|
After creating a workspace, you can view and modify its configuration or delete unused workspaces. |
|
|
Switch workspace |
Log on to the DataV console, click the |
Limits
The following table lists the maximum number of workspaces (including the default workspace) supported by each DataV-Board 7.0 edition.
|
DataV-Board 7.0 version |
Number of workspaces |
|
Professional Edition Trial |
1 Note
This is the system default workspace. No manual creation is required. |
|
Personal Edition |
|
|
Enterprise Edition |
2 |
|
Professional Edition |
5 |
Prerequisites
-
The DataV-Board service must be activated.
-
(Optional) Create a RAM user. Create a RAM user first if the workspace requires additional members for collaborative development.
Access workspace management
The Personal Edition does not support accessing the workspace management page.
Access the DataV console.
-
Click the
 icon next to the workspace name in the upper left corner, select Manage, and proceed to the workspace management page.
If your role is Operator, you must log on to the Visualization Application Center, click Manage Workspaces in the upper left corner, and navigate to the workspace management page.
Create a workspace
-
On the Workspace Management page, click Create Workspace.
-
In the Create Workspace dialog box, enter the workspace name and click OK to access the workspace product page.
-
On the workspace product page, configure the basic and member information of the workspace as needed.
-
Configure basic information
You can view the workspace identity and configure quotas. The workspace identity is a unique, immutable identifier used for copy and transfer operations.
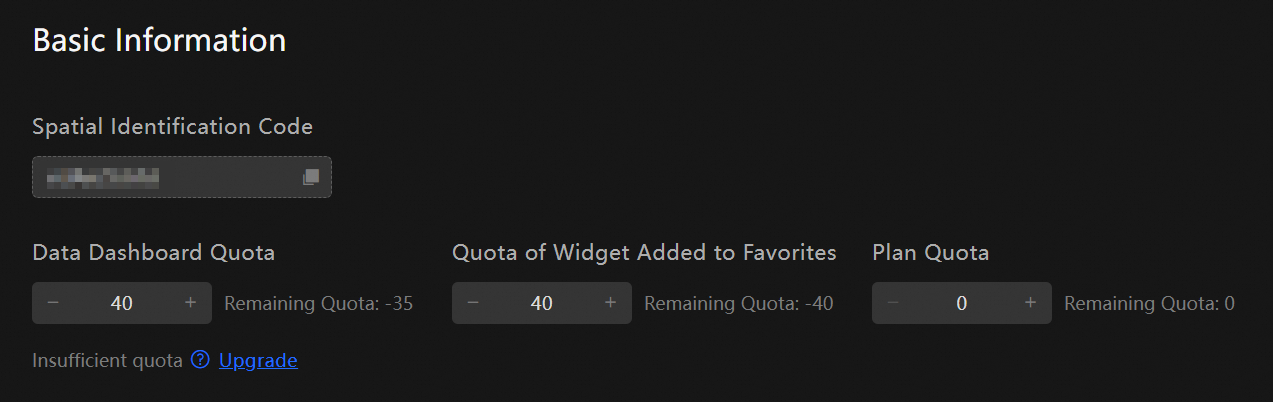 Note
NoteWhen multiple workspaces exist, they share the quota amount.
The quotas related to the workspace are as follows.
Parameter
Description
Configuration Principle
Maximum Quota per Version
Dashboard Quota
The number of dashboards that can be created in the current workspace.
All types of quotas must adhere to the following principles:
-
The total number of quotas for all workspaces in the currently purchased version of DataV-Board 7.0 must not exceed the maximum quota supported by the version.
NoteFor example, in the Enterprise Edition product you purchased, the total number of Dashboard Quotas for all workspaces must not exceed
20. -
The quota for the current workspace must not exceed the remaining quota of the purchased version.
NoteFor example, if you purchased the Enterprise Edition product with a Dashboard Quota limit of
20, and the total number of Dashboard Quotas configured in existing workspaces is15, then the Remaining Dashboard Quota is 5. Therefore, the Dashboard Quota for any new workspace must not exceed5.
-
Professional Edition Trial: 5
-
Personal Edition: 5
-
Enterprise Edition: 20
-
Professional Edition: 40
Favorite Widget Quota
The number of widgets that can be favorited in the current workspace.
-
Professional Edition Trial: 5
-
Personal Edition: Not supported
-
Enterprise Edition: 20
-
Professional Edition: 40
3D City Quota
The number of 3D cities that can be created in the current workspace.
-
Professional Edition Trial: 1
-
Personal Edition: Not supported
-
Enterprise Edition: Not supported
-
Professional Edition: 10
Scenario Quota
The number of scenarios that can be configured in the current workspace.
-
Professional Edition Trial: 5
-
Personal Edition: Not supported
-
Enterprise Edition: 20
-
Professional Edition: 40
-
100
-
-
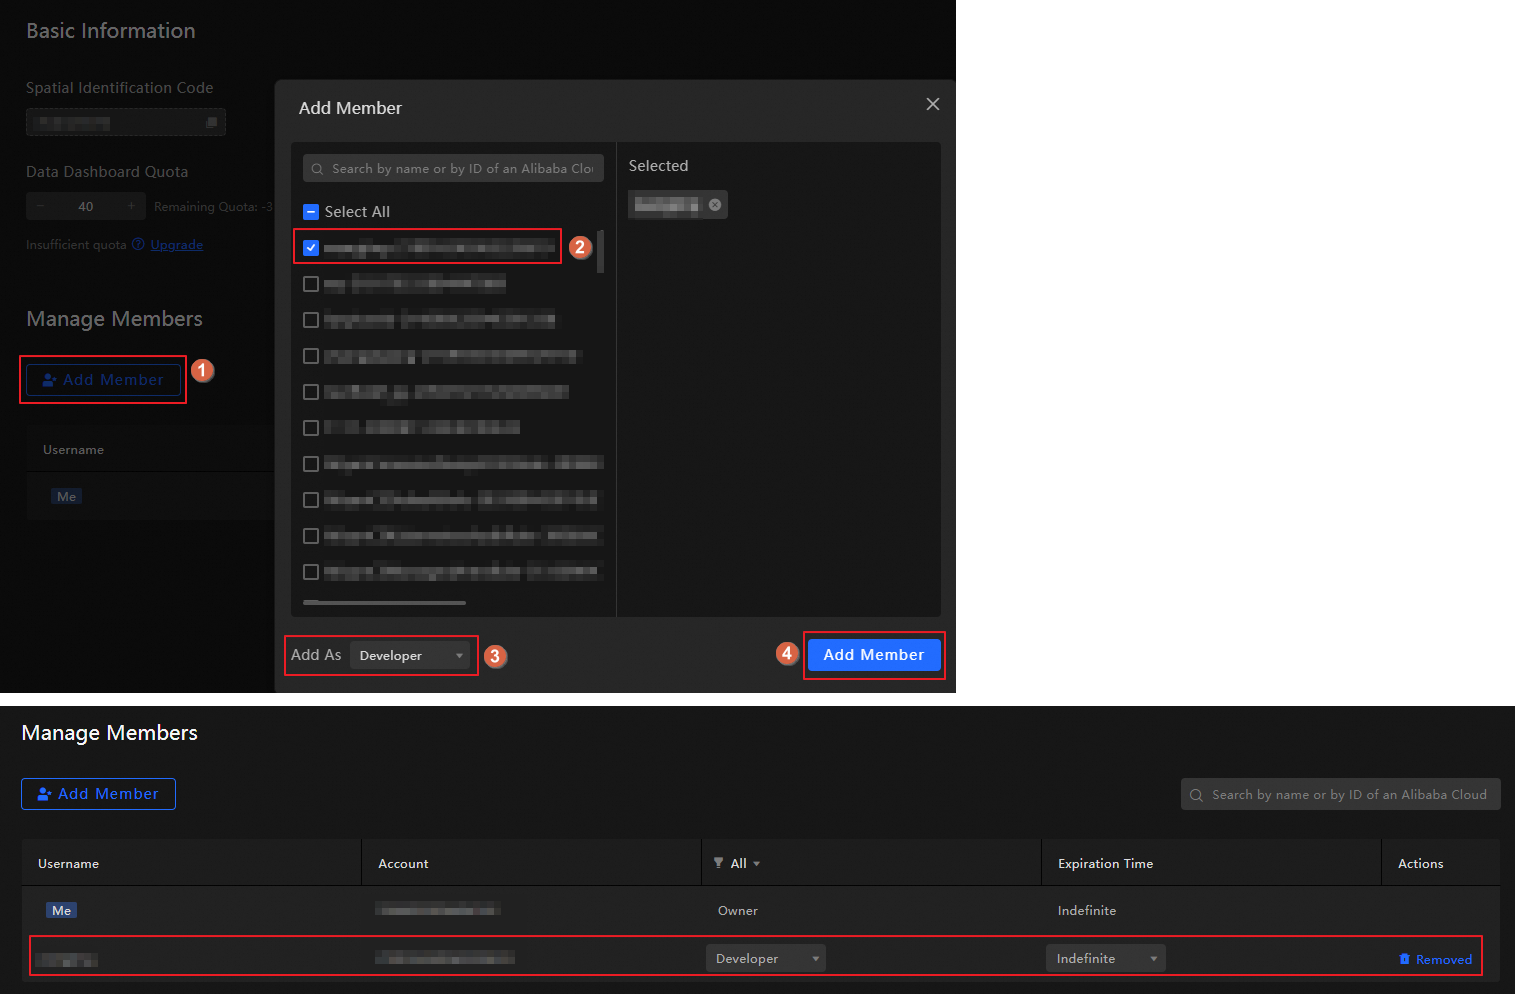
(Optional) add members and grant permissions
You can add RAM users as workspace members and grant them permissions for collaborative development. Member permissions are managed at the workspace level, giving you control over each functional module.
NoteBefore adding members, ensure you have created a RAM user.
-
Role Permission Description: Members receive permissions based on their assigned role. DataV-Board 7.0 supports the following roles:
-
Owner: Possesses all permissions within the workspace. The Alibaba Cloud account that activates DataV-Board 7.0 is the default Owner.
-
Administrator: Can add members, manage, and delete workspace resources but cannot create or delete workspaces.
-
Developer: Can create and edit dashboards within the workspace but lacks higher-level permissions. Primarily used for collaborative dashboard development.
-
Operator: Can view dashboards and demonstration scenarios but lacks higher-level permissions. Mainly assists business parties with daily dashboard operations.
Functional module
Permission point
Owner
Administrator
Developer
Operator
Workspace Management
Access workspace management page


Create a workspace
Assign dashboard quotas to workspaces
Delete a workspace
Create and edit other resources within the workspace (such as design resources).
Delete the following resources within the workspace:
-
Dashboard
-
Favorite widgets
-
Data sources
-
Project groups
-
Other resources (such as design resources)
Member Management
View member list
Add members
Remove members
Can remove any member except oneself.
Can remove any member except the owner (including oneself).
Only supports removing oneself.
Only supports removing oneself.
Modify member roles
Can modify the role of any member except oneself.
Can modify the role of any member except the owner and oneself.
Modify member expiration time
Can modify the expiration time of any member except oneself.
Can modify the expiration time of any member except the owner (including oneself).
Dashboard Management
Create a dashboard
Edit a dashboard, including the following:
-
Add widgets
-
Edit widgets
-
Delete widgets
-
Share dashboards
Rename a dashboard
Project Group
Rename a project group
Widget Package
Authorize a widget package
Upload widgets to a widget package
Visualization Application Center
-
Access permissions: View dashboards and demonstration scenarios.
-
Operation permissions: View and perform access statistics.
Visualization Studio
-
Usage permissions: View and cast screens.
-
Edit permissions: Add, delete, modify.
-
-
Operation Guide: Follow the steps shown in the figure below to add members and grant permissions. You can later modify member roles and expiration times, or remove members from the list.
NoteBy default, members do not have an expiration time. If an expiration time is set, the member's permissions will expire accordingly, and they will lose access to the workspace.
-
-


Manage workspaces
Access the workspace management page. From the workspace list on the left, you can perform the following operations:
-
View and Modify Workspaces: Click on a workspace to view its identity, quotas, and member list. Modify quotas or member information as necessary.
-
Rename a Workspace: Hover over the workspace and click the
icon to change its name. -
Delete a Workspace: Hover over the workspace and click the
icon to remove it.ImportantBe cautious when deleting a workspace as it cannot be restored.
-
Only the workspace Owner has the authority to delete a workspace.
-
Deleting the default workspace is not allowed.
-
If the workspace has created project resources such as dashboards, 3D cities, data sources, project groups, or favorited widgets, it cannot be deleted. Please delete these resources before attempting to delete the workspace.
-
-
Search for a Workspace: Log on to the DataV console, click the
icon next to the workspace name in the upper left corner, and search for the desired workspace by name or ID.
 icon next to the workspace name in the upper left corner, and search for the desired workspace by name or ID.
What to do next
Once the workspace is set up, integrate the necessary data sources based on business requirements and create dashboards. For additional development guidance, see core feature overview and how to build dashboards on a blank canvas.