Recurring modeling task instances are automatically generated each time an auto triggered task runs based on its schedule configuration. You can perform O&M on these instances, such as viewing their running status, rerunning them, and viewing node code.
Background information
Recurring modeling task instances include logical dimension table instances, logical fact table instances, and logical aggregate table instances. Each time a logical table task is scheduled, a corresponding instance is generated. You can manage these instances from either a table or a field perspective.
Usage notes
Standardized modeling uses dynamic materialization logic. You can perform O&M from the following two perspectives:
-
From the physical O&M perspective, you can view the latest materialized node code or operational logs to determine which fields or logical table task nodes are affected by each operation on a materialized node. For example, to backfill data for a logical table task node, you must first identify the materialization node for the logical table task node. Then, you must backfill data for each materialization node individually. This process is complex and cannot guarantee data consistency.
-
From the logical O&M perspective, you only need to select the fields or logical table task instances that require operations. The system automatically calculates the corresponding materialization nodes based on the current materialization method. It also suggests related fields that must be operated on together to ensure data consistency and correctness. You do not need to be concerned with the physical implementation, which shortens the operation path and reduces O&M costs.
Epoch Modeling Task Instance Page Access
-
On the Dataphin home page, in the top menu bar, choose Development > O&M.
-
In the navigation pane on the left, choose Instance O&M > Recurring Instance.
-
In the top menu bar, select the production or developer environment.
-
On the Recurring Instance page, click the Modeling Task tab.
Operations in the modeling task instance list
Each modeling task instance generated by an auto triggered task appears in the Recurring Instance > Modeling Task list. The list displays the name, running status, schedule epoch, data timestamp, scheduled time, start time, end time, runtime, priority, owner, project, related baseline instances, tags, and supported operations for each instance.
-
Instance Object: An auto triggered task generates a recurring instance object each time it runs. The object includes the table name and ID and identifies the node's scheduling method. Click the
 icon next to the column name to sort the objects by name in ascending or descending order. For more information, see Description of recurring instance indicator marks.
 -
Running Status: The running status of a modeling task includes the running status of its fields and nodes. Click the
 icon next to a field to view the details of each running status.
The field running status represents the collective running status of all fields in the logical table. For example, the
 icon indicates that the fields in the logical table have two statuses: Succeeded and Not Running. The number next to the field running status icon indicates the number of fields in the current logical table node. The number next to the node icon indicates the number of materialization nodes in the current logical table node. You can also click the
  icon to view the normalized running status of each field. For a description of the running status indicators, see Description of recurring instance running status.
The running status of a field is determined by the running status of all materialization nodes that it belongs to. The final displayed status is the normalized running status of the field. The rules are as follows:
-
If at least one materialization node that the field belongs to has a running status of Succeeded, the normalized status of the field is Succeeded.
-
The normalized status of the field is Failed only if all materialization nodes that the field belongs to have a running status of Failed.
-
If at least one materialization node that the field belongs to has a running status of Running, the normalized status of the field is Running.
-
If some materialization nodes that the field belongs to have a running status of Waiting, and some have a running status of Not Running or Failed, the normalized status of the field is Waiting.
-
If all materialization nodes that the field belongs to have a running status of Not Running, the normalized status of the field is Not Running.
-
-
Start Running Time: The time that the instance started running. Click the
 icon next to the column name to sort by the start time in ascending or descending order.Note
The start time of a logical table node is the start time of the earliest internal materialization node for the instance object.
-
End Running Time: The time when the instance finished running. Click the
icon next to the column name to sort by the end time in ascending or descending order.NoteThe end time of a logical table node is the end time of the latest internal materialization node for the instance object.
-
Running Duration: The total time from when the instance started running until it finished. Click the
icon next to the column name to sort by the duration in ascending or descending order.NoteThe runtime of a logical table node is the time difference between the start time of the earliest internal materialization node and the end time of the latest internal materialization node for the instance object.
-
Priority: The priority level of the instance.
NoteIf the baseline feature is enabled, the baseline task takes the highest priority among all baselines. This overwrites the originally configured priority of the node.
-
Project: The project that the node belongs to. The format is
Project English name (Project Chinese name). -
Related Baseline Instance: This field displays the baseline for which the node is an end node. It also displays related baselines that include the node as an ancestor node within their protection scope.
NoteIf the baseline feature is not enabled, this field is not displayed.
The following operations are supported in the modeling task instance list:
|
Operation |
Description |
|
DAG |
Click the |
|
View Run Log |
Click the |
|
Rerun |
Click the If a rerun is required for your business scenario, perform a forced rerun. For more information, see Force rerun the current instance. |
|
View Gantt Chart |
Note
You can view the Gantt chart only after you purchase the artificial intelligence for IT operations value-added service and enable the artificial intelligence for IT operations module for the current tenant. Click the
For more information about the Gantt chart, see View the Gantt chart for a critical path. |
|
Download upstream and downstream nodes |
Download the list of upstream and downstream nodes for the current node. The list includes all columns, including those that are not displayed. Click Download upstream and downstream nodes. In the Download upstream and downstream nodes dialog box, select the levels for upstream and downstream nodes. You can select from Level 1~Level 10, or Unlimited levels. The default is Level 1. After you select the levels, click OK to download the Excel file. The file is named |
|
Field and batch operations |
Click the |
|
View Production Lineage |
Click the |
|
View Consumption Lineage |
Click the |
|
View Materialization Code |
Click the |
|
Recurring Task |
Click the |
|
Edit Development Node |
Click the Note
You can edit development nodes only for script instances in projects that use the Dev-Prod pattern. |
|
View Production Node |
Click the Note
You can edit development nodes only for script instances in projects that use the Dev-Prod pattern. |
|
Edit Node |
Click the Note
You can edit development nodes only for script instances in projects that use the Basic pattern. |
|
Rerun Downstream |
Click the To rerun the entire lineage, use the force rerun feature for downstream instances. For more information, see Force rerun downstream instances. The Rerun downstream operation is often used in the following scenarios:
|
|
Set To Success & Resume |
Click the |
|
Stop |
Click the Note
You cannot stop instances with a node status of Succeeded, Failed, or Not Running. You can stop instances with any other node status. The Stop operation is often used in the following scenarios:
|
|
Forced Rerun |
Click the
Important
A forced rerun does not check whether all ancestor nodes have run successfully or whether the scheduled time for the current instance has been reached. This creates a risk of run failure or data quality issues. Confirm that there is no impact on downstream data before you proceed. |
|
Remove Upstream Dependency |
Click the Important
You must retain at least one upstream instance. |
|
Pause |
Click the Note
The Pause operation is often used when resources are limited. You can pause low-priority instances to ensure that high-priority tasks run first. |
|
Resume |
Click the |
|
Modify Priority |
Click the Note
Logical aggregate tables can have multiple priorities. |
Operations for modeling task instance DAG nodes
The Directed Acyclic Graph (DAG) shows the upstream and downstream dependencies of instance nodes and allows you to perform O&M on them. By default, the DAG displays the main node (the selected node) and its first-level ancestor and descendant nodes.
Dataphin supports cross-project O&M on instance nodes. To operate on cross-project instance nodes, you must have view and operation permissions for the project that the instance belongs to. For aggregate table instances, you can operate only on metrics that you have permission to access.
-
Operations supported in the DAG
Operation
Description
Expand Parent Node
Expand the dependency nodes at different levels of the main node in the DAG.
Expand Child Node
View Task
Go to the DAG of the task node that generated the current instance node. You can view the task node details and information about its ancestor and descendant nodes. You can also perform O&M on the task node. For more information, see Manage modeling tasks.
Expand Materialization Node
Expand the internal materialization nodes that correspond to the logical table.
Hover the mouse pointer over the materialization node box. Then, right-click or click the icon to view the node code, materialization node fields, and operational logs of the materialization node.

View Operation Logs
View the log information of operations performed on the instance.
-
Operations supported for DAG nodes
You can hover your mouse over a DAG node to view its name, type, schedule epoch, owner, and description. The operations supported for DAG nodes of modeling task instances are the same as those in the modeling task instance list. For more information, see Operations in the modeling task instance list.
Batch operations for modeling task instances
|
Operation |
Description |
|
Rerun All Failed Instances |
Select multiple modeling task instances. Then, at the bottom of the list, select Rerun All Failed Instances, Rerun All Instances In Desired State, or Force Rerun All Instances.
|
|
Stop |
You cannot stop instances with a node status of Succeeded, Failed, or Not Running. You can stop instances with any other node status. If you select only instances with a node status of Succeeded, Failed, or Not Running, the batch stop operation is not supported. |
|
Set To Success & Resume |
In batches, set the running status of instance nodes that are Failed or Not Running to Succeeded. The nodes then continue to be scheduled. |
|
Pause |
You can pause only instances with a status of Not Running, Waiting for Scheduling Time, or Throttling. If you do not select instances with one of these statuses, the batch pause operation is not supported. |
|
Resume |
Resume recurring instances that are Paused. |
|
Modify Priority |
In batches, modify the priority of the selected instances. You can select Highest, High, Medium, Low, or Lowest. Note
Logical aggregate tables can have multiple priorities. |
|
Download All |
Download all recurring instance data to a local file. This includes data from integration, computing, and modeling task instances. The file is downloaded in .xlsx format with the name The file contains the following information: instance object, instance ID, running status, schedule epoch, data timestamp, priority, owner, project (for logical aggregate tables with multiple projects, the project names are separated by commas (,)), scheduled time, start time, end time, runtime, retry count/auto-retry count, related baseline instances (for instances with multiple baselines, the baseline names are separated by commas (,)), and schedule resource group (this parameter is empty for modeling task instances). |
Rerun downstream nodes
-
In the Rerun Downstream dialog box, configure the parameters.
Note-
You can rerun the descendant nodes of a modeling task instance only if the instance has a running status of Succeeded or Failed, and its fields have a normalized status of Succeeded or Failed. For more information about the running status of logical tables and the normalized status of fields, see Operations in the modeling task instance list.
-
If you cannot rerun descendant nodes because of status limitations, but your business scenario requires it, you can perform a forced rerun. For more information, see Force rerun the current instance.
-
Basic information
You can filter by field running status or search for target fields by name.
The Prioritize Required Fields option displays fields that Dataphin determines must be included in the rerun scope to ensure data quality. This determination is based on field logic and data changes in ancestor nodes.
NoteTo ensure data consistency and correctness, the rerun operation includes all fields within the materialization nodes of the selected fields, along with all fields within other materialization nodes of any associated fields.
Parameter
Description
Start Node
Select the start node for rerunning downstream nodes. You can select the entire table or specific fields.
-
Entire Table: Rerun the downstream instances for all fields in the logical table instance.
-
Specific Fields: Specify the fields whose descendant nodes need to be rerun, as needed.
You can filter by field running status or search for target fields by name.
Start Node Running Mode
Define the running mode of the start node. You can select dry-run or normal run.
-
Dry-run: The instance status is shown as successful (normal scheduling), but the operational log is empty, there is no execution duration, and no data is actually processed.
-
Normal Run: Normal scheduling.
-
-
Downstream configuration
Downstream rerun scope
Description
All Failed Instances
Rerun only the fields that depend on the current instance and have failed to run, along with their associated fields.
Custom Configuration
To customize the downstream nodes to rerun, select this option. You can search by node name or ID, or filter by running status, owner, and project.
You can filter downstream instance nodes by run failure, descendant node level, and by prioritizing required fields. You can also enter a node name or ID to quickly filter downstream nodes.
-
-
Click Submit.
After the downstream nodes are rerun, their data is updated.
Force rerun the current instance
-
In the Force Rerun Current Instance - Logical Table dialog box, configure the rerun parameters.
Forced rerun scope
Description
Entire Table
Force a rerun of all fields in the logical table.
Specific Fields
Specify the fields to rerun, as needed. You can force a rerun of any field in the current logical table instance, regardless of its normalized running status.
You can filter by field running status or search for target fields by name.
-
Click OK. A dialog box appears, showing the associated required fields. Confirm the fields and click OK.
To ensure data consistency and correctness, the forced rerun includes all fields within the materialization nodes of the selected fields, along with all fields within other materialization nodes of any associated fields.
Force rerun downstream instances
-
In the Force Rerun Downstream Instances - Logical Table dialog box, select a configuration method and configure the parameters.
-
You can force a rerun of downstream instances using either Quick Configuration or Custom Configuration. The details are as follows:
-
Quick Configuration
a. Select the entire table as the start node and specify the running mode for the start point.
Parameter
Description
Start Node
For quick configuration, the start node is set to the entire table by default. This means all fields in the logical table instance are start nodes.
Start Node Running Mode
Define the running mode of the start node. You can select dry-run or normal run.
-
Dry-run: The instance status is shown as successful (normal scheduling), but the operational log is empty, there is no execution duration, and no data is actually processed.
-
Normal Run: Normal scheduling.
b. Select the scope for the forced downstream rerun.
When you use quick configuration, the scope of the forced downstream rerun defaults to all downstream instances that depend on the current logical table instance.
-
-
Custom Configuration
-
Basic information
Parameter
Description
Start Node
Select the start node for rerunning downstream nodes. Dataphin supports selecting the entire table or specific fields.
-
Entire table: Force a rerun of the downstream instances for all fields in the logical table instance.
-
Specific fields: Specify the fields whose descendant nodes need to be forcibly rerun, as needed.
You can filter by field running status or search for target fields by name.
Start Node Running Mode
Define the running mode of the start node. Dataphin supports selecting dry-run or normal run.
-
Dry-run: The instance status is shown as successful (normal scheduling), but the operational log is empty, there is no execution duration, and no data is actually processed.
-
Normal Run: Normal scheduling.
-
-
Downstream configuration
Parameter
Description
Downstream forced rerun scope
Select the scope for the forced downstream rerun. You can select all instances or a custom configuration.
-
All Instances: All descendant instance nodes of the selected fields.
-
Custom Configuration: To customize the nodes for the forced downstream rerun, select this option. You can search by field name or filter by running status.
Field list
You can filter fields by prioritizing required fields. You can also enter a field name to quickly filter fields.
Prioritizing required fields shows fields that Dataphin determines must be included in the forced rerun scope. This determination is based on field logic and data changes in ancestor nodes to ensure data quality.
-
-
-
-
Click Submit. A dialog box appears, showing the associated required fields. Confirm the fields and click OK.
To ensure data consistency and correctness, the forced rerun includes all fields within the materialization nodes of the selected fields, along with all fields within other materialization nodes of any associated fields.
Field and batch operations for a logical table
The Field and Batch Operations page for the logical table displays information about each field, including its name, running status, field type, start time, end time, runtime, and supported operations.
|
Operation |
Description |
|
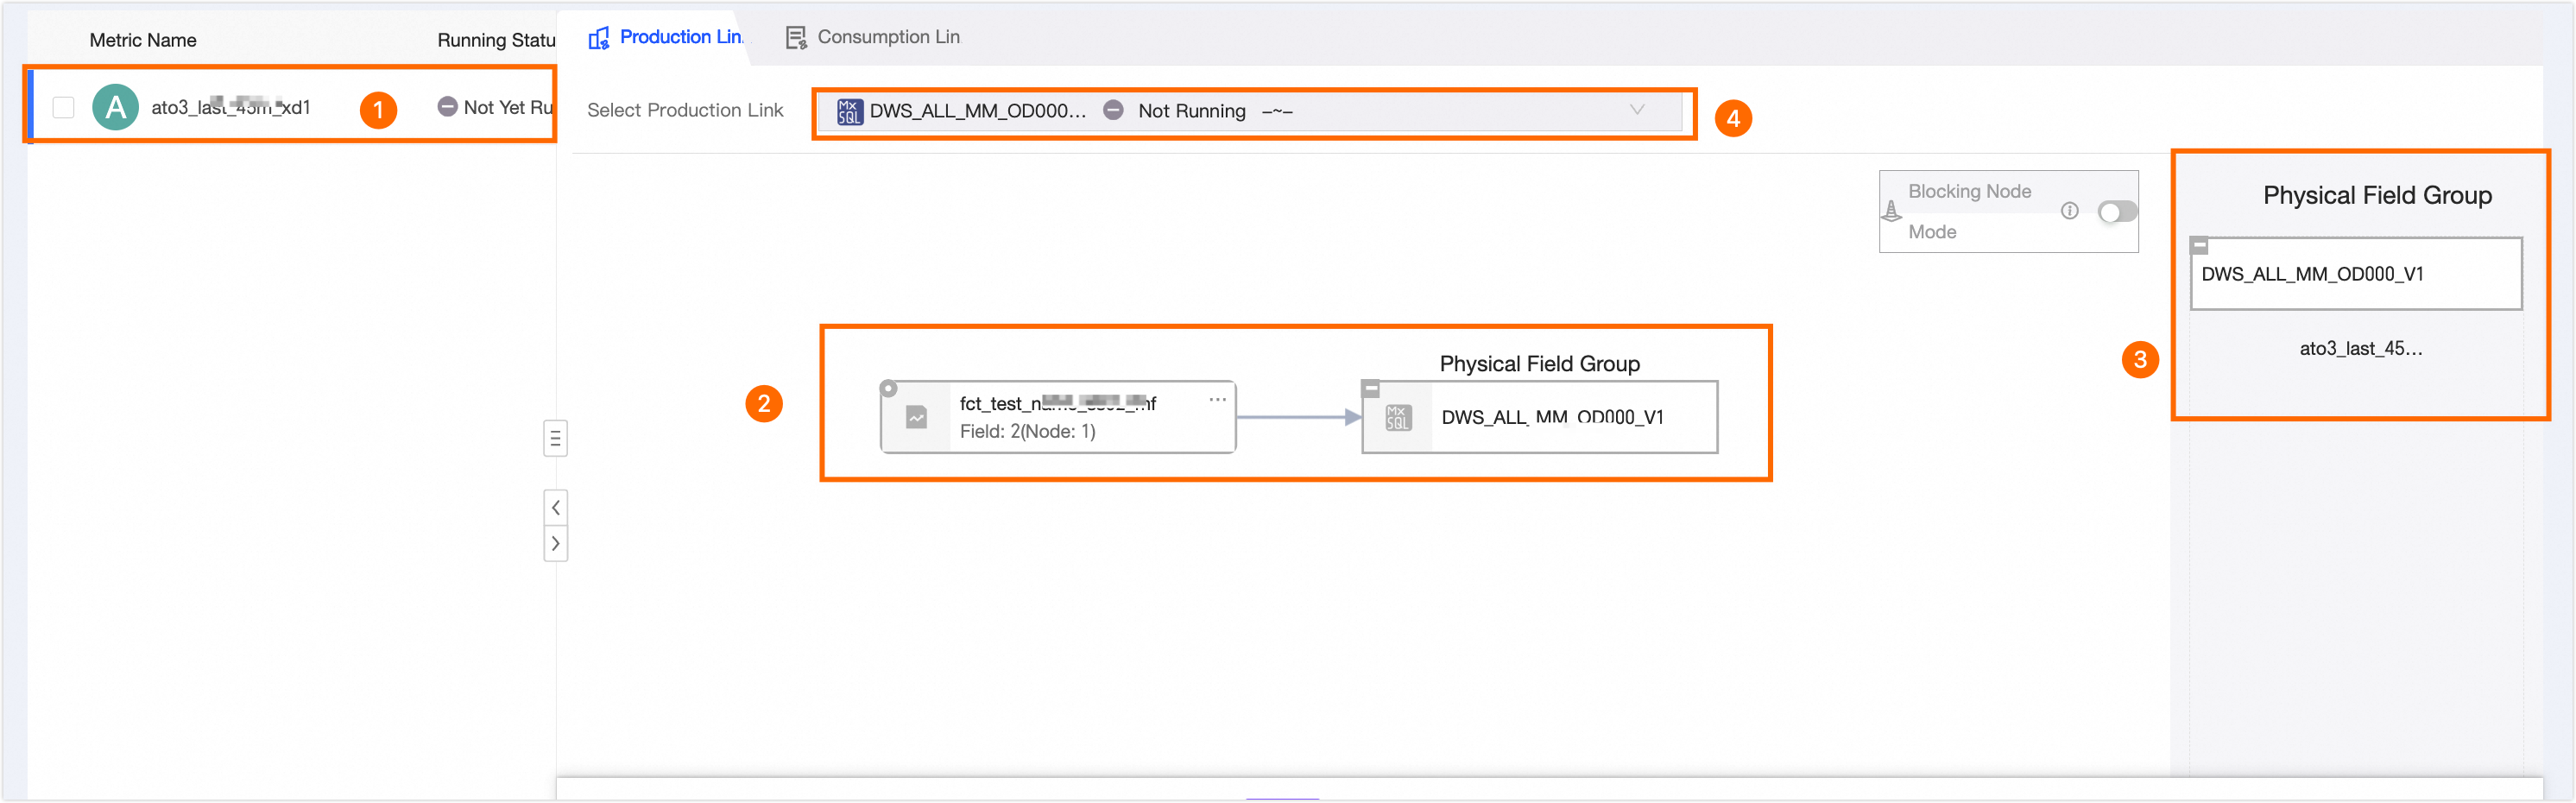
View Production Lineage |
View the materialization lineage of fields in the modeling task instance and the field groups of materialization nodes.
① Displays the fields of the current modeling task instance node and their running status. You can click to select different fields. The production lineage of the selected field is displayed on the right. ② Displays the materialization lineage of the selected field. ③ Displays all fields of the materialization node. ④ Displays the materialization nodes of the current modeling node. If the logical table node has multiple materialization nodes, click area ④ to switch between them and view their information. |
|
View Run Log |
View the log of the current instance run. |
|
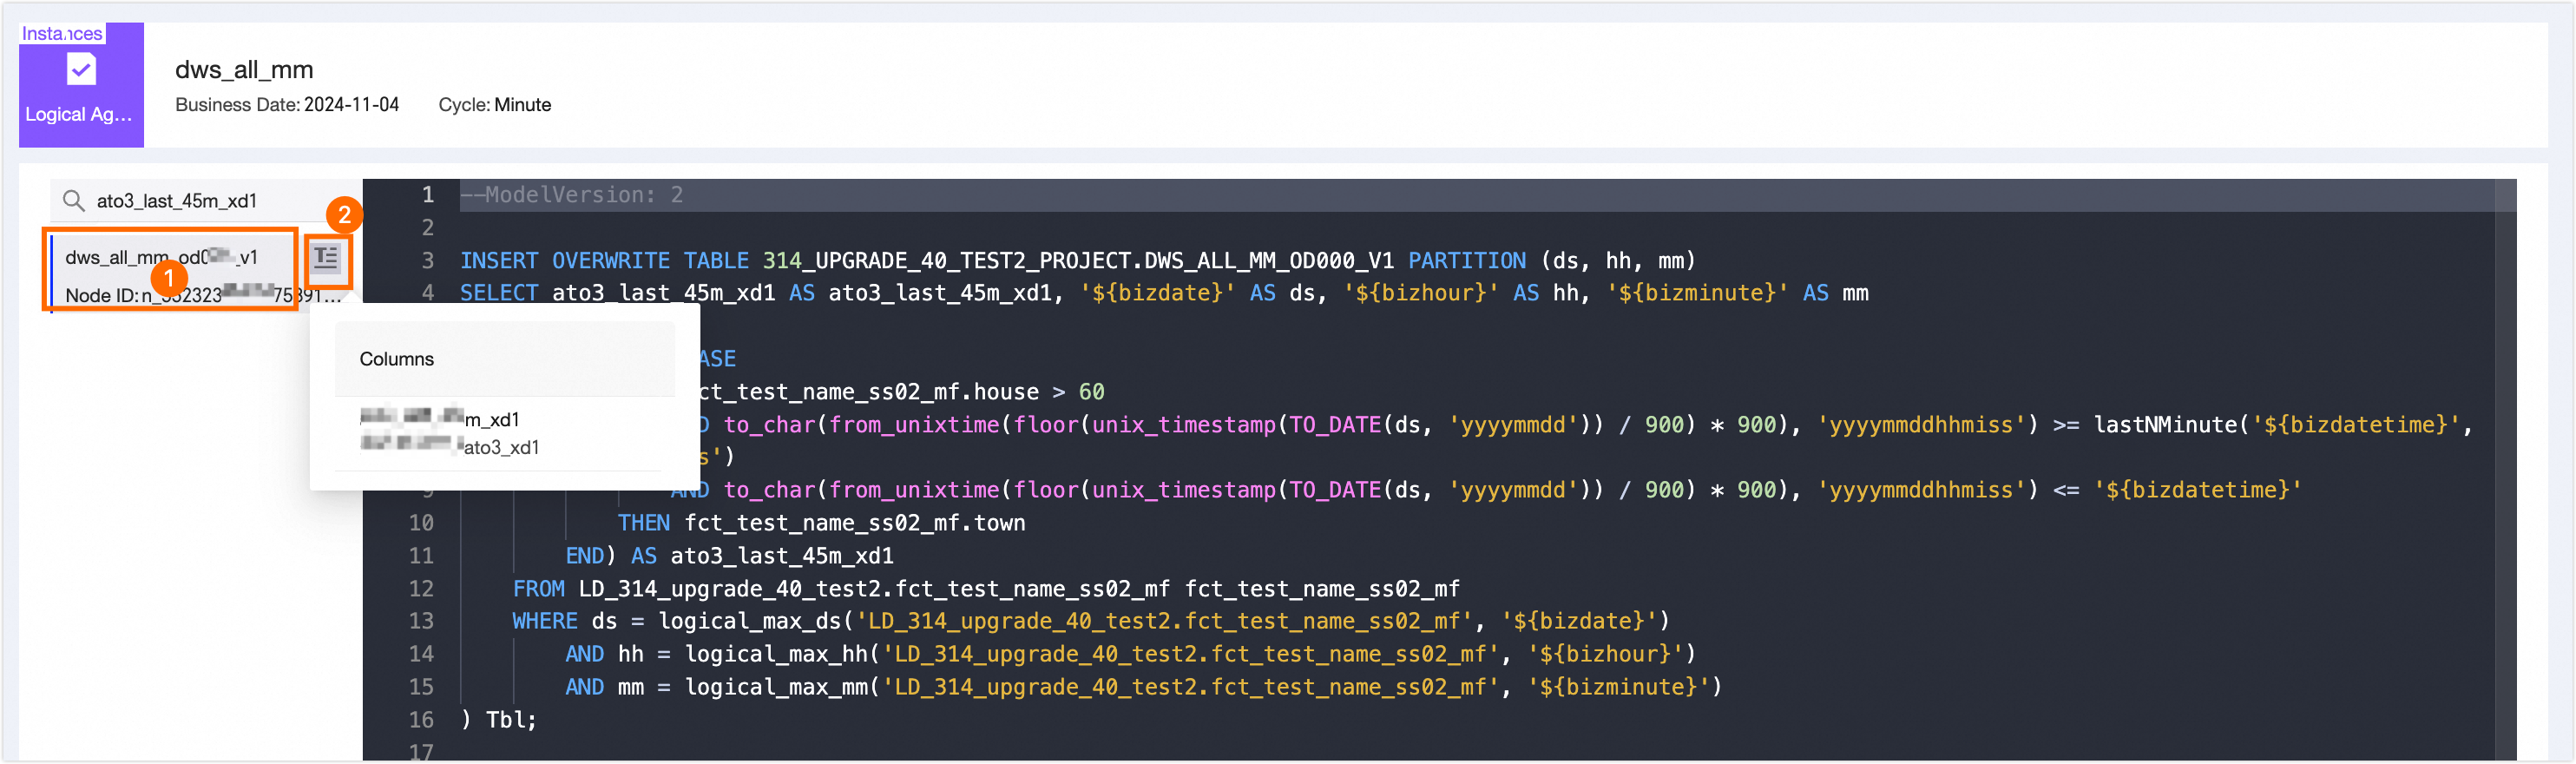
View Materialization Code |
View the materialization code of all materialization nodes in the modeling task instance.
On the View Materialization Code page, you can switch between all materialization nodes in area ① to view their code. You can also hover the mouse pointer over the |
|
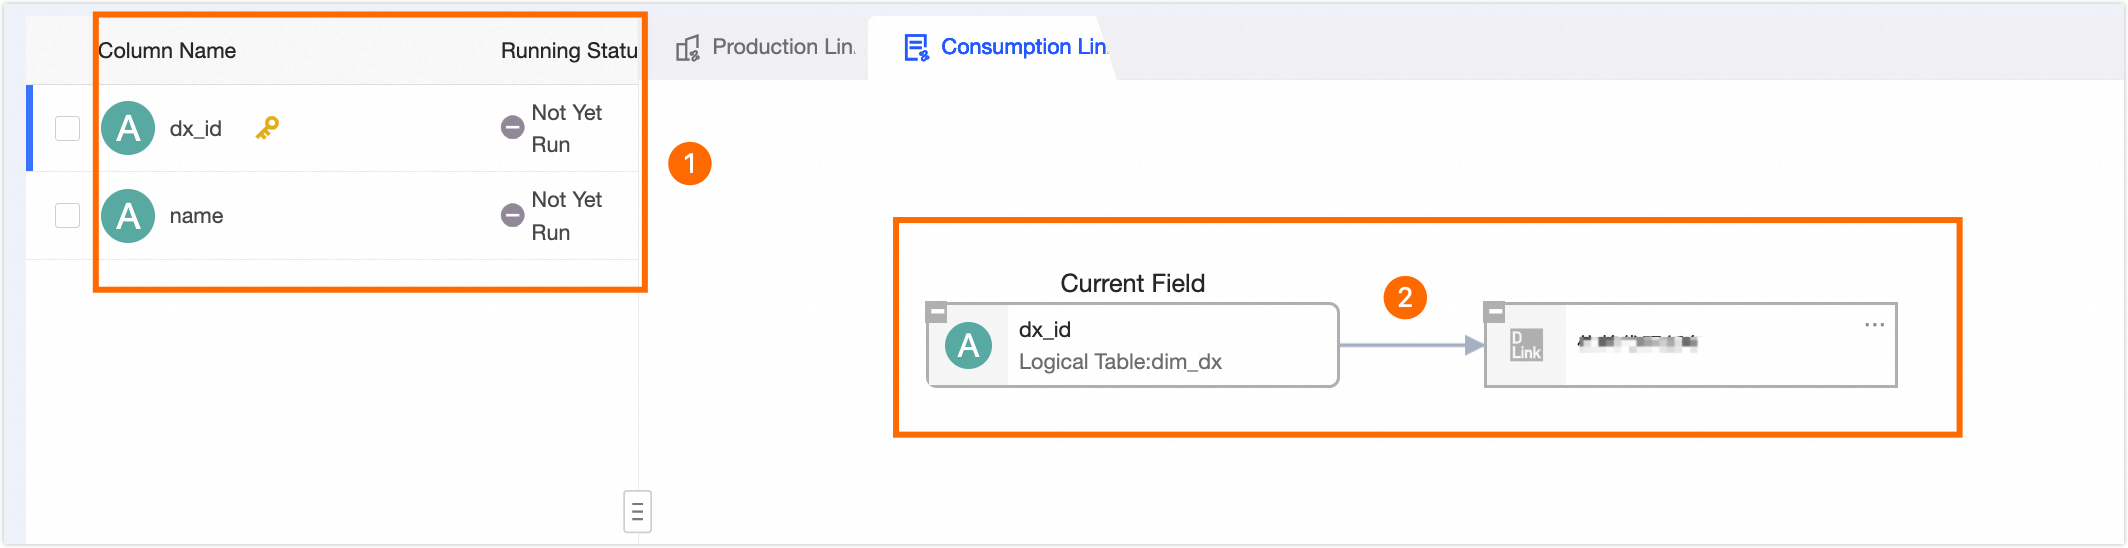
View Consumption Lineage |
View the dependencies of the fields in the modeling task instance node. This helps you analyze the impact on descendant nodes when you manage the fields.
① Displays the fields of the current modeling task instance node. You can select different fields. The consumption lineage of the selected field is displayed on the right. ② Displays the descendant nodes of the selected field. This helps you analyze the impact on descendant nodes when you manage the field. |
|
Rerun |
Dataphin supports rerunning only logical table instances with a running status of Succeeded or Failed, and fields with a normalized status of Succeeded or Failed. After the rerun, the data of the rerun fields in the current instance and their descendant instance nodes is updated. If you cannot perform the rerun operation because of limitations on the running status of the logical table instance and the normalized status of fields, but your business scenario requires it, you can perform a forced rerun. For more information, see Force rerun the current instance. |
|
Rerun Downstream |
Dataphin supports rerunning only the descendant nodes of fields that have a normalized status of Succeeded or Failed in modeling task instances with a running status of Succeeded or Failed. If you cannot rerun downstream nodes because of limitations on the running status of the modeling task instance and the normalized status of fields, but your business scenario requires it, you can perform a forced rerun. For more information, see Force rerun the current instance. The Rerun downstream operation is often used in the following scenarios:
|
|
Stop |
You cannot stop instances with a node status of Succeeded, Failed, or Not Running. You can stop instances with any other node status. After an instance is stopped, its node status changes to Failed. After the current instance node stops running, its descendant nodes will not run. The Stop operation is often used in the following scenarios:
|
|
Forced Rerun |
A forced rerun does not check whether all ancestor nodes have run successfully or whether the scheduled time for the current instance has been reached. This creates a risk of run failure or data quality issues. Confirm that there is no impact on downstream data before you proceed. For more information, see Force rerun the current instance. The details of forcing a rerun of downstream instances are as follows:
|
|
Pause |
Sets the current scheduling epoch of the field to a paused state. Pausing a field pauses its current scheduling epoch but does not affect its other scheduling epochs. |
|
Set To Success & Resume |
Manually set the running status of fields that are Failed or Not Running to Succeeded. The fields then continue to be scheduled. For more information, see Set the status to Succeeded and continue scheduling. |
|
Resume |
Dataphin supports resuming only Paused fields. After a paused field is resumed, the system checks whether the current node meets the running conditions:
If these conditions are met, the field automatically starts to run. If the conditions are not met, only the freeze status of the field is canceled. The field will start to run when the conditions are met. |
Set the status to Succeeded and continue scheduling
-
In the Set to Succeeded and Continue Scheduling - Logical Table dialog box, select the scope of the operation.
-
Failed Fields: All fields with a normalized running status of Failed are set to Succeeded.
-
Not Run Fields: All fields with a normalized running status of Not Running are set to Succeeded.
-
Failed and Not Run Fields: All fields with a normalized running status of Failed or Not Running are set to Succeeded.
-
Custom Configuration: In the field list, you can select specific fields in the logical table instance that have a normalized running status of Failed or Not Running and set their status to Succeeded.
-
-
Click OK to apply the setting.