Data standards support business, technical, and management requirements. Data standard management involves defining and applying standardized definitions for data and its attributes. This topic describes how to create and manage data standards.
Permissions
Super administrators and data standard administrators can create or clone data standards in any data standard set.
Standard set maintainers and standard set members can create or clone data standards in the standard sets they have joined.
Super administrators, data standard administrators, and standard owners can manage the data standards they own. Management actions include editing, submitting for publishing, deleting, unpublishing, and editing associated standards.
Limits
A single standard set supports up to 1,000 data standards.
Standard List
On the Data Standard page, you can focus on specific data standard sets that you follow or that are relevant to you, and quickly obtain an overview of the standards in those sets. The data standard list provides two display modes: Edit and View. On the Standard List page, click the ![]() icon in the upper-right corner to switch views.
icon in the upper-right corner to switch views.
In View mode, you can browse configured standard set directories and data standard information. You cannot perform any actions. Use this mode for reading only.
In Edit mode, you can view standard set directories and data standards. You can also edit, delete, create new standards, clone standards, publish, submit for publishing, or revoke standards. You can edit or delete standard set directories. Only accounts with data standard management permissions in the current standard set can access Edit mode. The following figure shows Edit mode.
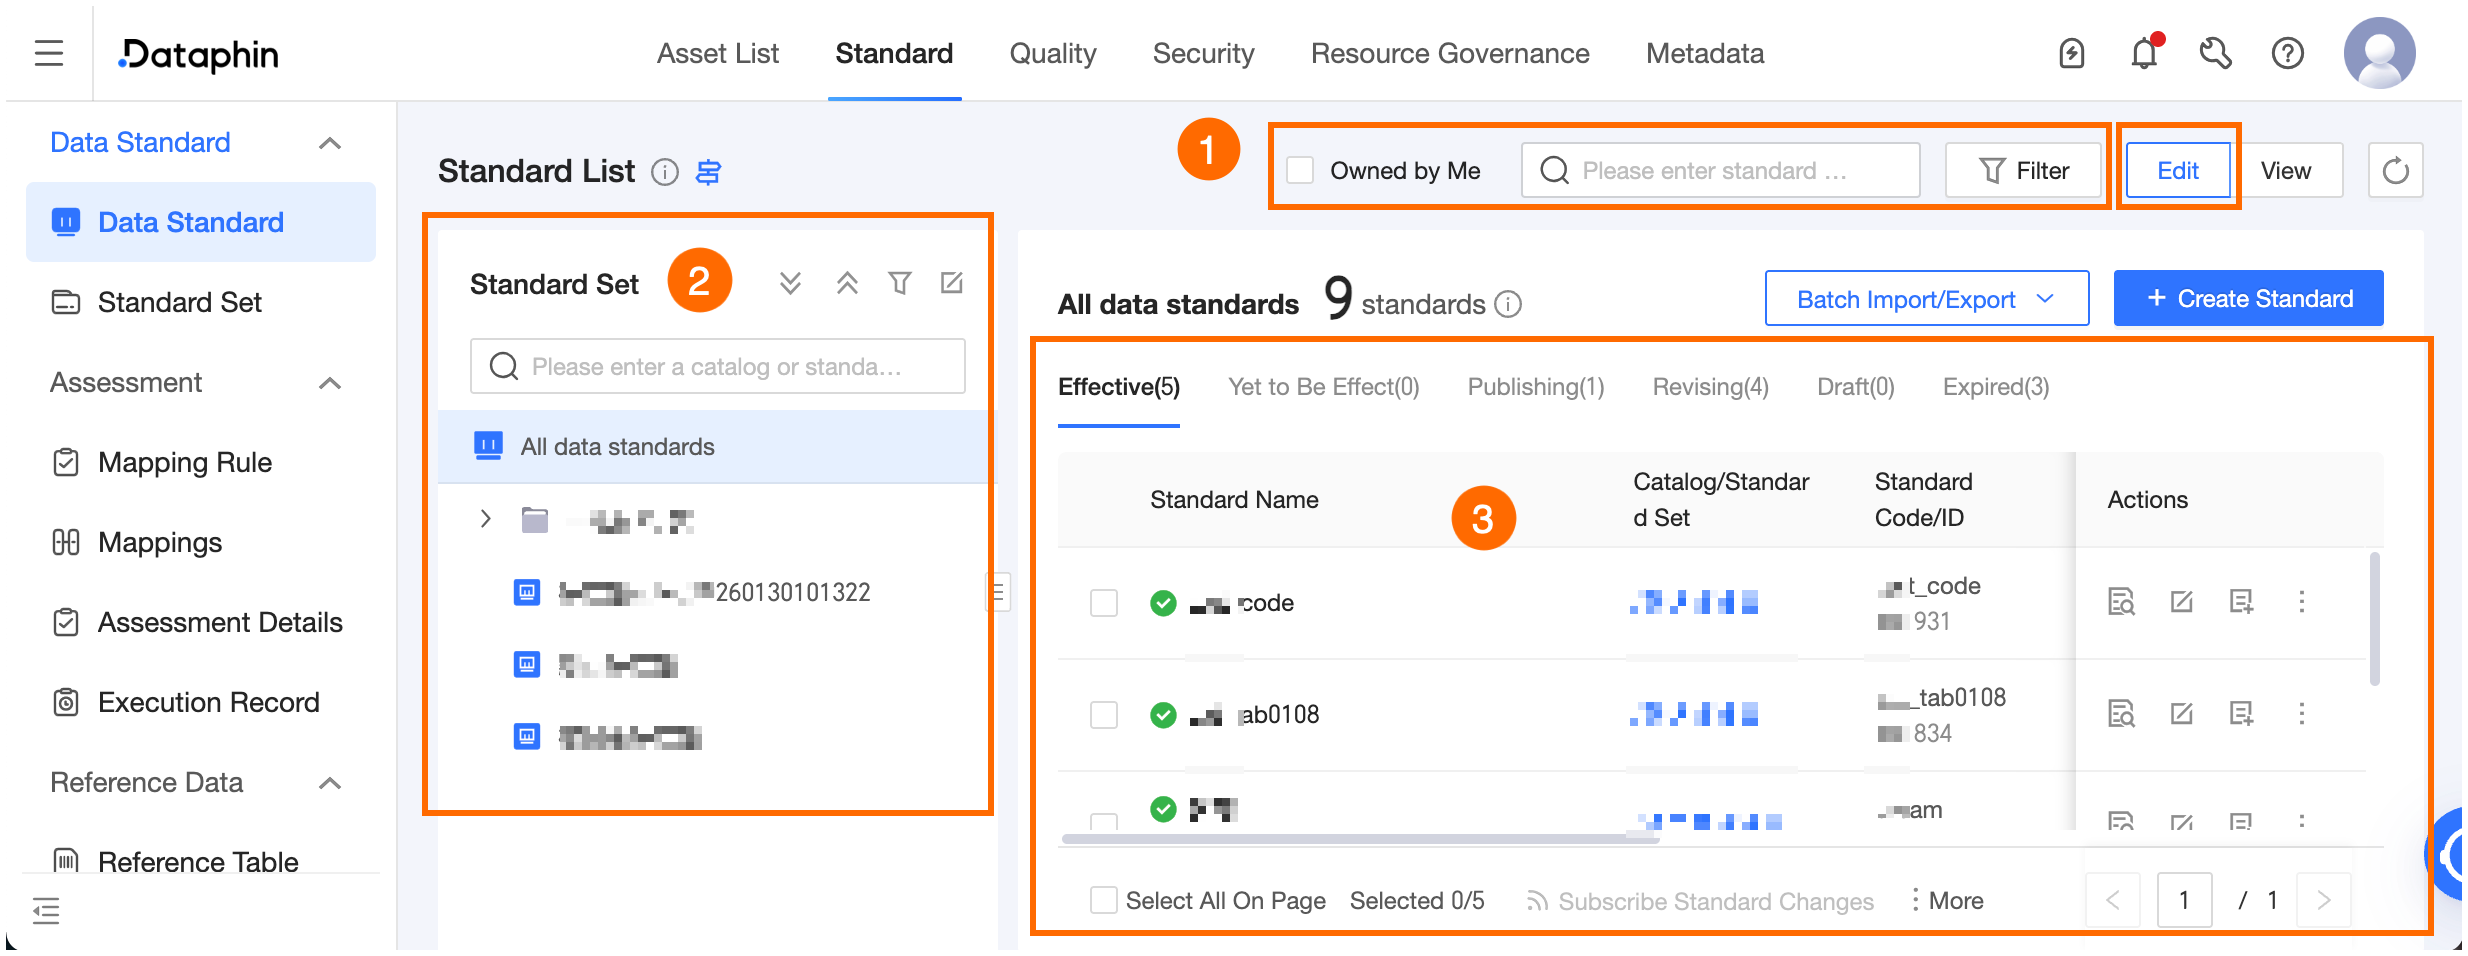
Area | Description |
① Filter and search area | Search by standard name, code, or ID. Filter by standards you own, standard owners, standard sets, standard types, or standard templates. |
② Standard sets | Standard set directories organize standard sets and standards by business or organizational structure. They support classification and hierarchical management.
|
③ Data standard list | Different standard states show different information and support different actions. See Actions supported by standards.
|

Actions supported by standards
State | Action |
In Effect, Yet To Be Effect, Out Of Effect | Support View, Edit, Add mapping relationship, View mapping relationships, Clone, Edit associated standards, Edit associated documents, Subscribe to standard changes, and Unpublish. Click the Subscribe to standard changes or Unpublish button at the bottom to batch unpublish or subscribe to changes for standards in In Effect, Yet To Be Effect, or Out Of Effect state. |
In Publish | Support View, Go to approval task, Republish, Revoke publish, Clone, Edit associated standards, Edit associated documents, and Subscribe to standard changes. |
Under Revision, Draft | Support View, Edit, Submit for publishing, Clone, Edit associated standards, Edit associated documents, Subscribe to standard changes, and Delete. Click the Subscribe to standard changes, Publish, or Delete button at the bottom to batch submit for publishing, delete, or subscribe to changes for standards in Under Revision or Draft state. |
Action | Description |
View |
Click the standard name or the View icon in the Actions column to view the standard's Basic Information, Monitoring Rules, and Historical Versions. You can switch between versions on the Basic Information and Monitoring Details pages.
|
Edit |
|
Add mapping relationship | Add mapping relationships between data standards and asset objects manually and in batches. Click the Add mapping relationship icon in the Actions column. Select asset objects. Click OK to complete. See Add mapping relationship. |
View mapping relationships | Click to go to Data Standards > Mapping Relationships > Valid Mappings. The system shows all valid mappings for the current data standard in expanded view. |
Submit for publishing | If the standard set containing the current standard has publishing approval enabled, submission requires approval. After approval, the standard becomes In Effect or Yet To Be Effect. If approval is disabled, the standard publishes directly to production after passing validation. Note
|
Clone | Quickly clone a standard. |
Delete | You can delete standards in Draft or Under Revision state. Deletion is permanent. Proceed with caution. Note Batch deletion supports only standards you have permission to manage. Others are skipped. View details in batch operation logs. See Other operation logs. |
Go to approval task | Go to the approval task for the standard. |
Republish |
Note If the standard set has merge approval enabled and a previous approval for this standard was rejected or revoked, republishing triggers a new approval flow for all standards in that previous flow. Before republishing, click View historical approval tasks to confirm the scope. If you do not want other standards republished, revoke the current publish first, then resubmit. |
Unpublish |
Note If the standard set has merge approval enabled, the entire approval task is revoked. Click View approval task to confirm before revoking. |
Edit associated standards | Configure associated data standard information to quickly view related associations. For example, a metric standard may associate with its statistical dimension standard. Associated standards do not track version history. You can view associations only when the latest version is selected. Edit: Click Edit to add or remove associated standards. Click Save to complete. |
Edit associated documents | Configure associated standard document information to quickly view related document associations. Associated documents do not track version history. You can view associations only when the latest version is selected. Edit: Click Edit to add, download, or remove associated documents. Click Save to complete. |
Subscribe to standard changes | Subscribe to standard state changes to stay updated and adjust business processes as needed. View subscription details in My Subscribed Assets. See View my subscribed assets.
Note
|
Unpublish | If the standard set containing the current standard has unpublishing approval enabled, unpublishing requires approval. After approval, the standard becomes Draft. If approval is disabled, the standard becomes Draft after passing validation. Note
|


Create a data standard
Create data standards in a specified standard set using a specified standard template.
The standard set determines the standard’s classification, permission controls, and publishing approval workflow. The standard template determines the attributes to fill and configurable monitoring options.
Data standards have three entry points, depending on whether a standard template is configured:
Entry 1: On the global standard list, click the New Standard button in the upper-right corner. Select the standard set and template to go to the standard details configuration page.
Entry 2: On a single standard set’s data standard list, if the set has a default template, you are taken directly to the details page. If no default template is set, select a template first.
Entry 3: On the standard template list, click the New icon for a template. The template is pre-filled. Select a standard set to go to the new standard page.
Procedure
On the Dataphin homepage, click Governance > Standard in the top menu bar.
The following steps use the global standard list’s New Standard option as an example. Click Standard in the navigation pane on the left. Then click the + New Standard button.
In the New Data Standard dialog box, select a standard set and template.
Standard Set: Select the standard set for the data standard.
Standard Template: If the selected standard set has a default template, it is pre-filled. If no default template is set, select one. To create a template, see Create and manage standard templates.
Click Next to go to the new standard page and configure parameters.
To switch templates, click Switch in the upper-right corner.
ImportantIf you have already configured data standard information, switching templates clears all configurations. You cannot recover them. Verify that your configurations are complete and meet attribute value requirements.
Parameter
Description
Attribute configuration
Attribute information
Value requirements depend on the attribute configuration in the selected template. For example, the Suspend scheduling date attribute uses an Enumeration (single-select) field type. Its allowed values reference the China statutory holidays lookup table. When creating the data standard, this attribute appears as a dropdown with options from the lookup table.

Standard code value: If the template generates codes automatically, the system shows a generated code. Click Regenerate for a new code. Click Switch to custom edit to enter a code that meets the template’s code rules.
System attribute configuration:
Range value: Use for attributes with continuous numeric or date ranges. Configure as follows:
Enter enumeration values: Use when values are enumerable. Separate values with English commas. Maximum 5,000 characters.
Interval value: Use for continuous numeric or date ranges. Choose from >, >=, <, <=, or No restriction. If both min and max are No restriction, skip configuration.
Reference lookup table: Use when values change dynamically or must follow constraints. Only published lookup tables are available.
See Custom attributes.
Built-in attributes: If referencing Dataphin built-in attributes, configure as follows:
When referencing System attribute - Data type, select the database storage type.
If the data type is CHAR(n) or VARCHAR(n), configure length. CHAR defaults to 255. Valid range: 1–255. VARCHAR defaults to 1,000. Valid range: 1–65,535.
If the data type is DECIMAL(p,s), configure precision. Default is [38,18]. Precision range: 1–38. Scale range: 0–18. Scale must be less than precision.
You can set precision to an integer from 1~38 and scale to an integer from 0~18. Scale must be less than precision. Otherwise, the input is invalid.
When referencing System attribute - Value domain, configure value constraints based on the attribute’s value type and range type.
When referencing System attribute - Nullable / Empty string allowed / Unique value, choose Yes or No.
When referencing System attribute - Data classification / Data grading, select the required classification and grading level for layered data governance. See Manage data classification and Manage data grading.
NoteIf a built-in attribute is referenced by a data standard, its built-in monitoring is also referenced. If you have not enabled the corresponding module, you cannot reference the built-in monitoring. You can reference only the attribute configuration. Module-to-attribute mapping is as follows:
Value domain, Nullable, Empty string allowed, Unique value use built-in content quality monitoring. Enable the Asset Quality module for monitoring to take effect.
Data classification and Data grading use built-in asset security monitoring. Enable the Asset Security module for monitoring to take effect.
For attributes referencing system public attributes, you can choose whether to auto-add corresponding monitoring. The system generates validation details based on the attribute value and meaning. Modify the configuration as needed. Clear the monitoring checkbox if you do not need compliance auditing.
Note: The monitoring checkbox next to each attribute corresponds to a rule in the monitoring configuration list below.
Business information
Standard set and directory
Default standard set name.
Effective time
Set the standard’s effective time.
Permanent: Effective indefinitely.
Custom: Effective for a specified period. After the period ends, the standard becomes Out Of Effect. To continue using it, update the effective time and republish.
Owner
Select the standard’s owner. The owner must be a maintainer or member of the standard set. Owners can edit and delete the standard.
Description
Custom description. Maximum 256 characters.
Bid Failure Monitoring Configuration
Monitoring rules include metadata monitoring and content quality monitoring inherited from system attributes, plus custom quality monitoring rules. See Metadata monitoring and Content quality monitoring.Create rules.See Quality monitoring rule configuration. Click the
 button to view monitoring configuration details.
Monitoring rule configuration
If you purchased the Asset Quality module, you can add custom quality monitoring, such as Field uniqueness validation. After configuration, all asset objects mapped to this standard can quickly reference this monitoring on the quality rule configuration page. This ensures compliance with data standard constraints and enables bulk quality rule creation. Each data standard supports up to 100 monitoring rules. You can view, edit, and delete monitoring rules.
When creating Dataphin table quality rules, reference these monitoring rules to quickly generate quality rules in bulk.
On the standard mapping relationships page, quickly reference the monitoring configured here for each valid mapping and generate corresponding quality monitoring rules.
NoteIf you delete a quality monitoring rule, referenced quality rules become incomplete. Proceed with caution.
If you modify a quality monitoring rule, referenced quality rules update automatically. Custom configurations remain unchanged.
Referencing public attributes with monitoring adds corresponding rules automatically, such as metadata monitoring.
Editing capabilities vary across features that generate quality rules. See Quality rule editing instructions.
AI mapping configuration
Detection Features
After configuring detection features for the standard, the system recommends mapping relationships between standards and asset objects during compliance mapping. It uses defined feature expressions, data content, and object descriptions. This reduces manual configuration effort. Select up to 20 features. Features are combined with OR logic.
Click the View icon next to a feature to view details in the View feature details dialog box.
Association information
Associated standards
View associated data standard information, including standard name, code, directory & standard set, owner, and relationship details.
Add associated standard: Click Add. In the Add associated standard dialog box, associate data standards. Add up to 50 standards. Click OK to add to the list. Click Save or Save and publish at the bottom to save successfully.
View standard: Click the standard name to view basic information, monitoring rules, and historical version details in the View standard panel.
Remove associated standard: Click the Delete icon in the Actions column to remove the association.
Associated lookup tables
View associated lookup table information, including table name, code, owner, and relationship details.
View lookup table: Click the table name or the View icon in the Actions column to view table details and references.
Edit associated lookup table: Lookup tables are generated automatically from configured standard attribute values. Update the attribute values to update the associated lookup table.
Associated documents
View associated standard document information, including document name, description, directory, and creator.
Add associated document: Click Add. In the Add associated document dialog box, associate documents. Add up to 50 documents. Click OK to add to the list. Click Save or Save and publish at the bottom to save successfully.
Preview document: Preview PDF documents online.
Download document: Download standard documents to your local device.
Remove associated document: Click the Delete icon in the Actions column to remove the association.
Click Save to view the configuration in the standard list.
Click Save and publish. In the Submit for publishing standard dialog box, enter Approval notes as reference information. Click OK to publish the standard to production.
Quality monitoring rule configuration
Parameter | Description | |
Basic information | Rule name | Customize the rule name per business needs. Maximum 128 characters. |
Description | Customize the quality rule description. Maximum 128 characters. | |
Template source | System template: Built-in parameters are configurable. Suitable for general rules. Custom template: Predefined parameters require no configuration. Used for rules with business logic. | |
Rule template | Rule templates include Completeness, Uniqueness, Validity, and Stability.
See Template type description for details. | |
Rule configuration | Configure monitoring rule details. If the rule validates fields, the system selects fields or metrics automatically based on standard mappings. Do not configure fields here. See Table parameter configuration. Note: Rule configuration supports changes only in data standards. After referencing the rule on the Quality page, you cannot change the rule configuration. You can change the rule name, strength, scheduling configuration, and status. You can run and test the rule. | |
Validation configuration | Validation configuration varies by template. See Validation configuration description. Note: Validation configuration supports changes only in data standards. After referencing the rule on the Quality page, you cannot change the validation configuration. | |