The Hive output component writes data to a Hive data source. When you synchronize data from other data sources to Hive, configure the Hive output component after configuring the source data source.
Limits
The Hive output component supports writing data to Hive tables in the following file formats: orc, parquet, text, Hudi, Iceberg, and Paimon. The Hudi format is supported only for Hive compute sources or data sources on Cloudera Data Platform 7.x. The Iceberg and Paimon formats are supported only for Hive compute sources or data sources on E-MapReduce 5.x. The component does not support data integration for ORC transactional tables or Kudu tables.
For Kudu table data integration, use the Impala output component. For more information, see Configure the Impala output component.
Prerequisites
You have created a Hive data source. For more information, see Create a Hive data source.
The account used to configure the Hive output component properties must have read-through permission on the data source. If you do not have this permission, you can request data source permissions. For more information, see Apply for, Renew, and Return Data Source Permissions.
Procedure
On the Dataphin home page, in the top menu bar, choose Developer > Data Integration.
On the integration page, in the top menu bar, select a Project. If you are in Dev-Prod mode, also select an Environment.
In the left navigation pane, click Batch Pipeline. In the Batch Pipeline list, click the batch pipeline that you want to develop to open its configuration page.
In the upper-right corner of the page, click Component Library to open the Component Library panel.
In the left navigation pane of the Component Library panel, select Outputs. Find the Hive component in the list of output components and drag it to the canvas.
Click and drag the
 icon of the target input, transform, or flow widget to connect it to the current Hive Outputs widget.
Click the
 icon on the Hive output component card to open the Hive Output Configuration dialog box.
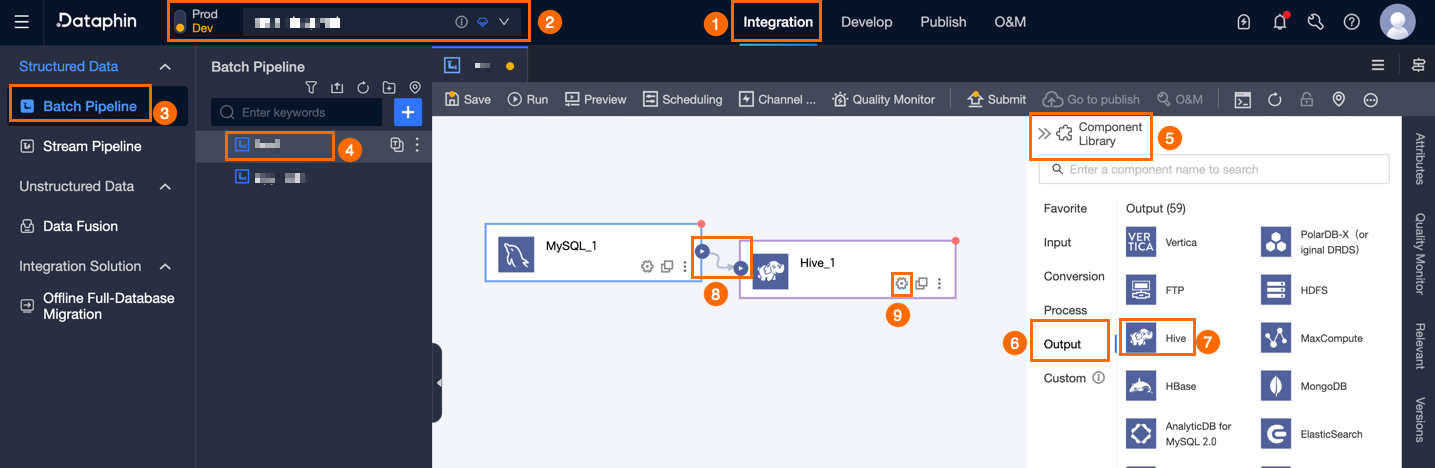
In the Hive Output Configuration dialog box, set the parameters.
The parameters differ for Hive tables and Hudi tables.
Output target table is a Hive table
Parameter
Description
Basic Settings
Step Name
The name of the Hive output component. Dataphin automatically generates a name, which you can change. The naming convention is as follows:
The name can contain Chinese characters, letters, underscores (_), and digits.
The name can be up to 64 characters long.
Datasource
Lists all Hive data sources, regardless of whether you have sync write permission. Click the
 icon to copy the current data source name.
For data sources without write-through permission, you can click Apply next to the data source to request write-through permission for the data source. For detailed steps, see Apply for, Renew, and Return Data Source Permissions.
If you do not have a Hive data source, click New Data Source to create one. For more information, see Create a Hive data source.
Table
Select a destination table (Hive table) for the output data. You can search by entering a table name keyword, or enter the exact table name and then click Exact Search. After you select a table, the system automatically checks the table status. Click the
 icon to copy the name of the currently selected table.
If the target table for data synchronization does not exist in the Hive data source, you can use the one-click table creation feature to quickly create it. Follow these steps:
Click One-click table creation. Dataphin automatically generates the code to create the target table. This includes the target table name, which defaults to the source table name, and field types, which are based on a preliminary conversion of Dataphin fields.
Set Data lake table format to None or Iceberg.
NoteYou can select Iceberg only if the data lake table format is enabled for the selected data source or the compute source used by the current project, and the format is set to Iceberg.
Set Execution engine to Hive or Spark.
NoteYou can select an execution engine only when Data lake table format is set to Iceberg. If Spark is configured for the selected data source, Spark is displayed and selected by default. Otherwise, only Hive is displayed and selected.
The DDL statement is automatically generated based on the selected data lake table format and execution engine. You can modify the statement. When you are finished, click Create. After the target table is created, Dataphin automatically uses it as the output target.
NoteIf a table with the same name exists in the development environment, Dataphin reports an error that the table already exists.
If there are no matching items, you can still perform data integration by manually entering a table name.
Policy for missing production table
The policy to apply if the production table does not exist. You can select Do nothing or Automatic creation. The default is Automatic creation. If you select Do nothing, the table is not created when the node is published. If you select Automatic creation, a table with the same name is created in the target environment when the node is published.
Do nothing: If the target table does not exist, a message prompts you that the table does not exist when you submit the node, but you can still publish it. In this case, you must create the target table in the production environment before you can run the node.
Automatic creation: Click Edit DDL Statement. The DDL statement for the selected table is automatically filled in, and you can adjust it. Use the
${table_name}placeholder for the table name in the DDL statement. This is the only supported placeholder. It is replaced with the actual table name at runtime.If the target table does not exist, the system first tries to create it using the DDL statement. If the table creation fails, the pre-publish check fails. You can modify the DDL statement based on the error message and try to publish the node again. If the target table already exists, the DDL statement is not executed.
NoteThis parameter is supported only in projects that use the Dev-Prod mode.
File encoding
Select the encoding for files stored in Hive. File Encoding includes UTF-8 and GBK.
Loading Policy
The strategy for writing data to the target Hive data source. Load policies include Overwrite All Data, Append Data, and Overwrite Only Data Written By Integration Tasks. The applicable scenarios are as follows:
Overwrite all data: Deletes all data from the target table or partition, and then adds new data files prefixed with the table name.
Append data: Appends data directly to the target table.
Overwrite only data written by the integration node: Deletes data files that are prefixed with the table name from the target table or partition. Data written by other means, such as SQL statements, is not deleted.
NULL value replacement (optional)
This parameter is supported only for source tables in the
textfiledata storage format. Enter the string to replace withNULL. For example, if you enter\N, the system replaces the string\NwithNULL.Field separator (optional)
This parameter is supported only for source tables in the
textfiledata storage format. Enter the separator between fields. If you leave this blank, the system uses\u0001as the separator by default.Compression Format (optional)
The compression format for the files. The available formats depend on the data storage format in Hive:
If the data storage format is orc, you can select zlib or snappy.
If the data storage format is parquet, you can select snappy or gzip.
If the data storage format is textfile, you can select gzip, bzip2, lzo, lzo_deflate, hadoop-snappy, or zlib.
Field separator handling (optional)
This parameter is supported only for output tables in the
textfiledata storage format. If your data contains the default or a custom field separator, you can configure a Field separator handling policy to prevent data writing errors. You can select Keep, Remove, or Replace with.Row delimiter handling (optional)
This parameter is supported only for output tables in the
textfiledata storage format. If your data contains the default or a custom row delimiter, you can configure a Row delimiter handling policy to prevent data writing errors. The default row delimiter is\n. If your data contains line feed characters such as\ror\n, select a handling policy to prevent errors. You can select Keep, Remove, or Replace with.Hadoop parameter settings (optional)
Used to adjust write parameters. You can enter different parameters for different table types. Separate multiple parameters with commas (,), in the format
{"key1":"value1", "key2":"value2"}. For example, for an ORC output table with many fields, you can adjust the{"hive.exec.orc.default.buffer.size"}parameter based on the available memory. If you have enough memory, try increasing this value to improve write performance. If you are out of memory, try decreasing this value to reduce garbage collection (GC) time and improve write performance. The default value is 16384 bytes (16 KB). We recommend that you do not exceed 262144 bytes (256 KB).Partition
If the selected target table is a partitioned table, you must enter partition information. For example,
state_date=20190101. You can also use parameters to write data incrementally every day. For example,state_date=${bizdate}.Preparation statements (optional)
An SQL script to run on the database before data import.
For example, to ensure continuous service availability, you can create a target table Target_A before this step runs. The step writes data to Target_A. After the step finishes, you can rename the existing service table Service_B to Temp_C, rename Target_A to Service_B, and then delete Temp_C.
Completion statements (optional)
An SQL script to run on the database after data import.
Field mapping
Input fields
Displays the input fields based on the output of the upstream component.
Output fields
The output fields area displays all fields of the selected table.
ImportantTo ensure that data is written to Hive without errors, all output fields must be mapped to input fields.
Mapping
You can manually select the field mapping based on the upstream input and the fields of the target table. Mapping includes Same-row Mapping and Same-name Mapping.
Map by name: Maps fields that have the same name.
Map by row: Maps data between fields in the same row, even if the field names in the source and target tables are different. Only fields in the same row are mapped.
Output target table is a Hudi table
Parameter
Description
Basic Settings
Step Name
The name of the Hive output component. Dataphin automatically generates a name, which you can change. The naming convention is as follows:
The name can contain Chinese characters, letters, underscores (_), and digits.
The name can be up to 64 characters long.
Datasource
Lists all Hive data sources, regardless of whether you have sync write permission. Click the
icon to copy the current data source name.For data sources without write-through permissions, you can click Apply next to the data source to request write-through permissions. For detailed instructions, see Apply for, Renew, and Return Data Source Permissions.
If you do not have a Hive data source, click Create Data Source to create one. For detailed instructions, see Create a Hive Data Source.
Table
Select the target table (Hudi table) for output data. You can enter a keyword to search for tables, or enter the exact table name and click Exact Search. After you select a table, the system automatically performs a table status check. Click the
icon to copy the name of the current table.If the target table for data synchronization does not exist in the Hive data source, you can use the one-click table creation feature to quickly create it. Follow these steps:
Click One-click table creation. Dataphin automatically generates the code to create the target table. This includes the target table name, which defaults to the source table name, and field types, which are based on a preliminary conversion of Dataphin fields.
Set Data lake table format to Hudi.
Hudi Table Type: You can select MOR (merge On Read) or COW (copy On Write). The default is MOR (merge on read).
Primary Key Field (Optional): Enter the primary key fields. Separate multiple fields with a comma (,).
Extended Properties (optional): Enter configuration properties supported by Hudi in the format
k=v.NoteIf a table with the same name exists in the development environment, Dataphin reports an error that the table already exists when you click Create.
If there are no matching items, you can still perform data integration by manually entering a table name.
Set Execution engine to Hive or Spark.
NoteYou can select an execution engine only when Data lake table format is set to Hudi. The default execution engine is Hive. If Spark is enabled for the selected data source, you can select Spark.
The DDL statement is automatically generated based on the selected data lake table format and execution engine. You can modify the statement. When you are finished, click Create.
Policy for missing production table
The policy to apply if the production table does not exist. You can select Do nothing or Automatic creation. The default is Automatic creation. If you select Do nothing, the table is not created when the node is published. If you select Automatic creation, a table with the same name is created in the target environment when the node is published.
Do nothing: If the target table does not exist, a message prompts you that the table does not exist when you submit the node, but you can still publish it. In this case, you must create the target table in the production environment before you can run the node.
Automatic creation: Click Edit DDL Statement. The DDL statement for the selected table is automatically filled in, and you can adjust it. Use the
${table_name}placeholder for the table name in the DDL statement. This is the only supported placeholder. It is replaced with the actual table name at runtime.If the target table does not exist, the system first tries to create it using the DDL statement. If the table creation fails, the pre-publish check fails. You can modify the DDL statement based on the error message and try to publish the node again. If the target table already exists, the DDL statement is not executed.
NoteThis parameter is supported only in projects that use the Dev-Prod mode.
Partition
If the selected target table is a partitioned table, you must enter partition information. For example,
state_date=20190101. You can also use parameters to write data incrementally every day. For example,state_date=${bizdate}.Loading Policy
The policy for writing data to the target Hive data source. Options include Overwrite data, Append data, and Update data.
Overwrite data: Replaces existing data with new data.
Append data: Appends data directly to the target table.
Update data: Updates records based on the primary key. If a record does not exist, it is inserted.
NoteData written by other means, such as SQL statements, is not deleted.
BulkInsert
Enables fast, bulk synchronization of large data volumes, typically for initial data import.
NoteThis parameter is supported and enabled by default only when the loading policy is set to Append data or Overwrite data.
Batch write
Writes data to the target table in batches. After you enable this feature, also configure the Batch Ratio.
Batch ratio
The proportion of the total Java Virtual Machine (JVM) memory. The default is 0.2. You can enter a decimal value between 0.01 and 0.50.
Hadoop parameter settings (optional)
Used to adjust write parameters. You can enter different parameters for different table types. Separate multiple parameters with commas (,), in the format
{"key1":"value1", "key2":"value2"}. You can use the{"hoodie.parquet.compression.codec":"snappy"}parameter to change the compression format to snappy.Field mapping
Input fields
Displays the input fields based on the output of the upstream component.
Output fields
The output fields area displays all fields of the selected table.
NoteYou do not need to map all fields for Hudi tables.
Mapping
You can manually select field mappings based on the upstream input and the fields of the target table. Mapping includes Same-row Mapping and Same-name Mapping.
Map by name: Maps fields that have the same name.
Map by row: Maps data between fields in the same row, even if the field names in the source and target tables are different. Only fields in the same row are mapped.
Output target table is a Paimon table
Parameter
Description
Basic Settings
Step Name
The name of the Hive output component. Dataphin automatically generates a name, which you can change. The naming convention is as follows:
The name can contain Chinese characters, letters, underscores (_), and digits.
The name can be up to 64 characters long.
Datasource
Lists all Hive data sources, regardless of whether you have sync write permission. Click the
icon to copy the current data source name.For a data source without write-through permission, you can click Request next to it to apply for the permission. For more information, see Apply for, Renew, and Return Data Source Permissions.
If you do not have a Hive data source, click Create Data Source to create a data source. For more information, see Create a Hive Data Source.
Table
Select the target table (Paimon table) for output data. Enter a keyword for the table name to search, or enter the exact table name and click Exact Search. After you select a table, the system automatically checks the table status. Click the
icon to copy the name of the currently selected table.If the target table for data synchronization does not exist in the Hive data source, you can use the one-click table creation feature to quickly create it. Follow these steps:
Click One-click table creation. Dataphin automatically generates the code to create the target table. This includes the target table name, which defaults to the source table name, and field types, which are based on a preliminary conversion of Dataphin fields.
Set Data lake table format to None, Iceberg, or Paimon.
NoteYou can select Iceberg only if the data lake table format is enabled for the selected data source or the compute source used by the current project, and the format is set to Iceberg.
Set Execution engine to Hive or Spark.
NoteYou can select an execution engine only when Data lake table format is set to Iceberg or Paimon. If Spark is configured for the selected data source, Spark is displayed and selected by default. Otherwise, only Hive is displayed and selected.
For Paimon table type, you can select MOR (merge on read), COW (copy on write), or MOW (merge on write). The default is MOR.
NoteYou can configure the Paimon table type only when Data lake table format is set to Paimon.
The DDL statement is automatically generated based on the selected data lake table format and execution engine. You can modify the statement. When you are finished, click Create. After the target table is created, Dataphin automatically uses it as the output target.
NoteIf a table with the same name exists in the development environment, Dataphin reports an error that the table already exists when you click Create.
If there are no matching items, you can still perform data integration by manually entering a table name.
Policy for missing production table
The policy to apply if the production table does not exist. You can select Do nothing or Automatic creation. The default is Automatic creation. If you select Do nothing, the table is not created when the node is published. If you select Automatic creation, a table with the same name is created in the target environment when the node is published.
Do nothing: If the target table does not exist, a message prompts you that the table does not exist when you submit the node, but you can still publish it. In this case, you must create the target table in the production environment before you can run the node.
Automatic creation: Click Edit DDL Statement. The DDL statement for the selected table is automatically filled in, and you can adjust it. Use the
${table_name}placeholder for the table name in the DDL statement. This is the only supported placeholder. It is replaced with the actual table name at runtime.If the target table does not exist, the system first tries to create it using the DDL statement. If the table creation fails, the pre-publish check fails. You can modify the DDL statement based on the error message and try to publish the node again. If the target table already exists, the DDL statement is not executed.
NoteThis parameter is supported only in projects that use the Dev-Prod mode.
Loading Policy
The strategy for writing data to the target Hive data source. Loading policies include Append Data, Overwrite Data, and Update Data. The applicable scenarios are described as follows:
Append data: Appends data directly to the target table.
Overwrite data: Replaces existing data with new data.
Update data: Updates records based on the primary key. If a record does not exist, it is inserted.
NULL value replacement (optional)
This parameter is supported only for source tables in the
textfiledata storage format. Enter the string to replace withNULL. For example, if you enter\N, the system replaces the string\NwithNULL.Field separator (optional)
This parameter is supported only for source tables in the
textfiledata storage format. Enter the separator between fields. If you leave this blank, the system uses\u0001as the separator by default.Field separator handling (optional)
This parameter is supported only for output tables in the
textfiledata storage format. If your data contains the default or a custom field separator, you can configure a Field separator handling policy to prevent data writing errors. You can select Keep, Remove, or Replace with.Row delimiter handling (optional)
This parameter is supported only for output tables in the
textfiledata storage format. If your data contains the default or a custom row delimiter, you can configure a Row delimiter handling policy to prevent data writing errors. The default row delimiter is\n. If your data contains line feed characters such as\ror\n, select a handling policy to prevent errors. You can select Keep, Remove, or Replace with.Hadoop parameter settings (optional)
Used to adjust write parameters. You can enter different parameters for different table types. Separate multiple parameters with commas (,), in the format
{"key1":"value1", "key2":"value2"}. For example, for an ORC output table with many fields, you can adjust the{"hive.exec.orc.default.buffer.size"}parameter based on the available memory. If you have enough memory, try increasing this value to improve write performance. If you are out of memory, try decreasing this value to reduce GC time and improve write performance. The default value is 16384 bytes (16 KB). We recommend that you do not exceed 262144 bytes (256 KB).Partition
If the selected target table is a partitioned table, you must enter partition information. For example,
state_date=20190101. You can also use parameters to write data incrementally every day. For example,state_date=${bizdate}.Field mapping
Input fields
Displays the input fields based on the output of the upstream component.
Output fields
The output fields area displays all fields of the selected table.
ImportantTo ensure that data is written to Hive without errors, all output fields must be mapped to input fields.
Mapping
You can manually select field mappings based on the upstream input and the fields of the target table. Mapping includes Same-row Mapping and Same-name Mapping.
Map by name: Maps fields that have the same name.
Map by row: Maps data between fields in the same row, even if the field names in the source and target tables are different. Only fields in the same row are mapped.
Click Confirm to complete the configuration of the Hive output component.