Alibaba Cloud Container Service for Kubernetes (ACK) is a high-performance service for managing and running containerized applications in the cloud. This tutorial walks you through deploying ACK-Cube—an online Rubik's cube game—to a managed ACK Pro cluster and exposing it to the internet.
By the end of this tutorial, you will have:
-
Created a managed ACK Pro cluster
-
Deployed the ACK-Cube application to the cluster
-
Accessed the running game from a public URL

Prerequisites
Before you begin, make sure you have:
-
An Alibaba Cloud account with the required permissions to activate ACK and create clusters
-
Completed service activation and authorization for ACK. See Quickly create an ACK managed cluster for the full setup process.
-
Reviewed the billing information for ACK clusters and associated resources
Step 1: Create a cluster
ACK's Intelligent Managed mode simplifies cluster creation—configure a few planning parameters and ACK creates a cluster that follows best practices in one click. The cluster includes an intelligent managed node pool whose lifecycle ACK manages automatically. For more information, see Create an ACK managed cluster (intelligent managed mode).
To customize detailed cluster configurations instead, see Create an ACK managed cluster.
-
Log on to the ACK consoleACK consoleACK consoleACK console. On the Clusters page, click Create Kubernetes Cluster.
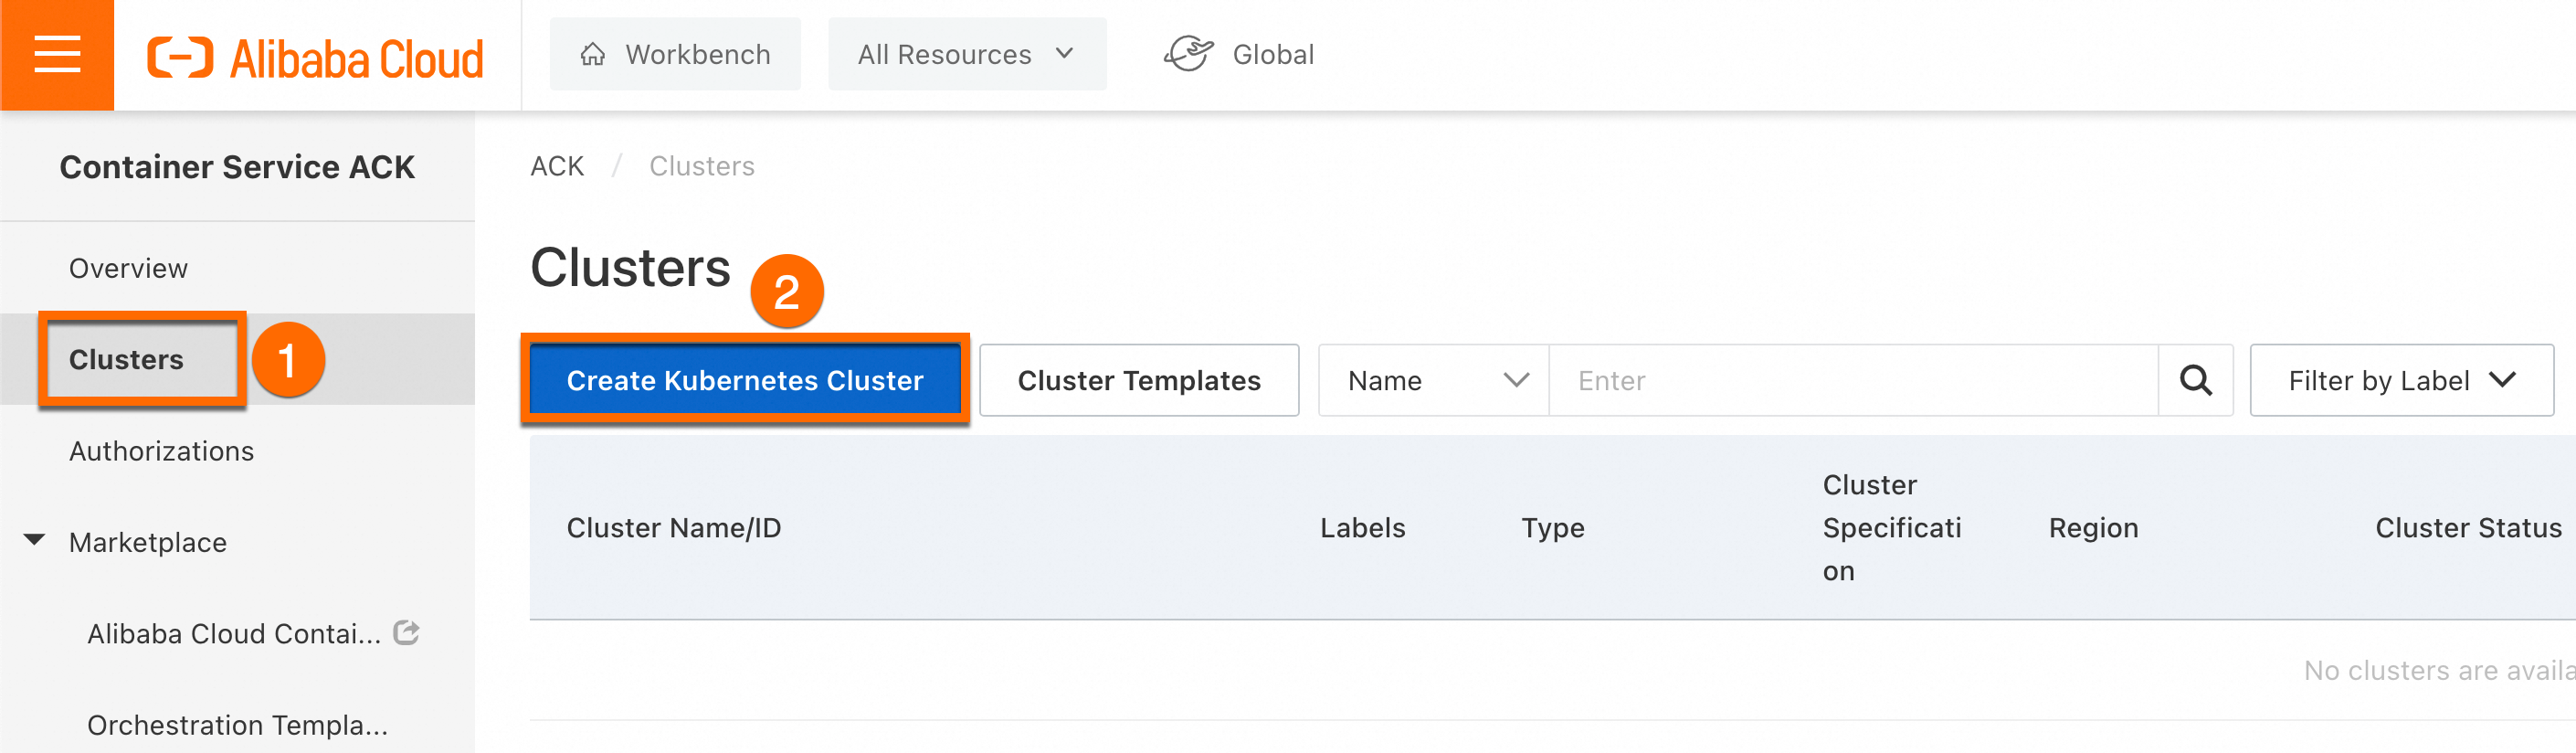
-
On the page that appears, click the ACK Managed Cluster tab and enable Intelligent Managed. To access the cluster over the internet, select Expose API Server With EIP. Click Confirm Configurations, review your selections, and click Create Cluster. Cluster creation takes a few minutes. Wait until the cluster status shows as Running before proceeding.

Step 2: Deploy the application
The ACK-Cube application uses a public container image. To pull it, the cluster must have internet access. Before deploying, choose one of the following options:
-
Enable an existing ACK cluster to access the Internet: Create an internet NAT gateway in the virtual private cloud (VPC) where the cluster is deployed. This gives all cluster resources internet access automatically.
-
Assign a static public IP address to each node in the cluster.
Then choose your deployment method:
-
Console deployment: Deploy and expose the application through the ACK console UI.
-
kubectl deployment: Connect to the cluster using CloudShell, Workbench, or a local kubectl client, then deploy using YAML manifests.
Option A: Console deployment
Deploy and expose the application
This section shows how to create a Deployment for the ACK-Cube game and expose it to the internet using a Service. For the full list of Deployment parameters, see Create a stateless application by using a Deployment.
-
On the Clusters page, click the name of your cluster (for example,
ACK-Demo). -
In the left navigation pane, choose Workloads > Deployments.
-
In the upper-right corner, click Create from Image.
-
On the Basic Information tab, set the application name to
ack-cube. -
Click Next. On the Container tab, set the following parameters:
Parameter Description Example value Image Name The container image to deploy. registry.cn-hangzhou.aliyuncs.com/acr-toolkit/ack-cube:1.0Resource Limit The maximum CPU and memory the application can consume. CPU: 1 Core, Memory: 1024 MiB. Leave Ephemeral Storage blank. Required Resources The CPU and memory reserved for the application. CPU: 0.5 Core, Memory: 512 MiB. Leave Ephemeral Storage blank. Port The container port settings. Name: ack-cube, Container Port:80, Protocol: TCP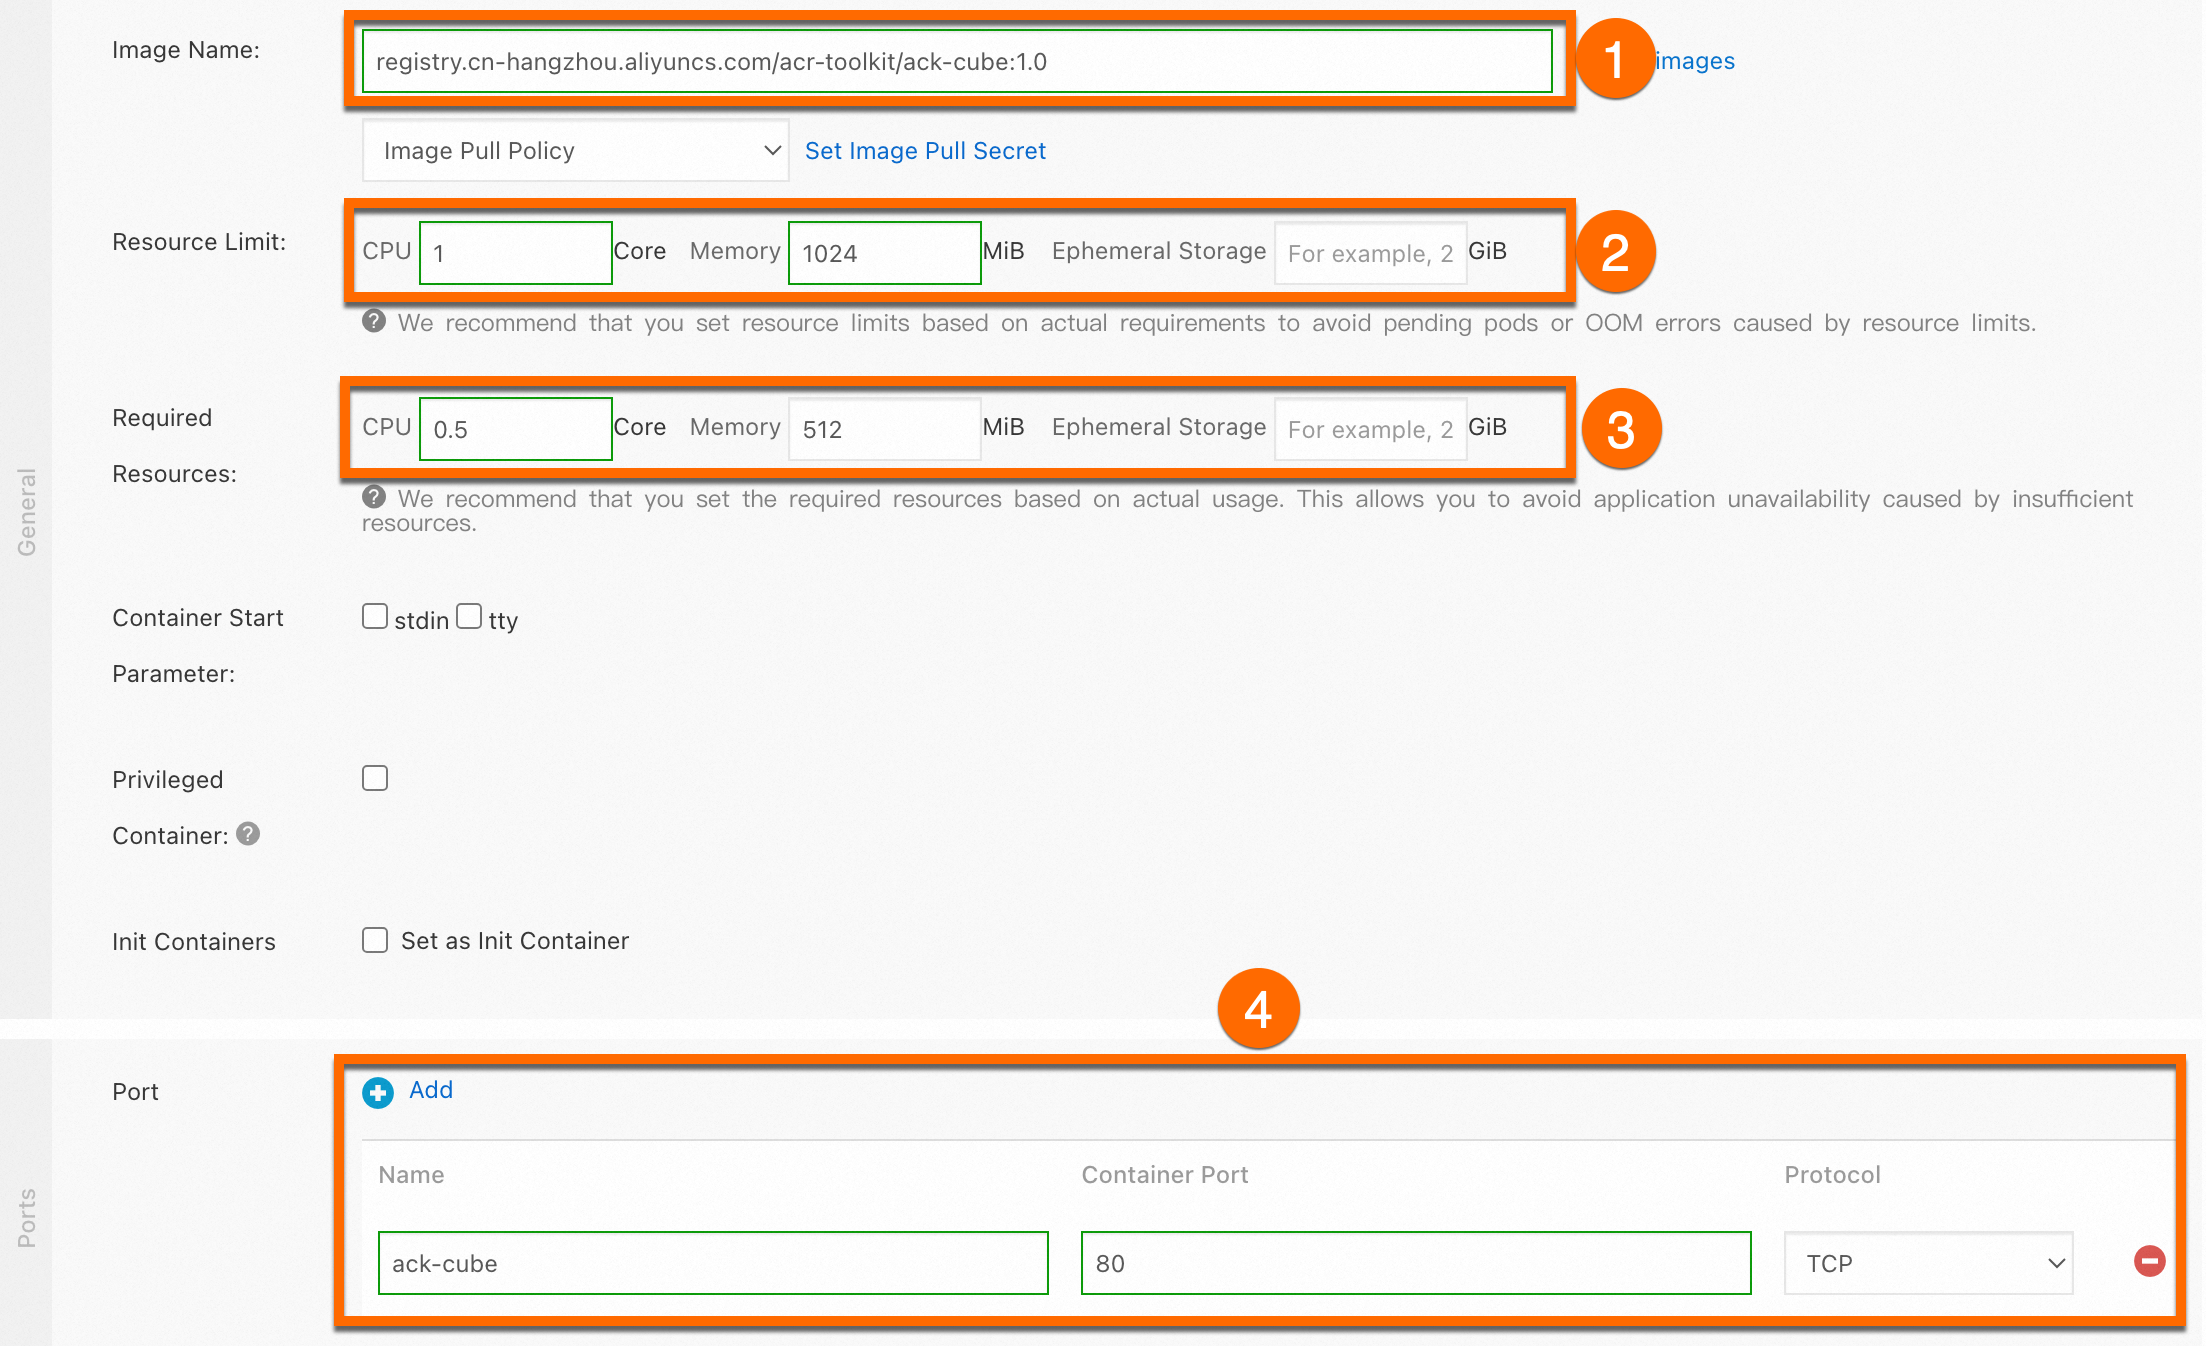
-
Click Next. On the Advanced tab, click Create in the Services section. In the Create Service dialog box, set the following parameters and click OK.
Parameter Description Example value Name The name of the Service. ack-cube-svcType How the Service is accessed. Select Server Load Balancer > Classic Load Balancer (CLB) > Create Resource. Keep the default CLB settings for this test environment. Port The Service port and container port. The container port must match the backend Pod. Service Port: 80, Container Port:80, Protocol: TCP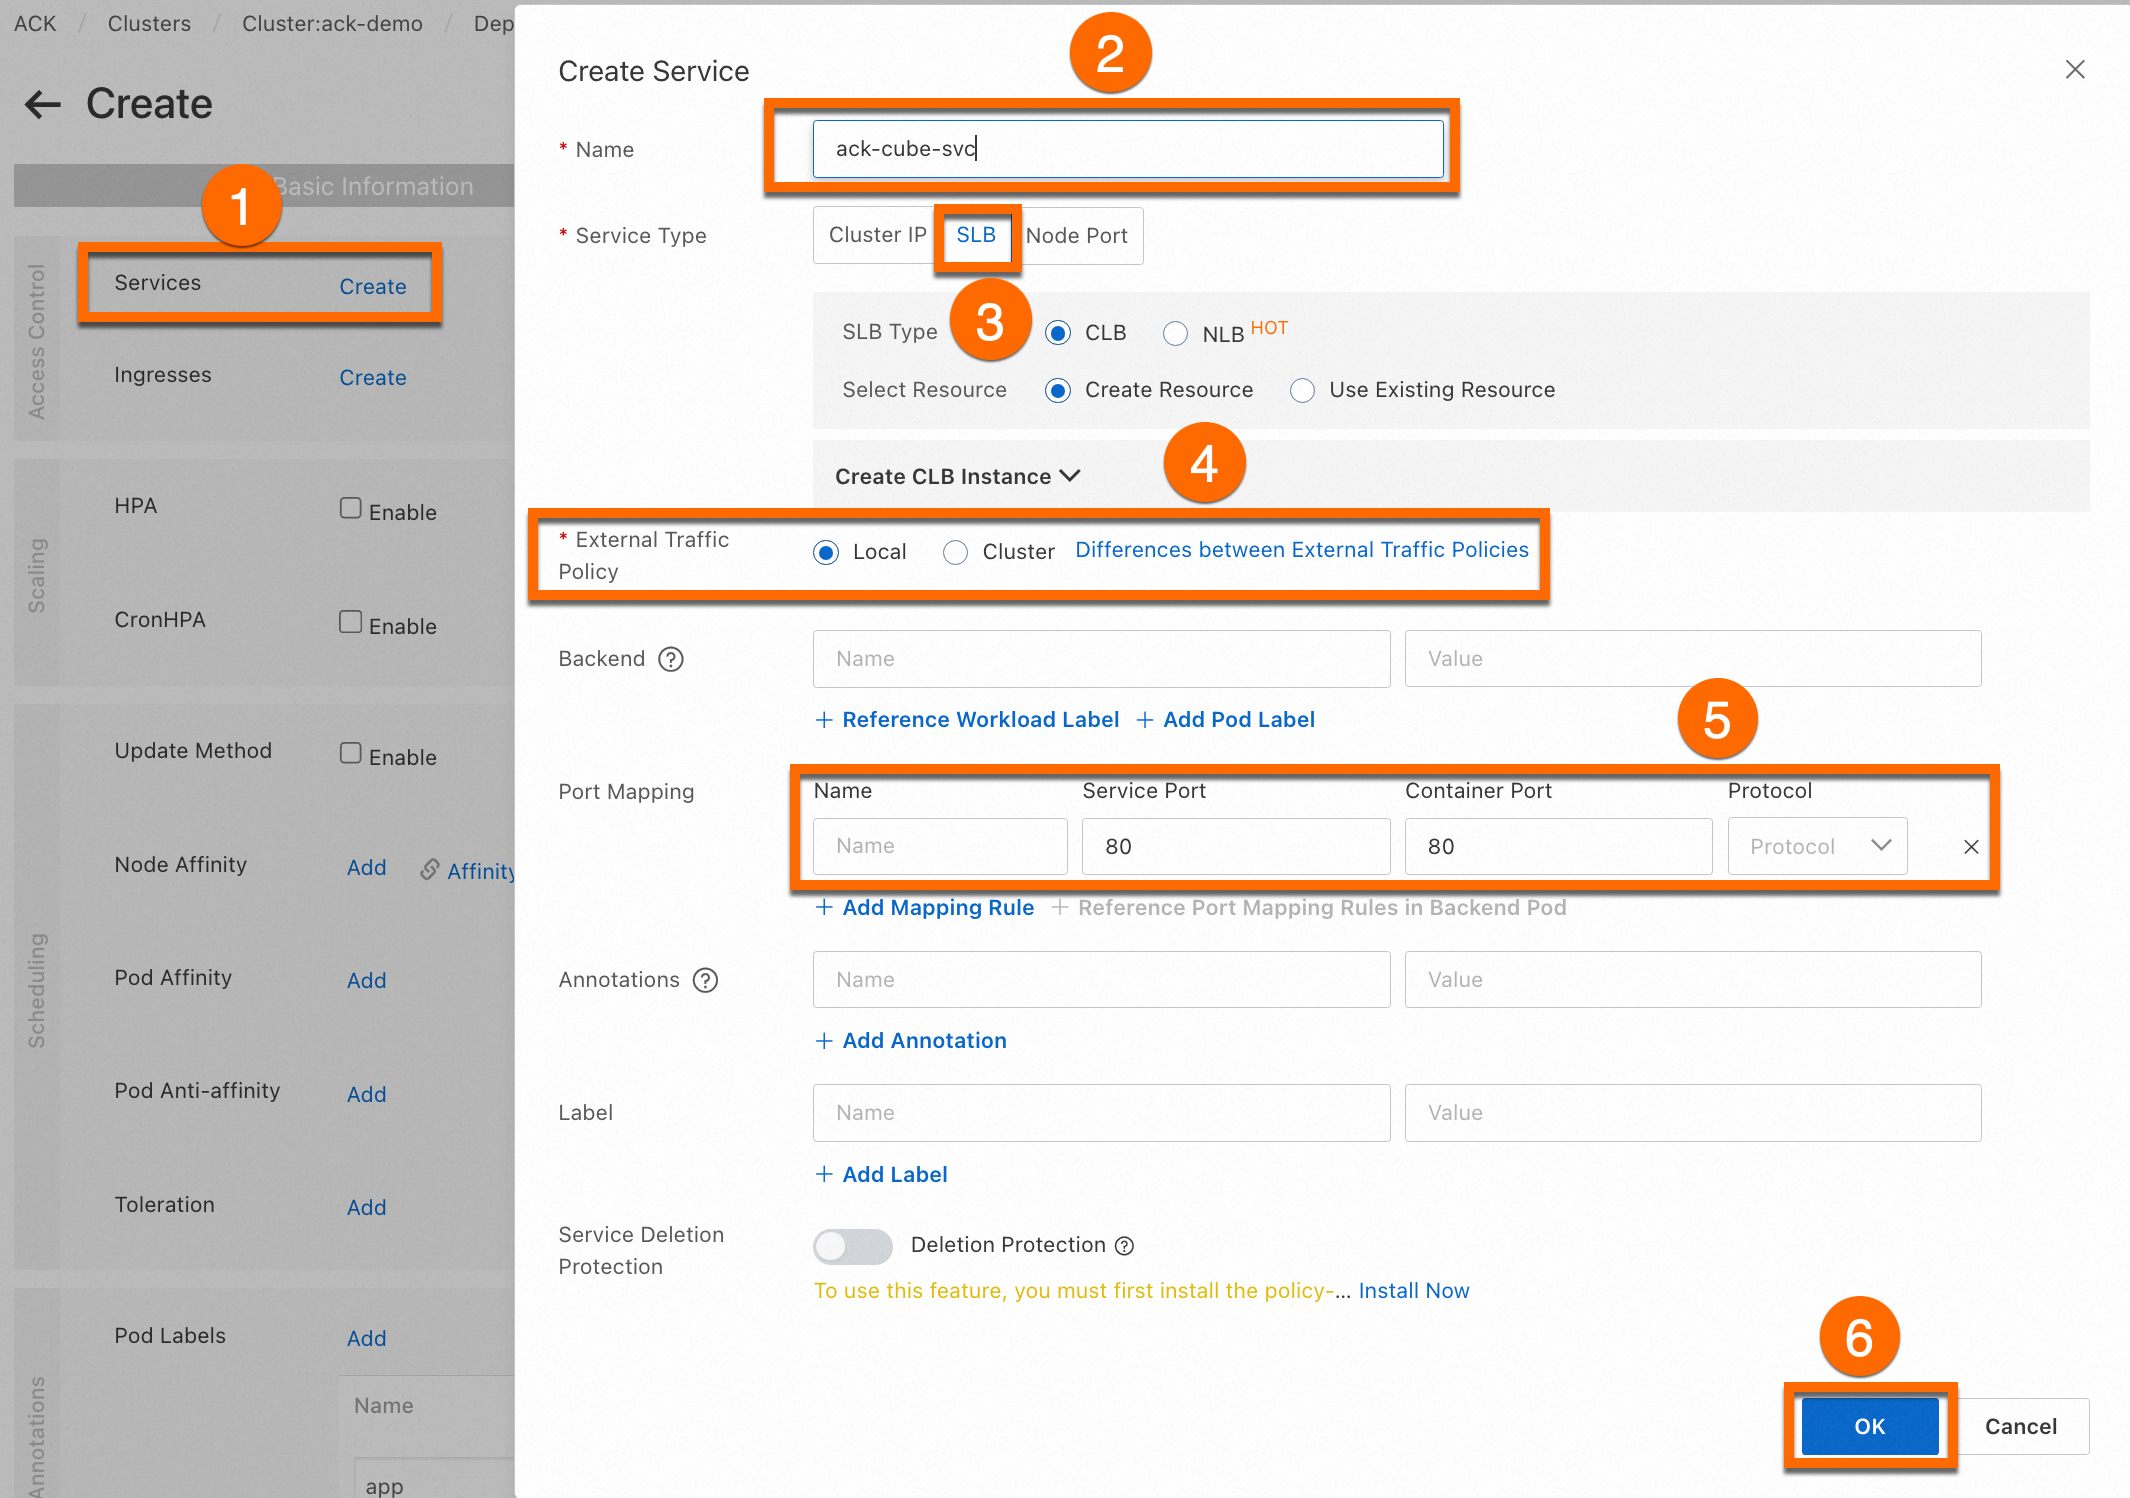
-
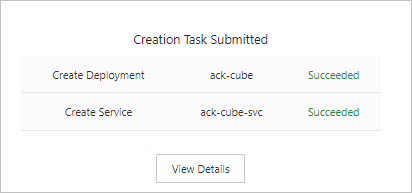
Click Create. A success page appears with the application's objects listed. Click View Details to review them.
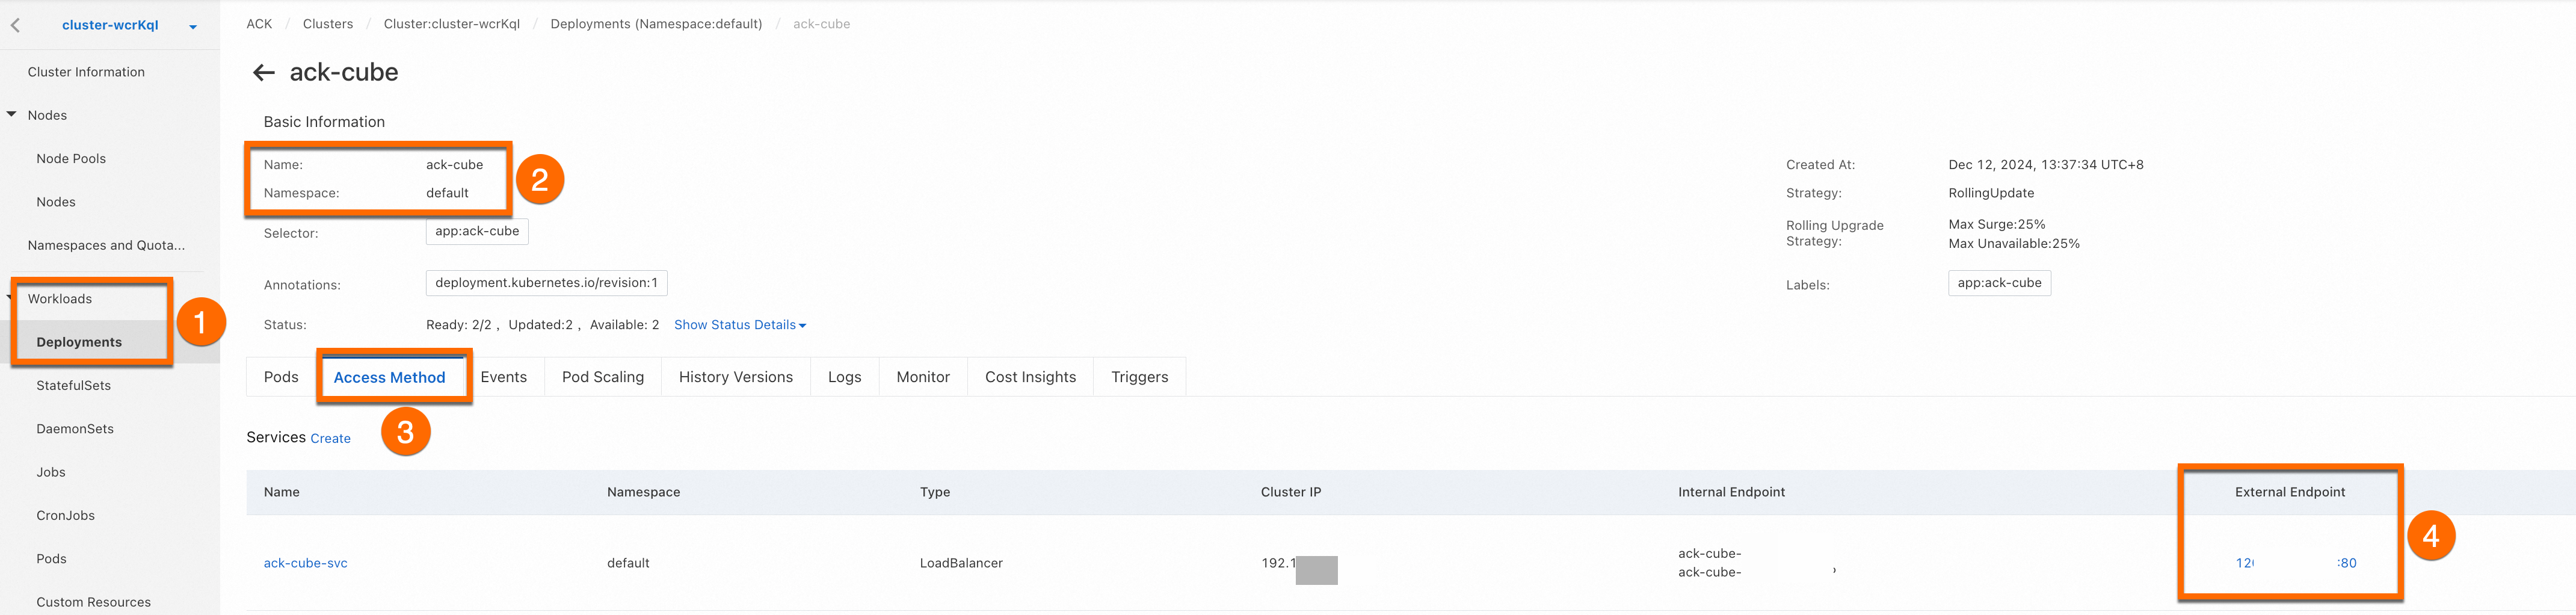
Access the application
Log on to the ACK consoleACK consoleACK consoleACK console. On the Clusters page, click your cluster name. In the left navigation pane, choose Workloads > Deployments. Find the ack-cube application in the default namespace. Click the Access Method tab, find the ack-cube-svc Service, and click the link in the External Endpoint column to open the Rubik's cube game.
Option B: kubectl deployment
Connect to the cluster
Connect to your ACK cluster using one of the following methods:
CloudShell
CloudShell provides a browser-based Linux environment with pre-installed tools at no cost. When CloudShell starts, it provisions a Linux virtual machine for you. You can use it with the CloudShell Web IDE to manage your cloud resources.
Log on to the ACK consoleACK consoleACK consoleACK console. In the left navigation pane, click your target cluster. On the Cluster Information page, choose Basic Information > Open Cloud Shell. After a few seconds, the CloudShell interface starts and kubectl is ready to use. For more information, see Use kubectl on Workbench or Cloud Shell to connect to ACK clusters.
Workbench
Workbench is a browser-based remote connection tool that requires no additional software installation.
Log on to the ACK consoleACK consoleACK consoleACK console. In the left navigation pane, click your target cluster. On the Cluster Information page, choose Basic Information > Manage Clusters Using Workbench. After a few seconds, the Workbench interface starts. For more information, see Connect to an instance by using Workbench.
kubectl client
Use a local kubectl client to connect over the internet.
-
Log on to the ACK consoleACK consoleACK consoleACK console. Click your cluster name (for example,
ACK-Demo). On the Cluster Information page, click the Connection Information tab. Copy the credentials from the Public Access tab and paste them into$HOME/.kube/config. Create the.kubedirectory andconfigfile if they don't already exist. For more information, see Obtain the kubeconfig file of a cluster and use kubectl to connect to the cluster. -
Run the following command to verify the connection:
kubectl get namespaceExpected output:
NAME              STATUS   AGE
arms-prom         Active   4h39m
default           Active   4h39m
kube-node-lease   Active   4h39m
kube-public       Active   4h39m
kube-system       Active   4h39m
Deploy and expose the application
This section explains how to use kubectl to deploy a stateless workload (a Deployment) in your ACK cluster and expose it by using a Service of the LoadBalancer type. All examples use YAML manifests applied with kubectl apply. The Deployment runs two replicas of ACK-Cube, and the Service exposes it via a LoadBalancer type that automatically provisions a Server Load Balancer (SLB) instance. For more information about exposing applications, see Use an automatically created SLB instance to expose an application.
-
Create a file named
ack-cube.yamlwith the following content:apiVersion: apps/v1 # for versions before 1.8.0 use apps/v1beta1 kind: Deployment metadata: name: ack-cube # The name of the application. labels: app: ack-cube spec: replicas: 2 # The number of replicated pods. selector: matchLabels: app: ack-cube # You must specify the same value for the selector of the Service that is used to expose the application. template: metadata: labels: app: ack-cube spec: containers: - name: ack-cube image: registry.cn-hangzhou.aliyuncs.com/acr-toolkit/ack-cube:1.0 # Replace with the address of the image that you want to use in the <image_name:tags> format. ports: - containerPort: 80 # The container port that you want to expose. resources: limits: # The resource limits. cpu: '1' memory: 1Gi requests: # The resource requests. cpu: 500m memory: 512Mi -
Deploy the application:
kubectl apply -f ack-cube.yaml -
Verify that the Deployment is running:
kubectl get deployment ack-cubeExpected output:
NAME READY UP-TO-DATE AVAILABLE AGE ack-cube 2/2 2 2 96s -
Create a file named
ack-cube-svc.yamlwith the following content. Theselectorvalue must match thematchLabelsvalue inack-cube.yaml(app: ack-cube) to associate the Service with the backend application.apiVersion: v1 kind: Service metadata: labels: app: ack-cube name: ack-cube-svc namespace: default spec: ports: - port: 80 protocol: TCP targetPort: 80 selector: app: ack-cube # You must specify the value of the matchLabels parameter in the YAML file that is used to create the Deployment. type: LoadBalancer -
Create the Service to expose the application. Creating a
LoadBalancerService automatically provisions a public-facing SLB instance.kubectl apply -f ack-cube-svc.yaml -
Confirm the Service is running and get the public IP address. This may take a minute while the SLB instance is provisioned.
kubectl get svc ack-cube-svcExpected output:
NAME TYPE CLUSTER-IP EXTERNAL-IP PORT(S) AGE ack-cube-svc LoadBalancer 172.16.72.161 47.94.xx.xx 80:31547/TCP 32s -
Enter the
EXTERNAL-IPaddress (for example,47.94.xx.xx) in your browser to access the Rubik's cube game.
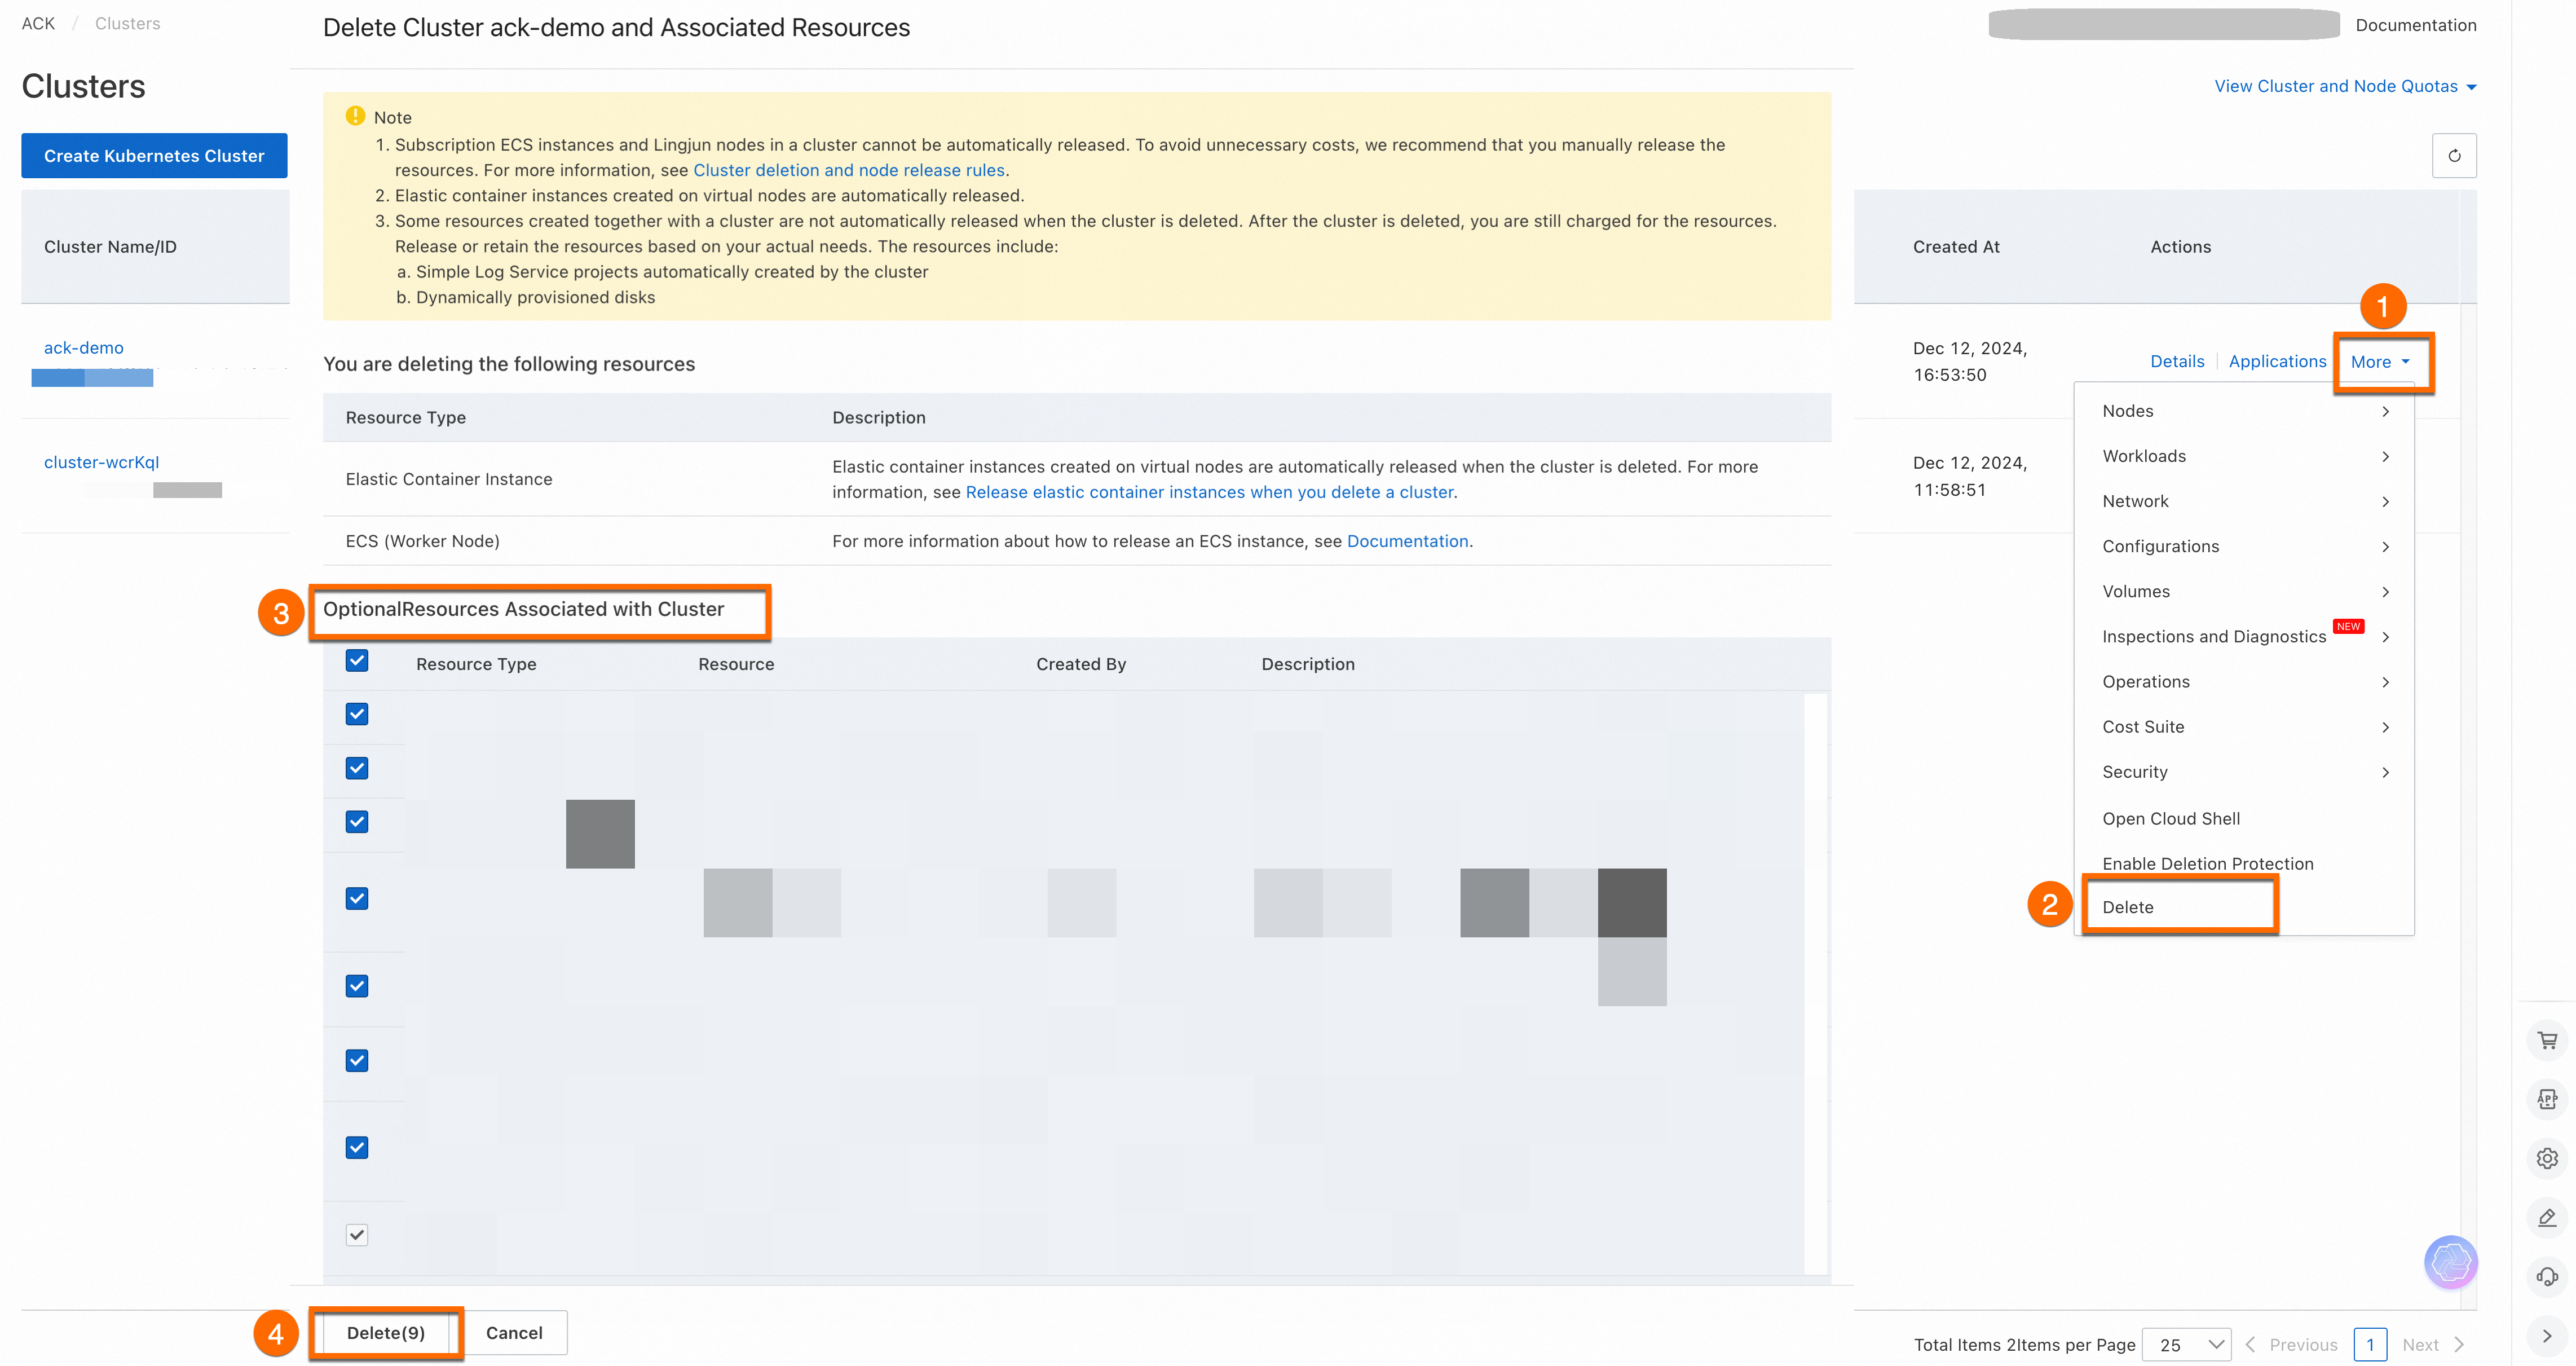
Step 3: Clean up resources (optional)
ACK cluster costs include cluster management fees charged by ACK and fees for other Alibaba Cloud resources used.
To delete the cluster, log on to the ACK consoleACK consoleACK consoleACK console. On the Clusters page, find your cluster, click More in the Actions column, and select Delete. On the Delete Cluster And Associated Resources page, select the resources to delete and click Delete. For more information, see Delete a cluster.
Intelligent Managed clusters have Deletion Protection enabled by default. Disable this feature before deleting the cluster.
What's next
-
Auto-scaling: If your workload has unpredictable or variable resource requirements—common for web applications, game services, or online education platforms—configure auto-scaling for both workloads and cluster resources. See Auto scaling overview.
-
Layer 7 routing: To manage HTTP/HTTPS routing rules across multiple services, use an Ingress instead of a Service. See Ingress management.
-
Observability: Monitor cluster infrastructure, application performance, and business metrics to track system health and diagnose issues. See Observability system overview.