Use spot instances to save costs on large model fine-tuning
To reduce model fine-tuning costs, you can use a scaling group to automatically provision spot instances. This solution ensures training continuity by automatically creating a new instance and resuming from the latest checkpoint when a spot instance is subject to interruption and reclamation.
Solution overview
This solution uses a scaling group to enable low-cost, large model fine-tuning. It employs a spot-instance-first strategy and uses Object Storage Service (OSS) to persist checkpoints. During the training process:
Prioritize spot instances: The scaling group prioritizes spot instances for training tasks and uses OSS to store checkpoint files.
When a spot instance is interrupted and reclaimed: The scaling group first attempts to provision a spot instance from available inventory in other availability zones. If spot inventory is insufficient, it automatically provisions a pay-as-you-go instance and resumes training from the latest checkpoint.
After spot inventory is restored: The scaling group automatically replaces the pay-as-you-go instance with a spot instance and resumes training from the latest checkpoint.

If you are cost-sensitive and can tolerate longer training times, you can configure the scaling group to use only spot instances. In this configuration, training is paused when spot instances are unavailable and resumes automatically when inventory is restored, maximizing your cost savings. Learn more about combining scaling groups and spot instances.
Cost comparison
The following cost comparison is for reference only. Actual savings may vary based on runtime conditions.
Assume a total training time of 12 hours, a spot instance price of 3.5/hour, and a pay-as-you-go instance price of 10/hour. The cost comparison is as follows.
Mode | Spot instances only | Hybrid (spot and pay-as-you-go) | Pay-as-you-go only |
Description | When a spot instance is interrupted and reclaimed, training pauses. A new spot instance is automatically launched to continue training after capacity is restored. | Assume that of the 12 total training hours, 8 hours are on spot instances and 4 hours are on pay-as-you-go instances due to interruptions. | All training is performed on pay-as-you-go instances. |
Cost | 12h * 3.5/h = 42 | 8h * 3.5/h + 4h * 10/h = 68 | 12h * 10/h = 120 |
Savings vs. pay-as-you-go only | 65% | 43.33% | 0% |
Procedure
Build a custom image with the base training environment.
This image serves as the launch image for instances in the scaling group. It includes a startup script that automatically resumes training, ensuring that new instances can quickly start the task and run without manual intervention.
Create and configure a scaling group.
The scaling group automatically creates new spot or pay-as-you-go instances after an interruption, ensuring the training task continues.
Start the training task.
Enabling the scaling group triggers a scale-out event, creating an instance that automatically begins the training task.
Simulate an interruption (verification).
Manually release an instance to simulate an interruption or reclamation scenario. Verify that a new instance is launched and that the training task resumes automatically to ensure stability and reliability.
1. Build a custom training image
This topic demonstrates how to perform self-cognition fine-tuning on the DeepSeek-R1-Distill-Qwen-7B model by using the Swift training framework on a single-machine, single-GPU setup.
First, create an instance with the required training environment and dependencies. Then, create a custom image from this instance to serve as the launch image for your scaling group, which improves startup efficiency. The image includes an automatic training script and a boot-start service to automate the workflow. The architecture of the ECS instance used to create this image is shown in the following figure.
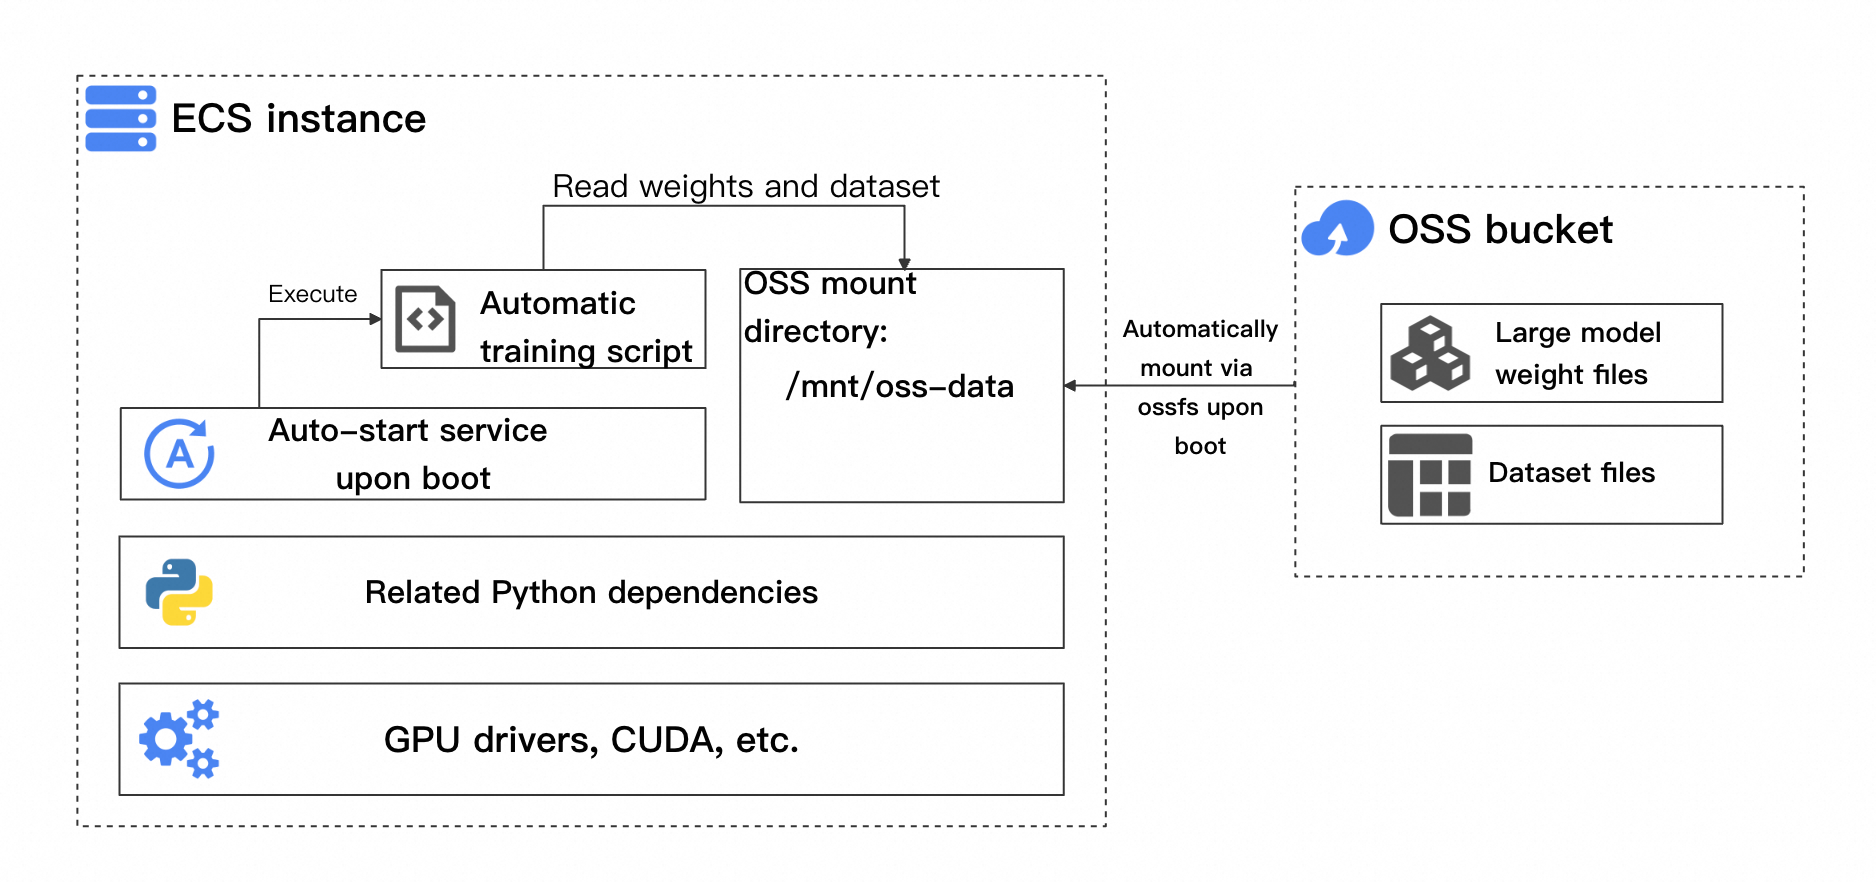
Key components include:
Base training environment dependencies: Includes the GPU driver, CUDA, and relevant Python dependencies, which vary based on the training framework.
Automatic training script: This script must automatically check whether to resume from the latest checkpoint and if training is complete.
Automatic bucket mount on startup: When the training script starts, it reads model weights, datasets, and generated checkpoint files from the OSS bucket.
Boot-start service: This service ensures that the training script runs automatically after the instance starts, reading the necessary files from the bucket to begin or continue training.
After you understand these components, follow the steps below to build the image.
1.1 Create an instance and build the environment
This instance serves as a template from which to create a custom image. Later, the scaling group will use this image to automatically create new instances.
Go to the ECS console to create a GPU instance.
First, create a pay-as-you-go GPU instance to set up the base environment. This tutorial uses an
ecs.gn7i-c8g1.2xlargeinstance in Availability Zone J of the China (Hangzhou) region. Configure the instance as follows:1. Billing Method: Pay-As-You-Go.
②:Region. China (Hangzhou).
③④: Network and Zone. Select a VPC and a vSwitch. If they do not exist, you can create them by following the on-screen instructions.
⑤⑥: Select instance type. Select
ecs.gn7i-c8g1.2xlarge.⑦⑧⑨: Images: Ubuntu 22.04 64-bit.
⑩: Auto-install GPU driver. Select the versions: CUDA version 12.4.1, Driver version 550.127.08, and CUDNN version 9.2.0.82.
⑪: . 60 GiB.
⑫⑬⑭: Assign public IPv4 address to allow the instance to access the internet and download model files. For Bandwidth Billing Method, select Pay-by-traffic. For Maximum Bandwidth, select 100 Mbps.
⑮⑯⑰: Create a new basic security group. Open at least the SSH (TCP: 22) and ICMP (IPv4) ports to allow remote connections.
⑱⑲⑳: Logon Credential. This credential is used to log on to the instance. You can select a key pair or a password. Follow the on-screen prompts to complete the configuration.
21:Instance Name. Specify a name for the instance to make it easy to remember and find. This topic uses
ess-lora-deepseek7b-templateas an example.After completing the configuration, click Confirm Order and wait for the instance to be created.
After the instance is created, connect to it and wait for the GPU driver to install.
Go to ECS console - Instances.
Find the instance you created in the previous step, and click Connect in the Actions column. Connect to the instance using Workbench and log in as prompted.
If you cannot find the instance, your current region may not match the instance's region. You can switch regions in the upper-left corner.
If the instance is stopped, refresh the page and wait for it to start.
After connecting to the instance, wait for the GPU driver to finish installing. After installation, you are prompted to reconnect.
If the interface freezes, try refreshing the page and reconnecting to the instance.
Welcome to Alibaba Cloud Elastic Compute Service !

Last login: Tue Mar 18 21:12:39 2025 from xxx
  % Total    % Received % Xferd  Average Speed   Time    Time     Current
                                 Dload  Upload   Total   Spent    Left  Speed
100    21  100    21    0     0    875      0 --:--:-- --:--:-- --:--:--   913

Driver-xxx installing, it takes 0 minutes. Remaining installation time 11 to 15 minutes!
[cuda-12.4.1. Installing, it tasks 2 to 5 minutes. Remaining installation time 9 to 12 minutes!
Install Python dependencies.
Run the following commands to install the required dependencies for training.
The Ubuntu 22.04 64-bit image used in this tutorial already includes Python 3.10, so no separate Python installation is needed.
# The Ubuntu 22.04 image includes Python 3.10, so no extra installation is needed.
python3 -m pip install --upgrade pip
# Switch to the Alibaba Cloud internal PyPI mirror.
pip config set global.index-url http://mirrors.cloud.aliyuncs.com/pypi/simple/

pip install modelscope==1.22.3
pip install openai==1.61.0
pip install tqdm==4.67.1
pip install "vllm>=0.5.1" -U
pip install "lmdeploy>=0.5,<0.6.5" -U --no-deps
pip install autoawq -U --no-deps
pip install auto_gptq optimum bitsandbytes -U
pip install ms-swift[all]
pip install timm -U
pip install deepspeed==0.14.* -U
pip install qwen_vl_utils decord librosa pyav icecream -U
While waiting for dependencies to install, you can click theicon in the upper-right corner to open a multi-terminal and proceed with Step 1.2 simultaneously.
1.2 Create and mount an OSS bucket
In this step, create a bucket in OSS and mount it as a data disk to the ECS instance. This bucket will store the model weight files, datasets, and checkpoints generated during training.
Go to the OSS console to create a bucket.
The following are key configuration parameters. Keep the default values for any unmentioned parameters.
2. Bucket. You will use this bucket name when you mount the bucket later.
3. Region. Select Region-specific. The region must be the same as the region of the ECS instance. In this example, the region is China (Hangzhou).
ECS instances can access OSS buckets in the same region over the internal network at no charge for traffic. For more information, see Access OSS resources from an ECS instance over an internal network.
Create and attach a RAM role.
A RAM role authorizes the ECS instance to access your OSS bucket. To create and attach a RAM role, follow these steps:
In the RAM console, create a RAM role. Key configuration parameters are described below.
Navigate to the Roles page of the Resource Access Management (RAM) console and click Create Role.
②: Principal type. Select Cloud Service.
③: Principal name. Select ECS. This specifies that the role will be granted to an ECS instance.
④: Click OK and set a name for the RAM role as prompted.
In the RAM console, create the following custom policy.
Go to the Policies page of the Resource Access Management (RAM) console and click Create Policy.
Select the Script Editor tab and enter the following policy script.
③: This policy grants full access to a specific bucket. The policy script is as follows.
ImportantWhen you set the policy, replace
<bucket_name>with your Bucket.{ "Version": "1", "Statement": [ { "Effect": "Allow", "Action": "oss:*", "Resource": [ "acs:oss:*:*:<bucket_name>", "acs:oss:*:*:<bucket_name>/*" ] } ] }After the configuration, click OK and set a name for the policy as prompted.
In the RAM console, grant permissions to the RAM role.
⑥: Principal. Select the RAM role that you created earlier.
⑦: Permission Policy. Select the custom policy that you created earlier.
After the configuration, click OK.
Go to the ECS console and attach the RAM role to the instance.
If you cannot find the instance, your current region may not match the instance's region. You can switch regions in the upper-left corner.
In the instance list on the ECS console, find the target instance and attach the RAM role that you created in Step 1.2 from the Actions column.
Mount the bucket to the ECS instance.
Connect to the instance created in Step 1.1 and run the following command to install the ossfs tool.
wget https://gosspublic.alicdn.com/ossfs/ossfs_1.91.5_ubuntu22.04_amd64.deb
apt-get update
DEBIAN_FRONTEND=noninteractive apt-get install gdebi-core
DEBIAN_FRONTEND=noninteractive gdebi -n ossfs_1.91.5_ubuntu22.04_amd64.deb
Run the following command to complete the mount operation. Make sure to replace the following placeholders in the command:
<bucket_name>: Replace with the Bucket of the bucket you created.<ecs_ram_role>: Replace with the name of the RAM role you created.<internal_endpoint>: Replace withoss-cn-hangzhou-internal.aliyuncs.com.ImportantThis tutorial uses a bucket in the China (Hangzhou) region, so the VPC internal endpoint is
oss-cn-hangzhou-internal.aliyuncs.com.
# Replace with your bucket name, internal endpoint, and RAM role.
BUCKET_NAME="<bucket_name>"
ECS_RAM_ROLE="<ecs_ram_role>"
INTERNAL_ENDPOINT="<internal_endpoint>"

# Bucket mount path
BUCKET_MOUNT_PATH="/mnt/oss-data"

# 1. Back up the fstab file before mounting.
cp /etc/fstab /etc/fstab.bak

# 2. Create the mount directory.
mkdir $BUCKET_MOUNT_PATH
# 3. Mount the bucket to the instance.
ossfs $BUCKET_NAME $BUCKET_MOUNT_PATH -ourl=$INTERNAL_ENDPOINT -oram_role=http://100.100.100.200/latest/meta-data/ram/security-credentials/$ECS_RAM_ROLE
# 4. Set auto-mount on startup.
echo "ossfs#$BUCKET_NAME $BUCKET_MOUNT_PATH fuse _netdev,url=http://$INTERNAL_ENDPOINT,ram_role=http://100.100.100.200/latest/meta-data/ram/security-credentials/$ECS_RAM_ROLE,allow_other 0 0" | sudo tee -a /etc/fstab
(Verification) Test if the storage space is available.
Upload any file to the OSS bucket.
In the OSS console, go to the Files page of your bucket. Click Upload File and upload a test file to verify the mount.
In the instance, run the following command to check if you can see the file from the OSS bucket in the directory.
ls /mnt/oss-data/If the file is visible, the mount was successful.
root@ixxx:~# ls /mnt/oss-data/
test.txt
1.3 Prepare the model and dataset
The model weights and dataset used in this tutorial are downloaded from the ModelScope community. After you connect to the instance, follow the steps below. Download the model and dataset to the directory where the OSS bucket is mounted and wait for the download to complete.
Download the dataset
# Bucket mount path
BUCKET_MOUNT_PATH="/mnt/oss-data"

# Download the fine-tuning dataset from the ModelScope community
# Use the modelscope tool installed in Step 1.1
modelscope download --dataset swift/self-cognition --local_dir $BUCKET_MOUNT_PATH/self-cognition
modelscope download --dataset AI-ModelScope/alpaca-gpt4-data-zh --local_dir $BUCKET_MOUNT_PATH/alpaca-gpt4-data-zh
modelscope download --dataset AI-ModelScope/alpaca-gpt4-data-en --local_dir $BUCKET_MOUNT_PATH/alpaca-gpt4-data-en
If the download progress stalls, press Enter several times.
Download the model weights
ImportantThe model weight file is large. If the download fails or you see a
please try againmessage, retry the command to resume the download.# Bucket mount path BUCKET_MOUNT_PATH="/mnt/oss-data" # Download the DeepSeek-R1-Distill-Qwen-7B model from the ModelScope community modelscope download --model deepseek-ai/DeepSeek-R1-Distill-Qwen-7B --local_dir $BUCKET_MOUNT_PATH/DeepSeek-R1-Distill-Qwen-7BIf the download progress stalls, press Enter several times.
Test the model weights
After the download is complete, you can run the following command to perform an inference test with the model and verify that the model weight file is complete.
# Bucket mount path
BUCKET_MOUNT_PATH="/mnt/oss-data"

CUDA_VISIBLE_DEVICES=0 swift infer \
    --model $BUCKET_MOUNT_PATH/DeepSeek-R1-Distill-Qwen-7B \
    --stream true \
    --infer_backend pt \
    --max_new_tokens 2048
After the model loads, you can start a conversation with the large language model. If the model weights fail to load, download them again.
[INFO:swift] Start time of running main: 2025-03-26 13:35:50.564493
[INFO:swift] request_config: RequestConfig(max_tokens=2048, temperature=None, top_k=None, top_p=None, repetition_penalty=None, num_beams=1, stop=[], seed=None, stream=True, logprobs=False, top_logprobs=None, n=1, best_of=None, presence_penalty=0.0, frequency_penalty=0.0, length_penalty=1.0)
[INFO:swift] Input 'exit' or 'quit' to exit the conversation.
[INFO:swift] Input 'multi-line' to switch to multi-line input mode.
[INFO:swift] Input 'reset-system' to reset the system and clear the history.
[INFO:swift] Input 'clear' to clear the history.
<<< Who are you?
After the test is complete, you can enter
exitto end the conversation.
1.4 Write an automatic training script
Write an automatic training script.
Run the following command to create an automatic training script and grant it executable permissions. This script automatically resumes training from the latest checkpoint and determines when training is complete.
# Create an automatic training script. cat <<EOF > /root/train.sh #!/bin/bash # Bucket mount path BUCKET_MOUNT_PATH="/mnt/oss-data" # Storage directory for model weights and datasets MODEL_PATH="\$BUCKET_MOUNT_PATH/DeepSeek-R1-Distill-Qwen-7B" DATASET_PATH="\$BUCKET_MOUNT_PATH/alpaca-gpt4-data-zh#500 \$BUCKET_MOUNT_PATH/alpaca-gpt4-data-en#500 \$BUCKET_MOUNT_PATH/self-cognition#500" # Set the output directory OUTPUT_DIR="\$BUCKET_MOUNT_PATH/output" mkdir -p "\$OUTPUT_DIR" # Logic to check if training is already complete if [ -f "\$OUTPUT_DIR/logging.jsonl" ]; then last_line=\$(tail -n 1 "\$OUTPUT_DIR/logging.jsonl") if echo "\$last_line" | grep -q "last_model_checkpoint" && echo "\$last_line" | grep -q "best_model_checkpoint"; then echo "Training already completed. Exiting." exit 0 fi fi # Initialize resume argument RESUME_ARG="" # Find the latest checkpoint LATEST_CHECKPOINT=\$(ls -dt \$OUTPUT_DIR/checkpoint-* 2>/dev/null | head -1) if [ -n "\$LATEST_CHECKPOINT" ]; then RESUME_ARG="--resume_from_checkpoint \$LATEST_CHECKPOINT" echo "Resume training from: \$LATEST_CHECKPOINT" else echo "No checkpoint found. Starting new training." fi # Start the training command CUDA_VISIBLE_DEVICES=0 swift sft \\ --model \$MODEL_PATH \\ --train_type lora \\ --dataset \$DATASET_PATH \\ --torch_dtype bfloat16 \\ --num_train_epochs 1 \\ --per_device_train_batch_size 1 \\ --per_device_eval_batch_size 1 \\ --learning_rate 1e-4 \\ --lora_rank 8 \\ --lora_alpha 32 \\ --target_modules all-linear \\ --gradient_accumulation_steps 16 \\ --eval_steps 50 \\ --save_steps 10 \\ --save_total_limit 5 \\ --logging_steps 5 \\ --max_length 2048 \\ --output_dir "\$OUTPUT_DIR" \\ --add_version False \\ --overwrite_output_dir True \\ --system 'You are a helpful assistant.' \\ --warmup_ratio 0.05 \\ --dataloader_num_workers 4 \\ --model_author swift \\ --model_name swift-robot \\ \$RESUME_ARG EOF # Grant executable permissions chmod +x /root/train.shCreate a Linux service and set it to start on boot.
Run the following command to create a service and configure the training script to start automatically on boot.
# Create log storage directory
mkdir -p /root/train-service-log

# Write the Service configuration file
cat <<EOF > /etc/systemd/system/train.service
[Unit]
Description=Train AI Model Script
After=network.target local-fs.target remote-fs.target
Requires=local-fs.target remote-fs.target

[Service]
ExecStart=/root/train.sh
WorkingDirectory=/root/
User=root
Environment="PATH=/usr/bin:/usr/local/bin"
Environment="CUDA_VISIBLE_DEVICES=0"
StandardOutput=append:/root/train-service-log/train.log
StandardError=append:/root/train-service-log/train_error.log

[Install]
WantedBy=multi-user.target
EOF

# Reload systemd configuration
systemctl daemon-reload
# Configure the train.service to start on boot
systemctl enable train.service
The command returns the following output upon completion:
Created symlink /etc/systemd/system/multi-user.target.wants/train.service → /etc/systemd/system/train.service.
1.5 Build the custom image
After completing all previous steps, create a custom image from the configured instance. This image serves as the launch image for new instances during scale-out, which eliminates the need to reinstall dependencies.
Go to the Instances page of the ECS console.
Create the image as described below.
In the instance list on the ECS console, find the target instance. In the Actions column, click More > Disks and Images > Create Custom Image. Complete the image creation as prompted.
Wait for the image to be created. This process takes about 5 minutes. You can check the creation progress on the Images page of the ECS console.
After the image is created, you can release the instance created in Step 1.1.
2. Create a scaling group
Configure a scaling group to automate instance management. The scaling group ensures that after an instance is interrupted, a new spot or pay-as-you-go instance is automatically created to continue the training task. When spot instances become available, they will automatically replace pay-as-you-go instances to save costs.
2.1 Create a scaling group
First, you need to create a scaling group. Follow these steps.
Go to the Auto Scaling console to create a scaling group.
ImportantMake sure the scaling group is in the same region as the instance created in Step 1.1.
Configure the scaling group as follows. For detailed parameter descriptions, see Parameters.
Configure the following parameters: Set Scaling Group Name to ess-lora-deepseek-7b, Type to ECS, and Source for Instance Configuration to Existing instance. Set Min. Instances to 0, Max. Instances to 1, and keep the Default Cooldown Time at 300 seconds.
ImportantWhen you select a VPC and vSwitch at ⑤⑥, we recommend that you select vSwitches in multiple availability zones. This allows the scaling group to provision resources across zones, increasing the probability of successfully creating spot instances.
ImportantIf you want to maximize cost savings by using only spot instances for training, you must disable both Use Pay-as-you-go Instances to Supplement Spot Capacity and Replace Pay-as-you-go Instances with Spot Instances.
After the configuration, click Create. You can then proceed to create a scaling configuration as prompted.
2.2 Create a scaling configuration
A scaling configuration defines the specifications, image, and other information for instances in a scaling group. After you configure it, the scaling group automatically creates new instances based on these settings. On the Create Scaling Configuration page, complete the following configurations:
1. Scaling Configuration Name: ②: Billing Method: Spot Instance. |
③ and ④: Image. Select Custom Images, and then select the custom image that you created in Step 1.5. ⑤: Instance Configuration Mode. Select Specify Instance Type. 6. Instance Usage Duration. Select 1 Hour. After the instance runs for one hour, the system starts to check whether to interrupt and reclaim the instance. If you select No Specified Usage Duration, you can use spot instances at a lower cost, but they have a higher probability of interruption. This may lead to the instance being reclaimed before a valid checkpoint can be created, which slows down training progress. For more information about the differences between these two options, see Use spot instances in scaling groups to reduce costs. ⑦: Highest price per instance. Select Use Automatic Bid to automatically bid based on the market price. 8. Select an instance type. Select the instance type that you set when you created the instance in Step 1.1, which is |
9. Security Group. Select the security group that you configured when you created the instance in Step 1.1. This tutorial is an offline training solution, so no public IP address needs to be assigned. |
⑩: Logon Credential. Select Use Predefined Password. |
⑪⑫⑬: . Select the RAM role created in Step 1.2. When the scaling group automatically creates instances, this RAM role will be automatically attached to the new instances. |
After you click Create, you may see a prompt about insufficient scaling configuration strength. Click Continue.
After you create the scaling configuration, enable the scaling configuration and enable the scaling group as prompted.
After the scaling configuration is created successfully, click Enable Configuration in the dialog box that appears. | In the Select Scaling Configuration confirmation dialog box, click OK. | In the Enable Scaling Group confirmation dialog box, click OK to enable the scaling group. |
3. Start the training task
After the scaling group is configured, adjust the expected number of instances to 1. The steps are as follows.
Go to the scaling group details page and view the Instance Scaling Overview. The current instance counts are all 0. | Click Modify in the Instance Scaling Overview section. Enable the Expected Number of Instances switch, set the value to 1, and click OK. The scaling group will automatically create a spot instance. |
The scaling group then automatically creates a new instance and starts the training task.
The scaling group periodically checks if the number of instances in the group matches the expected number of instances. Because the current count is 0, a scale-out is automatically triggered to create a new instance.
After you adjust the expected number of instances, there may be a delay in instance creation. You can view ongoing activities on the Scaling Activities tab.
After the instance is created and started, you can find an
outputfolder in your OSS bucket. This folder stores the checkpoint files generated during training.
4. Simulate an interruption (verification)
After the instance starts the training task, check the output directory in your OSS bucket to see if a folder such as checkpoint-10 has been created. Once a checkpoint is generated, you can manually release the training instance to simulate an interruption. The steps to manually release an instance are as follows:
Manually release the instance.
First, go to the Instances tab of the scaling group and click the Instance ID to go to the corresponding Instance Details page.
On the instance details page, click in the upper-right corner and follow the prompts to release the instance.
Check if training resumes from the latest checkpoint.
Wait for the scaling group to create a new instance. After the instance is created, connect to it and view the task log.
Go to the Instances tab of the scaling group and click the Instance ID to go to the corresponding Instance Details page.
Click Connect in the upper-right corner and connect to the instance as prompted.
Run the following command to view the model training log. This log output path was set for the boot-start service in Step 1.4.
cat /root/train-service-log/train.logAs you can see, the training task resumes from the latest checkpoint.
root@ixxx:~# cat train-service-log/train.log
Resume training from: /mnt/oss-data/output/checkpoint-10
run sh: /usr/bin/python3 /usr/local/lib/python3.10/dist-packages/xxx
  s-data/self-cognition#500 --torch_dtype bfloat16 --num_train_epochs xxx
  --eval_steps 50 --save_steps 10 --save_total_limit 5 --logging_steps xxx
  --num_workers 4 --model_author swift --model_name swift-robot --resume xxx
Next steps
Use the fine-tuned model for inference
Release resources
Recommendations for production environments
Before using this solution in production, adapt it based on your business needs and the following recommendations.
Integrate CloudMonitor for interruption handling
When applying this solution in a production environment, we recommend that you integrate CloudMonitor into your training code to detect and respond to spot instance interruption events. Saving a checkpoint five minutes before an interruption reduces progress loss when resuming training. The improved architecture is as follows:

Establish a task recovery mechanism
In this tutorial's example, training resumes automatically from the latest checkpoint without checking its validity. In a production application, it is recommended to implement an anomaly detection mechanism to rule out invalid checkpoints and automatically resume training from the latest valid one.
Improve the task completion process
You can add logic to your training code to determine when the task is complete. Upon completion, use the CLI or SDK to call the scaling group's API and change the expected number of instances to 0. The scaling group then automatically releases any excess instances, avoiding unnecessary costs.
Additionally, when the task is complete, you can report custom events to CloudMonitor. This allows you to receive notifications about the training results by email, SMS, or DingTalk chatbot.
Use a high-performance file system
When you train models with a large number of parameters, OSS can become a system bottleneck. We recommend that you use a high-throughput, low-latency file system such as CPFS as a mounted file system to improve performance.
Configure multi-AZ vSwitches for higher availability
If you configure a vSwitch in only a single availability zone, the scaling group can create instances only in that zone, which can easily lead to scale-out failures due to insufficient capacity. We recommend that you configure vSwitches in multiple availability zones. When a spot instance is reclaimed, the system automatically tries to create a new one in other zones, increasing the availability of spot instances.