On the Database Proxy page, you can view basic configurations of proxy endpoints and manage the configurations.
Prerequisites
You have created a cluster instance. For more information, see Purchase an instance.
You have created a tenant in the cluster instance. For more information, see Create a tenant.
NoteAfter a tenant is created, ApsaraDB for OceanBase automatically provides proxy services for this tenant.
View basic proxy information
Log in to the ApsaraDB for OceanBase console.
In the left-side navigation pane, click Instances.
On the Instances page, click the name of the target cluster instance to go to the Cluster Instance Workspace page.
In the left-side navigation pane, click Database Proxy.
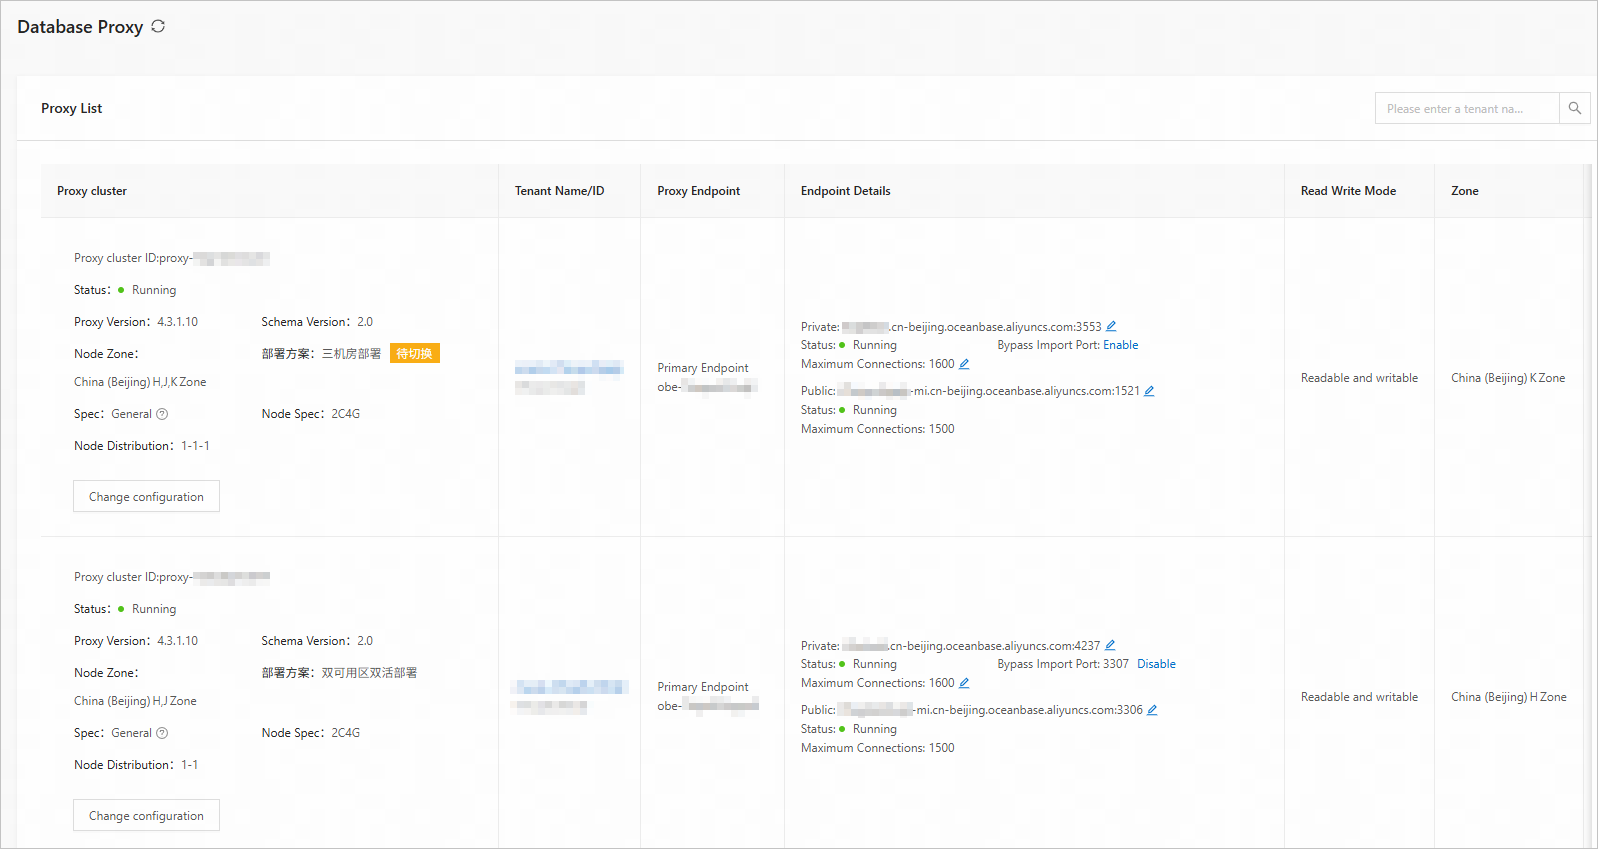
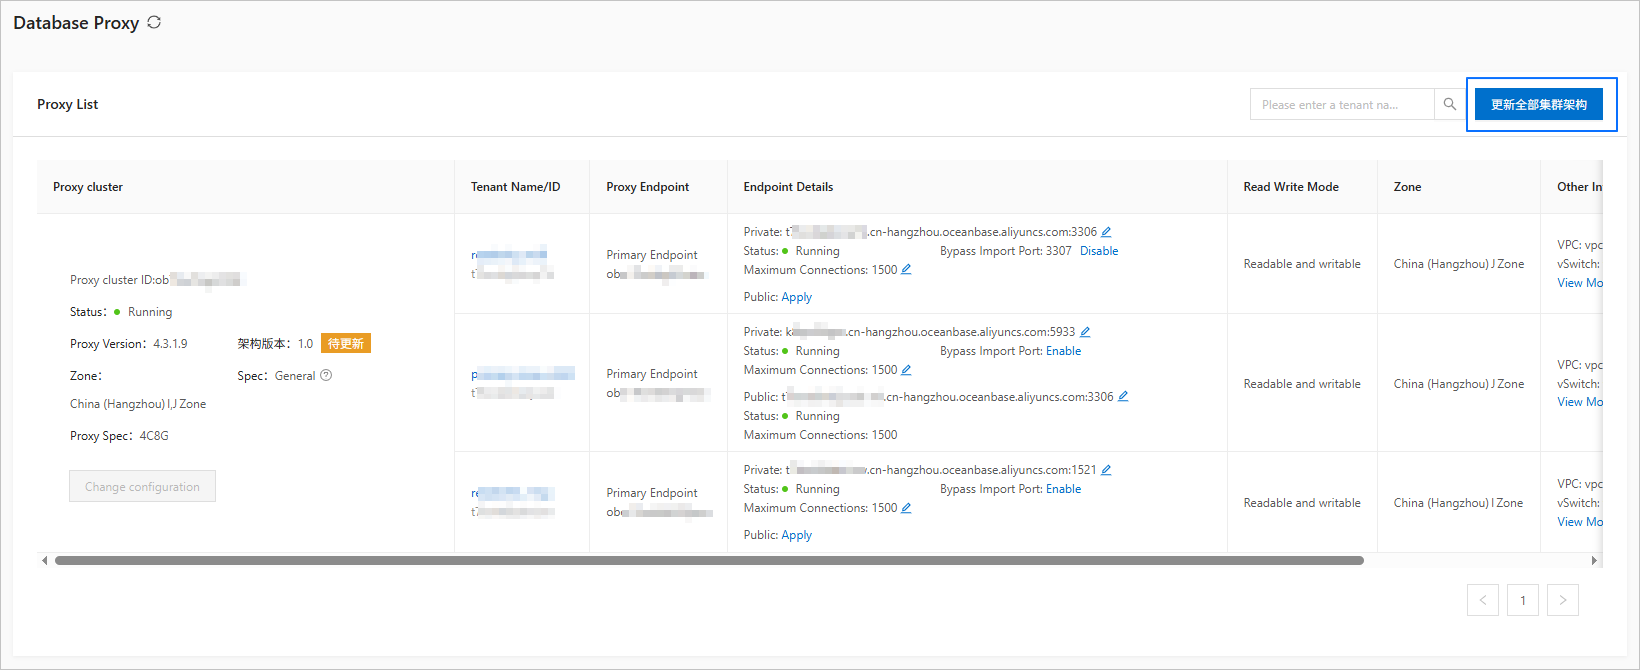
In the proxy endpoint list, you can view the basic information about tenants for which the proxy service is enabled. You can query the proxy endpoint of a specific tenant by tenant name or ID.
Parameter
Description
Proxy Cluster
The basic information about the proxy cluster. You can view the ID, status, proxy version, architecture version, zone of each node, deployment mode, specification type, node specification, and node distribution information. You can also adjust the type and specification of the proxy cluster by referring to Modify configurations.
Tenant Name/ID
The tenant name/ID corresponding to the proxy endpoint. You can click the tenant name to go to the tenant details page.
Proxy Endpoint
The type and name of the proxy endpoint. Three types of proxy endpoints are supported: primary endpoint, read/write endpoint, and read-only endpoint.
Endpoint Details
The private endpoint, public endpoint, status, maximum number of connections, and direct load port of the proxy endpoint.
Click Apply to apply for a public endpoint for the primary endpoint. For more information, see Enable a public endpoint.
Click the corresponding
 button to modify the private endpoint, public endpoint, or maximum number of connections. For more information, see Modify the maximum number of connections to a proxy endpoint.
 Click the corresponding
 button to copy the private endpoint or public endpoint.
 Click Enable to enable a direct load port for the private endpoint of the primary endpoint. For more information, see Direct load.
Read Write Mode
The read/write mode of the proxy endpoint.
The read/write mode is readable and writable for a primary endpoint, read/write splitting for a read/write endpoint, and read-only for a read-only endpoint.
Zone
The zone where the proxy endpoint is deployed.
Other Information
The VPC and characteristic information of the proxy endpoint.
Actions
You can click Configure in the Actions column of a proxy endpoint to modify the configuration of that endpoint. For more information about the parameters, see Add an endpoint.
Update all cluster architectures
Allows you to execute a task to upgrade the version of the proxy cluster architecture, for example, from V1.0 to V2.0. For more information, see Upgrade the cluster architecture version.
Upgrade the cluster architecture version
Cluster architecture version upgrade is supported only for allowlisted users. To use this feature, contact OceanBase Technical Support.
The architecture version of a database proxy cluster can be upgraded to V2.0. For more information, see Overview.
Log in to the ApsaraDB for OceanBase console.
In the left-side navigation pane, click Instances.
On the Instances page, click the name of the target cluster instance to go to the Cluster Instance Workspace page.
In the left-side navigation pane, click Database Proxy.
On the Database Proxy page, click Update all cluster architectures in the upper-right corner.
In the dialog box that appears, confirm the upgrade information and click OK.
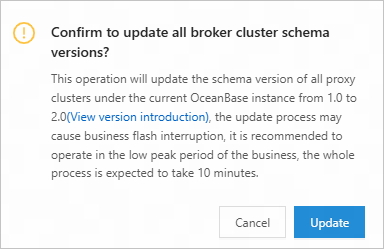
After the upgrade is completed, the architecture version is V2.0.
Modify configurations
Before you modify the configurations of a proxy cluster, you must first upgrade its architecture.
Log in to the ApsaraDB for OceanBase console.
In the left-side navigation pane, click Instances.
On the Instances page, click the name of the target cluster instance to go to the Cluster Instance Workspace page.
In the left-side navigation pane, click Database Proxy.
In the Proxy Cluster section, click Change Configuration.
Modify the proxy specification or number of proxy nodes.
Modify the proxy specification
On the Change configuration page, select Agent Specifications.
Modify the parameters.
Parameter
Description
Change object
If a proxy cluster contains multiple endpoints, you can select Current Agent Cluster or Create a new cluster for the specified address.
Current Agent Cluster: You can only modify the specification and cannot change the deployment mode.
Create a new cluster for the specified address: You can select a deployment mode and a specification. A separate proxy cluster will be created for this endpoint. The configurations of the original proxy cluster remain unchanged.
Target Spec Type
General: Your database proxy service instance shares CPU resources with other users. The specification of your database proxy service instance is allocated based on the actual size of your cluster. This specification type applies to business with stable and average traffic.
NoteWhen you modify the specification of a proxy cluster with the general specification type, if you change the deployment mode of the proxy cluster, a new free quota calculation rule applies. That is, the total number of cores of all proxy clusters with the general specification type in an OceanBase cluster is capped at a quarter of the total cores of the OceanBase cluster. The remaining quota for all proxies with the general specification type and the highest specification of a single node are displayed below the slider. You can properly allocate the resources among all the proxy clusters. For example, if the current OceanBase cluster is deployed in 2-2 mode with eight CPU cores, the quota for all proxy clusters sharing the specification in this OceanBase cluster is capped to eight CPU cores, which is calculated this way: 2 × 2 × 8/4.
Exclusive: Your database proxy service instance uses exclusive CPU resources. You can scale out the resource specification of your database proxy service instance based on business needs. This specification type is billable and applies to business with high access traffic. For more information, see Billing of database proxies.
Target Deployment Scenario
Single-AZ deployment: All nodes are deployed in the same zone to process traffic.
dual-zone dual-live deployment: Nodes are distributed in two zones to process traffic.
Dual-zone primary/standby deployment: Nodes are deployed in two zones. The primary node in one zone processes 99% of the traffic. The standby node processes 1% of the traffic.
NoteThis deployment mode is supported only for the exclusive specification type.
The three-zone deployment mode is no longer supported for proxy clusters. Only single-zone and dual-zone deployment modes are supported.
Target Node Availability Zone
The zones of the primary and standby nodes.
VPC
The VPC.
vSwitch
The vSwitch.
Target Spec
The specification of your database proxy service instance. You can adjust the specification at a step of 2C4G, which means 2 CPU cores and 4 GB of memory.
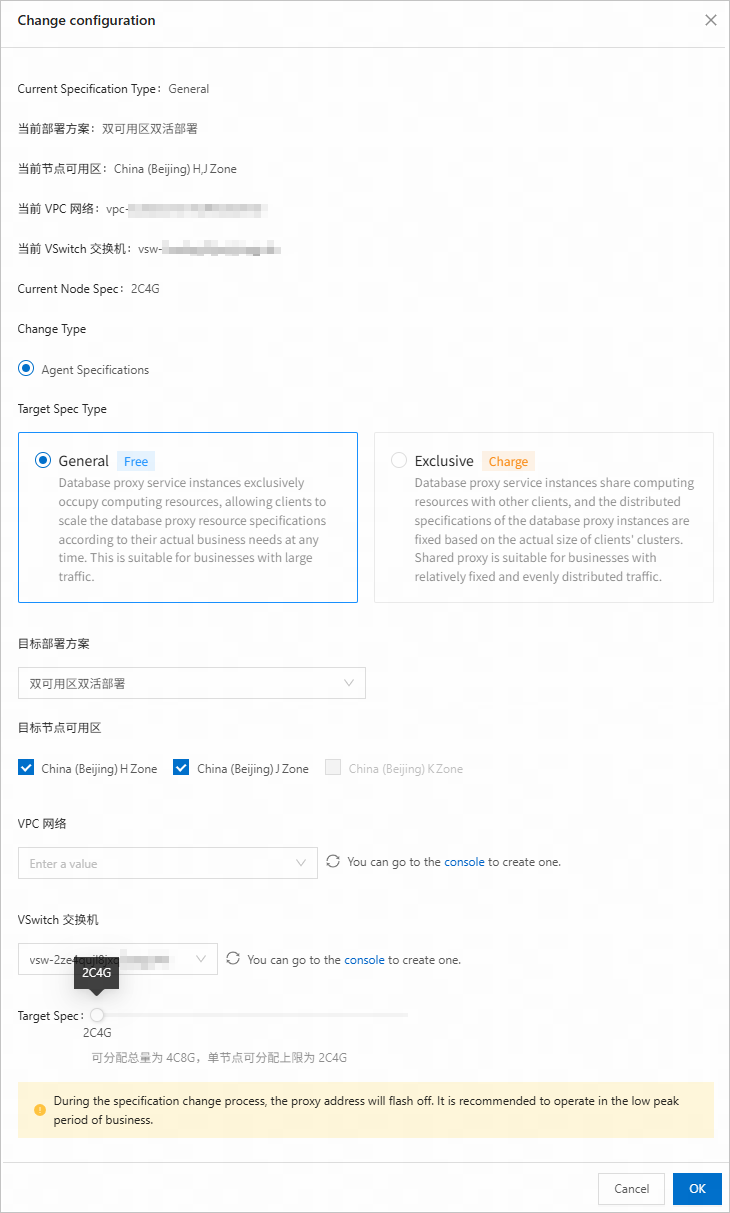
Click OK.
Modify the number of proxy nodes
Only whitelisted users can modify the number of proxy nodes. To use this feature, contact OceanBase Technical Support.
You can modify the number of proxy nodes only for the exclusive specification type.
ApsaraDB for OceanBase allows you to modify the number of nodes of a proxy cluster in each zone to implement proxy-layer load balancing and high availability.
On the Change configuration page, select Number of Proxy Nodes.
Configure the following parameters.
Parameter
Description
Proxy Nodes
The number of proxy nodes. The default value range is 1 to 15.
NoteThe default maximum number of proxy nodes is 15 for the exclusive specification type. If you need more nodes, contact OceanBase Technical Support.
Destination Proxy Address
Select the target proxy endpoint.
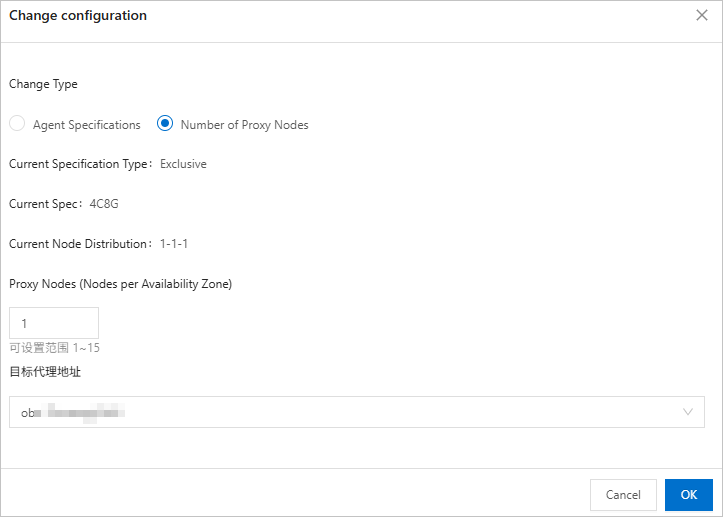
Click OK.