Add an access address
This topic describes how to add an access address and perform other operations related to an access address.
Principle
ApsaraDB for OceanBase provides a network proxy layer between your database and applications. You can add a read-only address or read/write splitting address in the proxy layer to fully use the multi-replica capabilities of ApsaraDB for OceanBase, thereby improving the execution efficiency of your business system.
In ApsaraDB for OceanBase, read/write splitting means that the read and write operations are respectively processed by different nodes to improve the read/write performance and availability of the database. Write operations that usually involve data modifications and updates are performed on the primary node. This ensures data consistency and reliability and avoids data corruption and losses, thereby improving the security and stability of the database. Read operations that only access data replicas are distributed to multiple standby nodes to implement parallel processing and load balancing. This reduces the load and response time of the database, thereby improving user experience and satisfaction. For more information, see Overview.
Concepts
-
Primary endpoint: It supports data reads and writes with strong consistency. By default, data is read by using the primary endpoint. When a tenant is created, the primary endpoint is automatically created. By default, the primary endpoint proxy is deployed in a primary zone.
-
Access address: It can be a read-only address or a read/write splitting address.
-
Read-only address: It supports only read operations. Read requests are sent to a follower of the full-featured replica to ensure final data consistency.
-
Read/Write splitting address: It supports both read and write operations. Write requests are sent to the leader of the full-featured replica, and read requests beyond the transaction are sent to followers to reduce load on the leader, ensuring final data consistency.
-
Direct connection address: It supports both read and write operations. By default, requests are directly forwarded to the leader.
Note-
Generally, the data accessed by using a read-only address lags less than 1s behind the data accessed by using the corresponding primary endpoint.
-
We recommend that you use a primary endpoint, read-only address, or read/write splitting address in a production environment.
-
At present, the direct connection address service is available only to users on the allowlist. To enable this service, contact ApsaraDB for OceanBase Technical Support.
-
Read-only replica access address:Only supports read operations,Read requests are sent to read-only replicas,Ensures eventual data consistency。
Limitations
-
The limitations on access addresses are as follows:
-
You cannot add an access address for a tenant in a standby instance.
-
In single-IDC or dual-IDC deployment mode, only one primary endpoint is supported at the proxy layer, and you can add only one read-only or read/write splitting address.
-
In multi-IDC deployment mode, only one primary endpoint is supported at the proxy layer, and you can add at most two read-only or read/write splitting addresses. If you need more addresses, contact ApsaraDB for OceanBase Technical Support to apply for proxy resources of higher specifications.
-
-
The limitations on direct connection addresses are as follows:
-
Direct connection addresses can be created only for a tenant of ApsaraDB for OceanBase V4.2.1.2 or later with only one resource unit.
-
At present, a direct connection address can be used for private network access.
-
-
The version limitations on read/write splitting addresses are as follows:
-
For a cluster of OceanBase Database V3.x, you can enable read/write splitting addresses only if the version of OceanBase Database Proxy (ODP) ranges from V3.2.9 to V4.0.
-
For a cluster of OceanBase Database V4.x, you can enable read/write splitting addresses only if the version of ODP is V4.1 or later.
-
Procedure
-
Log in to the ApsaraDB for OceanBase console.
-
In the left-side navigation pane, click Instances.
-
In the instance list, click the name of the target cluster instance to go to the Cluster Instance Workspace page.
-
In the tenant list, click the name of the target tenant to go to the Tenant Workspace page.
-
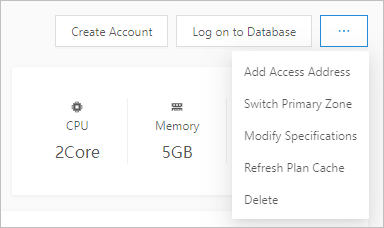
Click the More icon in the upper right corner, and select Add Access Address.
NoteIf the number of access addresses for cluster replicas reaches the specified threshold, the Add Access Address button is unavailable.
-
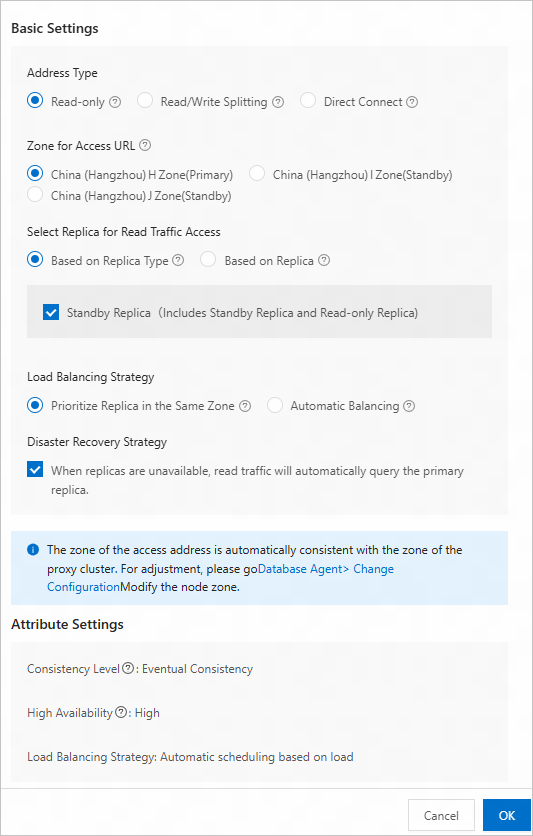
Specify the type and zone of the address and click OK.

Parameter
Description
Address Type
The type of the address to be added. Valid values:
-
Read-only
-
Read/Write Splitting
-
Direct Connect
Note-
For a tenant in a Standard Edition (Key-Value) instance, you can add only one read-only address.
Zone for Access URL
The zone of the address. To add a read-only address, specify the zone where the address resides. To add a read/write splitting address, specify the zone where the data accessed by read requests resides.
-
If you add a read-only or read/write splitting address, the address proxy and the accessed data are in the same zone, namely, the specified zone.
-
If you add a direct connection address, the address must be in the primary zone.
Select Replica for Read Traffic Access
-
Based on Replica Type: Traffic is forwarded to your selected type of replica. If you select multiple replicas of this type, traffic is distributed based on the specified load balancing strategy.
-
Based on Replica: Traffic is forwarded to your selected replica.
NoteIf you select the Based on Replica method, you must upgrade ODP to V4.3.1 or later. To upgrade ODP, submit a ticket to OceanBase Technical Support.
Load Balancing Strategy
-
Prioritize Replica in the Same Zone: preferentially accesses replicas in the same zone as ODP.
NoteThis value is applicable only when Based on Replica Type is selected for Select Replica for Read Traffic Access.
-
Automatic Balancing: automatically balances traffic among the selected replicas based on the current load.
-
Custom weights: allows you to customize a traffic weight for the selected replicas.
NoteThis value is applicable only when Based on Replica is selected for Select Replica for Read Traffic Access.
Disaster Recovery Strategy
-
When you set the disaster recovery strategy by replica type, read traffic is automatically forwarded to the leader if replicas of the selected type are unavailable.
-
When you set the strategy by replica, traffic is forwarded to the selected disaster recovery replica if the specified replica is unavailable. Traffic is automatically balanced among multiple replicas based on the current load.
NoteA read-only columnstore replica cannot accept traffic from or forward traffic to other types of replicas. Therefore, the disaster recovery strategy has limitations.
-
When Based on Replica Type is selected for Select Replica for Read Traffic Access and a read-only columnstore replica is selected, the disaster recovery feature is unavailable.
-
When Based on Replica is selected for Select Replica for Read Traffic Access and a read-only columnstore replica is selected, you can only select another read-only columnstore replica as its disaster recovery replica. When you select a replica other than a read-only columnstore replica for read traffic, you cannot select a read-only columnstore replica as its disaster recovery replica.
Primary Endpoint VPC
The VPC of ODP.
ImportantSelect an ODP VPC rather than a cluster or tenant VPC.
If no suitable VPC is available, create a VPC as prompted. For more information, see What is a VPC?
Primary Endpoint vSwitch
The vSwitch of ODP. If no vSwitch is available, go to the VPC console and create a vSwitch.
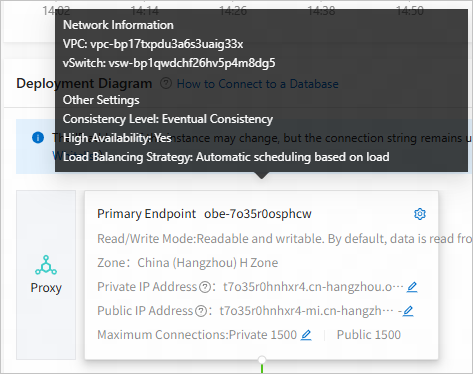
Consistency Level
The default value is Eventual Consistency. Data replication latency exists between a read-only zone and a primary zone. This may cause a time difference in the query result between the read-only zone and the primary zone. The query result is determined by the replication latency. However, the data is eventually consistent.
High Availability
The ODP service is deployed with a high availability architecture that provides disaster recovery capabilities. In dual-IDC deployment, you can specify a zone as the primary zone when creating a proxy address. By default, the other zone serves as the standby zone. If the primary zone or the primary node of the proxy address fails, the system switches to the standby zone.
Load Balancing Policy
The default value is Automatic scheduling based on load. The system monitors the load of servers in real time and automatically routes new requests to servers with lower load to prevent any node from becoming overloaded. For more information, see Load balancing.
-
Related operations
Enable public IP addresses
ApsaraDB for OceanBase allows you to enable public IP addresses for primary endpoints of tenant instances and serverless instances. The following procedure takes a tenant instance as an example:
-
Log in to the ApsaraDB for OceanBase console.
-
In the left-side navigation pane, click Instances.
-
In the instance list, click the name of the target cluster instance to go to the Cluster Instance Workspace page.
-
In the left-side navigation pane, click Tenant Management.
-
In the tenant list, click the name of the target tenant to go to the Tenant Workspace page.
-
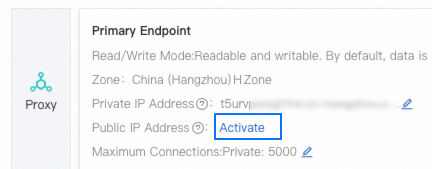
In the Deployment Diagram section, click Activate on the primary endpoint card.
-
In the dialog box that appears, click OK.
-
After the public IP address is enabled, you need to add it to the allowlist. For more information, see Create an allowlist.
Edit an access address
By default, an access address is in the same zone as that of the proxy cluster. To change the zone of an access address, choose Database Proxy > Change Configuration and change the zone of the node. For more information, see Manage the database proxy service.
-
Log in to the ApsaraDB for OceanBase console.
-
In the left-side navigation pane, click Instances.
-
On the Instances page, click the name of the target cluster instance to go to the Cluster Instance Workspace page.
-
In the left-side navigation pane, click Tenant Management to go to the Tenant Management page.
-
In the tenant list, click the name of the target tenant to go to the Tenant Workspace page.
-
Hover over the target address card in the Deployment Diagram section.
-
Click the Settings icon in the upper-right corner of the card.
-
On the access address editing page, modify the configuration information and click OK.
Delete an access address
-
Log in to the ApsaraDB for OceanBase console.
-
In the left-side navigation pane, click Instances.
-
On the Instances page, click the name of the target cluster instance to go to the Cluster Instance Workspace page.
-
In the left-side navigation pane, click Tenant Management to go to the Tenant Management page.
-
In the tenant list, click the name of the target tenant to go to the Tenant Workspace page.
-
Hover over the target address card in the Deployment Diagram section.
-
Click
 in the upper-right corner of the card. Note
After an access address is deleted, the related service becomes unavailable. Before you delete an access address, make sure that all access requests to the address are stopped.
 in the upper-right corner of the card.
 View proxy address information
-
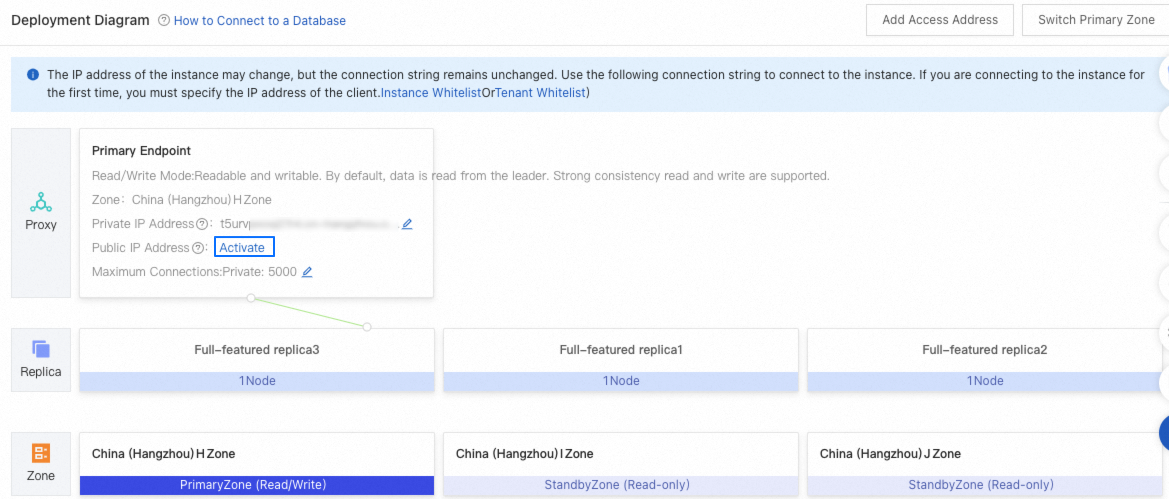
After you add an access address or direct connection address, you can view the address information in the deployment diagram section of the tenant workspace.
-
You can hover over the card of a primary endpoint, access address, or direct connection address to view the complete private address. In the upper-right corner of the card, you can click the Set icon to edit the access address or direct connection address, and click the Delete icon to delete the address.
-
You can click the Copy icon next to a private address to copy the address.
-
You can click the Edit icon next to Maximum Connections to modify the maximum number of connections to the corresponding address.
-
You can click Activate to enable a public address for the private address of the primary endpoint.