A Job runs one-off tasks and ensures that the required number of pods complete successfully. This topic explains how Jobs work and how to create one in ACK using the console or kubectl.
How Jobs work
Unlike Deployments, StatefulSets, and DaemonSets—which keep a target number of pods running continuously—a Job tracks successful pod completions. Set spec.completions for required successes and spec.parallelism for maximum concurrency.
Execution types
Choose an execution type:
Non-parallel (sequential)
Run one pod at a time. The Job is complete when the pod terminates successfully.
spec.completions |
spec.parallelism |
|---|---|
| 1 | 1 |
Use for one-time initialization tasks, such as database migrations.
Parallel with fixed completion count
Run multiple pods in parallel. The Job completes when spec.completions pods succeed.
spec.completions |
spec.parallelism |
|---|---|
| N | M (M ≤ N) |
-
If M = N: all N pods run in parallel, all must succeed. Use when compute resources are sufficient.
-
If M < N: up to M pods run concurrently until N pods complete successfully. Use for redundancy—for example, tasks across multiple zones where only one result is needed.
Resource-constrained parallel
When resources are insufficient to run N pods in parallel, limit concurrency with spec.parallelism.
spec.completions |
spec.parallelism |
|---|---|
| N | M (M < N) |
M pods run at a time. As each pod completes successfully, new ones start until N succeed.
Prerequisites
Ensure that you have:
-
An ACK cluster with public network access (to pull the sample image)
-
kubectl connected to the cluster (kubectl method only)
To enable public network access:
-
(Recommended) Enable an existing ACK cluster to access the Internet — create a NAT gateway for the VPC. All cluster resources gain public access.
-
Assign static public IP addresses to nodes — every node that runs workloads must have a public IP.
Create a Job
Create a Job using the ACK console
-
Log on to the ACK console. In the left navigation pane, click Clusters.
-
On the Clusters page, click the name of the cluster you want. In the left-side pane, choose Workloads > Jobs.
-
On the Jobs page, click Create from Image.
-
In the Basic Information step, configure the basic settings and click Next.
-
In the General section, enter
registry.cn-hangzhou.aliyuncs.com/acs-sample/nginx:latestin the Image Name field. In the Start part of the Lifecycle section, enter/bin/shin the Command field and enter["-c", "echo 'starting...'; COUNTER=0; while [ $COUNTER -lt 5 ]; do sleep 2; COUNTER=$((COUNTER+1)); echo $COUNTER; done; echo 'finished'; exit 0"]in the Parameter field. Then click Next.ImportantPulling the
registry.cn-hangzhou.aliyuncs.com/acs-sample/nginx:latestimage requires Internet access. If you enabled Configure SNAT for VPC when creating the cluster, the cluster already has Internet access. For existing clusters, enable Internet access.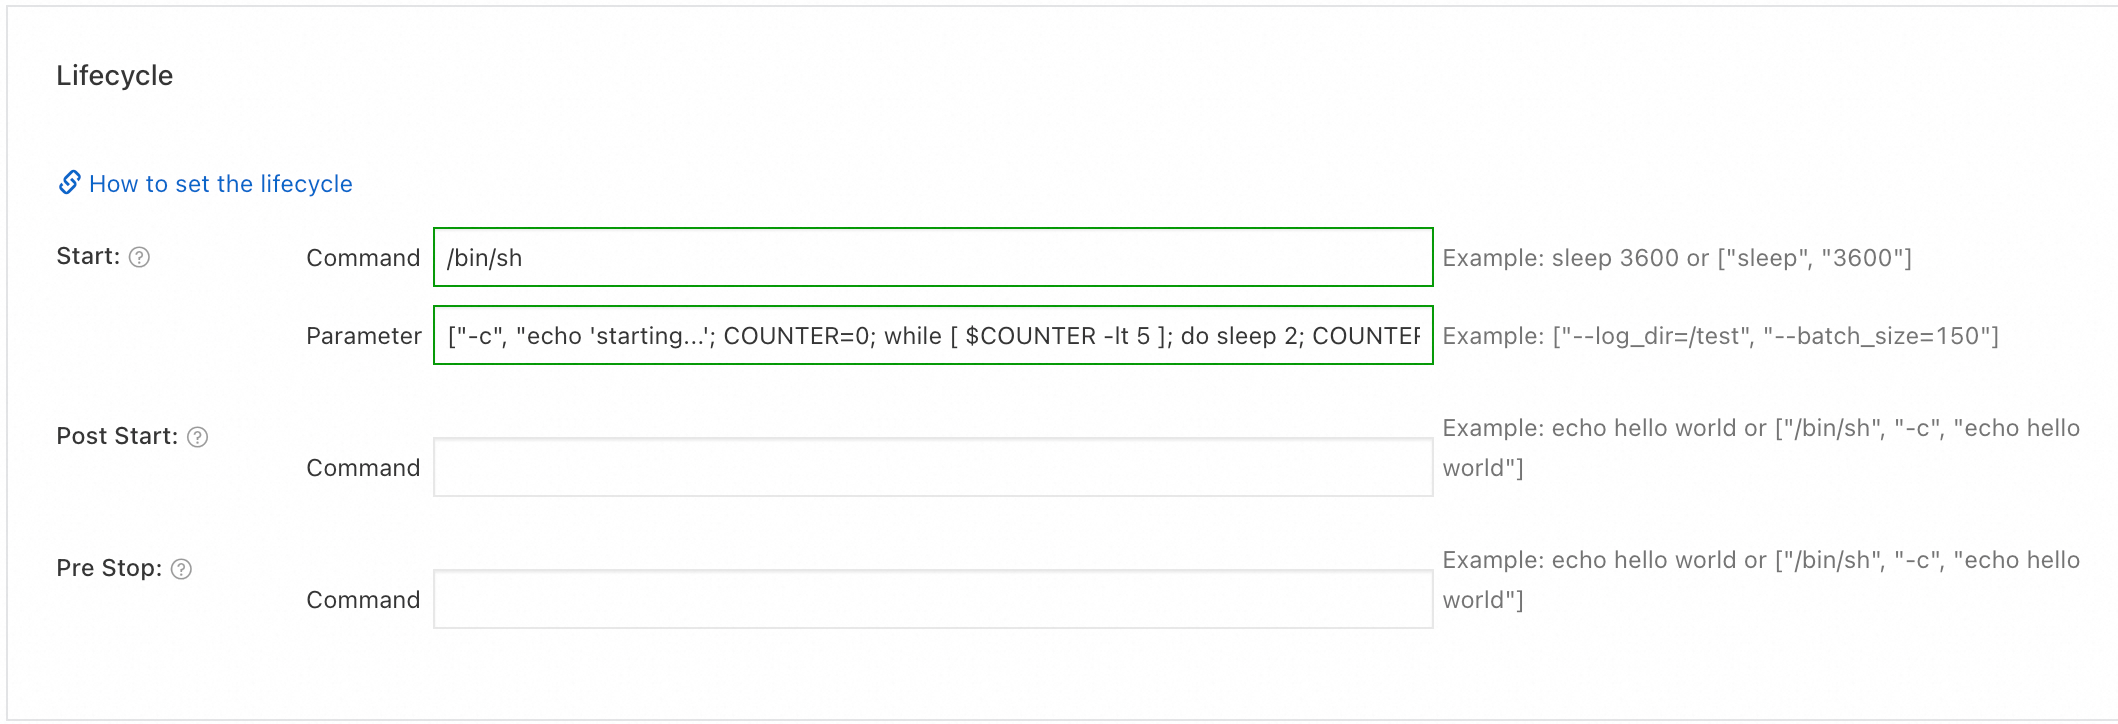
-
In the Advanced step, configure Job Settings. In this example, set Completions to 2, then click Create.
Parameter Description Completions Required successful pod completions. Maps to spec.completions.Parallelism Maximum concurrent pods. Maps to spec.parallelism.Timeout Maximum Job duration in seconds. Maps to spec.activeDeadlineSeconds. Default:600. The Job terminates when this duration is exceeded, regardless of how many pods have succeeded.BackoffLimit Maximum pod failures before the Job fails. Maps to spec.backoffLimit. Default:6.Restart Pod restart policy. Maps to template.spec.restartPolicy. Options: Never (restart existing pod; does not count towardspec.backoffLimit) or On Failure (create a new pod to replace the failed one).Pod Labels Pod labels. ACK adds app:<application-name>by default.Pod Annotations Pod annotations. Some ACK features use annotations for configuration. 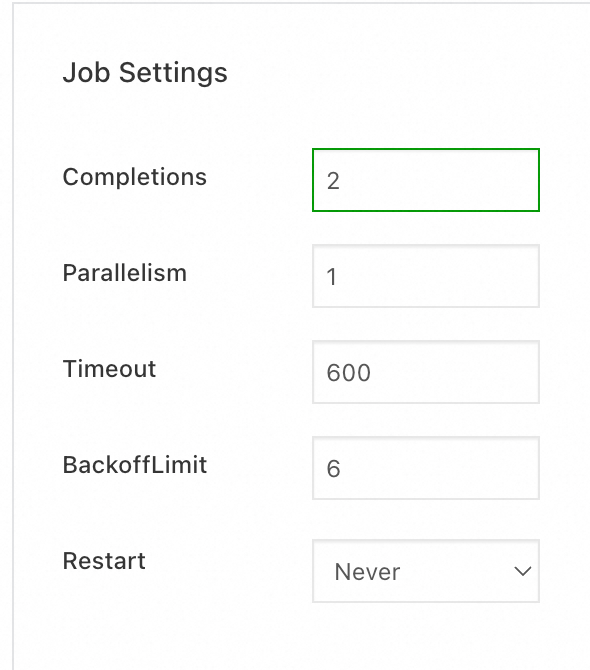
-
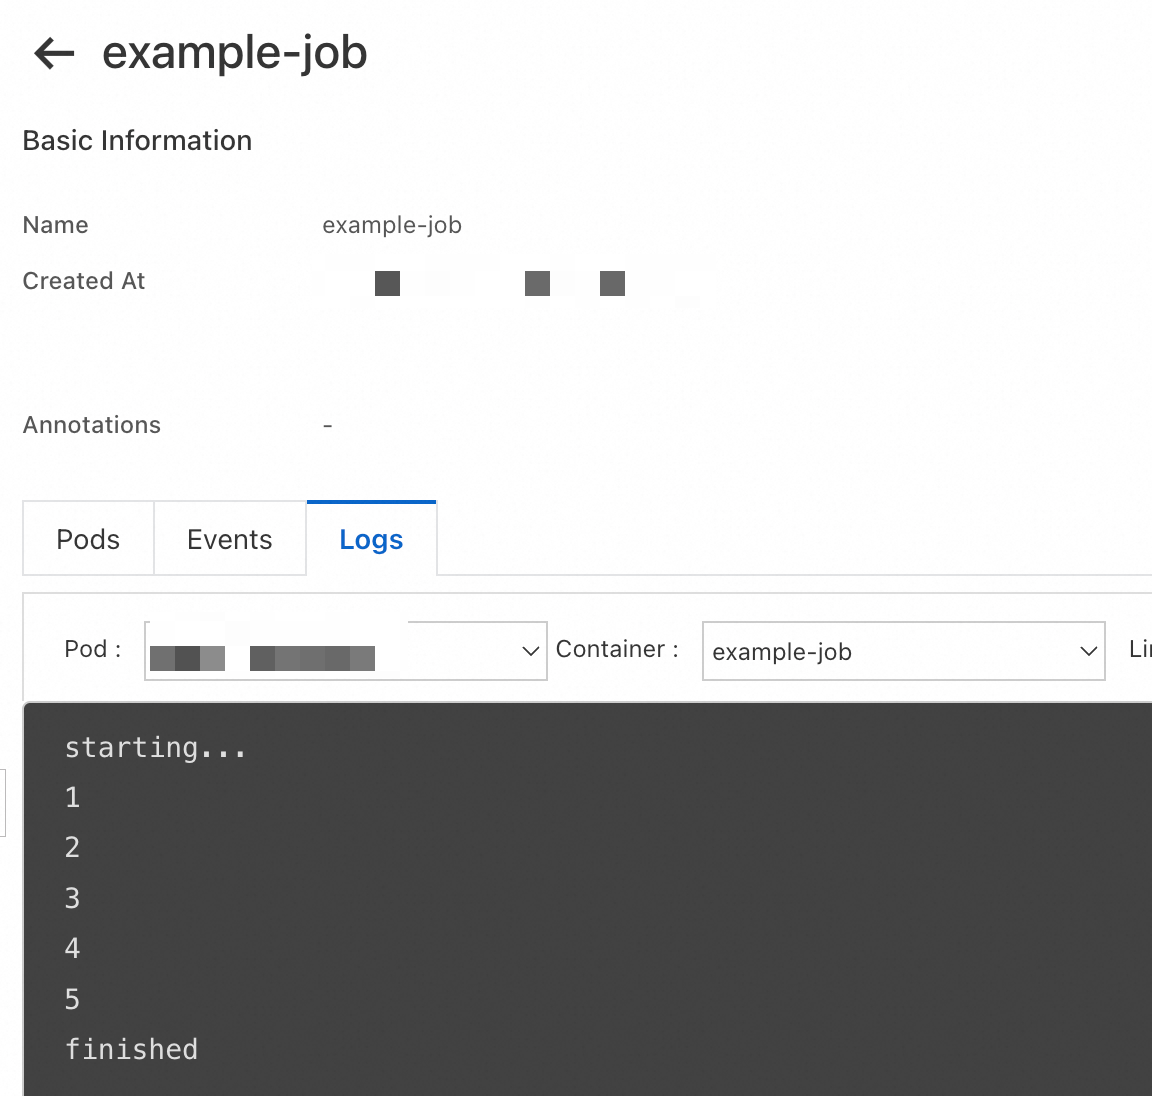
View the Job logs in the ACK console. Both pods produce identical output.
Create a Job using kubectl
Connect to the cluster with kubectl before proceeding. See Obtain the kubeconfig file of a cluster and use kubectl to connect to the cluster.
-
Create a
job.yamlfile:apiVersion: batch/v1 kind: Job metadata: name: example-job spec: completions: 2 # Stop the Job after two pods terminate successfully. parallelism: 1 # Run only one pod at a time. template: spec: containers: - name: counter image: registry.cn-hangzhou.aliyuncs.com/acs-sample/nginx:latest command: - /bin/sh - -c - | echo "starting..."; COUNTER=0; while [ $COUNTER -lt 5 ]; do sleep 2; COUNTER=$((COUNTER+1)); echo "${COUNTER}"; done; echo "finished"; exit 0 restartPolicy: Never -
Apply the manifest:
kubectl apply -f job.yamlExpected output:
job.batch/example-job created -
After about 15 seconds, check the Job status:
kubectl get job example-jobOne pod has succeeded; the Job is still running:
NAME STATUS COMPLETIONS DURATION AGE example-job Running 1/2 16s 16s -
After about 40 seconds, check again:
kubectl get job example-jobThe Job is complete:
NAME STATUS COMPLETIONS DURATION AGE example-job Complete 2/2 27s 37s -
View the logs from all pods:
kubectl logs -l job-name=example-jobOutput (two identical sets, one per pod):
starting...
1
2
3
4
5
finished
starting...
1
2
3
4
5
finished
Next steps
-
Create a CronJob — schedule a Job on a recurring basis.
-
FAQ about workloads — resolve common issues with workloads.
-
Pod troubleshooting — diagnose and fix pod exceptions.