This topic describes how to enable Layer 7 listeners of Classic Load Balancer (CLB) to preserve client IP addresses by using the X-Forwarded-For request header.
How X-Forwarded-For works
HTTP and HTTPS listeners support the X-Forwarded-For header. You can configure backend servers to retrieve client IP addresses from the X-Forwarded-For header.
Format of X-Forwarded-For:
X-Forwarded-For: <Client IP address, IP address of Proxy Server 1, IP address of Proxy Server 2, ...>Therefore, the leftmost IP address carried in the X-Forwarded-For header is the client IP address.
HTTPS listeners of CLB encrypt requests on CLB. However, CLB communicates with backend servers over HTTP. Therefore, backend servers use HTTP even if HTTPS listeners are used.
Procedure
Prerequisites
A CLB instance is created. A Layer 7 listener is created for the CLB instance. In this example, an HTTP listener that uses port 80 is used. For more information, see Create and manage a CLB instance and Add an HTTP listener.
A server group is created for the CLB instance. Backend servers are added to the server group. In this example, a vServer group that contains Elastic Compute Service (ECS) instances and uses HTTP and port 80 is used. For more information, see Create and manage a vServer group.
Step 1: Check whether client IP preservation based on X-Forwarded-For is enabled for the listener
Log on to the CLB console.
In the top navigation bar, select the region in which the CLB instance is deployed.
On the Instances page, click the ID of the CLB instance that you want to manage.
On the instance details page, click the Listener tab and click the ID of the Layer 7 listener that you want to manage.
On the details page of the listener, check whether Custom HTTP Header includes the X-Forwarded-For: Retrieve Client IP option.
NoteBy default, Layer 7 listeners of CLB use the X-Forwarded-For header to preserve client IP addresses. This header cannot be disabled.
Step 2: Configure backend servers
The following procedures show how to configure backend servers. Choose a procedure based on the type of backend server that you use.
Configure an NGINX server
In this example, the CentOS 7.9 operating system and NGINX 1.20.1 are used. Adjust the configurations based on the environment that you use.
Run the command
nginx -V | grep http_realip_moduleon the NGINX server to check whether the http_realip_module module is installed on the NGINX server. NGINX servers use the http_realip_module module to parse the value of X-Forwarded-For.If
--with-http_realip_moduleis included in the output, it indicates that http_realip_module is installed on the NGINX server and you can proceed to the next step.NoteNGINX 1.0.4, which was released in 2011, and later support the http_realip_module module. If your NGINX version is earlier than 1.0.4, we recommend that you back up data and upgrade to a later version.
If the http_realip_module module is not installed on the NGINX server, compile and install NGINX again, and then install http_realip_module. We recommend that you use package managers such as YUM to install and manage NGINX. Packet managers simplify the process.
Modify and save the NGINX configuration file. The following code block shows an example. Run the
nginx -tcommand to query the path of the configuration file, which is/etc/nginx/nginx.confby default. The path may vary based on the environment that you use.http { # Set the variable $http_x_forwarded_for, which is used to record the value of X-Forwarded-For. log_format main '$remote_addr- $remote_user [$time_local] "$request" ' '$status $body_bytes_sent "$http_referer" ' '"$http_user_agent" "$http_x_forwarded_for"'; # ... }Run the
sudo nginx -s reloadcommand to reload the NGINX configuration file.
Configure an Apache server
In this example, the CentOS 7.9 operating system and Apache 2.4.6 are used. Adjust the configurations based on the environment that you use.
Run the command
httpd -M | grep remoteip_moduleon the Apache server to check whether the remoteip_module module is installed on the Apache server. Apache uses remoteip_module to parse the value of X-Forwarded-For.If
remoteip_module (shared)is included in the output, it indicates that the module is installed on the Apache server and you can proceed to the next step.NoteApache 2.4.0, which was released in 2012, and later support the remoteip_module module. If your Apache version is earlier than 2.4.0, we recommend that you back up data and upgrade to a later version.
If the remoteip_module module is not installed on the Apache server, compile and install Apache again, and then install remoteip_module. We recommend that you use package managers such as YUM to install and manage Apache. Packet managers simplify the process.
Modify and save the Apache configuration file. The following code block shows an example. The default path of the configuration file is
/etc/httpd/conf/httpd.conf. The path may vary based on the environment that you use.# ... <IfModule log_config_module> # Add the LogFormat directive %{X-Forwarded-For}i, which is used to record the information about X-Forwarded-For. LogFormat "%{X-Forwarded-For}i %h %l %u %t \"%r\" %>s %b \"%{Referer}i\" \"%{User-Agent}i\"" combined LogFormat "%{X-Forwarded-For}i %h %l %u %t \"%r\" %>s %b" common #... </IfModule> # ...Run the command
sudo systemctl restart httpdto restart Apache.
Configure an IIS server
In this example, the Windows Server 2016 operating system is used. Adjust the configurations based on the environment that you use.
Download and decompress the F5XForwardedFor file.
Copy the
F5XFFHttpModule.dllandF5XFFHttpModule.inifiles from thex86\orx64directory to a directory on the IIS server. Make sure that the IIS process has read and write permissions on the directory.Open IIS Manager in Server Manager.
Select the IIS server and double-click Modules.
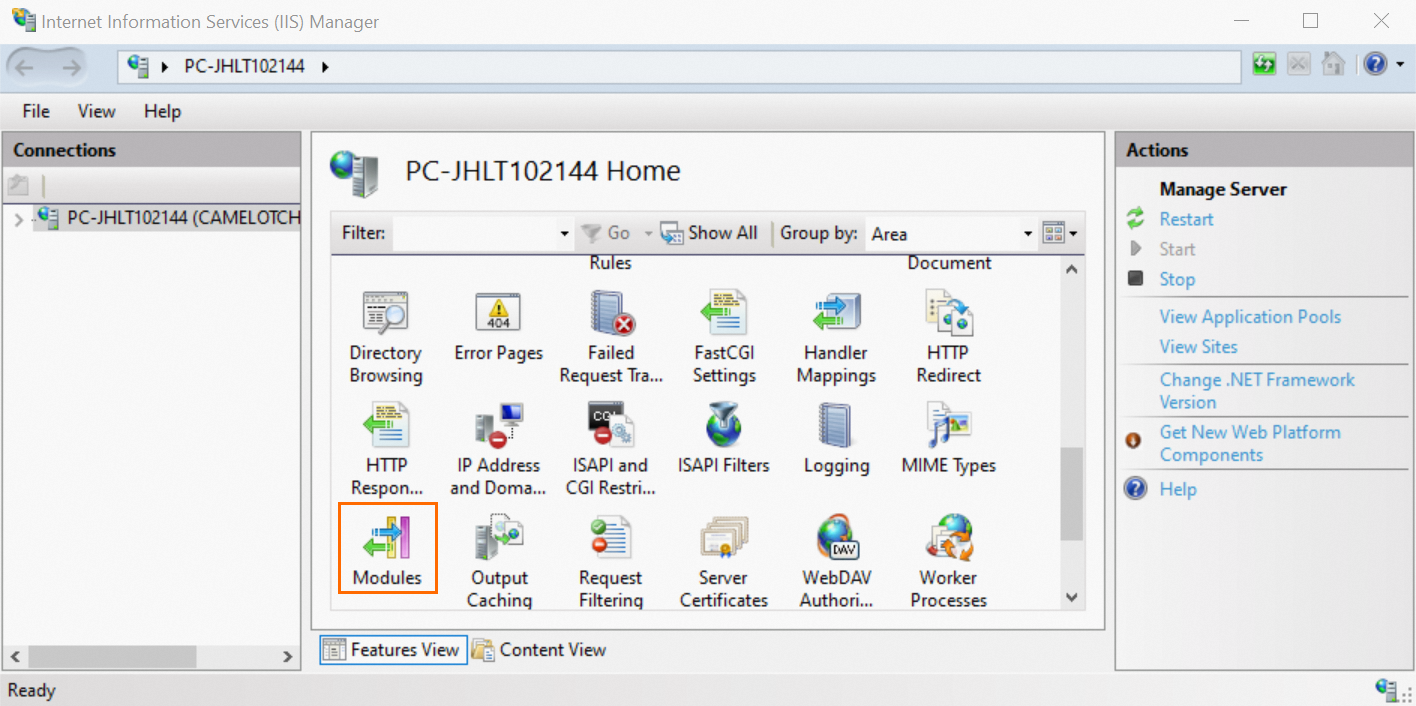
Click Configure Native Modules, and then click Register in the dialog box that appears.
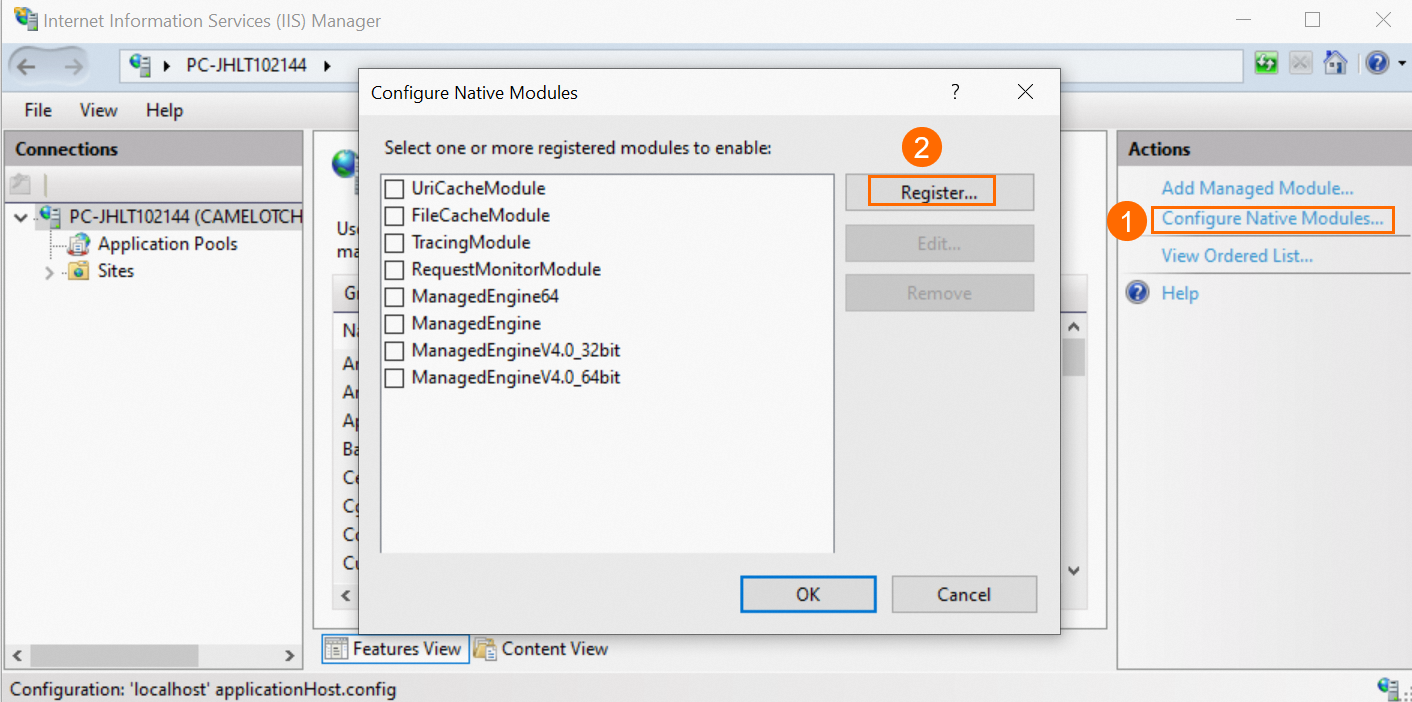
Add the downloaded .dll file.
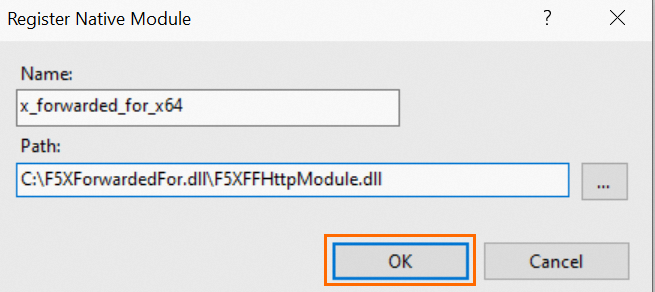
Enter a file name, select a path, and then click OK.
The module to be registered is automatically selected. Click OK.
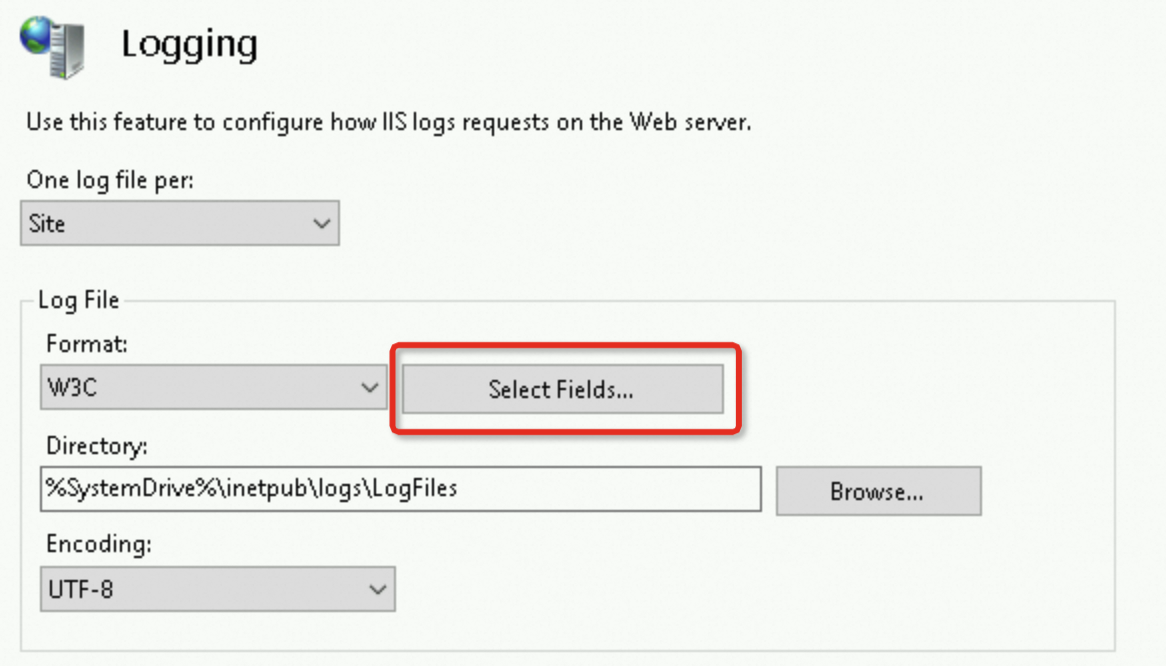
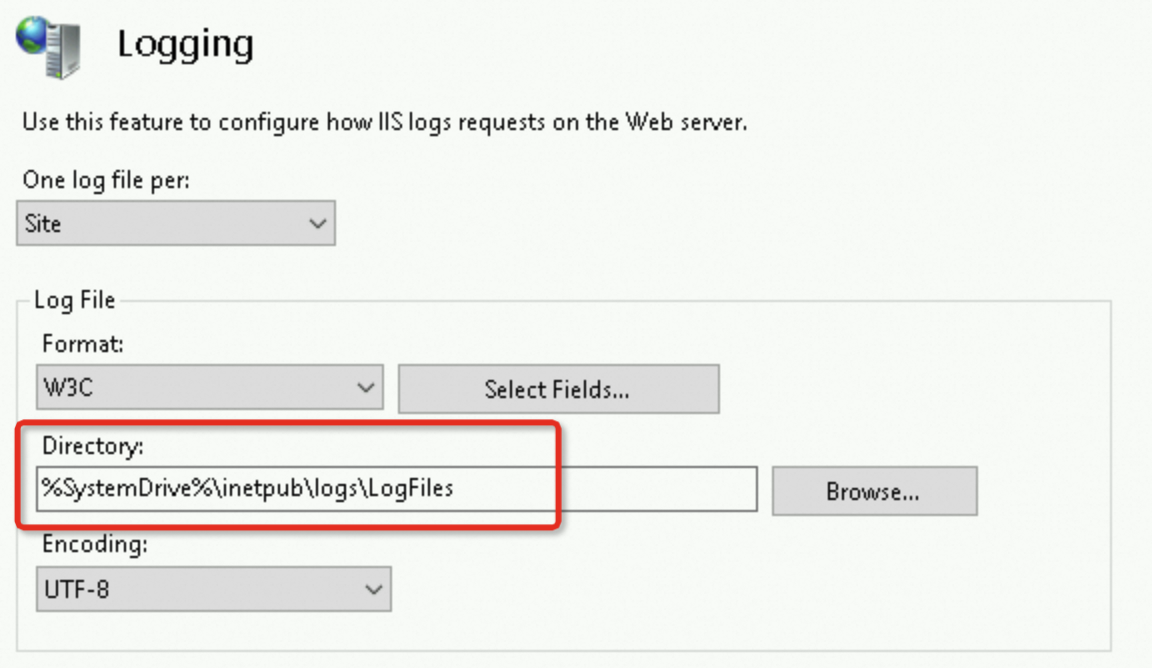
Return to the homepage of IIS Manager and double-click Logging. Configure a log format to record the information about
X-Forwarded-For.Click Select Fields.
Click Add Field in the lower-left corner, add the following field, and then click OK.

Click Apply in the right-side Actions pane.
Restart the IIS server and wait until the configurations take effect.
Step 3: Test whether the backend server can retrieve client IP addresses
The following procedures show how to run tests. Choose a procedure based on the type of backend server that you use.
NGINX server
If you use an NGINX server, you can check the NGINX log to determine whether the backend server can retrieve client IP addresses.
The default path of the NGINX log is /var/log/nginx/access.log.
In each log entry, the leftmost IP address in the $http_x_forwarded_for variable is the client IP address.

Apache server
If you use an Apache server, you can check the Apache log to determine whether the backend server can retrieve client IP addresses.
The default path of the Apache log is /var/log/httpd/access_log.
In each log entry, the leftmost IP address in the %{X-Forwarded-For}i variable is the client IP address.

IIS server
If you use an IIS server, you can check the IIS log to determine whether the backend server can retrieve client IP addresses.
You can find the path to the log file in the Logging module.
In each log entry, the leftmost IP address in X-Forwarded-For is the client IP address.

FAQ
Why do IP addresses that start with 100 frequently access backend ECS instances?
CLB forwards external requests to backend ECS instances by using the private IP address of the system server. CLB also accesses the ECS instances to perform health checks and monitor service availability.
The system CIDR block of CLB is 100.64.0.0/10, which is reserved by Alibaba Cloud. To prevent security issues, this CIDR block is not allocated to other network elements. As a result, the backend ECS instances are accessed by IP addresses that start with 100.
To ensure service availability, we recommend that you add a security rule which allows access from these IP addresses to all backend servers.
How does CLB preserve client IP addresses when it is used together with Web Application Firewall (WAF), Content Delivery Network (CDN), or Global Accelerator (GA)?
If requests are filtered by WAF, CDN, or GA before they reach CLB, you can use the X-Forwarded-For header to preserve client IP addresses. WAF, CDN, and GA can pass the X-Forwarded-For header to backend servers by default. No additional configurations are required.
If you want to prevent X-Forwarded-For spoofing, which can compromise service security, you can specify a header to record client IP addresses. For example, if a request travels through the client, CDN, WAF, CLB, and ECS, and CDN passes the Ali-Cdn-Real-Ip header to backend servers, you can enable Ali-Cdn-Real-Ip to record client IP addresses and add the $http_Ali_Cdn_Real_Ip variable to the NGINX configuration file. The IP address recorded by $http_Ali_Cdn_Real_Ip is the client IP address.
You can also take the following measures to improve system security:
Authenticate the X-Forwarded-For header: Enable backend servers to filter out requests that contain invalid or untrusted X-Forwarded-For headers. You can check the format and IP address of the X-Forwarded-For header to determine whether it is valid and trusted.
Enable firewalls and access control lists (ACLs): Deploy a firewall and an ACL between CLB and its backend servers to filter out malicious requests that may manipulate the X-Forwarded-For header.
Enable SSL/TLS encryption: Enable SSL/TLS encryption to encrypt data transmission, including the transmission of the X-Forward-For header. This measure prevents man-in-the-middle (MITM) attacks and data tampering.
How does CLB preserve client IP addresses when it is deployed in a Container Service for Kubernetes (ACK) cluster?
CLB can preserve client IP addresses when it is deployed in an ACK cluster. Client IP preservation may be implemented in different ways. For more information, see How do I configure the pods to obtain the real IP addresses of clients?
References
Application Load Balancer (ALB), Classic Load Balancer (CLB), and NLB use different methods to preserve client IP addresses.
ALB uses the X-Forwarded-For header to preserve client IP addresses. For more information, see Enable ALB to preserve client IP addresses and pass them to backend servers.
NLB uses the client IP preserve feature of backend server groups or the Proxy protocol to preserve client IP addresses. For more information, see Enable NLB to preserve client IP addresses.
Layer 4 listeners of CLB can directly preserve client IP addresses, or use the Proxy protocol to preserve client IP addresses. For more information, see Enable Layer 4 listeners to preserve client IP addresses.