Protect your public-facing website from web attacks with Web Application Firewall (WAF) 3.0. A single DNS change routes your traffic through WAF for inspection—no infrastructure changes required. WAF filters malicious requests, forwards clean traffic to your origin server, and protects any website, whether hosted in the cloud or on-premises.
How it works
A CNAME record routes your website's traffic through WAF for inspection by pointing your domain's existing DNS record to the CNAME target provided by WAF.

Origin server: The server that hosts your website. If a load balancer—such as Application Load Balancer (ALB), Classic Load Balancer (CLB), or Network Load Balancer (NLB)—or a NAT Gateway is deployed in front of the server, the origin server is the next-hop device that receives traffic from WAF.
Back-to-origin: The process of WAF forwarding inspected traffic to your origin server. This traffic originates from WAF's public IP address range (CIDR blocks). To ensure delivery, add these IP addresses to the allowlist on your origin server's firewall or security group.
WAF has deployed 11 protection nodes in China (Beijing), China (Hangzhou), China (Shenzhen), China (Hong Kong), Singapore, Malaysia, US (Silicon Valley), Germany, Indonesia, Dubai, and Japan. When your service is protected by the public cluster, WAF automatically routes your traffic to the optimal protection node based on the geolocation of your origin server.
Prerequisites
Before you begin, ensure that you have:
Permission to modify the domain's DNS records
An SSL certificate for the domain (required for HTTPS traffic)
An ICP filing for your domain if your server is in the Chinese mainland. To check filing status, see How do I check the ICP filing information for a domain name?
Add a domain to WAF
Go to the Web Application Firewall 3.0 console. In the top menu bar, select a resource group and a region (Chinese Mainland or Outside Chinese Mainland). In the left navigation pane, click Onboarding. On the CNAME Record tab, click Add.
Step 1: Configure the listener
In the Domain Name field, enter the domain name to protect. Supported formats: Wildcard matching rules: Priority rule: If both an exact domain name and a wildcard domain name are added and a request matches both, the protection rules for the exact domain name take precedence.
Matches only subdomains at the same level. For example,
*.aliyundoc.commatcheswww.aliyundoc.comandexample.aliyundoc.com, but notwww.example.aliyundoc.com.Applied to a second-level domain such as
*.aliyundoc.com, it also matches the apex domainaliyundoc.com.Applied to a third-level domain such as
*.example.aliyundoc.com, it does not matchexample.aliyundoc.comitself.
If WAF prompts for domain ownership verification after you enter the domain name, complete one of the following methods:
DNS validation (recommended): Add a TXT record at your DNS provider.
File validation: Upload the validation file to the web root directory of your origin server. This requires operational access to the origin server and a security group policy that allows public IP access.
DNS validation
In the validation prompt area, click the Method 1: DNS Record tab.
Add a TXT record at your DNS provider using the Record Type, Host Name, and Record Value from the WAF console. If you use Alibaba Cloud DNS, follow these steps. For other providers, perform equivalent steps in their system.
On the Public Zone page, find the primary domain name and click DNS Settings.
Click Add Zone, configure the following parameters, and click OK.
Parameter
Value
Record Type
TXT
Hostname
The domain name prefix, such as
verificationRecord Value
The record value generated by WAF, such as
verify_8fca29dec226****
Wait for the TXT record to take effect. A new TXT record takes effect immediately. Changes to an existing TXT record typically take effect after 10 minutes, depending on the TTL (Time to Live) configured for the domain.
Return to the WAF console and click Verify.
Successful validation confirms domain ownership.
If validation fails, troubleshoot as follows:
Check the TXT record: Confirm the host record and record value exactly match the information in the WAF console. If there are discrepancies, delete the incorrect record, add it again, and validate again.
Wait for DNS propagation: DNS records may not take effect immediately. Wait 10 minutes and validate again.
Switch validation method: If validation repeatedly fails, use Method 2: File Verification.
File validation
In the validation prompt area, click the Method 2: Verification File tab.
Click the link to download the validation file (① in the figure).
Important- The validation file is valid for only 3 days after download. If you do not complete validation within this period, download the file again. - Do not modify the validation file in any way, such as editing or renaming it. - WAF accesses the origin server based on the selected protocol. Make sure your origin server's security group or firewall rules allow the corresponding traffic: - If you select HTTP: allow inbound TCP traffic on port 80 from
0.0.0.0/0. - If you select HTTPS: allow inbound TCP traffic on port 443 from0.0.0.0/0.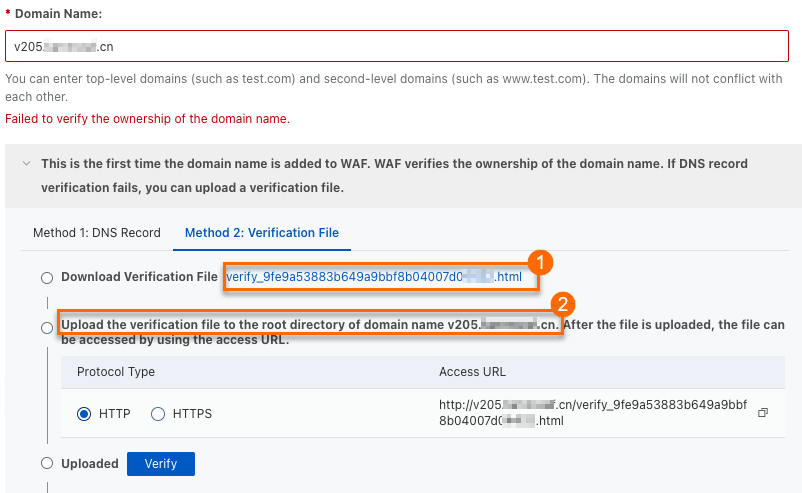
Upload the validation file to the web root directory of your domain's origin server (② in the figure). This can be an Elastic Compute Service (ECS) instance, an Object Storage Service (OSS) bucket, or any other origin server.
If you add a wildcard domain name such as
*.aliyun.com, upload the validation file to the root directory ofaliyun.com.Return to the WAF console and click Verify.
Successful validation confirms domain ownership.
If validation fails, troubleshoot based on the error message:
Issue
Solution
Cannot access the domain name
1. Check the domain's DNS record to ensure a record points to the origin server. For Alibaba Cloud DNS, see Add a DNS record. 2. Check the origin server's security group or firewall rules to ensure public access requests are allowed. For ECS security groups, see Add a security group rule.
Validation file does not exist
Re-upload the validation file to the origin server.
Incorrect file content
1. Delete the incorrect validation file from the origin server. 2. Re-upload the correct validation file.
Because a rule allowing access from all IP addresses (
0.0.0.0/0) is a security risk, delete this temporary rule after ownership is confirmed, unless your origin server's initial security configuration already included it.Select the Protocol Type (HTTP or HTTPS) and configure the required settings. Configure both protocols simultaneously if needed.
WAF Custom Edition for shared virtual hosts does not support HTTPS.
HTTP
HTTP Port: Enter the port that users use to access the website. Port 80 is recommended for HTTP. To use a non-standard port, specify one within the supported port range. Press Enter after each port.
HTTPS
HTTPS Port: Enter the port that users use to access the website. Port 443 is recommended for HTTPS. To use a non-standard port, specify one within the supported port range. Press Enter after each port.
HTTPS Upload Type: Upload the SSL certificate for the domain so WAF can inspect HTTPS traffic. Upload: Select Existing Certificate: From the certificate drop-down list, select the certificate to upload to WAF. Purchase Certificate: If you have not purchased a certificate, see Purchase a commercial certificate.
Certificate Name: Set a unique name. It cannot match an already-uploaded certificate.
Certificate File: Paste the certificate content in PEM, CER, or CRT format. Example format:
-----BEGIN CERTIFICATE-----......-----END CERTIFICATE-----Format conversion: If the certificate is in PFX or P7B format, use the certificate tool to convert it to PEM format.
Certificate chain: If there is an intermediate certificate, concatenate the server certificate followed by the intermediate certificate before pasting.
Private Key: Paste the private key content in PEM format.
RSA:
-----BEGIN RSA PRIVATE KEY-----......-----END RSA PRIVATE KEY-----ECC:
-----BEGIN EC PRIVATE KEY-----......-----END EC PRIVATE KEY-----
If the WAF console displays "Failed to verify the integrity of the certificate chain. If you use this certificate, service access may be affected.", there is a problem with the certificate chain. Check the correctness and completeness of the certificate content and re-upload it in the Certificate Management Service console. For details, see Upload, sync, and share SSL certificates.
ImportantIf your origin server does not support HTTPS (for example, no SSL/TLS certificate is deployed), enable HTTP back-to-origin. Otherwise, back-to-origin requests fail and your website becomes inaccessible.
Option When to use Upload Your certificate is not in Alibaba Cloud Certificate Management Service Select Existing Certificate Your certificate is already issued or uploaded in Alibaba Cloud Certificate Management Service (Original SSL Certificate) Purchase Certificate You do not have an SSL certificate—purchase one and wait for it to be issued before adding the domain To configure advanced settings such as Enable SM-based HTTPS, HTTP2, Enable HTTPS Routing, TLS Version, HTTPS Cipher Suite, Whether Layer 7 Proxy, Such as Anti-DDoS Proxy or Alibaba Cloud CDN, Is Deployed in Front of WAF, IPv6, Exclusive IP, Shared Cluster-based Intelligent Load Balancing, or Resource Group, see Advanced configurations. Otherwise, keep the default values and click Next.
Step 2: Configure forwarding
In the Server Address area, enter the IP address or domain name of the origin server. WAF uses this configuration to forward requests to the origin server. If you are unsure of the origin server's address, see How do I find the public IP or domain name of my origin server?
ImportantDo not confuse the Domain Name (Such as CNAME) field with the domain name you added in Step 1. This field is for the origin server's address. For example, if the origin server is an ALB instance, enter its DNS name, such as
alb-xxx.cn-shanghai.alb.aliyuncsslb.com.Complete the configuration based on the origin server address type. IP: Domain Name (such as CNAME):
Origin Port: The port the origin server uses. By default, this is the same as the HTTP/HTTPS port configured in Step 1. To use a different port for back-to-origin requests, specify one within the supported port range.
Origin IP Address: Enter the IP addresses of the origin server. Requirements:
Must be a publicly accessible IP address.
Up to 20 IP addresses. Press Enter after each address. If you enter multiple addresses, WAF distributes back-to-origin requests based on the load balancing algorithm you select.
IPv4 and IPv6 addresses are supported individually or simultaneously. To configure an IPv6 address, enable IPv6 protection in Configure Listener first.
Origin Port: The port the origin server uses. By default, this is the same as the port configured in Step 1. To use a different port for back-to-origin requests, specify one within the supported port range.
Origin Domain Name: Enter the origin server's domain name. WAF only forwards client requests to the IPv4 address resolved from this domain name. For IPv6 websites, use the IP method instead.
ImportantIf the origin server address changes, update it here promptly.


To configure advanced settings such as Load Balancing Algorithm, Standby Link Back-to-origin, HTTP Back-to-Origin, Origin SNI, Request header field configuration, Traffic Tag, Back-to-origin Timeout Configuration, Retry Back-to-origin Requests, or Back-to-origin Keep-alive Requests, see Advanced configurations. Otherwise, keep the default values and click Submit.
Step 3: Switch traffic
After completing the WAF console configuration, perform the following steps to route traffic through WAF. Without these steps, WAF protection is not active.
Allow WAF back-to-origin IP addresses
If your origin server has access control policies (security group rules, firewall rules) or security software such as Safedog or Yunsuo, add the WAF back-to-origin IP address range to the allowlist. Otherwise, WAF's back-to-origin traffic may be blocked, causing service interruptions.
For maximum security, restrict your origin server's ingress traffic to allow connections exclusively from the WAF back-to-origin IP address range.
In the upper-right corner of the Add Completed page, click WAF IP Address.
In the Back-to-origin CIDR Block dialog box, click Copy to copy all WAF back-to-origin IP addresses.
The copied IP address ranges are comma-separated and include both IPv4 and IPv6 ranges, such as
2408:400a:3c:xxxx::/56.Add the copied IP ranges to your origin server's firewall. For example, if the origin server is an ECS instance, add the IP ranges to the ECS security group.
On the ECS instance details page, click Security Groups > Security Groups, and select the target security group.
On the security group details page, under Security Group Details > Inbound, click Add Rule.
Create separate rules for IPv4 and IPv6, as a single rule cannot contain both address types.
Add IPv4 rule: Paste the copied IP segment in the Source area, manually removing the IPv6 addresses. Set Port Range to the origin port configured in Step 2. Keep other parameters at their default values and click Save.
Add IPv6 rule: Click Add Rule again, add the IPv6 address segment, and select IPv6 in the Source area.
Verify locally before switching DNS
Before changing the domain's DNS settings, verify that your WAF configuration is correct by modifying your local hosts file. This lets you confirm everything works without affecting live users—and roll back without impact if there's an issue.
On the Add Completed wizard page, click Copy CNAME to copy the WAF CNAME.
Go to Network Diagnostic Analysis, enter the copied CNAME address (such as
xxx.c.yundunwaf2.com), and click OK.Copy the IP address from the DNS service provider analysis results and add it to your local
hostsfile. Windows: macOS:Open
C:\Windows\System32\drivers\etc\hostswith Notepad. Add the following line at the end and save:<IP address copied in the previous step> <domain name added to WAF>Open
cmdand runping <domain name added to WAF>. If the output IP matches the one you added, the hosts file is in effect. If not, runipconfig /flushdnsto flush the DNS cache, then ping again.Open a browser and enter your protected domain.
If the website loads normally, the WAF configuration is correct. Proceed to modify DNS.
If access fails, check your WAF configuration, fix any issues, and re-run local verification.
After verification, restore the hosts file to its original state.
Press
Command + Spaceto open Terminal.Run
sudo vim /etc/hoststo open the hosts file.Add the following line at the end and save: ``
<IP address copied in the previous step> <domain name added to WAF>``Run
ping <domain name added to WAF>. If the output IP matches the one you added, the hosts file is in effect. If not, runsudo killall -HUP mDNSResponderto flush the DNS cache, then ping again.Open a browser and enter your protected domain.
If the website loads normally, proceed to modify DNS.
If access fails, check your WAF configuration, fix any issues, and re-run local verification.
After verification, remove the entry from your hosts file.
Modify the domain's DNS record
Point your domain's DNS record to the CNAME provided by WAF so that web requests are routed through WAF for protection.
Perform this operation during off-peak hours to minimize business impact.
On the Add Completed wizard page, click Copy CNAME to get the WAF CNAME address.
Update your domain's DNS record to point to the WAF CNAME. If your domain's DNS is hosted by Alibaba Cloud DNS, follow these steps. For other providers, perform equivalent steps in their system.
On the Public Zone page, find the target domain and click Settings in the Actions column.
Locate the Hostname to modify and click Edit in the Actions column. For example, if the domain added to WAF is
www.aliyundoc.com, locate the entry with host recordwwwunder the primary domainaliyundoc.com.In the Edit Record panel, set Record Type to CNAME and Record Value to the WAF CNAME address. Keep other settings unchanged. When modifying DNS records, note the following: > Warning: During the DNS change, some users may experience temporary service interruptions. Add the new CNAME record immediately after deleting the old one.
For the same host record, only one CNAME record value is allowed. Change it to the WAF CNAME address.
A CNAME record conflicts with other record types such as A, MX, and TXT for the same host record. Delete conflicting records before adding the CNAME record.
Click OK to save. The updated DNS record takes effect shortly. > Note: DNS propagation takes time. If the website is inaccessible after the change, wait 10 minutes and refresh.
Step 4: Verify the protection
After setup is complete, confirm that the domain was added successfully and that WAF is intercepting attacks.
Enter your website domain in a browser. If it loads normally, the domain has been added successfully.
Access your website domain, not the WAF CNAME. The CNAME is only for DNS resolution and cannot be accessed directly.
Test WAF's attack interception by entering a cross-site scripting (XSS) test string in the browser address bar:
<protected domain name>/alert(xss)If a 405 block page appears, WAF intercepted the attack and is working correctly.
After completing the CNAME setup, also review the following:
Custom protection rules: WAF enables a set of default protection rules for added domains. View these rules on the Protection Configuration > Protected Objects page. To customize rules (for example, to allowlist a specific IP address), create or modify protection rules. For more information, see Mitigation Settings Overview.
Obtain client IP on the origin server: By default, all requests received by the origin server appear to originate from WAF's IP addresses. To get the real client IP address on the origin server, see Obtain the originating IP address of a client.
Advanced configurations
Set the following advanced configurations while following the procedure or after onboarding is complete. To edit after onboarding, go to the CNAME Record tab, find the target domain, and click Edit in the Actions column.
Enhance security protection level (HTTPS)
| Parameter | Description |
|---|---|
| HTTP2 | Uses the HTTP/2 protocol to improve page loading speed and reduce latency. After enabling, HTTP/2 and HTTPS share the same port. |
| Enable force HTTPS redirect | Forces all HTTP access to redirect to HTTPS and enables HSTS by default. Available only when HTTP is not selected as the listener protocol. |
| TLS version | Defines the allowed TLS versions between the client and WAF. Higher versions offer stronger security but lower compatibility with older clients. For high-security scenarios, select TLS 1.2 and later. |
| HTTPS cipher suite | Defines the allowed encryption algorithms between the client and WAF. Strong cipher suites offer high security but lower compatibility with older clients. For high-security scenarios, select a strong cipher suite. |
| Enable HTTP back-to-origin | Allows WAF to connect to the origin via HTTP when the origin server does not support HTTPS. Enable this if your origin server has no SSL certificate; otherwise, your website will be inaccessible. |
| Enable origin SNI | When the origin server hosts HTTPS services for multiple domain names on the same IP address, enable this feature to ensure correct routing. |
Enable SM-based HTTPS:
On the Configure Listener page, turn on the Enable SM-based HTTPS switch.
In the SM Certificate Upload Mode area, select an upload method:
Manual upload: Select a local SM certificate in PEM format. The certificate must include four files: SM Certificate (such as
server_enc.pem), Encryption Private Key (such asserver_enc.key), SM Signing Certificate (such asserver_sign.pem), and Signing Private Key (such asserver_sign.key). If the certificate is in another format such as PFX or P7B, convert it to PEM format.Select Existing Certificate: Select a certificate issued or uploaded in Alibaba Cloud Certificate Management Service (Original SSL Certificate).
Apply for a New Certificate: Purchase a certificate first, then wait for it to be issued before adding it to WAF.
Optional: To allow only SM clients to access your website, turn on the Allow Access Only from SM Certificate-based Clients switch.
HTTP/2: On the Configure Listener page, select HTTP2.
Enable HTTPS routing: On the Configure Listener page, expand Advanced Settings and click Enable HTTPS Routing.
TLS version: On the Configure Listener page, expand Advanced Settings and select the desired TLS Version:
TLS 1.0 and Later (Best Compatibility and Low Security): Supports all legacy clients.
TLS 1.1 and Later (High Compatibility and High Security): Blocks clients that only support TLS 1.0.
TLS 1.2 and Later (High Compatibility and Best Security): Meets the latest security compliance requirements but blocks clients using TLS 1.0 or 1.1.
Support TLS 1.3: Select this if your website supports the TLS 1.3 protocol. WAF does not listen for TLS 1.3 client requests by default.
HTTPS cipher suite: On the Configure Listener page, expand Advanced Settings and select the desired HTTPS Cipher Suite:
All Cipher Suites (High Compatibility and Low Security)
Custom Cipher Suite (Select it based on protocol version. Proceed with caution.): If your website supports only specific cipher suites, select this option and choose from the supported suites.
- Cipher suite security: The ECDHE-RSA-AES128-SHA256 and ECDHE-RSA-AES256-SHA384 cipher suites use ECDHE for key exchange and RSA for authentication, with AES-CBC for encryption. Their security and performance are lower than suites that use authenticated encryption modes such as AES-GCM. Some security scanners may flag them as weak. If this occurs, select a custom cipher suite and manually exclude these two suites. - Naming standards: Cipher suite naming standards vary. WAF displays them in OpenSSL format, while some scanners use the IANA standard. For example, ECDHE-ECDSA-AES256-SHA384 in OpenSSL corresponds to TLS_ECDHE_ECDSA_WITH_AES_256_CBC_SHA384 in IANA. To find the correspondence, visit ciphersuite.info or use other TLS query tools.
Strong cipher suites Weak cipher suites ECDHE-ECDSA-AES128-GCM-SHA256 AES128-GCM-SHA256 ECDHE-ECDSA-AES256-GCM-SHA384 AES256-GCM-SHA384 ECDHE-ECDSA-AES128-SHA256 AES128-SHA256 ECDHE-ECDSA-AES256-SHA384 AES256-SHA256 ECDHE-RSA-AES128-GCM-SHA256 ECDHE-RSA-AES128-SHA ECDHE-RSA-AES256-GCM-SHA384 ECDHE-RSA-AES256-SHA ECDHE-RSA-AES128-SHA256 AES128-SHA ECDHE-RSA-AES256-SHA384 AES256-SHA ECDHE-ECDSA-AES128-SHA DES-CBC3-SHA ECDHE-ECDSA-AES256-SHA
Enable HTTP routing: On the Configure Forwarding Rule page, expand Advanced HTTPS Settings and click Enable HTTP Routing. The back-to-origin port defaults to 80. Change this port if needed.
Origin SNI: On the Configure Forwarding Rule page, expand Advanced HTTPS Settings and select Origin SNI (Server Name Indication). Set a value for the SNI extension field:
Use domain name in host header: The SNI value of the back-to-origin request matches the Host field in the HTTP request header. For example, if the added domain name is
*.aliyundoc.comand the client request Host iswww.aliyundoc.com, the back-to-origin SNI iswww.aliyundoc.com.Custom: Specify a fixed SNI value, which can differ from the Host field. Use this only when the origin server has special configuration requirements, such as needing to direct requests from multiple domain names to a specific backend service.
Extend network access capabilities (IPv6)
Enable IPv6:
If your website supports IPv6, use this feature to direct IPv6 traffic to WAF. The system assigns an IPv6 WAF IP address to the domain name.
IPv4 client requests are forwarded to the IPv4 origin server. IPv6 client requests are forwarded to the IPv6 origin server. If no IPv6 origin server is configured, they fall back to the IPv4 origin server.
This feature is available only for pay-as-you-go, subscription Enterprise, and Ultimate editions of WAF in Chinese Mainland.
If this feature is enabled, Shared Cluster-based Intelligent Load Balancing is not supported.
Steps: On the Configure Listener page, expand More Settings and click Enable IPv6.
Improve service availability and performance
| Parameter | Description |
|---|---|
| Enable Exclusive IP | All domain names added to the same WAF instance share a WAF IP by default. A domain name with this feature enabled is assigned an independent IP address, so it is unaffected when other domain names experience DDoS attacks. For more information, see Exclusive IP address. Important Not supported for Subscription Basic Edition instances. |
| Shared Cluster Intelligent Load Balancing | Configure at least three protection nodes in different regions for the WAF instance. Combined with intelligent DNS resolution and the least-time back-to-origin algorithm, this ensures the shortest path and lowest latency for traffic from the protection node to the origin server. For more information, see Use the intelligent load balancing feature. Important Not supported for Subscription Basic Edition instances. |
| Load balancing algorithm | When the origin server has multiple addresses, configure a load balancing policy to distribute back-to-origin traffic. |
| Enable secondary back-to-origin link | Configure a secondary origin server for high availability. When all primary back-to-origin addresses are unreachable and request traffic is at least 100 QPS (Queries Per Second), the system automatically switches to the secondary link within 30 seconds and switches back after the primary link recovers. |
Enable Exclusive IP:
Pay-as-you-go instances are billed based on the number of enabled exclusive IP addresses. For more information, see Pay-as-you-go billing description.
Exclusive IP addresses are not fixed. Follow the steps in this topic to modify the domain's DNS settings to ensure business stability.
Enabling this feature disables Shared Cluster-based Intelligent Load Balancing.
On the Configure Listener page, expand More Settings and click Exclusive IP Address. For subscription instances where this option is unavailable, follow the on-screen prompts to upgrade and purchase the Exclusive IP value-added service.
Shared Cluster-based Intelligent Load Balancing:
Billing for pay-as-you-go instances is determined by whether Shared Cluster-based Intelligent Load Balancing is enabled. For more information, see Pay-as-you-go billing.
If enabled, IPv6 and exclusive IP addresses are not supported.
On the Configure Listener page, expand More Settings. In the Protection Resource area, select Shared Cluster-based Intelligent Load Balancing. For subscription instances where this option is unavailable, follow the on-screen instructions to upgrade and enable the Intelligent Load Balancing value-added service.
Load balancing algorithm: On the Configure Forwarding Rule page, select a Load Balancing Algorithm:
Round-robin: Distributes client requests sequentially to each server in the origin server address list. Ideal for even load distribution across multiple origin servers.
IP hash: Forwards requests from the same client to the same origin server. Suitable for session persistence, but may result in unbalanced load.
Least time: Uses intelligent DNS resolution and the least-time back-to-origin algorithm to ensure the shortest path and lowest latency.
ImportantTo use the Least time algorithm, set Protection Resource to Shared Cluster-based Intelligent Load Balancing during Configure Listener.
Standby Link Back-to-origin: On the Configure Forwarding Rule page, click Standby Link Back-to-origin. Enter up to 20 addresses in IP or domain name format. Press Enter after each address.
IP: Must be a publicly accessible IP address. Both IPv4 and IPv6 are supported. To configure an IPv6 address, enable IPv6 protection during Configure Listener first.
Domain name: WAF only forwards client requests to the IPv4 address resolved from this domain. For IPv6 websites, use the IP method.
If the origin server address changes, update it here promptly.
Obtain real client information
| Parameter | Description |
|---|---|
| Is there a layer 7 proxy (Anti-DDoS/CDN, etc.) in front of WAF? | If a layer 7 proxy such as a CDN is deployed in front of WAF, configure Obtain Actual IP Address of Client so WAF can get the real client IP for security analytics. |
| Enable traffic tagging | Helps the origin server distinguish requests that have passed through WAF and get the originating IP address or source port of the client. |
| Request header field forwarding configuration | WAF inserts specific headers into processed HTTP requests by default. Configure these headers as needed. If a header already exists in the request when WAF inserts it, its value is overwritten. |
Is a layer 7 proxy such as Anti-DDoS proxy or CDN deployed in front of WAF?
On the Configure Listener page, in the Is a Layer 7 proxy such as Anti-DDoS Proxy or CDN deployed in front of WAF section, configure the following:
No: Business requests received by WAF come directly from the client.
Yes: Business requests are forwarded from another layer 7 proxy service. Configure how to determine the client's IP:
Use the First IP Address in X-Forwarded-For Field as Actual IP Address of Client: WAF obtains the client IP in the following order:
Reads X-Real-IP from the request header.
If X-Real-IP does not exist, uses the first IP in X-Forwarded-For (XFF).
[Recommended] Use the First IP Address in Specified Header Field as Actual IP Address of Client to Prevent X-Forwarded-For Forgery: > Note: Configure the other proxy service to write the client's source IP into a specified header field, such as X-Real-IP or X-Client-IP. This prevents attackers from bypassing WAF by forging the XFF field. In the Header Field box, enter one or more header fields. Press Enter after each field. WAF obtains the client IP in the following order:
Matches the configured Header Field sequentially.
If none of the specified headers exist, tries X-Real-IP.
If still no result, uses the first IP in XFF.
Enable Traffic Tag: On the Configure Forwarding Rule page, expand Other Advanced Settings, select Enable Traffic Tag, and configure:
Custom Header: Set a Header Name and Header Value that WAF adds to origin requests to identify requests that passed through WAF. For example,
WAF-TAG: Yes, whereWAF-TAGis the header name andYesis the value. Your origin server can then use this field for validation or access control.ImportantDo not enter standard HTTP header fields such as User-Agent. Doing so overwrites the standard header's content with your custom value.
Originating IP Address: Specify the header field containing the client's originating IP address. WAF records and forwards this field to the origin server.
Source Port: Specify the header field containing the client's originating port. WAF records and forwards this field to the origin server.
Request Header Forwarding: On the Configure Forwarding Rule page, expand Other Advanced Settings and select the header fields to insert:
Insert X-Client-IP to get the real client IP: Forwards the client's originating IP address.
Add X-True-IP with Real Client IP: Forwards the client's IP address to the origin server.
Insert Web-Server-Type to get the server type: The first proxy adds this header to inform the backend of the type of frontend web server or proxy processing the request.
Add WL-Proxy-Client-IP with Real Client IP: Similar to X-Client-IP, specific to Oracle WebLogic Server.
Insert X-Forwarded-Proto to get the frontend protocol: The protocol the client uses to connect to the first proxy.
Optimize back-to-origin link quality
| Parameter | Description |
|---|---|
| Set back-to-origin timeout | Configure the timeout for WAF to establish new connections and read/write connections when origin server processing time is long. |
| Retry back-to-origin requests | When a back-to-origin attempt fails, WAF retries each origin server three times by default. Disable this to stop retrying on failure. |
| Back-to-origin keep-alive requests | Maintain a long-term connection between WAF and the origin server. If you experience occasional 502 errors after integration, set the WAF persistent connection value to be less than or equal to the corresponding value on the origin server. |
Set back-to-origin timeout: On the Configure Forwarding Rule page, expand Other Advanced Settings and configure:
Connection Timeout Period: Timeout for WAF to establish a connection with the origin server. Increase this only if connections are slow due to high network latency or heavy origin server load. Default: 5 s. Valid range: 1–3,600 s.
Read Connection Timeout Period: Timeout for receiving a response from the origin server. Increase this for operations that require long response times, such as report exports or batch data processing. Default: 120 s. Valid range: 1–3,600 s.
Write Connection Timeout Period: Timeout for requests sent from WAF to an origin server. Increase this only if the origin server is under heavy load and processes requests slowly. Default: 120 s. Valid range: 1–3,600 s.
Retry back-to-origin requests: On the Configure Forwarding Rule page, expand Other Advanced Settings and configure the settings in the Back-to-origin Retry section.
Back-to-origin keep-alive requests:
If you disable this feature, back-to-origin keep-alive connections do not support the WebSocket protocol.
On the Configure Forwarding Rule page, expand Other Advanced Settings, and in the Back-to-origin Keep-alive Requests area, enable the feature and configure:
Max Requests per Connection: Default: 1,000. Valid range: 60–1,000. For Nginx origin servers, this corresponds to the
keepalive_requestsparameter. For more information, see the Nginx documentation.Timeout Period of Idle Keep-alive Requests: Default: 15 s. Valid range: 10–3,600 s. For Nginx origin servers, this is equivalent to the
keepalive_timeoutparameter.
Improve resource management efficiency
Resource group:
Simplifies resource management and permission configuration. If you do not specify a resource group, the domain is added to the Default Resource Group. For more information, see Resource groups.
On the Configure Listener page, in the Resource Group area, select the resource group from the drop-down list.
Maintenance
Update the certificate for a domain
If a certificate is about to expire or needs to be replaced (for example, due to revocation), update it in WAF.
WAF displays aicon in the connection list when a certificate has fewer than 30 calendar days of validity remaining. Update it promptly to avoid service disruption.
Set up SSL certificate message reminders to receive email or SMS notifications before expiration. For more information, see Set up message notifications for SSL certificates.
To avoid interruptions from expired certificates, enable the certificate hosting service of Alibaba Cloud Certificate Management Service (Original SSL Certificate). This service automatically requests certificates before they expire. For more information, see What is Certificate Hosting Service?
Certificate purchased from Alibaba Cloud:
In the Certificate Management Service (Original SSL Certificate) console, renew the SSL certificate. For more information, see Renew an SSL certificate.
In the WAF console, find the domain in the CNAME record list and click Edit in the Actions column.
In the HTTPS Upload Type area, select Select Existing Certificate, choose the updated certificate, and click Next > Submit.
Certificate purchased from another platform:
Download the certificate file from the original purchase platform.
In the WAF console CNAME access list, click Edit in the Actions column for the target domain.
In the HTTPS Upload Type area, select Upload and enter:
Certificate Name: Set a unique name. It cannot match an already-uploaded certificate.
Certificate File: Paste the certificate content in PEM, CER, or CRT format. Example format:
-----BEGIN CERTIFICATE-----......-----END CERTIFICATE-----Certificate chain: If an intermediate certificate is included, paste the server certificate first, then the intermediate certificate.
Format conversion: If the certificate is in PFX or P7B format, use the certificate tool to convert it to PEM format.
Private Key: Paste the private key content in PEM format.
RSA:
-----BEGIN RSA PRIVATE KEY-----......-----END RSA PRIVATE KEY-----ECC:
-----BEGIN EC PRIVATE KEY-----......-----END EC PRIVATE KEY-----
Re-add a domain after ICP filing expiration
After a domain is added via CNAME, WAF periodically checks its ICP filing status. If the filing expires, WAF automatically stops forwarding traffic for that domain. After re-applying for the filing and receiving approval, return to the CNAME onboarding page and click Add Again.
Disable or remove WAF protection
Temporarily disable: If you encounter issues after onboarding, such as a high number of false positives, turn off the WAF Protection Status switch on the Protected Objects page. For more information, see Disable WAF protection with one click.
Remove WAF protection:
Change the domain's DNS record back to the origin server address.
In the WAF console, click Delete in the Actions column for the target domain.
Before deleting, change the domain's DNS record back to the origin server address. Otherwise, the CNAME address becomes invalid and your website becomes inaccessible.
Billing: For pay-as-you-go WAF instances, charges include request processing fees plus instance and protection rule fees. To stop all billing, see Disable WAF.
Manage WAF domains in bulk via API
When managing multiple domains in WAF, use the API to view or add them efficiently.
To add a domain to a WAF instance, see CreateDomain.
To query the configuration details of a CNAME domain, see DescribeDomain.
Apply in production
Follow these best practices to ensure security and stability when onboarding production resources.
HTTPS configuration: Deploy certificates on your instances and use the following configurations:
Upload certificate files to Certificate Management Service (Original SSL Certificate).
Configure a traffic forwarding port of the HTTPS type. In the TLS Version Control section, configure TLS 1.2 or later.
Set up notifications for SSL certificates to update them before they expire.
Phased rollout: First, add a non-production instance during off-peak hours. After running it for a period and confirming services are normal, add the production instance.
Check services: After onboarding, confirm services are working normally:
Check logs: Look for significant changes in the percentage of 200 status codes, and watch for sudden spikes or drops in QPS. If you have enabled the WAF log service, see WAF logs.
Application monitoring: Confirm that core application functions such as user access and transactions are working normally.
Maintenance: After going live, continuously monitor for attacks and false positive events:
Event handling: Check Security Reports and configure CloudMonitor notifications to stay informed about attacks and security events.
Rule tuning: Monitor attack logs to check whether legitimate user requests are being blocked and optimize protection rules accordingly.
FAQ
Onboarding
How do I view the WAF back-to-origin CIDR blocks and the WAF CNAME?
The WAF back-to-origin CIDR blocks and the WAF CNAME address for each added domain are available on the onboarding page.

How do I check the DNS status of an added domain?
Check the DNS status in the onboarding list to identify domains with DNS anomalies and adjust settings according to the console prompts.
| DNS status | Action |
|---|---|
| Normal DNS resolution | No action required. |
| Abnormal DNS resolution, using A record for connection | Delete the A record of the domain, add a CNAME record, and point the record value to the WAF CNAME address. |
| Abnormal DNS resolution, using incorrect WAF IP | Delete the A record of the domain, add a CNAME record, and point the record value to the WAF CNAME address. |
| Abnormal DNS resolution, using incorrect CNAME address | Change the CNAME record value to the WAF CNAME address. |
| Unknown DNS resolution, proxy enabled for the domain | A layer 7 proxy is enabled in front of WAF. Check whether the origin server address configured in the proxy is the WAF CNAME address. If it is correct, ignore this alert. |
| DNS check timed out | Click the |
| No DNS record, please connect to WAF | Add a CNAME record and enter the WAF CNAME address as the record value. |
| DNS not resolved to WAF, please connect to WAF | Modify the CNAME record and enter the WAF CNAME address as the record value. |
How do I check the ICP filing information for a domain name?
In Network Diagnostic Analysis, select Website Diagnostic Analysis and enter the domain name. Confirm that the Filing Inspection status is The website has been filed. If the status shows The website has not been filed. Please consult your website server provider, you must complete the ICP filing before adding the domain name to WAF.
If you are using an Alibaba Cloud server, go to the Alibaba Cloud ICP Filing System to file. For more information, see ICP filing process.
If you are not using an Alibaba Cloud server, go to your server provider's filing system or the MIIT ICP Filing website to file.
How do I find the public IP or domain name of my origin server?
In the Forwarding Configuration > Server Address section, go to the Network Diagnostic Analysis page, enter your domain name, and check the DNS Provider Resolution Results area. If an IP record (A or AAAA record) is returned, enter the corresponding IP in WAF. If a domain name record (CNAME record) is returned, enter the corresponding Domain Name (Such as CNAME).
How do I determine the port my website uses?
Check the back-to-origin port configuration using the following information:
Standard ports (default): Web services use standard ports that do not need to be specified in the URL.
HTTP:
http://yourdomain.comuses port 80.HTTPS:
https://yourdomain.comuses port 443.
Non-standard ports: The port number appears after the domain name in the format
domain:port.HTTP:
http://yourdomain.com:8080uses port 8080.HTTPS:
https://yourdomain.com:8443uses port 8443.
For the most accurate port information, check the configuration file of your web server, such as nginx.conf for Nginx or Apache.
WAF VIP
What is a WAF VIP and how can I view it?
After a domain is added to WAF, the system assigns an independent virtual IP address (VIP) to receive business requests. This VIP is not shared with other tenants. Within the same WAF instance:
If domain exclusive IP or intelligent load balancing is not enabled, all domain names share one VIP.
If domain exclusive IP is enabled, each domain name gets an independent VIP.
If intelligent load balancing is configured, all domain names share multiple VIPs.
The WAF VIP cannot be viewed directly in the console. Use ping or nslookup on a client to query the domain added to WAF:
ping example.com # Replace with the domain name added to WAFThis VIP is the WAF ingress IP address, not the WAF back-to-origin IP address range. Configure the origin server's allowlist strictly according to the steps in Allow WAF back-to-origin IP addresses.
How do I set a default SSL or TLS policy to make the VIP compliant?
To meet HTTPS communication requirements in compliance scenarios, WAF supports customizing SSL certificates and TLS policies for VIPs. Before running a compliance scan on the WAF VIP, upload a compliant HTTPS certificate and configure the desired TLS protocol versions and cipher suites.
If you enable Exclusive IP Address, this configuration also applies to the exclusive IP address.
Click Default SSL/TLS Settings above the CNAME records.

In the Default SSL/TLS Settings dialog box, configure the following settings and click OK.
Parameter Description HTTPS Upload Type Upload an SSL certificate. The operation is the same as uploading a domain certificate. See Upload a certificate. TLS Version Options: TLS 1.0 and Later (Best Compatibility and Low Security), TLS 1.1 and Later (High Compatibility and High Security) (blocks TLS 1.0 clients), TLS 1.2 and Later (High Compatibility and Best Security) (blocks TLS 1.0 and 1.1 clients), Support TLS 1.3. HTTPS Cipher Suite Options: All Cipher Suites (High Compatibility and Low Security), Custom Cipher Suite (Select it based on protocol version. Proceed with caution.)
When I scan my domain's ports, why does it show open high-risk ports that I didn't open?
When scanning a domain added to WAF via CNAME using tools such as Nmap, you may see ports that are not open on your origin server. This is because the domain's DNS points to WAF's VIP, so you are actually scanning the VIP's ports. This is normal behavior.
WAF only forwards traffic for ports configured in the console. For unconfigured ports, WAF sends an RST packet to terminate the connection immediately after the TCP three-way handshake—no data is forwarded. There is no security risk for unconfigured ports, and VIP ports cannot be manually closed. For more information, see WAF non-standard port opening instructions.
Can I change the DNS record to the WAF VIP?
No. When adding a domain to WAF via CNAME, point the DNS resolution to the CNAME provided by WAF, not to WAF's VIP address. The VIP may change—for example, when enabling or disabling exclusive IP or intelligent load balancing, or in the event of a WAF failure. Using a CNAME ensures the system switches the backend IP address automatically, guaranteeing business continuity.
Product capabilities
Can I use WAF with other services, such as a CDN or NAT Gateway?
Yes. If a layer 7 proxy such as a CDN or Anti-DDoS is deployed in front of WAF, configure the Is a Layer 7 proxy such as Anti-DDoS or CDN deployed in front of WAF? setting when adding to WAF. For more information, see Provide WAF security protection for domain names with CDN content acceleration enabled.
The origin server address for WAF connection is the next-hop device after WAF protection. It supports resources such as NAT Gateway, Server Load Balancer, servers, and OSS.

What cipher suites does WAF support?
In CNAME record mode, use custom cipher suites to control which client requests WAF responds to based on supported suites. For a list of supported cipher suites, see HTTPS cipher suite.