When you use CNAME integration Web Application Firewall (WAF), the origin server receives the IP address of the last-hop proxy instead of the actual client IP. WAF inserts the X-Forwarded-For field in HTTP request headers to pass the real IP address. This topic describes how to configure various backend web servers to extract the real client IP address from this field to ensure that log recording and security auditing function as expected.
How it works
After you use CNAME access to connect your domain to WAF, client requests are first routed through WAF and possibly other intermediate proxies (such as CDN or Anti-DDoS Pro) before they reach the origin server. At this point, the source IP address of the TCP connection received by the origin server is the IP address of the last-hop proxy, not the actual client IP address.
When WAF forwards HTTP requests, it automatically adds the X-Forwarded-For header field. The initial value of this field is the client IP address. Each time the request passes through a proxy node, the IP address of that node is appended to the end of the field in the following format:
X-Forwarded-For: client IP, proxy 1 IP, proxy 2 IP, …Therefore, you must configure the backend web server to extract the leftmost IP address from the X-Forwarded-For header, which is the original client IP address. The following sections describe the configuration methods for different platforms.
Step 1: Obtain the WAF back-to-origin IP ranges
Log on to the Web Application Firewall console. In the top navigation bar, select the resource group and region of your WAF instance (Chinese Mainland or Outside Chinese Mainland). Then, click and record all WAF back-to-origin IP ranges for later configuration.
Step 2: Configure the origin server
Before you configure the origin server, back up the environment by creating ECS snapshots or backing up configuration files to prevent configuration loss.
Configure Nginx
Nginx uses the http_realip_module module to parse X-Forwarded-For. Perform the following steps to modify the Nginx configuration.
Check whether http_realip_module is installed
Log on to the server and run the following command:
nginx -V 2>&1 | grep -o with-http_realip_moduleIf the output contains
with-http_realip_module, the module is installed. Skip to Configure Nginx to trust WAF back-to-origin IP ranges.If no output is returned, the current Nginx does not have this module compiled. Proceed to Add the realip module.
Versions installed using yum install nginx or apt install nginx typically include this module. Custom-compiled versions or minimal container images may not.
Add the realip module (only if missing)
Method 1: Reinstall using the system package manager
# Alibaba Cloud Linux / CentOS / RHEL
sudo yum reinstall nginx -y

# Ubuntu / Debian
sudo apt install --reinstall nginx-core nginx-full
Method 2: Compile from source code
Install dependencies.
# Alibaba Cloud Linux / CentOS / RHEL
sudo yum install -y gcc pcre-devel zlib-devel openssl-devel

# Ubuntu / Debian
sudo apt update
sudo apt install -y build-essential libpcre3-dev zlib1g-dev libssl-dev
Check the installed Nginx version.
# Check the version (used to download the corresponding source code)
nginx -v

# Check the full compilation arguments
nginx -V 2>&1 | grep 'configure arguments' | sed 's/configure arguments: //'
Record the output, for example,
--prefix=/usr/local/nginx --with-http_ssl_module --with-http_v2_module.Download the Nginx source code for the corresponding version. Replace the version number with the actual one.
cd /tmp
wget http://nginx.org/download/nginx-1.26.0.tar.gz
tar zxvf nginx-1.26.0.tar.gz
cd nginx-1.26.0
Configure the compilation arguments. Copy the original arguments from Step 2 and append
--with-http_realip_moduleat the end../configure \ --prefix=/usr/local/nginx \ --with-http_ssl_module \ --with-http_v2_module \ --with-http_realip_moduleCompile and upgrade the service.
make
#  After running make, a new nginx binary file is generated in the objs/ directory.

#  Rename the old binary (keep a backup)
sudo mv /usr/local/nginx/sbin/nginx /usr/local/nginx/sbin/nginx.old

#  Replace with the newly compiled version
sudo cp objs/nginx /usr/local/nginx/sbin/nginx

# Get the PID of the current master process
OLD_PID=$(pgrep -f 'nginx: master' | head -1)

# Start the new master process
sudo kill -USR2 $OLD_PID

# Wait for the new process to start
sleep 2

# Shut down the old process
sudo kill -QUIT $OLD_PID
Configure Nginx to trust WAF back-to-origin IP ranges
Edit the main configuration file
nginx.conf(default location:/etc/nginx/nginx.conf) and add the following content to thehttp {}block.http { # Trust the X-Forwarded-For header from WAF back-to-origin IPs # Replace with the actual WAF back-to-origin IP ranges obtained from the console. Each range must be on a separate line. # You must include all WAF back-to-origin ranges. If any are missing, logs may still show WAF back-to-origin IPs instead of the real client IP. set_real_ip_from <ip_range1>; set_real_ip_from <ip_range2>; ... set_real_ip_from <ip_rangex>; # Specify the X-Forwarded-For header to extract the real IP address real_ip_header X-Forwarded-For; }Reload the Nginx configuration:
nginx -t && nginx -s reload
Verify the configuration
Access the website. Replace
http://your-domain.com/with the domain name that is connected to WAF.curl http://your-domain.com/View the Nginx access logs. The real client IP address should be displayed.
tail -f /var/log/nginx/access.log
Configure IIS 7 (applicable to IIS 7 and later)
When WAF acts as a reverse proxy, the c-ip field in the default IIS logs records the WAF back-to-origin IP instead of the actual client IP. You can use the W3C custom log field feature in IIS to write the X-Forwarded-For request header to the logs for auditing and troubleshooting purposes.
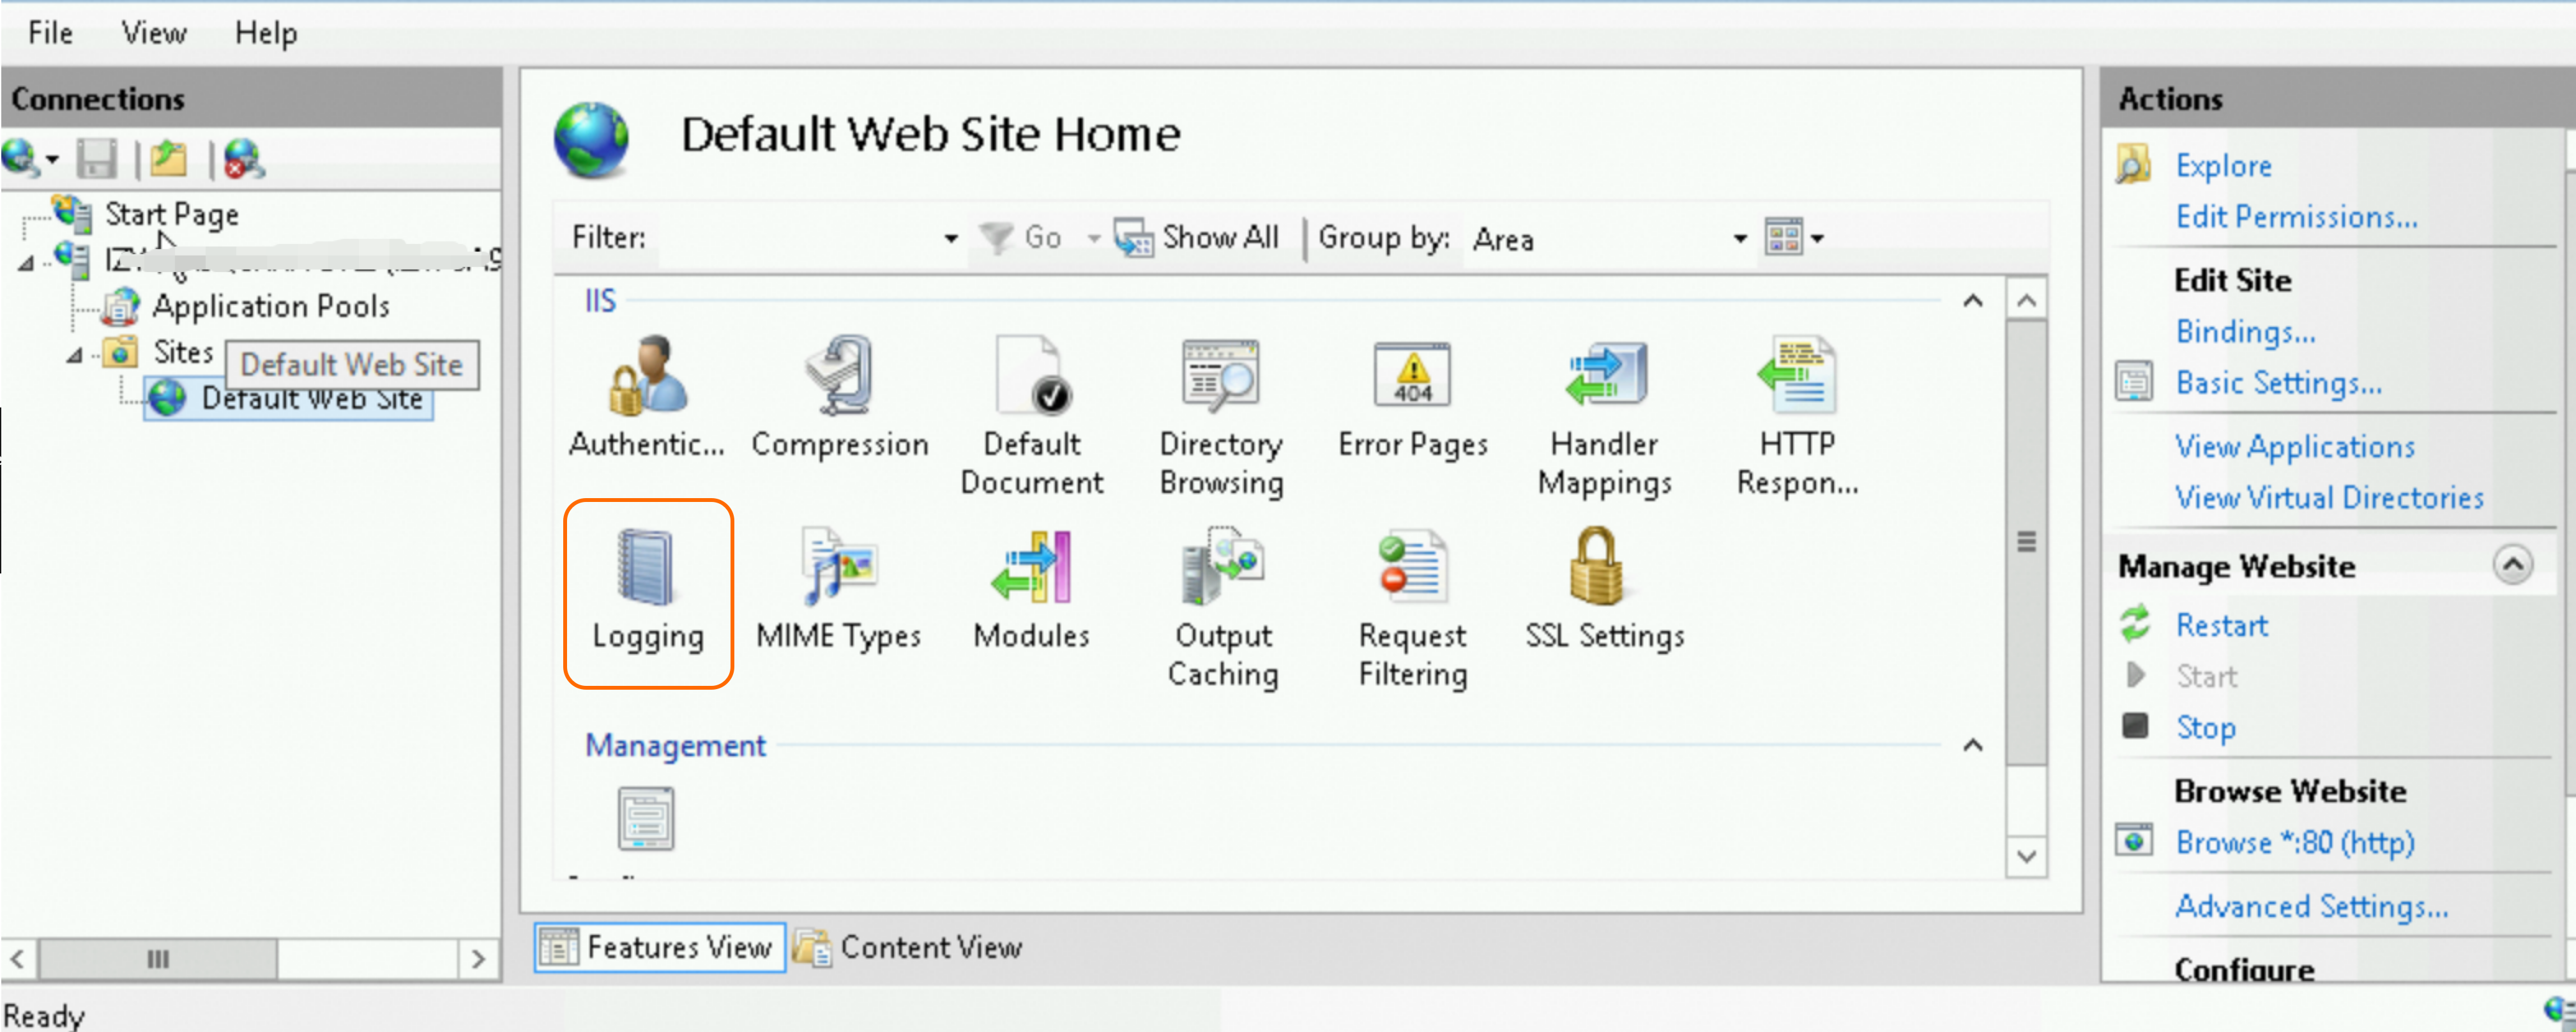
Open IIS Manager. In the left-side Connections tree, expand the server node and select the target website (for example,
Default Web Site).In the Features View pane on the right, double-click the Logging icon.
In the Log Files section, make sure that the Format is set to W3C (the default value). If a different format is selected, change it to W3C.
In the Log Files section, click Select Fields....
At the bottom of the dialog box that appears, click Add Field....
In the Add Custom Field dialog box, enter the following information and click OK.
Parameter
Description
Field Name
Enter
X-FORWARDED-FORSource Type
Select
Request HeaderSource
Enter
X-Forwarded-ForClick OK to save the custom field.
Click OK again to close the logging fields window, and then click Apply in the Actions pane to save the changes.
Restart IIS for the changes to take effect.
Access the website to verify the configuration, and view the access logs (default path:
C:\inetpub\logs\LogFiles\W3SVC1\). The real client IP address should be displayed.
Configure Apache
Apache 2.4 and later includes the remoteip_module (mod_remoteip.so), which can be used to obtain the real client IP address.
Alibaba Cloud Linux / CentOS / RHEL
Edit the main Apache configuration file.
sudo vim /etc/httpd/conf/httpd.confAdd the following content to the end of the file.
# Enable mod_remoteip
LoadModule remoteip_module modules/mod_remoteip.so

# Specify the request header used by WAF to pass the real IP address (WAF uses X-Forwarded-For)
RemoteIPHeader X-Forwarded-For

# Set the WAF back-to-origin IP ranges. Replace the placeholders with the actual Alibaba Cloud WAF back-to-origin IP ranges
RemoteIPTrustedProxy 100.xx.xx.0/10
RemoteIPTrustedProxy 11.xx.xx.0/13
RemoteIPTrustedProxy 112.xx.xx.0/16
Locate the log format section in the configuration file, and change
%hto%a.%arepresents the remote IP address of the connection (the real client IP address after being corrected bymod_remoteip), whereas%hrepresents the original connection IP address (the WAF node IP address). The following figure shows a modified example.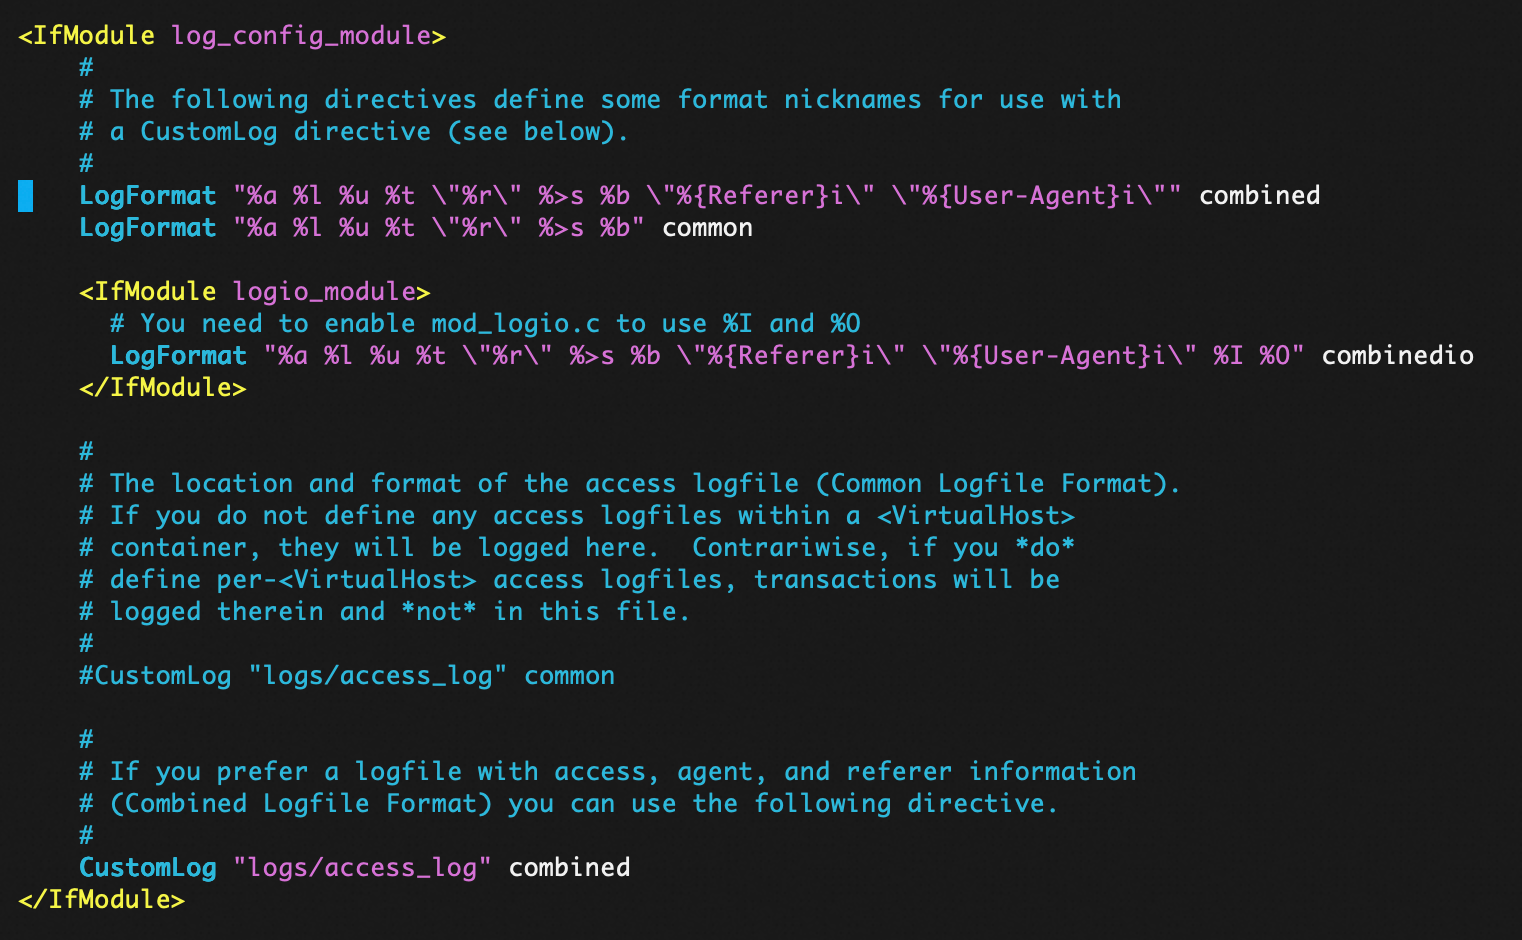
Restart Apache for the changes to take effect.
sudo systemctl restart httpdAccess the website to verify the configuration, and view the access logs. The real client IP address should be displayed.
tail -f /var/log/httpd/access_log
Ubuntu / Debian
Enable the
remoteipmodule.sudo a2enmod remoteipEdit the main Apache configuration file.
sudo vim /etc/apache2/apache2.confAdd the following content to the end of the file.
# Specify the request header used by WAF to pass the real IP address (WAF uses X-Forwarded-For)
RemoteIPHeader X-Forwarded-For

# Set the WAF back-to-origin IP ranges. Replace the placeholders with the actual Alibaba Cloud WAF back-to-origin IP ranges
RemoteIPTrustedProxy 100.xx.xx.0/10
RemoteIPTrustedProxy 11.xx.xx.0/13
RemoteIPTrustedProxy 112.xx.xx.0/16
Locate the log format section in the configuration file, and change
%hto%a.%arepresents the remote IP address of the connection (the real client IP address after being corrected bymod_remoteip), whereas%hrepresents the original connection IP address (the WAF node IP address). The following figure shows a modified example.
Restart Apache for the changes to take effect.
sudo systemctl restart apache2Access the website to verify the configuration, and view the access logs. The real client IP address should be displayed.
tail -f /var/log/apache2/access.log
Configure Tomcat
Tomcat can obtain the real client IP address by enabling the X-Forwarded-For feature.
Go to the Tomcat installation directory and open the
tomcat/conf/server.xmlconfiguration file.Modify the AccessLogValve log configuration to the following:
<Valve className="org.apache.catalina.valves.AccessLogValve" directory="logs"
prefix="localhost_access_log." suffix=".txt"
pattern="%{X-FORWARDED-FOR}i %l %u %t %r %s %b %D %q %{User-Agent}i %T" resolveHosts="false"/>
Restart Tomcat.
sudo systemctl restart tomcatAccess the website to verify the configuration, and view the access logs. The real client IP address should be displayed.
# Replace the following command with the actual Tomcat installation directory path and the actual log file
tail -f /opt/tomcat/logs/localhost_access_log.2026-01-01.txt
Configure a Kubernetes cluster
When a Kubernetes cluster that uses the Nginx Ingress Controller is connected to WAF, the real client IP address is added by WAF to the X-Forwarded-For request header. By default, the Nginx Ingress Controller does not trust this field, and business containers cannot obtain the real client IP address.
Perform the following steps to configure the Nginx Ingress Controller.
Edit the ConfigMap of the Ingress Controller:
kubectl -n kube-system edit cm nginx-configurationAdd the following configuration items to the
datafield:compute-full-forwarded-for: "true" forwarded-for-header: "X-Forwarded-For" use-forwarded-headers: "true"Save and exit. The configuration automatically takes effect without the need to restart pods.
After the configuration is complete, the Ingress Controller identifies the first IP address in
X-Forwarded-Foras the real client IP address and retains this value when forwarding requests.
Advanced optimization: Pass the real IP address by using a custom header
In complex network architectures, relying on the standard X-Forwarded-For (XFF) header carries risks such as spoofing and IP confusion across multiple proxy layers. You can use a custom HTTP header to pass the real client IP address to improve security and control.
The following example demonstrates how to obtain the real client IP address by using a custom header. The corresponding network architecture is shown in the following figure.

Configure CDN
By default, CDN carries the
Ali-Cdn-Real-IpHTTP request header in back-to-origin requests, which indicates the real IP address of the client when it connects to the CDN node. You can use Add a custom outbound request header to pass this IP address to WAF. The following table shows an example of the CDN console configuration.Parameter
Example
Operation
Add
Request Header
Custom back-to-origin request header
Header Name
Enter a custom name, for example,
TrueIPHeader Value
$http_Ali_Cdn_Real_IpAllow Duplicates
Not Allowed
Rule Condition
Not used
Configure WAF
Complete the following two configurations in the WAF console:
Is a Layer 7 proxy such as Anti-DDoS Proxy or CDN deployed in front of WAF: Enable this option so that WAF correctly identifies the real client IP address.
Enable Traffic Tagging: Enable this option so that the origin server can obtain the real client IP address.
For more information about how to configure these options, see Real client information.
Parameter
Example
Is a Layer 7 proxy such as Anti-DDoS Proxy or CDN deployed in front of WAF
Select Yes, and then select [Recommended] Use the First IP Address in Specified Header Field as Actual IP Address of Client to Prevent X-Forwarded-For Forgery. Enter the Header Name that you specified in the CDN configuration, for example,
TrueIP.Enable Traffic Tagging
Select Originating IP Address, and enter the Header Name that you specified in the CDN configuration, for example,
TrueIP.Configure the origin server
Take Nginx as an example. Edit the main configuration file
nginx.confand add the following content to thehttp {}block. For more information, see Configure Nginx.http { # Trust request headers from WAF back-to-origin IP addresses # Replace with the actual WAF back-to-origin IP ranges obtained from the console. Each range must be on a separate line. # You must include all WAF back-to-origin ranges. If any are missing, logs may still show WAF back-to-origin IPs instead of the real client IP. set_real_ip_from <ip_range1>; set_real_ip_from <ip_range2>; ... set_real_ip_from <ip_rangex>; # Specify the custom request header to extract the real IP address. This example uses TrueIP real_ip_header TrueIP; }We recommend that you configure the security group of the origin server to only allow traffic from WAF back-to-origin IP ranges. This ensures that only WAF can communicate with the origin server, preventing attackers from bypassing WAF and directly accessing the public IP address of the origin server.
FAQ
What is the difference between the real IP address configuration on the origin server (described in this topic) and the Is a Layer 7 proxy such as Anti-DDoS Proxy or CDN deployed in front of WAF option in the WAF console?
Real IP address configuration on the origin server (described in this topic)
Purpose: After you use CNAME integration to connect your domain to WAF, this configuration enables the origin server (such as Nginx) to record the real client IP address in its access logs (such as
access.log) instead of the WAF back-to-origin IP address.Required: Only required if you need to view or process the real client IP address on the origin server.
The Is a Layer 7 proxy such as Anti-DDoS Proxy or CDN deployed in front of WAF option in the WAF console
Applicable scenario: Other Layer 7 proxies (such as CDN or Anti-DDoS Pro) are deployed in front of WAF.
Purpose: Instructs WAF to extract the real client IP address from a specific HTTP request header (such as
Ali-Cdn-Real-IporX-Forwarded-For) to ensure that security reports and attack identification are based on the real source IP address.Required: Only required if a Layer 7 proxy is deployed in front of WAF. If no front-end proxy exists, keep the default value No.
What is X-Forwarded-For spoofing and how do I prevent it?
X-Forwarded-For (XFF) spoofing refers to an attack where an attacker constructs or tampers with the X-Forwarded-For request header in an HTTP request to inject a fake client IP address, with the goal of bypassing IP-based access controls, log auditing, or security policies. X-Forwarded-For is a non-standard request header that can be arbitrarily set by clients. If a backend service directly trusts this field without validation, security risks arise.
Example: XFF spoofing attack command
An attacker can use the curl command to forge an X-Forwarded-For header, spoofing the IP address as 1.2.3.4:
curl -H "X-Forwarded-For: 1.2.3.4" https://example.com/To prevent XFF spoofing, use a custom trusted request header to pass the real IP address:
Configure CDN or WAF to use a predefined custom HTTP request header to pass the real client IP address when sending requests back to the origin server. The origin server then only parses this custom header. This request header is injected by trusted middleware (such as WAF) and cannot be directly controlled by clients, effectively preventing spoofing.