After you attach an Elastic RDMA Interface (ERI) to a GPU-accelerated instance, the instance can use RDMA passthrough for accelerated interconnectivity within a VPC. Compared to traditional RDMA, elastic Remote Direct Memory Access (eRDMA) provides more efficient data transmission. This improves communication efficiency between GPU-accelerated instances and reduces task processing time. This topic describes how to enable eRDMA on a GPU-accelerated instance.
Limits
Limitations | Description |
Instance types | The following instance types support ERIs:
|
Image | One of the following images is supported:
|
Number of eRDMA devices |
|
Network limits |
|
Procedure
To use the eRDMA feature on a supported instance, two conditions must be met: the eRDMA software stack is installed, and a network interface card with the Elastic RDMA Interface feature enabled is attached.
Configure eRDMA when you purchase an instance
Go to the ECS console to purchase an instance.
Create a GPU-accelerated instance that supports ERIs.
During the creation process, note the following configuration items. For information about other parameters, see Create an instance on the Custom Launch tab.
Instance: See Limits. This topic uses ebmgn8is as an example.
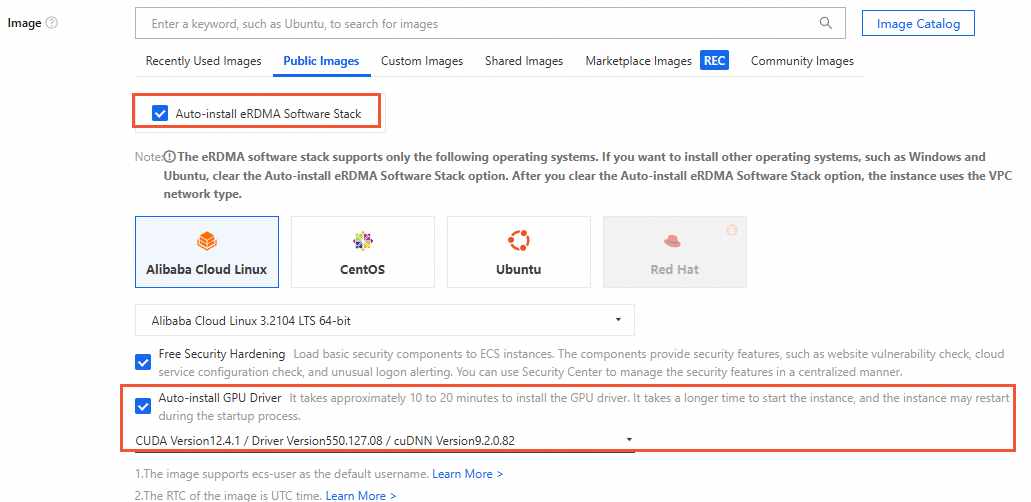
Image: When you select a public image, the Auto-install GPU Driver and Auto-install eRDMA Software Stack options are selected by default. After the instance is created, the system automatically installs the GPU driver, CUDA, cuDNN, and the eRDMA software stack.
(Optional) Enable Jumbo Frames: If the selected instance supports jumbo frames, you can enable this feature to improve
eRDMAcommunication performance.Enabling jumbo frames lets you set a larger MTU. When you use NCCL and the LL128 low-latency protocol for communication, the MTU must be 8500. If jumbo frames are not enabled, the MTU must be 1400. An incorrect MTU setting causes data consistency issues.
ENI: When you create a GPU-accelerated instance, an eRDMA primary network interface card and an eRDMA secondary ENI are created by default on the Network and Security Groups page. The eRDMA Interface option is automatically selected for the primary network interface card and the secondary ENI.
 Note
NoteAfter a GPU-accelerated instance is running, you cannot enable or disable the Elastic RDMA feature for a single ENI.
The two network interface cards with the Elastic RDMA feature enabled are automatically attached to different channels. You do not need to specify the channels.
The primary network interface card cannot be detached from the GPU-accelerated instance. It can only be created and released with the instance.
Go to the details page of the created instance, click the ENIs tab, and view the network interface card type of the instance.
If the network interface card type for the primary network interface card or secondary ENI is displayed as shown in the following figure, an ENI with the Elastic RDMA Interface feature enabled is attached to the instance.

Configure eRDMA for an existing GPU-accelerated instance
Log on to the ECS console.
Find the target instance, go to the instance details page, and then select the ENIs tab to check whether a network interface card with the Elastic RDMA Interface feature enabled is attached to the instance.

If it is enabled (as shown in the preceding figure), skip the following steps.
If it is not enabled, follow these steps to configure eRDMA for the primary network interface card or a secondary ENI.
Configure eRDMA for the primary network interface card or a secondary ENI.
NoteFor instance types that support jumbo frames, you can enable jumbo frames to improve
eRDMAcommunication performance.Enabling jumbo frames lets you set a larger MTU. When you use NCCL and the LL128 low-latency protocol for communication, the MTU must be 8500. If jumbo frames are not enabled, the MTU must be 1400. An incorrect MTU setting causes data consistency issues.
If you create a GPU-accelerated instance without selecting the eRDMA Interface option for the primary network interface card or the secondary ENI, you can create and attach two eRDMA-enabled secondary ENIs after the instance is created.
If you create a GPU-accelerated instance and select the eRDMA Interface option for only one ENI, you can create and attach only one additional eRDMA-enabled secondary ENI after the instance is created.
When you create and attach an eRDMA network interface card to a GPU-accelerated instance in the console, you cannot attach it to a different channel. This reduces the total bandwidth of the two eRDMA network interface cards by half. Therefore, use OpenAPI to attach the eRDMA network interface card.
(Recommended) Use OpenAPI
Method 1: Create and attach an Elastic RDMA network interface card
Each GPU-accelerated instance supports up to two eRDMA network interface cards. You must use the
NetworkCardIndexparameter to attach them to different channels.Create an Elastic RDMA network interface card.
For more information, see CreateNetworkInterface.
After the call is successful, record the ENI ID (the return value of
NetworkInterfaceId) from the returned data.Attach the eRDMA ENI.
For more information, see AttachNetworkInterface.
After the call is successful (the ENI is attached), you can view the attached Elastic RDMA network interface card on the ENIs tab of the GPU-accelerated instance.

Method 2: Modify the properties of an existing ENI
NoteThis method does not support specifying the
NetworkCardIndexparameter (the index of the physical network card to which the network interface card is attached). If you attach two RDMA network interface cards at the same time, using this method to configure eRDMA for a secondary ENI may prevent you from achieving the maximum bandwidth.For more information, see ModifyNetworkInterfaceAttribute.
Parameter
Description
RegionId
The ID of the region where the secondary ENI resides.
NetworkInterfaceId
The ID of the secondary ENI.
NetworkInterfaceTrafficMode
The communication mode of the secondary ENI. Valid values:
Standard: uses the TCP communication mode.
HighPerformance: enables the ERI and uses the RDMA communication mode.
In this step, select
HighPerformance.After the call is successful (the ENI is attached), you can view the attached Elastic RDMA network interface card on the ENIs tab of the GPU-accelerated instance.

Use the console
Create a secondary ENI.
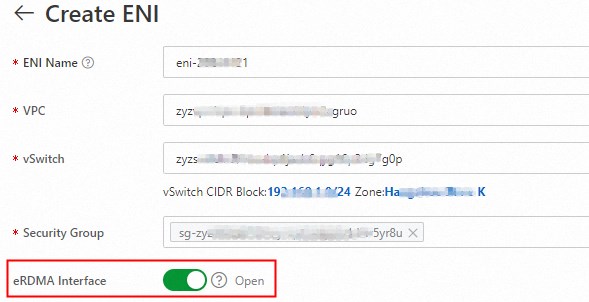
For more information, see Create and use an ENI. When you create a secondary ENI with an ERI, turn on the eRDMA Interface switch. The ERI shares the settings of the secondary ENI, including the IP address of the ENI and the security group rules applied to the ENI.
Attach the secondary ENI to the GPU-accelerated instance.
For more information, see Attach a secondary ENI.
NoteYou can attach a maximum of two secondary ENIs with ERI enabled to a single instance.
After you attach a secondary ENI with ERI enabled to a GPU-accelerated instance, you must stop the instance before you can detach the ENI. For more information, see Stop an instance (normal stop).
Remotely connect to the GPU-accelerated instance.
For more information, see Connect to a Linux instance using Workbench.
Run the
ifconfigcommand to check whether the newly attached secondary ENI exists.If the newly attached secondary ENI is not displayed, manually configure the network interface card. For more information, see Configure a secondary ENI. Otherwise, skip this step.
NoteSome images may not automatically detect newly attached secondary ENIs. You need to configure the secondary ENI on the instance.
(Optional) Install the Elastic RDMA Interface (ERI) software stack on the instance.
If you did not select the Auto-install eRDMA Software Stack option when you selected the public image, install the eRDMA software stack using a script or by manual installation as needed. This lets you start and use the ERI feature.
Install using a script
After the GPU-accelerated instance is created, you can use a script to separately install software such as the eRDMA software stack, GPU driver, CUDA, and cuDNN. The following script is an example.
#!/bin/sh

#Specify the versions to install
DRIVER_VERSION="570.133.20"
CUDA_VERSION="12.8.1"
CUDNN_VERSION="9.8.0.87"
IS_INSTALL_eRDMA="TRUE"
IS_INSTALL_RDMA="FALSE"
INSTALL_DIR="/root/auto_install"

#Use the .run file to install the driver and CUDA
auto_install_script="auto_install_v4.0.sh"

script_download_url=$(curl http://100.100.100.200/latest/meta-data/source-address | head -1)"/opsx/ecs/linux/binary/script/${auto_install_script}"
echo $script_download_url

rm -rf $INSTALL_DIR
mkdir -p $INSTALL_DIR
cd $INSTALL_DIR && wget -t 10 --timeout=10 $script_download_url && bash ${INSTALL_DIR}/${auto_install_script} $DRIVER_VERSION $CUDA_VERSION $CUDNN_VERSION $IS_INSTALL_RDMA $IS_INSTALL_eRDMA
Manual installation
After creating a GPU-accelerated instance, you can manually install the OFED, eRDMA, and GPU drivers and load the
nv_peer_memservice component as follows.Remotely connect to the GPU-accelerated instance.
For more information, see Connect to a Linux instance using Workbench.
Install the OFED driver.
Run the following command to install dependencies.
Alibaba Cloud Linux 3
yum install rpm-build flex iptables-devel systemd-devel gdb-headless elfutils-devel python3-Cython bison numactl-devel libmnl-devel libnl3-devel libdb-devel libselinux-devel perl-generators elfutils-libelf-devel kernel-rpm-macros valgrind-devel cmake lsof -yCentOS 8.5/8.4/7.9
CentOS 8.5/8.4
wget http://mirrors.cloud.aliyuncs.com/opsx/ecs/linux/binary/erdma/centos8/python3-Cython-0.29.32-3.16.x86_64.rpm
yum install python3-Cython-0.29.32-3.16.x86_64.rpm -y
yum install kernel-rpm-macros perl-generators libmnl-devel valgrind-devel rpm-build systemd-devel libdb-devel iptables-devel lsof elfutils-devel bison libnl3-devel libselinux-devel flex cmake numactl-devel -y
CentOS 7.9
sudo yum install python-devel python3-Cython kernel-rpm-macros perl-generators libmnl-devel valgrind-devel rpm-build systemd-devel libdb-devel iptables-devel lsof elfutils-devel bison libnl3-devel libselinux-devel flex cmake numactl-devel -y
Ubuntu 24.04/22.04/20.04/18.04
Ubuntu 24.04
sudo apt-get update -y
sudo apt-get install -y pkg-config
Ubuntu 22.04
sudo apt-get update -y
sudo apt-get install -y pkg-config
Ubuntu 20.04
sudo apt-get update -y
sudo apt-get install -y pkg-config
Ubuntu 18.04
sudo apt-get update
sudo apt-get install -y pkg-config
sudo apt install -y make dh-python libdb-dev libselinux1-dev flex dpatch swig graphviz chrpath quilt python3-distutils bison libmnl-dev libelf-dev gcc sudo python3
Run the following command to download the OFED package configuration file.
Alibaba Cloud Linux 3
sudo wget http://mirrors.cloud.aliyuncs.com/opsx/ecs/linux/binary/erdma/ofed/MLNX_OFED_SRC-5.4-3.5.8.0.tgz
sudo tar -xvf MLNX_OFED_SRC-5.4-3.5.8.0.tgz && cd MLNX_OFED_SRC-5.4-3.5.8.0/
sudo wget http://mirrors.cloud.aliyuncs.com/opsx/ecs/linux/binary/erdma/ofed/alibaba_cloud3/3/ofed_alibaba_cloud3.conf
sudo rm -rf SRPMS/mlnx-ofa_kernel-5.4-OFED.5.4.3.5.8.1.src.rpm
sudo wget http://mirrors.cloud.aliyuncs.com/erdma/kernel-fix/mlnx-ofa_kernel-5.4-OFED.5.4.3.5.8.1.egs.1.src.rpm  -O SRPMS/mlnx-ofa_kernel-5.4-OFED.5.4.3.5.8.1.egs.1.src.rpm
CentOS 8.5/8.4/7.9
CentOS 8.5/8.4
cd /root
wget http://mirrors.cloud.aliyuncs.com/opsx/ecs/linux/binary/erdma/ofed/MLNX_OFED_SRC-5.4-3.5.8.0.tgz
tar -xvf MLNX_OFED_SRC-5.4-3.5.8.0.tgz && cd MLNX_OFED_SRC-5.4-3.5.8.0/
wget http://mirrors.cloud.aliyuncs.com/opsx/ecs/linux/binary/erdma/ofed/alibaba_cloud3/3/ofed_alibaba_cloud3.conf
rm -rf SRPMS/mlnx-ofa_kernel-5.4-OFED.5.4.3.5.8.1.src.rpm
wget http://mirrors.cloud.aliyuncs.com/erdma/kernel-fix/mlnx-ofa_kernel-5.4-OFED.5.4.3.5.8.1.egs.1.src.rpm  -O SRPMS/mlnx-ofa_kernel-5.4-OFED.5.4.3.5.8.1.egs.1.src.rpm
CentOS 7.9
sudo wget http://mirrors.cloud.aliyuncs.com/opsx/ecs/linux/binary/erdma/ofed/MLNX_OFED_SRC-5.4-3.5.8.0.tgz
sudo tar -xvf MLNX_OFED_SRC-5.4-3.5.8.0.tgz && cd MLNX_OFED_SRC-5.4-3.5.8.0/
sudo wget http://mirrors.cloud.aliyuncs.com/opsx/ecs/linux/binary/erdma/ofed/alibaba_cloud3/3/ofed_alibaba_cloud3.conf
sudo rm -rf SRPMS/mlnx-ofa_kernel-5.4-OFED.5.4.3.5.8.1.src.rpm
sudo wget http://mirrors.cloud.aliyuncs.com/erdma/kernel-fix/mlnx-ofa_kernel-5.4-OFED.5.4.3.5.8.1.egs.1.src.rpm  -O SRPMS/mlnx-ofa_kernel-5.4-OFED.5.4.3.5.8.1.egs.1.src.rpm
Ubuntu 24.04/22.04/20.04/18.04
Ubuntu 24.04/22.04/20.04
sudo wget http://mirrors.cloud.aliyuncs.com/erdma/kernel-fix/deb/MLNX_OFED_SRC-debian-24.10-3.2.5.0.tgz
sudo tar -xvf MLNX_OFED_SRC-debian-24.10-3.2.5.0.tgz && cd MLNX_OFED_SRC-24.10-3.2.5.0 && curl -O http://mirrors.cloud.aliyuncs.com/erdma/kernel-fix/deb/ofed_debian.conf
sudo rm -rf SOURCES/mlnx-ofed-kernel_24.10.OFED.24.10.3.2.5.1.orig.tar.gz
wget http://mirrors.cloud.aliyuncs.com/erdma/kernel-fix/deb/mlnx-ofed-kernel_24.10.egs.1.OFED.24.10.3.2.5.1.orig.tar.gz -O SOURCES/mlnx-ofed-kernel_24.10.egs.1.OFED.24.10.3.2.5.1.orig.tar.gz
Ubuntu 18.04
sudo wget http://mirrors.cloud.aliyuncs.com/opsx/ecs/linux/binary/erdma/ofed/MLNX_OFED_SRC-debian-5.4-3.6.8.1.tgz
sudo tar -xvf MLNX_OFED_SRC-debian-5.4-3.6.8.1.tgz && cd MLNX_OFED_SRC-5.4-3.6.8.1 && curl -O http://mirrors.cloud.aliyuncs.com/erdma/kernel-fix/deb/ofed_debian.conf
sudo rm -rf SOURCES/mlnx-ofed-kernel_5.4.orig.tar.gz
sudo wget http://mirrors.cloud.aliyuncs.com/erdma/kernel-fix/deb/mlnx-ofed-kernel_5.4.egs.orig.tar.gz -O SOURCES/mlnx-ofed-kernel_5.4.egs.orig.tar.gz
Run the command that corresponds to your operating system to install the OFED driver.
Alibaba Cloud Linux 3
sudo ./install.pl --config ./ofed_alibaba_cloud3.conf --distro RHEL8
sudo dracut -f
CentOS 8.5/8.4/7.9
CentOS 8.5/8.4
./install.pl --config ./ofed_alibaba_cloud3.conf --distro RHEL8CentOS 7.9
sudo ./install.pl --config ./ofed_alibaba_cloud3.conf --distro RHEL7
Ubuntu 24.04/22.04/20.04/18.04
Replace
${VERSION_ID}with your Ubuntu system version, such as 24.04.sudo curl -O http://mirrors.cloud.aliyuncs.com/erdma/kernel-fix/deb/ofed_debian.conf sudo ./install.pl --config ./ofed_debian.conf --without-dkms --build-only --kernel-only sudo /usr/bin/dpkg -i --force-confmiss DEBS/ubuntu`lsb_release -s -r`/x86_64/*.deb update-initramfs -uRun the following command to check whether the
/usr/src/ofa_kernel/`uname -r`directory exists.If the directory exists, proceed to the next step.
ls /usr/src/ofa_kernel/`uname -r`If the directory does not exist, run the following command to create a symbolic link, and then proceed to the next step.
sudo ln -s /usr/src/ofa_kernel/default /usr/src/ofa_kernel/`uname -r`
Restart the instance.
After the OFED driver is installed, you must restart the instance to ensure that the new kernel module takes effect. For more information, see Restart an instance.
Install the eRDMA driver.
Download and install the eRDMA driver.
For Ubuntu 24.04, run the following command.
rm -rf  /lib/modules/`uname -r`/updates/dkms/erdma.ko
curl -O http://mirrors.cloud.aliyuncs.com/erdma/env_setup.sh && bash env_setup.sh --url "http://mirrors.cloud.aliyuncs.com/erdma/erdma_installer-1.4.3.tar.gz"
For other operating systems, run the following command.
sudo wget http://mirrors.cloud.aliyuncs.com/erdma/env_setup.sh
sudo bash env_setup.sh --egs
Run the following command to use the eadm tool to confirm that the eRDMA driver is installed correctly.
eadm verIf a result similar to the following one is returned, the driver is installed correctly.
 Note
NoteThis topic uses driver version 0.2.35 as an example. If the command is not found or fails to run, reinstall the eRDMA driver.
Install the GPU driver.
For more information, see Manually install a Tesla driver on a GPU-accelerated compute-optimized instance (Linux).
Load the nv_peer_mem service component.
(Recommended) For GPU driver versions 470.xx.xx and later
To enable GPU Direct RDMA, you must load the nv_peer_mem service component. Use GPU driver version 470.xx.xx or later because NVIDIA pre-installs this service component in these driver versions. You can directly load the nvidia_peermem module by following these steps.
sudo modprobe nvidia_peermem # You can run lsmod|grep nvidia to check whether nvidia_peermem is loaded.NoteIf the instance is restarted, you must reload the nvidia_peermem module.
For GPU driver versions earlier than 470.xx.xx
You must manually download and install the corresponding service component. The download and compilation installation method is as follows.
sudo git clone https://github.com/Mellanox/nv_peer_memory.git
# Compile and install nv_peer_mem.ko
cd nv_peer_memory && make
cp nv_peer_mem.ko /lib/modules/$(uname -r)/kernel/drivers/video
depmod -a
modprobe nv_peer_mem
# You can run lsmod|grep nv_peer_mem to check.
service nv_peer_mem start
Verify the bandwidth.
Remotely connect to the GPU-accelerated instance.
For more information, see Connect to a Linux instance using Workbench.
Run the following command to check whether the two eRDMA network interface cards are working correctly.
sudo ibv_devinfoThe eRDMA driver installation script installs the latest driver version by default. To install an earlier version of the eRDMA driver, submit a ticket for assistance.
This topic uses eRDMA driver version 0.2.37 or later as an example. If a result similar to the following one is returned, the two eRDMA network interface cards are working correctly. If the
stateof the ports of both eRDMA devices isPORT_ACTIVE, the eRDMA network interface cards are working correctly. Note
NoteIf the port
stateof the eRDMA device isinvalid state, the eRDMA network interface card is not working correctly. Check whether the secondary ENI is correctly configured. For example, run theifconfigcommand to check that all network interface card configurations and IP addresses exist.Run the following command to install the perftest tool.
sudo yum install perftest -yRun the following command to test whether the RDMA network bandwidth meets the hardware expectations.
On the server, run the following command to wait for connection requests from the client.
sudo ib_write_bw -d erdma_0 -F -q 16 --run_infinitely --report_gbits -p 18515On the client, run the following command to send connection requests and packets.
sudo ib_write_bw -d erdma_0 -F -q 16 --run_infinitely --report_gbits -p 18515 server_ipIn the command,
server_ipis the private IP address that corresponds to the ENI to which eRDMA is attached on the server-side ECS instance. For more information about how to obtain an IP address, see View IP addresses.
NoteThe preceding perftest test uses one network interface card for communication. If your service requires communication over two network interface cards, you must start two perftest processes at the same time. Use the
-dparameter to specify an eRDMA network interface card for each of the two processes and the-pparameter to specify different communication ports. For more information, see perftest details.The test results include the average bandwidth. If a result similar to the following one is returned, eRDMA communication is normal.
Test and verify
To test and verify the performance of GPU-accelerated instances with eRDMA networks in real-world applications, this topic uses nccl-tests as an example to show how to use eRDMA in your services. For more information about nccl-tests, see nccl-tests.
Run the following command to install NCCL.
Install NCCL by downloading and compiling the source code as follows:
NoteAlternatively, download the installation package from the official NVIDIA NCCL website and then install it.
This test uses
/usr/local/ncclas the NCCL installation path. You can specify a destination path for the NCCL installation as needed.# build nccl cd /root git clone https://github.com/NVIDIA/nccl.git cd nccl/ make -j src.lib PREFIX=/usr/local/nccl make install PREFIX=/usr/local/ncclRun the following command to check whether nccl and the libnccl.so library are installed.
# Check nccl
ls /usr/local/nccl
# Check the libnccl.so library
ls /usr/local/nccl/lib
Run the following command to install OpenMPI and the compiler.
wget https://download.open-mpi.org/release/open-mpi/v4.1/openmpi-4.1.3.tar.gz
tar -xzf openmpi-4.1.3.tar.gz
cd openmpi-4.1.3
./configure --prefix=/usr/local/openmpi
make -j && make install
Run the following command to set environment variables.
NCCL_HOME=/usr/local/nccl
CUDA_HOME=/usr/local/cuda
MPI_HOME=/usr/local/openmpi

export LD_LIBRARY_PATH=${NCCL_HOME}/lib:${CUDA_HOME}/lib64:${MPI_HOME}/lib:$LD_LIBRARY_PATH
export PATH=${CUDA_HOME}/bin:${MPI_HOME}/bin:$PATH
In the preceding command,
NCCL_HOMEpoints to the NCCL installation path (/usr/local/nccl),CUDA_HOMEpoints to the CUDA installation path (/usr/local/cuda), andMPI_HOMEpoints to the OpenMPI installation path (/usr/local/openmpi). Replace the paths with your actual installation paths.After you edit the command, go to the
~/.bashrcfile on the instance, setPATHandLD_LIBRARY_PATH, and then run the following command for the environment variable settings to take effect.source ~/.bashrcRun the following command to download and compile the test code.
git clone https://github.com/NVIDIA/nccl-tests
cd nccl-tests/
make MPI=1 CUDA_HOME=/usr/local/cuda MPI_HOME=/usr/local/openmpi
Run the following command to establish mutual trust between the instances over SSH.
Generate a public key on host1 and copy it to host2 to establish mutual trust between the instances over SSH.
#Run on host1
ssh-keygen
ssh-copy-id -i ~/.ssh/id_rsa.pub ${host2}

ssh root@{host2}   # Run on host1 to test whether you can connect to host2 without a password. If you can, mutual trust over SSH is established between the instances.
Run the following command to test the NCCL all_reduce performance.
# Replace host1 and host2 with your corresponding IP addresses
mpirun --allow-run-as-root -np 16 -npernode 8 -H host1:8,host2:8 \
--bind-to none \
-mca btl_tcp_if_include eth0 \
-x NCCL_SOCKET_IFNAME=eth0 \
-x NCCL_GIN_TYPE=0 \
-x NCCL_DEBUG=INFO \
-x LD_LIBRARY_PATH \
-x PATH \
./build/all_reduce_perf -b 4M -e 4M -f 2 -g 1 -t 1 -n 20
References
You can configure eRDMA on enterprise-level ECS instances to use a high-performance RDMA network that provides ultra-low latency, high throughput, and high elasticity on your existing network without changing the network topology of your services. For more information, see Enable eRDMA on enterprise-level instances.
In application scenarios that require large-scale data transmission and high-performance network communication in containers, you can use the eRDMA feature in a container (Docker) environment. This allows container applications to bypass the operating system kernel and directly access the physical eRDMA devices on the host, which provides faster data transmission and higher communication efficiency. For more information, see Enable eRDMA in a container (Docker).
To monitor or diagnose eRDMA, you can monitor the running status of eRDMA in real time. For more information, see Monitor and diagnose eRDMA.