Some enterprise-level ECS instances support eRDMA. This feature delivers an ultra-low-latency, high-throughput, and highly elastic RDMA network service without requiring changes to your existing network architecture. This topic explains how to enable eRDMA on enterprise-level ECS instances.
Limitations
Limitation | Description |
Instance type | The following instance types support eRDMA: |
Image |
Note The available images vary by instance type. The instance buy page displays only the images that are compatible with the selected instance type. |
Number of eRDMA devices | To query the maximum number of ERIs for an instance type, call the DescribeInstanceTypes operation and check the EriQuantity parameter. A value of 0 means the instance type does not support ERIs. |
Network limitations |
|
Configure eRDMA on enterprise instances
During instance creation
If the operating system does not support automatic installation of the eRDMA driver, or if the automatic installation fails, you can install the driver manually or using a script after the instance is created. For more information, see For existing instances.
The eRDMA driver installation begins after the instance starts and may take some time to complete.
Create an enterprise-level instance that supports the ERI feature. Note the following parameters when creating the instance. For information about other parameters, see Create an instance by using the wizard.
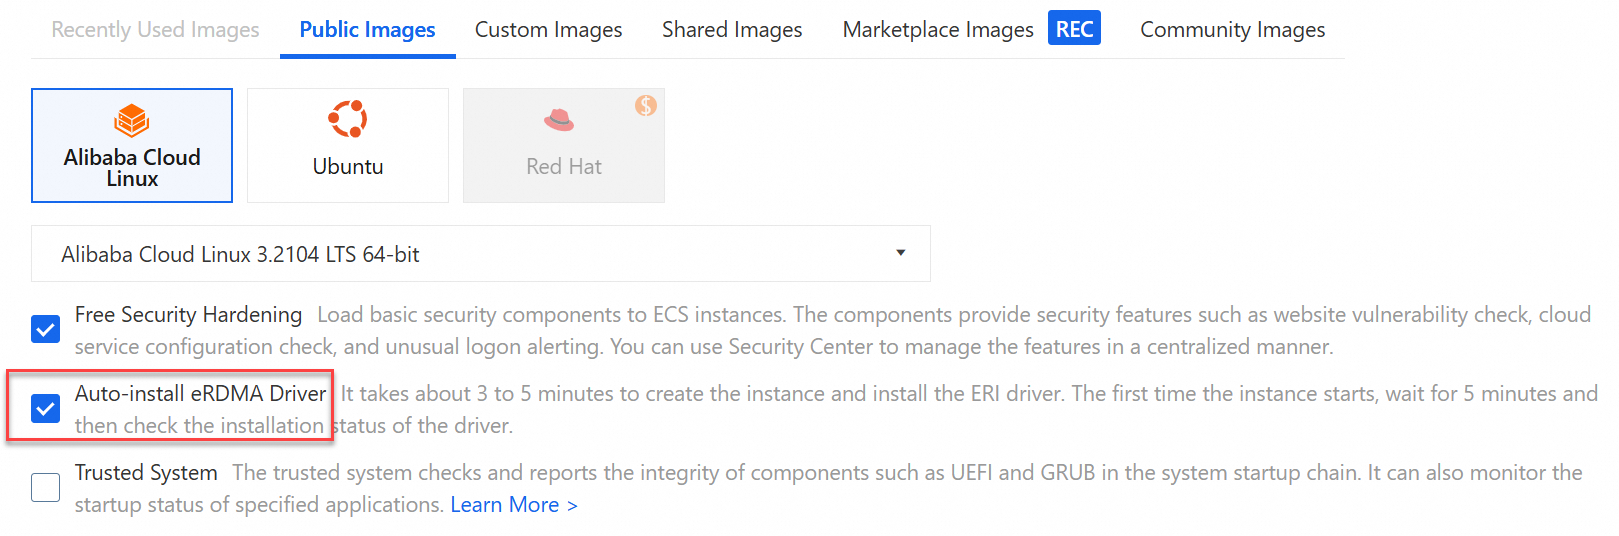
Instances & Images: Select an instance type that supports eRDMA and install the eRDMA driver.
Instance: For more information, see Limitations.
Images: Select Public Image and then select Install eRDMA Driver. The eRDMA driver is automatically installed when the instance starts.
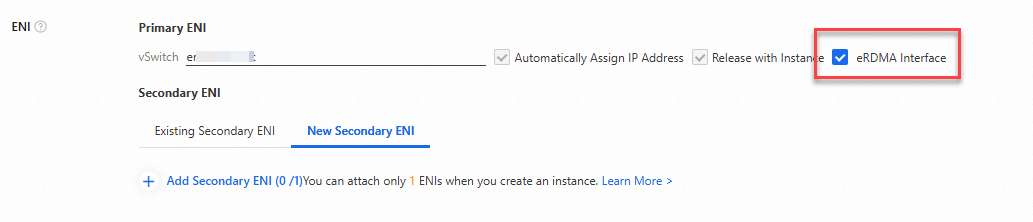
ENIs: To the right of Primary ENI, enable the ERI feature to bind an ERI to the ECS instance.
 Note
NoteWhen you create an enterprise-level instance, you can enable the ERI feature only for the primary ENI. If you need to configure eRDMA for a secondary ENI, you can enable the ERI feature for the secondary ENI in the console or by calling an API operation. For more information, see Elastic RDMA network interface card (ERI).
For existing instances
Verify that the instance type is on the list of eRDMA-supported instance types.
You need to select an instance type that supports
eRDMA.Verify the eRDMA configuration on the instance.
Verify whether eRDMA is correctly configured on the instance. For more information, see Verify the eRDMA configuration.
If eRDMA is not configured, install the eRDMA driver and bind an ERI.
Install the eRDMA driver for the instance.
If you did not select eRDMA Driver when you created the instance, the eRDMA driver is not automatically installed. You must install the eRDMA driver manually or by using a script.
Script-based method: By default, the latest stable version of the driver package is downloaded.
Manual method: You can download a specific version of the driver package.
One-click script installation
Run the following command to download the latest stable version of the driver package.
curl -O http://mirrors.cloud.aliyuncs.com/erdma/env_setup.shRun the following command to install the downloaded driver package.
sudo /bin/bash env_setup.sh > /var/log/erdma_install.log 2>&1After you run the installation script, the script automatically installs the required software dependencies and the eRDMA driver. Wait for the installation to complete.
NoteIf the driver installation script fails, check the installation log at
/var/log/erdma_install.log.
Manual installation
Run the following command to update prerequisite packages.
Alibaba Cloud Linux 3, CentOS, or Anolis OS:
sudo yum update -yUbuntu: No update is required. Skip this step.
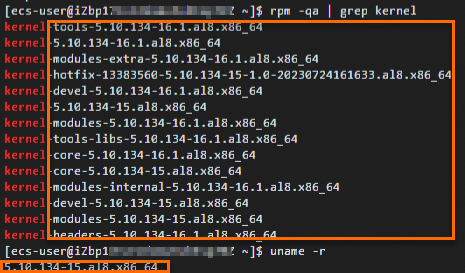
Run the following commands in sequence to check the latest kernel package version and the running kernel version.
rpm -qa | grep kernel  # View the latest kernel package version.
uname -r  # View the running kernel version of the operating system.
If the versions are the same, as shown in the following sample output, no further action is required. If the versions are different, you must restart the instance for the changes to take effect.
Run the following command to install the dependency packages.
For x86 instances, perform the following operations:
Alibaba Cloud Linux 3, CentOS, or Anolis OS:
sudo yum install gcc-c++ dkms cmake kernel-devel kernel-headers libnl3 libnl3-develUbuntu:
sudo apt-get install dkms cmake libnl-3-dev libnl-route-3-dev linux-headers-generic
For Arm instances, which require source-based build tasks, the dependency packages are numerous and may change. Therefore, you can skip this step and directly run the installation script. If the installation script fails, it will prompt you to install the necessary dependency packages. Install them as prompted, and then run the installation script again.
Run the following command to download the driver installation package.
Obtain the package from an internal URL:
wget http://mirrors.cloud.aliyuncs.com/erdma/erdma_installer-latest.tar.gzObtain the package from a public URL:
wget https://mirrors.aliyun.com/erdma/erdma_installer-latest.tar.gz
By default, the latest version of the driver installation package is downloaded. You can also download a specific version based on your requirements. For more information about the release information of different eRDMA installer package versions, see Step 2: Install the eRDMA driver for an ECS instance.
Run the following command to decompress the installation package and enter the file directory.
tar -xvf erdma_installer-latest.tar.gz && cd erdma_installerRun the following command to install the driver.
Method 1: Manually confirm the uninstallation and automatic download steps during installation.
sudo sh install.shMethod 2: The installation runs without confirmation.
sudo sh install.sh --batch
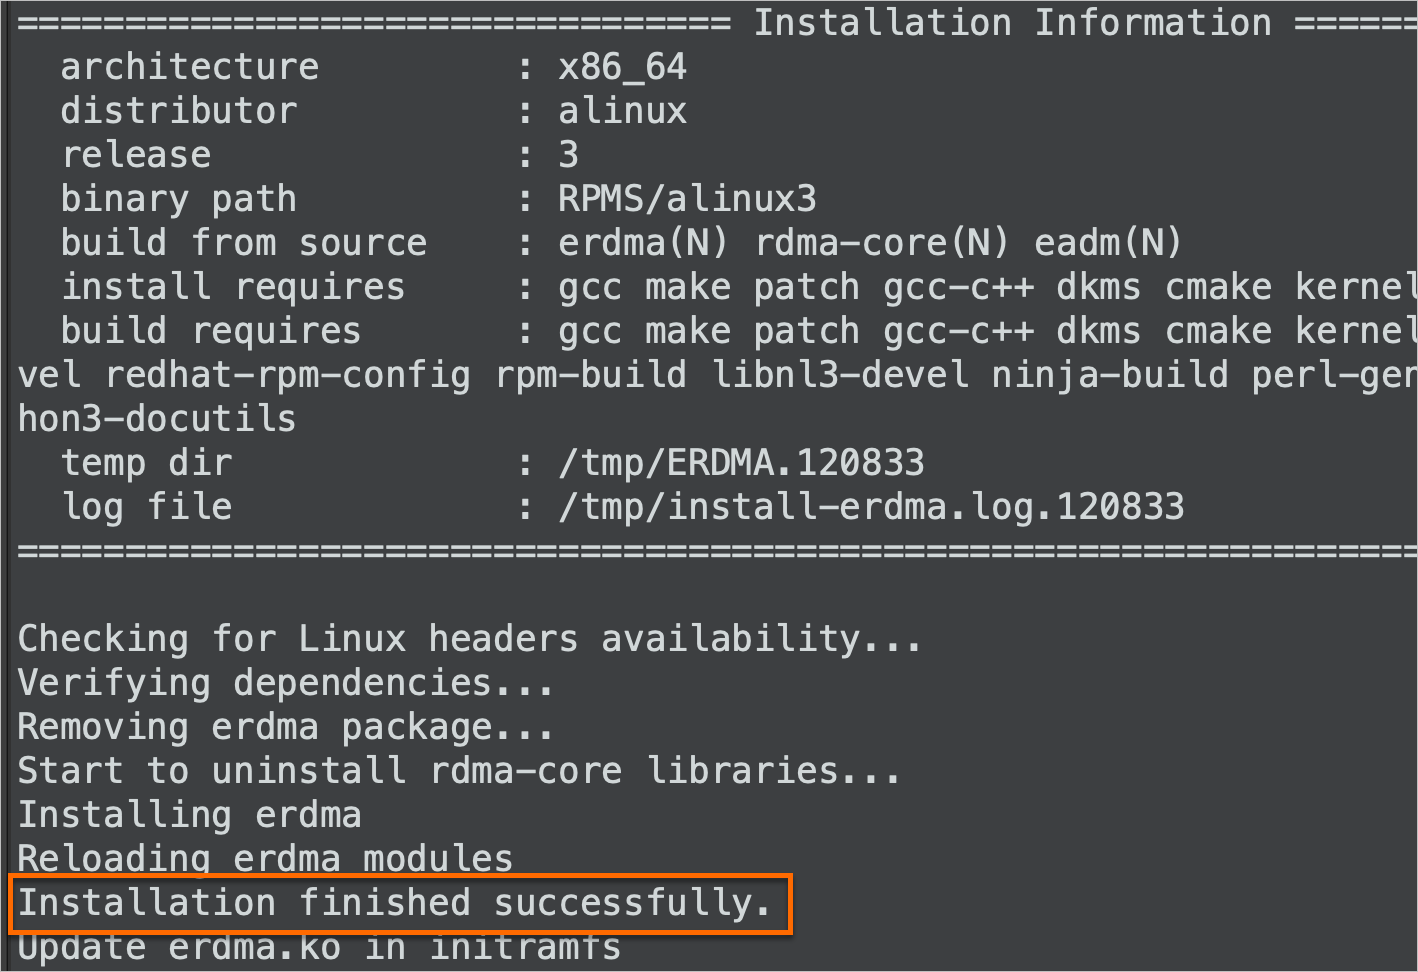
Check the output to confirm the installation result.
If the following information is returned, the driver is successfully installed.
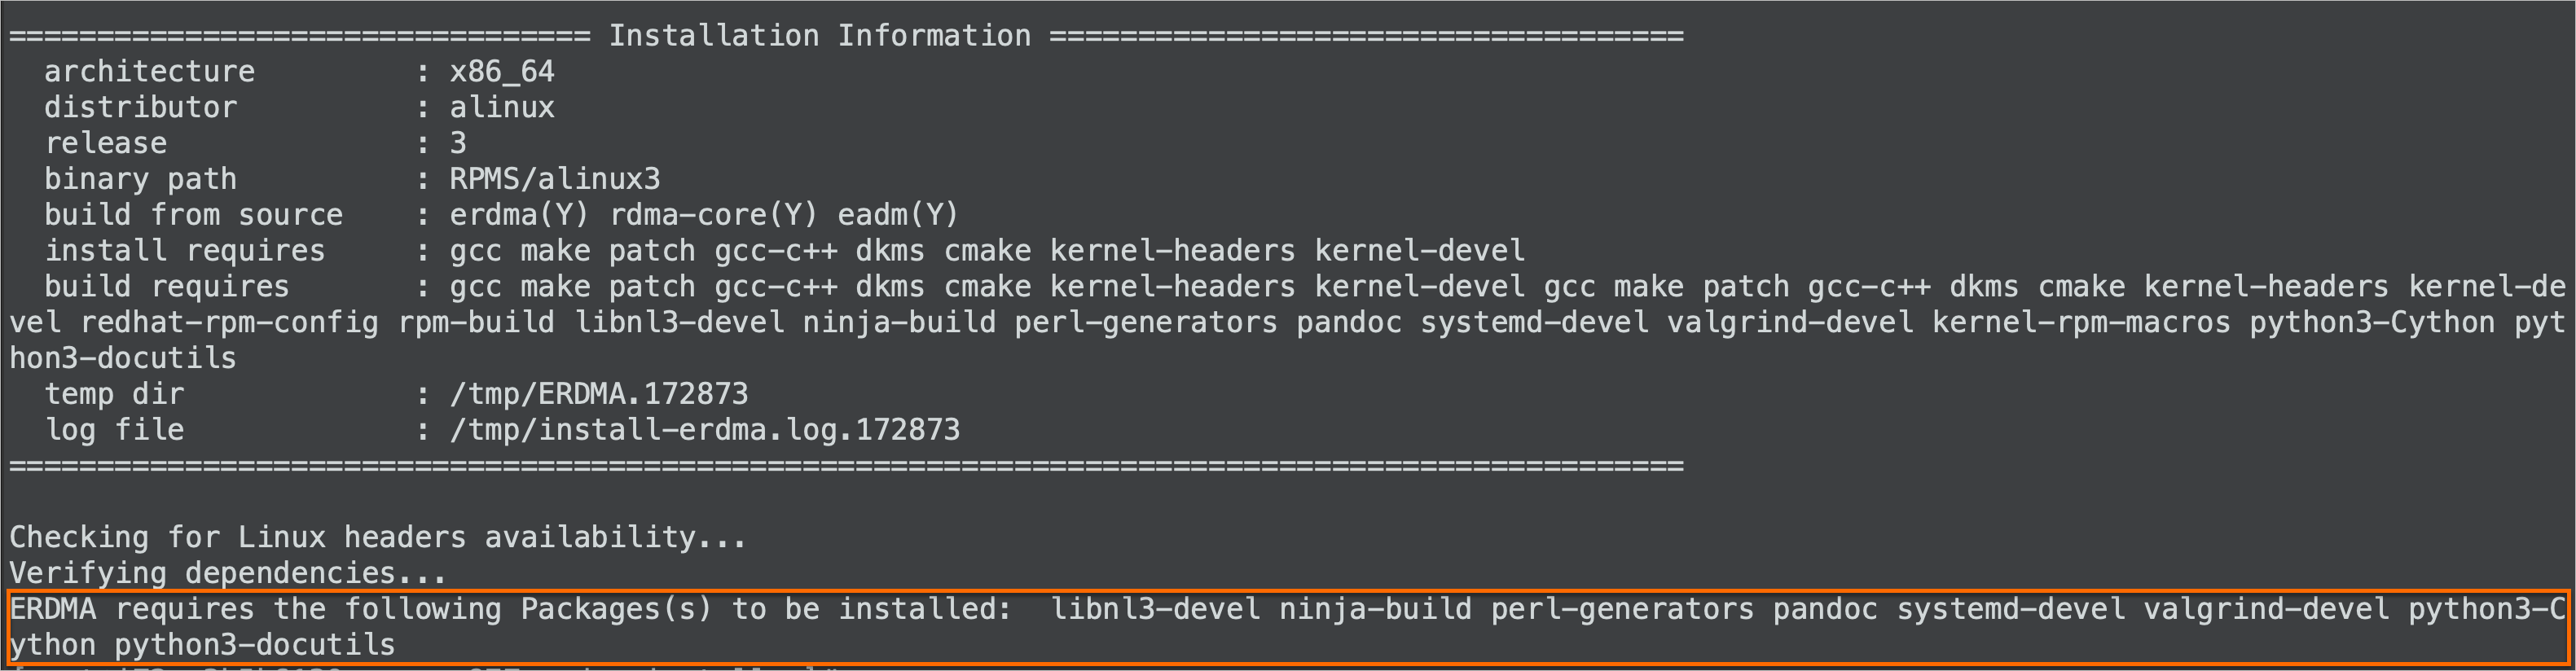
If the following information is returned, the driver installation failed. Follow the instructions in the prompt, and then try to install the driver again.
 Note
NoteIf you are using CentOS 7 and a package is missing during driver reinstallation, but you cannot obtain it by using
yum, you may need to run theyum install -y epel-releasecommand to install the EPEL repository. You can then obtain the required package.
Bind an ERI to the instance.
You can bind an ERI to the instance in one of the following ways.
NoteTo query the maximum number of ERIs for an instance type, call the DescribeInstanceTypes operation and check the EriQuantity parameter. A value of 0 means the instance type does not support ERIs.
-
Modify the attributes of a bound ENI to enable the eRDMA interface
-
Create an ERI and bind it to an ECS instance
-
To create an ERI, see Create a standalone ERI.
-
To bind an ERI to an ECS instance, see Bind a secondary ENI.
-
-
Create a secondary ENI with the eRDMA interface enabled and bind it to an instance by using an API operation
Create and bind a secondary ENI by using API operations:
-
Call an API operation to create an ERI.
Call the CreateNetworkInterface operation and set NetworkInterfaceTrafficMode to HighPerformance to enable the ERI feature.
Record the ENI ID returned in the
NetworkInterfaceIdparameter. -
Call AttachNetworkInterface. Set NetworkInterfaceId to the ID from the previous step and InstanceId to the target instance ID to bind the ERI-enabled ENI.
ImportantIf your instance type supports multiple ERIs, specify a different NetworkCardIndex for each ERI when binding them to maximize network bandwidth. This ensures the ERIs are bound to different channels. See Network card indexes.
-
-
Test the write latency of eRDMA
You can install perftest on two eRDMA-enabled enterprise-level instances and use ib_write_lat to perform a write latency test. For more information about perftest, see the perftest test suite.
Prerequisites
Prepare two enterprise-level instances configured with eRDMA. One will act as the server and the other as the client.
Ensure that the network configuration is correct and that the two servers can communicate with each other over the internal network. For more information, see Enable internal communication between ECS instances.
Procedure
Remotely connect to each of the two instances.
For more information, see Connect to a Linux instance by using Workbench.
Ensure that eRDMA is correctly configured on both instances.
For more information, see Verify the eRDMA configuration.
On both instances, run the following commands to install the perftest tool.
Install perftest from the official repository (requires a public IP address) or from a YUM/APT repository.
Official repository
-
Assign a public IP address to the ECS instance.
-
Download and install perftest from the official perftest repository.
YUM or APT repository
NoteThe
perftestversions in software repositories may differ across Linux distributions, causing compatibility issues. Use the same distribution on all communicating instances. If not possible, install from the official repository.-
Alibaba Cloud Linux 3, CentOS, or Anolis OS
sudo yum install perftest -y -
Ubuntu
sudo apt install perftest -y
-
Test whether the eRDMA network latency meets expectations.
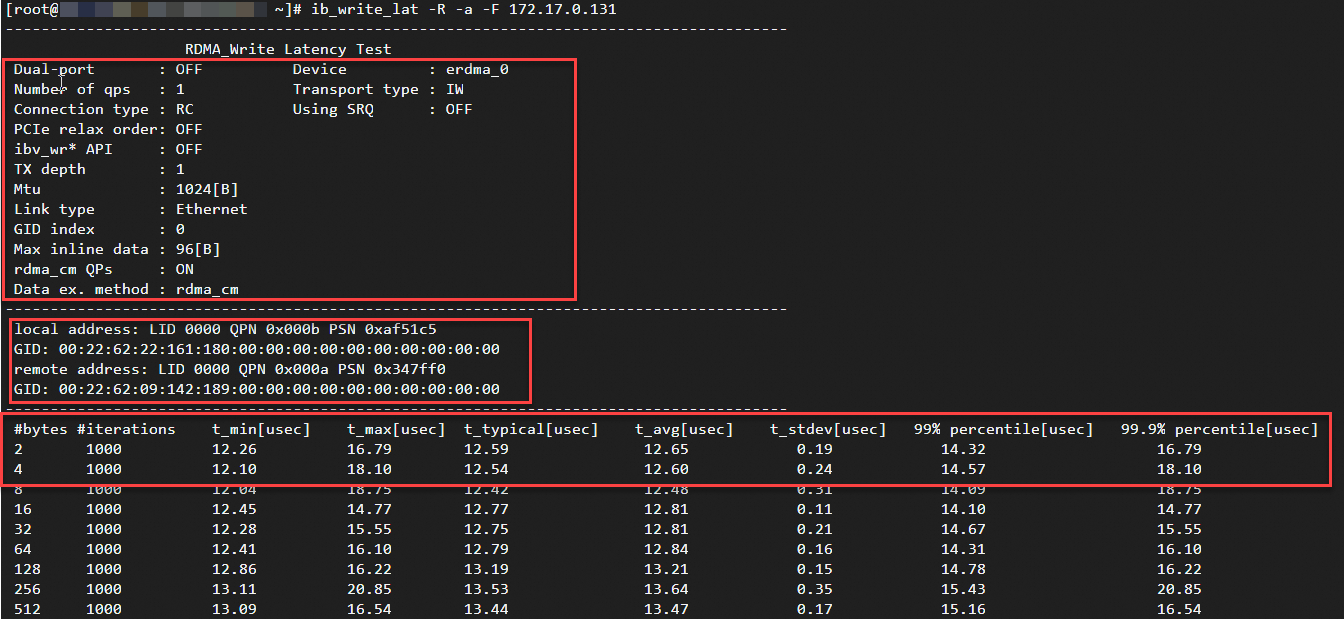
On the server instance, run the following command to start
ib_write_latas a server and listen for client connections.ib_write_lat -R -a -F-R: Specifies that the RDMA Connection Manager (RDMA_CM) is used to establish a connection.ImportantFor CPU-based instance types that support eRDMA, the default installation mode for the eRDMA kernel driver is Standard, which supports only the RDMA_CM connection establishment method. For more information, see Connection establishment methods.
By default, perftest uses an out-of-band (OOB) connection. When performing a perftest on a CPU-based instance, you can use the -R parameter on both the server and the client to specify the RDMA_CM connection establishment method. Otherwise, an exception may occur when the connection is established.
You can also use the command line to make the RDMA_CM and OOB connection methods compatible. For more information, see Change the connection establishment mode of eRDMA to be compatible with bRPC. After you enable compatibility, the -R parameter is no longer required.
-a: This option runs tests for all message sizes from 2 to 2^23 bytes. This allows you to test the impact of different message sizes on latency.-F: Forcefully overrides any existing connections. This means that if connections were previously established, using the-Foption ignores these connections and forces new connections to be established.
On the client instance, run the following command to start
ib_write_latand connect to the server.ib_write_lat -R -a -F <server_ip><server_ip>is the private IP address of the network interface on the server ECS instance that is used for the test and has the ERI feature enabled. To obtain the IP address, see View IP addresses.View the test results.
After the client test is complete,
ib_write_latoutputs test configuration information, connection information, and performance test results (statistics related to latency, including performance metrics such as minimum, maximum, and average latency).