Map eRDMA devices into Docker containers or use eRDMA Controller to expose them to pods in a self-managed Kubernetes cluster.
Limitations
eRDMA in Docker supports only the following images.
Alibaba Cloud Linux 3, Ubuntu 22.04, and Ubuntu 24.04 (ARM and x86)
Alibaba Cloud Linux 2, CentOS 7, CentOS 8, Ubuntu 18.04, Ubuntu 20.04, and Ubuntu 24.04 (x86 only)
Anolis OS images are not supported.
How it works
Use the Docker --device option to map the /dev/infiniband/rdma_cm and /dev/infiniband/uverbsX character devices into the container. User mode programs can then bypass the kernel and access the eRDMA device directly.
/dev/infiniband/rdma_cm: Character device for eRDMA connection management, including creating and destroying connections and handling connection events./dev/infiniband/uverbsX: Character device for user space eRDMA operations, including opening the device, managing communication endpoints, and registering memory buffers.Note/dev/infiniband/uverbsX:Xis the device index number. Runls /dev/infiniband | grep uverbsto find the device name.
Configure eRDMA in a Docker container
Step 1: Configure eRDMA for the instance
Verify that the instance type supports eRDMA, an Elastic RDMA Interface is attached, the eRDMA driver is deployed, and the eRDMA device works correctly.
Enterprise-level CPU instances: See Enable eRDMA on an enterprise-level instance.
GPU-accelerated instances: See Enable eRDMA on a GPU-accelerated instance.
Step 2: (Optional) Deploy Docker on the instance
Skip this step if Docker is already installed on the instance.
Connect to the instance. See Log on to a Linux instance using Workbench.
Check whether Docker is installed.
sudo docker -vIf Docker is installed, a version number is returned:
[root@i:xxx ~]# sudo docker -v
Docker version 26.1.3, build b72abbb
If not installed, proceed to Deploy Docker on the instance.
[root@i-xxx                  /]# sudo docker -v
sudo: docker: command not found
Deploy Docker on the instance.
Alibaba Cloud Linux or CentOS: See Install Docker.
Ubuntu: See the Ubuntu documentation.
Step 3: (Optional) Deploy an image for Docker
Skip this step if your Docker environment already has a base image.
The following example pulls an Alibaba Cloud Linux base image. Internet access is required.
-
Pull an Alibaba Cloud Linux Docker image.
sudo docker pull alibaba-cloud-linux-<image_version>-registry.<region_ID>.cr.aliyuncs.com/alinux<image_version>/alinux<image_version>:<TAG>-
<image_version>: The version of Alibaba Cloud Linux, such as2or3. -
<region_ID>: The ID of the image's region, such ascn-hangzhou. -
(Optional)
<TAG>: The Docker image tag. Defaults to the latest version if omitted.
-
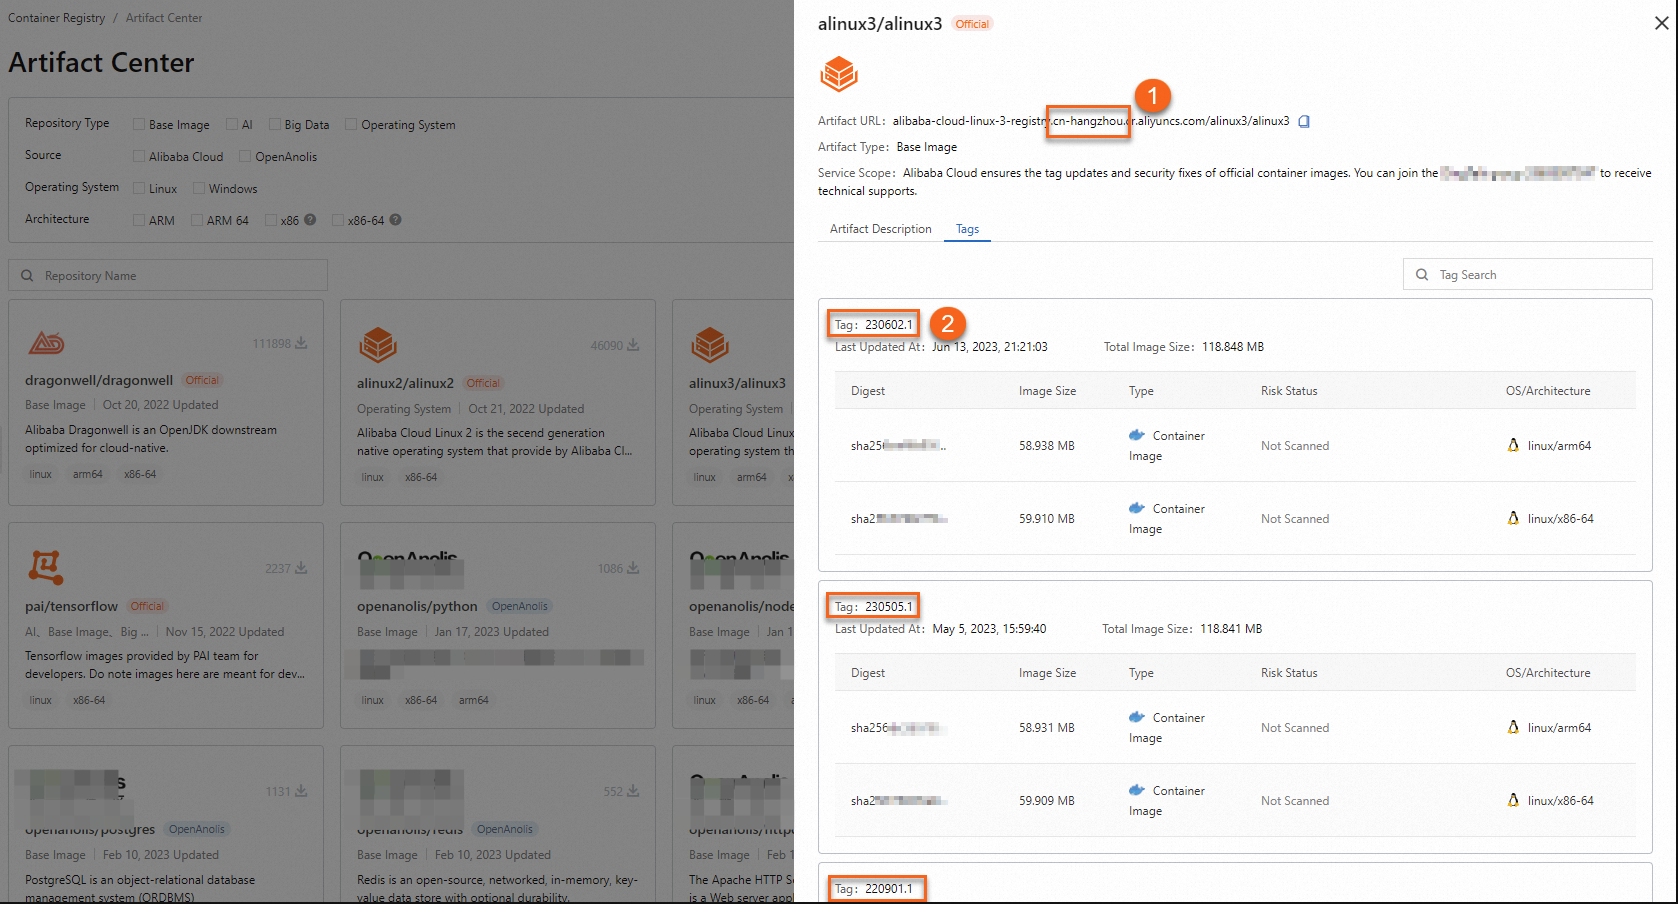
Click alinux2/alinux2 or alinux3/alinux3 to view the Docker image tag information for Alibaba Cloud Linux 2 and Alibaba Cloud Linux 3.
For example, the following figure shows Alibaba Cloud Linux 3 Docker image details. ① indicates the image region, and ② indicates the image tags.
Sample commands:
-
Pull the
220901.1tag of the Alibaba Cloud Linux 3 Docker image in thecn-hangzhouregion.sudo docker pull alibaba-cloud-linux-3-registry.cn-hangzhou.cr.aliyuncs.com/alinux3/alinux3:220901.1 -
Pull the latest Alibaba Cloud Linux 2 Docker image in the
cn-hangzhouregion.sudo docker pull alibaba-cloud-linux-2-registry.cn-hangzhou.cr.aliyuncs.com/alinux2/alinux2
-
-
Verify the image pull.
sudo docker imagesThe output confirms that the
220901.1Alibaba Cloud Linux 3 image and the latest Alibaba Cloud Linux 2 image were pulled.
Step 4: Start the container and attach the eRDMA device
Use the Docker --device option to map the /dev/infiniband/rdma_cm and /dev/infiniband/uverbsX character devices into the container. See How it works.
Connect to the ECS instance. See Log on to a Linux instance using Workbench.
Start a Docker container and map the eRDMA character devices to it.
sudo docker run --net=host --device=/dev/infiniband/uverbsX --device=/dev/infiniband/rdma_cm --ulimit memlock=-1 -t -i <IMAGE ID> /bin/bashParameters:
--net=host: Sets the container network mode tohost. Applications in the container share the host's network interfaces and configurations.--device=/dev/infiniband/uverbsXand--device=/dev/infiniband/rdma_cm: Expose the eRDMA user mode character devices to the container.View the character device name (the X in
uverbsX):ls /dev/infiniband | grep uverbs[root@ixxx ~]# ls /dev/infiniband | grep uverbs uverbs0--ulimit memlock=-1: Setsmaxlockedmemorytounlimited, so non-root users can lock enough memory for eRDMA operations.<IMAGE ID>: The Docker image ID. Runsudo docker imagesto view it.View the target image ID:
sudo docker imagesThis example uses the Alibaba Cloud Linux image from Step 3. Sample output:
[root@i-xxx ~]# docker images
REPOSITORY                                                            TAG       IMAGE ID       CREATED      SIZE
alibaba-cloud-linux-3-registry.cn-hangzhou.cr.aliyuncs.com/alinux3/alinux3   latest    e8d9a60b6967   8 days ago   205MB
Step 5: Deploy the eRDMA driver package for the Docker container
The eRDMA user mode driver package must also be deployed in the container. Without it, eRDMA devices cannot be detected from within the container. Alibaba Cloud provides yum and apt sources for easy installation.
Connect to the instance. See Log on to a Linux instance using Workbench.
Enter the target container.
If you ran the command in Step 4, you are already inside the container. Proceed to install the user mode driver package in the container.
View the target container ID.
sudo docker psThis example uses the container from Step 4. Sample output:
The target container ID is
b4ec2fbaedf7(the Alibaba Cloud Linux 3 container started in Step 4).[root@i _[ ~]# docker ps CONTAINER ID IMAGE COMMAND c9fc089a3c5d e8d9a60b6967 "/bin/bash" b4ec2fbaedf7 alibaba-cloud-linux-3-registry.cn-hangzhou.cr.aliyuncs.com/alinux3/alinux3 "/bin/bash"Enter the container.
sudo docker exec -it <CONTAINER ID> /bin/bashReplace CONTAINER ID with the target container ID from the previous step.
Install the user mode driver package in the container.
ImportantIn the following examples, http://mirrors.cloud.aliyuncs.com is an internal source address. To access the source over the Internet, replace http://mirrors.cloud.aliyuncs.com with https://mirrors.aliyun.com. Internet access may incur traffic fees. See Public bandwidth billing.
CentOS 7/CentOS 8
Create an
erdma.reposource file in/etc/yum.repos.d.sudo vim /etc/yum.repos.d/erdma.repoAdd the following content to
erdma.repoand save the file.[erdma] name = ERDMA Repository baseurl = http://mirrors.cloud.aliyuncs.com/erdma/yum/redhat/$releasever/erdma/$basearch/ gpgcheck = 1 enabled = 1 gpgkey = http://mirrors.cloud.aliyuncs.com/erdma/GPGKEYUpdate the yum source cache.
sudo yum makecacheInstall the user mode driver package.
sudo yum install libibverbs rdma-core librdmacm libibverbs-utils -y
Alibaba Cloud Linux
Add the repository.
sudo yum-config-manager \ --add-repo \ http://mirrors.cloud.aliyuncs.com/erdma/yum/alinux/erdma.repoNoteIf
yum-config-manageris not installed, runsudo yum install -y yum-utilsto install it.yum-config-manageris part of the yum-utils package.Update the yum source cache.
sudo yum makecacheInstall the user mode driver package.
sudo yum install libibverbs rdma-core librdmacm libibverbs-utils -y
Ubuntu 18.04/20.04/22.04/24.04
Add the PGP signature.
Ubuntu 18.04/Ubuntu 20.04
wget -qO - http://mirrors.cloud.aliyuncs.com/erdma/GPGKEY | sudo apt-key add -Ubuntu 22.04/24.04
wget -qO - http://mirrors.cloud.aliyuncs.com/erdma/GPGKEY | sudo gpg --dearmour -o /etc/apt/trusted.gpg.d/erdma.gpg
Add the apt source.
Ubuntu 18.04
echo "deb [ arch=amd64 ] http://mirrors.cloud.aliyuncs.com/erdma/apt/ubuntu bionic/erdma main" | sudo tee /etc/apt/sources.list.d/erdma.listUbuntu 20.04
echo "deb [ arch=amd64 ] http://mirrors.cloud.aliyuncs.com/erdma/apt/ubuntu focal/erdma main" | sudo tee /etc/apt/sources.list.d/erdma.listUbuntu 22.04
echo "deb [ ] http://mirrors.cloud.aliyuncs.com/erdma/apt/ubuntu jammy/erdma main" | sudo tee /etc/apt/sources.list.d/erdma.listUbuntu 24.04
echo "deb [ ] http://mirrors.cloud.aliyuncs.com/erdma/apt/ubuntu noble/erdma main" | sudo tee /etc/apt/sources.list.d/erdma.list
Update the apt source.
sudo apt updateInstall the user mode driver.
sudo apt install libibverbs1 ibverbs-providers ibverbs-utils librdmacm1 -y
View the eRDMA device information from within the container.
ibv_devinfo[root@ixxxx /]# ibv_devinfo hca_id: erdma_0 transport: iWARP (1) fw_ver: 0.2.0 node_guid: 0216:3eff:fe1d:fdc2 sys_image_guid: 0216:3eff:fe1d:fdc2 vendor_id: 0x1ded vendor_part_id: 4223 hw_ver: 0x0 phys_port_cnt: 1 port: 1 state: PORT_ACTIVE (4) max_mtu: 4096 (5) active_mtu: 4096 (5) sm_lid: 0 port_lid: 0 port_lmc: 0x00 link_layer: EthernetThe eRDMA device is detected from within the container.
To integrate eRDMA into TCP applications inside the container with SMC-R or NetACC, see Application adaptation overview.
Use eRDMA Controller to deploy an eRDMA pod on a self-managed Kubernetes cluster
Step 1: Install eRDMA Controller
Install Helm on the master node.
Helm manages the installation and uninstallation of eRDMA Controller components. After installation, run
helm versionto verify.curl -fsSL -o get_helm.sh https://raw.githubusercontent.com/helm/helm/main/scripts/get-helm-3 chmod 700 get_helm.sh ./get_helm.sDownload the eRDMA Controller source code on the master node.
git clone https://github.com/AliyunContainerService/alibabacloud-erdma-controller.gitThe installation configuration file is
deployment/helm/values.yaml. Modify this file to select a working mode and configure parameters. Two modes are supported:Regular Mode: eRDMA Controller automatically manages Elastic RDMA Interfaces (ERIs) and dynamically allocates eRDMA resources.
Local Mode: The eRDMA environment is already prepared on the Kubernetes nodes and the eRDMA devices are exposed to pods. No dynamic resource management is involved.
Configuration items:
localERIDiscovery: The controller working mode.true: Local Mode.false: Regular Mode (default).
credentials: In Regular Mode, the controller accesses Alibaba Cloud APIs to query and configure ECS instances and ENIs. Create a RAM role and grant the required permissions first.AccessKey authentication is supported. Set
typetoaccess_keyand enter the AccessKey ID and secret.credentials: type: "access_key" accessKeyID: "{access key}" accessKeySecret: "{access key secret}"Not required in Local Mode.
preferDriver: The eRDMA driver type for the node.default: Default driver mode.compat: RoCE-compatible driver mode.ofed: OFED-based driver mode, suitable for GPU-accelerated instance types.
allocateAllDevices: Device allocation policy in Regular Mode.true: Allocate all eRDMA devices on the node to the pod.false: Allocate one eRDMA device based on the NUMA topology.
exposedLocalERIs: The eRDMA devices on the node to expose to pods in Local Mode. See the example for the configuration format.exposedLocalERIs: - i-XXX erdma_0/erdma_1 # specify instance ID and erdma devices(erdma_0/erdma_1) to expose - i-* erdma_0 # specify erdma devices(erdma_0) to expose for all unspecified nodes - i-* erdma_* # expose all existing erdma devices for all unspecified nodesImage configuration: The default
erdma-agentimage (registry.aliyuncs.com/erdma/agent) does not support Local Mode. Build an agent image and push it to a custom image repository.Build and push the image. The example uses Alibaba Cloud Container Registry (ACR). Create a namespace and an image repository in advance.
docker build --tag <REGISTRY_NAME>-registry.<REGION_ID>.cr.aliyuncs.com/<NAMESPACE>/agent:<TAG> --target agent .

docker push <REGISTRY_NAME>-registry.<REGION_ID>.cr.aliyuncs.com/<NAMESPACE>/agent:<TAG>
Install the
erdma-controllercomponent withhelm.helm install -f deploy/helm/values.yaml --namespace kube-system alibaba-erdma-controller deploy/helm/Verify the installation.
In Regular Mode, verify that both the
erdma-agentanderdma-controllerpods are created:kubectl get pods -n kube-system | grep erdmaQuery eRDMA device resources on the node:
kubectl get erdmadevicesIn Local Mode, only the
erdma-agentpod is created. Theerdma-controllerpod anderdmadevicesresources are not available.
Step 2: Create a pod that supports eRDMA network acceleration
Declare
aliyun/erdma: 1inresources.limitsof the container spec. Replace<ERDMA_POD_IMAGE>with your container image address:apiVersion: apps/v1 kind: Deployment metadata: labels: app: erdma name: erdma spec: replicas: 1 selector: matchLabels: app: erdma template: metadata: labels: app: erdma annotations: spec: containers: - command: - sleep - "360000" image: <ERDMA_POD_IMAGE> name: erdma resources: limits: aliyun/erdma: 1To enable transparent acceleration with SMC-R, add the
network.alibabacloud.com/erdma-smcr: "true"annotation. Requires Alibaba Cloud Linux 3 with kernel 5.10.134-17 or later.Deploy the deployment based on the configuration file. The deployment starts the specified number of pod replicas.
kubectl apply -f example.yaml
References
To configure eRDMA in an ACK cluster, see Use eRDMA to accelerate container networks in ACK clusters.