SSL-VPN two-factor authentication requires a client to complete authentication with its SSL client certificate and the username and password of IDaaS before an SSL-VPN connection is created. The connection can be created only if the client passes the two authentications. SSL-VPN two-factor authentication helps prevent user identity theft and unauthorized SSL-VPN connections. It efficiently improves the security of SSL-VPN connections and protects sensitive data in VPCs against data breaches. This topic describes how to use SSL-VPN two-factor authentication to verify the identity of a client before an SSL-VPN connection is created. This can protect the resources in your VPC.
Scenarios

The preceding figure shows the scenario of the example used in this topic. A company uses Alibaba Cloud IDaaS to manage and maintain employee accounts and permissions. The company has created a VPC in the China (Hangzhou) region. Applications are deployed on Elastic Compute Service (ECS) instances in the VPC. To meet business requirements, the company wants to allow employees on business trips to remotely access resources that are deployed in the VPC after the employees pass IDaaS authentication.
In this case, the company can create an VPN gateway and enable the SSL-VPN and two-factor authentication features. After a client passes the SSL client certificate authentication and the username and password authentication of IDaaS, the client can establish an SSL-VPN connection to access resources in the VPC in a secure manner.
Preparations
An IDaaS Employee Identity and Access Management (EIAM) instance of Enterprise Edition is created. For more information, see Manage instances.
ImportantIDaaS EIAM 1.0 instances can no longer be purchased. We recommend that you use an IDaaS EIAM 2.0 instance. In this example, an IDaaS EIAM 2.0 instance is used. For more information, see [Change notice] SSL-VPN supports IDaaS EIAM 2.0 instances for two-factor authentication.
For more information about how to use IDaaS EIAM 1.0 instances, see How do I configure an IDaaS EIAM 1.0 instance?
An organization and an account are created in the IDaaS EIAM instance.
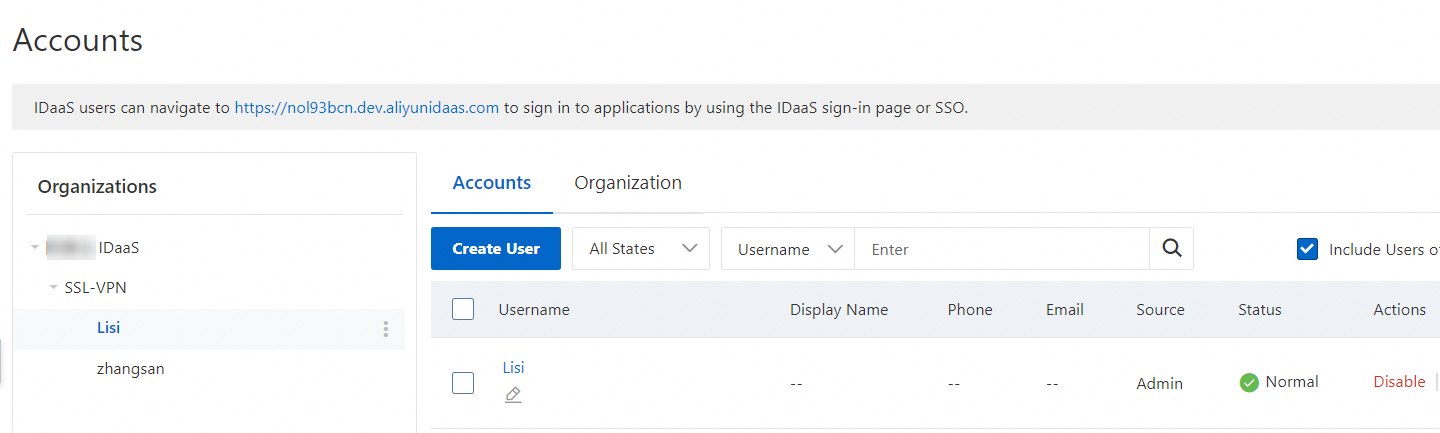
In this example, an organization and an account are manually created in the IDaaS EIAM instance, as shown in the following figure. You can also synchronize account information to the IDaaS EIAM instance over the Lightweight Directory Access Protocol (LDAP) protocol. This way, employees can log on to applications by using AD or LDAP authentication. For more information, see Establish an SSL-VPN connection for a client to access a VPC by using AD authentication. For more information about how to synchronize accounts, see Create Account or Organization.
A VPC is created in the China (Hangzhou) region and relevant applications are deployed on ECS instances in the VPC. For more information, see Create a VPC with an IPv4 CIDR block.
Make sure that security group rules are configured for the ECS instances in the VPC to allow clients to access cloud resources deployed on the ECS instances. For more information, see View security group rules and Add a security group rule.
Your client can access the Internet. The private CIDR block of the client does not overlap with that of the VPC.
Procedure

Step 1: Add an SSL-VPN application
Log on to the IDaaS console.
In the left-side navigation pane, click EIAM. On the IDaaS tab of the EIAM page, find the IDaaS EIAM instance that you created in Prerequisites and click Manage in the Actions column.
In the left-side navigation pane of the page that appears, click Applications. On the Applications page, click Add Application.
On the Add Application page, find the Alibaba SSL VPN template and click Add Application.
In the Add Application - Alibaba SSL VPN dialog box, enter a name for the application and click Add.
On the Sign-In tab of the application details page, use the default values for the parameters and click Save in the lower part of the page.
SSO: specifies whether to enable single sign-on (SSO). By default, this switch is turned on.
Grant Types: the method that is used by the application for authentication. In this example, the default value Password Grant is used. The default value of the IdPs parameter is IDaaS Account, which indicates that the system uses the accounts that you manually created in the IDaaS EIAM instance to verify the employee identity.
Authorize: the users who can access the application. In this example, the default value Manually is used. In this case, you need to manually grant permissions to the specified users to access the application. For more information, see the Authorization scope section of the "Configure SSO" topic.
On the Sign-In tab, click the Authorize sub-tab.
Grant permissions to the accounts that are used to access the application over an SSL-VPN connection. For more information, see Authorization.

Step 2: Create a VPN gateway
- Log on to the VPN gateway console.
On the VPN Gateways page, click Create VPN Gateway.
On the VPN Gateway page, configure the parameters that are described in the following table, click Buy Now, and then complete the payment.
The following table describes only the key parameters that you must configure. For other parameters, use the default values or leave them empty. For more information, see Create and manage a VPN gateway.
Parameter
Description
Region
The region in which you want to create the VPN gateway. China (Hangzhou) is selected in this example.
NoteMake sure that the VPC and the VPN gateway reside in the same region.
Gateway Type
The type of the VPN gateway. In this example, Standard is selected.
Network Type
Select the network type of the VPN gateway. In this example, Public is selected.
Tunnels
The tunnel mode of the VPN gateway. The system displays the tunnel modes that are supported in this region.
VPC
The VPC to be associated with the VPN gateway.
vSwitch 1
The first vSwitch to be associated with the VPN gateway in the selected VPC.
If you select Single-tunnel, you need to specify only one vSwitch.
If you select Dual-tunnel, you need to specify two vSwitches.
After the IPsec-VPN feature is enabled, the system creates an elastic network interface (ENI) for each of the two vSwitches as an interface to communicate with the VPC over an IPsec-VPN connection. Each ENI occupies one IP address in the vSwitch.
NoteThe system selects a vSwitch by default. You can change or use the default vSwitch.
After a VPN gateway is created, you cannot modify the vSwitch associated with the VPN gateway. You can view the vSwitch associated with the VPN gateway, the zone to which the vSwitch belongs, and the ENI in the vSwitch on the details page of the VPN gateway.
vSwitch 2
The second vSwitch to be associated with the VPN gateway in the selected VPC.
Specify two vSwitches in different zones in the associated VPC to implement disaster recovery across zones for IPsec-VPN connections.
For a region that supports only one zone, disaster recovery across zones is not supported. We recommend that you specify two vSwitches in the zone to implement high availability of IPsec-VPN connections. You can also select the same vSwitch as the first one.
NoteIf only one vSwitch is deployed in the VPC, create another one. For more information, see Create and manage vSwitches.
IPsec-VPN
Specifies whether to enable the IPsec-VPN feature for the VPN gateway. In this example, Disable is selected.
SSL-VPN
Specifies whether to enable the SSL-VPN feature for the VPN gateway. In this example, Enable is selected.
SSL connections
The maximum number of clients that can connect to the VPN gateway.
NoteThe SSL Connections parameter is available only after you enable the SSL-VPN feature.
Go back to the VPN Gateways page to view the VPN gateway that you created.
The VPN gateway that you created in the previous step is in the Preparing state. After about 1 to 5 minutes, the VPN gateway enters the Normal state. The Normal state indicates that the VPN gateway is initialized and ready for use.
Step 3: Create an SSL server
In the left-side navigation pane, choose .
In the top navigation bar, select the region in which you want to create an SSL server.
NoteMake sure that the SSL server and the VPN gateway that you created reside in the same region.
On the SSL Server page, click Create SSL Server.
In the Create SSL Server panel, configure the parameters that are described in the following table, and click OK.
The following table describes only the key parameters that you must configure. For other parameters, use the default values or leave them empty. For more information, see Create and manage an SSL server.
Parameter
Description
VPN Gateway
The VPN gateway that you created.
Local Network
The CIDR block of the VPC to which you want to connect. In this example, 192.168.0.0/16 is used.
Client CIDR Block
The CIDR block that your client uses to connect to the SSL server. In this example, 10.0.0.0/24 is used.
ImportantThe subnet mask of the client CIDR block must be 16 to 29 bits in length.
Make sure that the client CIDR block does not overlap with the local CIDR block, the VPC CIDR block, or route CIDR blocks associated with the client.
We recommend that you use 10.0.0.0/8, 172.16.0.0/12, 192.168.0.0/16, or one of their subnets as the client CIDR block. If you want to specify a public CIDR block as the client CIDR block, you must specify the public CIDR block as the user CIDR block of a VPC. This way, the VPC can access the public CIDR block. For more information, see the VPC FAQ and VPC FAQ sections of the "FAQ" topic.
After you create an SSL server, the system automatically adds routes that point to the client CIDR block to the VPC route table. Do not add routes that point to the client CIDR block to the VPC route table again. Otherwise, SSL-VPN connections cannot work as expected.
Advanced Configuration
The advanced configurations. You need to enable two-factor authentication for the VPN gateway. In this example, EIAM 2.0 (recommended) is selected for the IDaaS Instance Version parameter. Use the default values for other parameters.
IDaaS Instance Region: the region in which the IDaaS EIAM 2.0 instance resides. In this example, China (Hangzhou) is selected.
IDaaS Instance: the instance that you want to associate with the SSL server. Select the IDaaS EIAM 2.0 instance that you created in Prerequisites.
IDaaS Application: the SSL-VPN application that is added to the IDaaS instance.
NoteWhen you create an SSL server in the UAE (Dubai) region, we recommend that you associate the SSL server with an IDaaS EIAM 2.0 instance in Singapore to reduce latency.
Step 4: Create an SSL client certificate
In the left-side navigation pane, choose .
On the SSL Client page, click Create SSL Client.
In the Create SSL Client panel, enter a name for the SSL client, select the SSL Server to which you want to connect, and then click OK.
On the SSL Client page, find the SSL client that you created and click Download Certificate in the Actions column.
Save the downloaded SSL client certificate package to a local directory for further client configurations.
Step 5: Configure a client
Configure a Linux client
Open the command-line interface (CLI).
Run the following command to install OpenVPN:
# Run the following command to install OpenVPN on CentOS:
yum install -y openvpn
# Run the following command to check whether the /etc/openvpn/conf directory is created. If the directory is not created, you must manually create the /etc/openvpn/conf directory.
cd /etc/openvpn # Go to the openvpn directory.
ls              # Check whether the conf directory is created in the openvpn directory.
mkdir -p /etc/openvpn/conf # If the conf directory does not exist in the openvpn directory, you must manually create the conf directory.

# Run the following commands to install OpenVPN on Ubuntu:
apt-get update
apt-get install -y openvpn
# Run the following command to check whether the /etc/openvpn/conf directory is created. If the directory is not created, you must manually create the /etc/openvpn/conf directory.
cd /etc/openvpn # Go to the openvpn directory.
ls              # Check whether the conf directory is created in the openvpn directory.
mkdir -p /etc/openvpn/conf # If the conf directory does not exist in the openvpn directory, you must manually create the conf directory.
Decompress the SSL client certificate package that you download and copy the SSL client certificate to the /etc/openvpn/conf/ directory.
Go to the /etc/openvpn/conf directory, run the following command, and then enter the username and password. After the client passes IDaaS authentication, an SSL-VPN connection is established.
openvpn --config /etc/openvpn/conf/config.ovpn --daemon
Configure a Windows client
Download and install the OpenVPN client for Windows.
Decompress the SSL client certificate package that you downloaded and copy the SSL client certificate to the OpenVPN\config directory.
In this example, the certificate is copied to the C:\Program Files\OpenVPN\config directory. You must copy the certificate to the directory in which the OpenVPN client is installed.
Start the OpenVPN client, click Connect, and then enter the username and password. After the client passes IDaaS authentication, an SSL-VPN connection is established.

Configure a macOS client
Open the CLI.
If Homebrew is not installed on macOS, run the following command to install Homebrew:
/bin/bash -c "$(curl -fsSL https://raw.githubusercontent.com/Homebrew/install/HEAD/install.sh)"Run the following command to install OpenVPN:
brew install openvpnCopy the SSL client certificate package that you download to the configuration directory of the OpenVPN client.
Back up all configuration files in the /usr/local/etc/openvpn directory.
ImportantThe default installation path of OpenVPN may vary based on the version of macOS. Replace the relevant paths with the actual installation path when you perform this and subsequent operations.
Run the following command to delete the configuration files of OpenVPN:
rm /usr/local/etc/openvpn/*Run the following command to copy the downloaded SSL client certificate package to the configuration directory of OpenVPN:
cp cert_location /usr/local/etc/openvpn/cert_locationindicates the path of the SSL client certificate package that you download. Example: /Users/example/Downloads/certs6.zip.
Run the following commands to extract the certificate:
cd  /usr/local/etc/openvpn/
unzip /usr/local/etc/openvpn/certs6.zip
Go to the /usr/local/etc/openvpn directory, run the following command, and then enter the username and password to establish an SSL-VPN connection:
sudo /usr/local/opt/openvpn/sbin/openvpn --config /usr/local/etc/openvpn/config.ovpn
Step 6: Test the connectivity
After you complete the preceding steps, the client is connected to the VPC and can access resources in the VPC. Perform the following steps to test the connectivity between a Linux client and the VPC:
Open the CLI on the client.
Run the
pingcommand to access the ECS 1 instance in the VPC to test the connectivity.ping <IP address of ECS 1>If the following messages are returned, the client can access resources in the VPC.

FAQ
How do I configure an IDaaS EIAM 1.0 instance?
If you use an IDaaS EIAM 1.0 instance, you do not need to add an SSL-VPN application. You can directly associate the IDaaS EIAM 1.0 instance with the SSL server when you create the SSL server. The remaining procedure is the same as that for using an IDaaS EIAM 2.0 instance.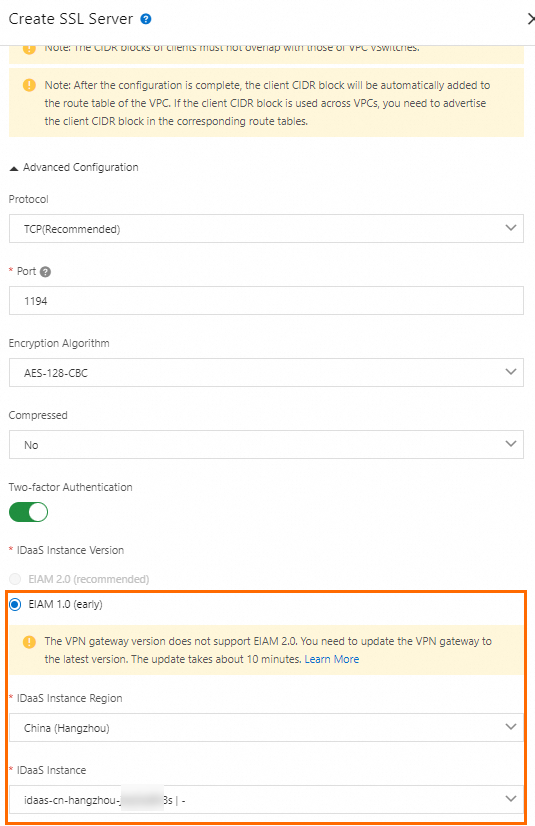
Can I use a pair of username and password and an OTP dynamic token for two-factor authentication during SSL-VPN IDaaS authentication?
No.
IDaaS supports only authentication based on usernames and passwords. OTP dynamic tokens and text messages can only be used on clients for two-factor authentication.