Use Data Transmission Service (DTS) to synchronize data from a PolarDB for MySQL cluster to an AnalyticDB for PostgreSQL instance. DTS runs an initial full data load followed by continuous incremental synchronization, so your AnalyticDB for PostgreSQL instance stays current with source changes.
How it works
DTS reads the binary log (binlog) from the PolarDB for MySQL cluster to capture row-level changes. Before streaming incremental changes, DTS performs an initial full data synchronization to establish a consistent baseline in the destination instance. Incremental synchronization starts from the point at which the full sync completed.
Prerequisites
Before you begin, make sure you have:
Binary logging enabled on the PolarDB for MySQL cluster. See Enable binary logging.
Enable binary loggingPrimary keys on all tables to be synchronized.
An AnalyticDB for PostgreSQL instance. See Create an AnalyticDB for PostgreSQL instance.
Create an AnalyticDB for PostgreSQL instance
Limitations
Object types
Only tables can be selected as synchronization objects.
Unsupported data types
DTS does not synchronize the following data types: BIT, VARBIT, GEOMETRY, ARRAY, UUID, TSQUERY, TSVECTOR, TXID_SNAPSHOT, and POINT.
Index limitations
Prefix indexes cannot be synchronized. If the source cluster contains prefix indexes, synchronization may fail.
DDL tool compatibility
Do not use gh-ost or pt-online-schema-change to run DDL operations on source objects during an active synchronization task. These tools can cause the task to fail.
Supported SQL operations
| Type | Operations |
|---|---|
| DML | INSERT, UPDATE, DELETE |
| DDL | ADD COLUMN |
CREATE TABLE is not supported. To synchronize a new table, add it to the selected objects in the task configuration. See Add an object to a data synchronization task.
Supported synchronization topologies
One-way one-to-one synchronization
One-way one-to-many synchronization
One-way many-to-one synchronization
Term mappings
When DTS synchronizes objects between PolarDB for MySQL and AnalyticDB for PostgreSQL, object names are mapped as follows:
| PolarDB for MySQL | AnalyticDB for PostgreSQL |
|---|---|
| Database | Schema |
| Table | Table |
Performance considerations
Impact on source and destination during initial synchronization
The initial full data synchronization reads from the source cluster and writes to the destination instance concurrently, which increases load on both sides. To reduce the risk of service degradation, run the synchronization task during off-peak hours — when CPU utilization on both the source and destination is below 30%.
High resource consumption is more likely if:
The source cluster has a large number of slow queries.
Source tables lack primary keys.
The destination instance encounters deadlocks.
Tablespace growth in the destination instance
Concurrent INSERT operations during initial full data synchronization cause table fragmentation in the destination instance. After initial synchronization completes, the tablespace of the destination instance will be larger than that of the source cluster.
Set up the synchronization task
Step 1: Purchase a DTS instance
Purchase a DTS instance. On the buy page, set the following:
Source Instance: PolarDB
Target Instance: AnalyticDB for PostgreSQL
Synchronization Topology: One-Way Synchronization
Step 2: Open the task configuration
Log on to the DTS console.DTS console
In the left-side navigation pane, click Data Synchronization.
At the top of the Synchronization Tasks page, select the region where the destination instance resides.
Find the DTS instance and click Configure Synchronization Channel in the Actions column.
Step 3: Configure the source and destination instances
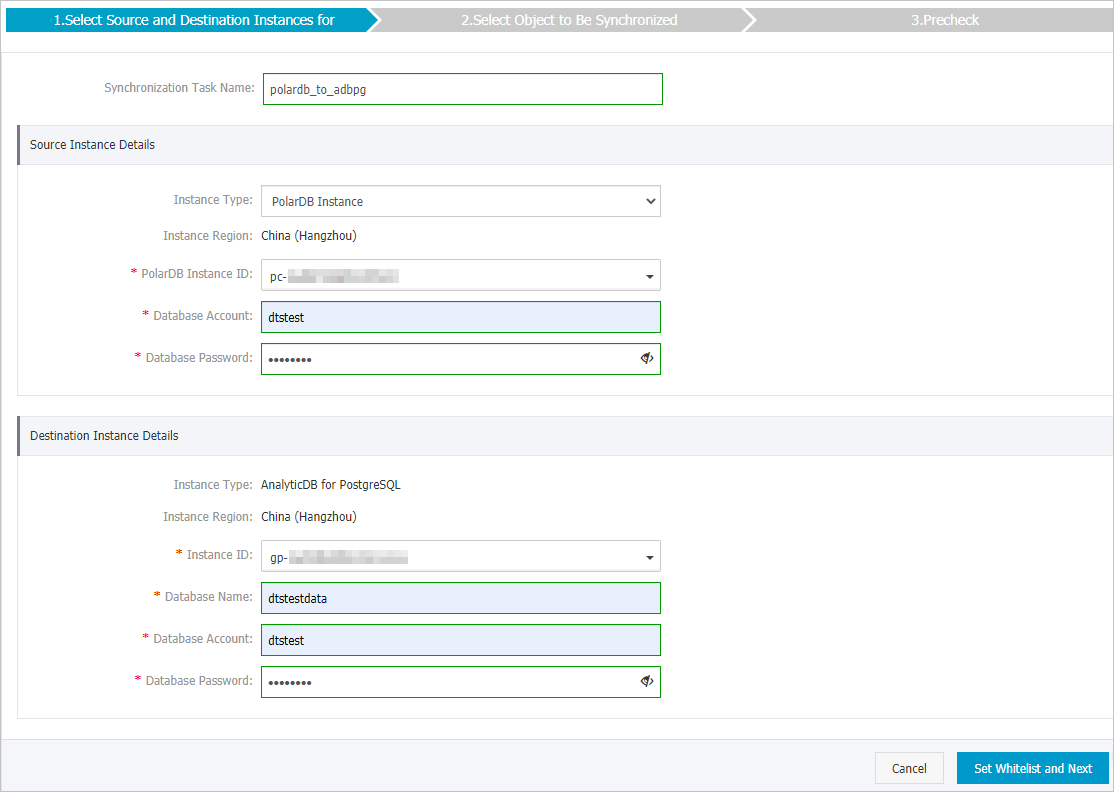
Source instance details
| Parameter | Description |
|---|---|
| Synchronization task name | DTS automatically generates a task name. We recommend that you specify an informative name for easy identification. You do not need to use a unique task name. |
| Instance type | Set to PolarDB Instance (read-only). |
| Instance region | The source region you selected on the buy page (read-only). |
| PolarDB instance ID | Select the ID of the PolarDB for MySQL cluster. |
| Database account | Enter the database account. The account must have read permissions on the objects to be synchronized. |
| Database password | Enter the password for the database account. |
Destination instance details
| Parameter | Description |
|---|---|
| Instance type | Set to AnalyticDB for PostgreSQL (read-only). |
| Instance region | The destination region you selected on the buy page (read-only). |
| Instance ID | Select the ID of the AnalyticDB for PostgreSQL instance. |
| Database name | Enter the name of the destination database. |
| Database account | Enter the initial account of the AnalyticDB for PostgreSQL instance, or an account with the RDS_SUPERUSER permission. See Create a database account and Manage users and permissions. |
| Database password | Enter the password for the database account. |
Step 4: Configure the whitelist and proceed
Click Set Whitelist and Next in the lower-right corner.
DTS automatically adds the CIDR blocks of DTS servers to the whitelists of both the PolarDB for MySQL cluster and the AnalyticDB for PostgreSQL instance, allowing DTS to connect to both.
Step 5: Select the synchronization policy and objects
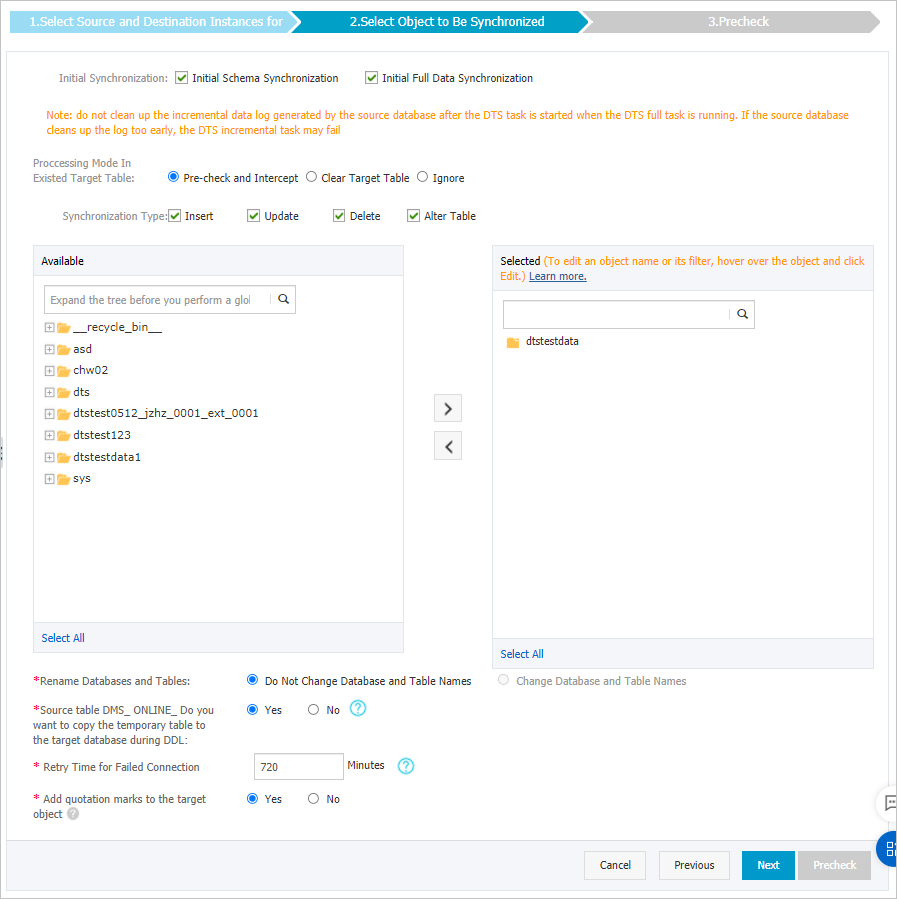
Synchronization policy
| Parameter | Description |
|---|---|
| Initial synchronization | Select both Initial Schema Synchronization and Initial Full Data Synchronization. DTS synchronizes the schemas and data of selected objects before starting incremental synchronization. |
| Processing mode for conflicting tables | Clear Target Table: Skips the Schema Name Conflict item during the precheck. Clears all data in the destination table before the initial full sync. Use this when you want to start fresh or after testing. Ignore: Skips the Schema Name Conflict item during the precheck. Appends incoming data to existing data in the destination table. Use this when merging data from multiple tables into one. |
| Synchronization type | Select the operation types to synchronize: Insert, Update, Delete, AlterTable. |
Objects to synchronize
In the Available section, select the tables to synchronize and click ![]() to move them to the Selected section.
to move them to the Selected section.
Only tables can be selected. To rename objects in the destination instance, use the object name mapping feature. See Rename an object to be synchronized and Object name mapping.
DMS online DDL replication
If you use Data Management (DMS) to perform online DDL operations on the source cluster, configure whether to replicate the temporary tables DMS generates:
Yes: DTS synchronizes data from temporary tables. This may delay the task if the online DDL operation generates large amounts of data.
No: DTS synchronizes only the original DDL statement, not temporary table data. The destination table may be locked during the operation.
Retry time for failed connections
By default, DTS retries failed connections for 720 minutes (12 hours). Adjust this based on your requirements. If DTS reconnects within the retry window, the task resumes automatically; otherwise, it fails.
DTS charges apply during the retry period. Release the DTS instance promptly if the source or destination instance is no longer available.
Step 6: Configure primary key and distribution columns
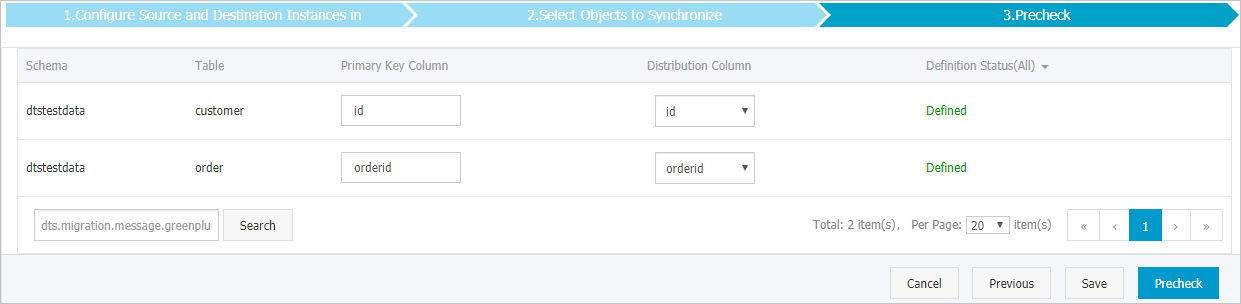
For each table to synchronize, specify the primary key column and distribution column in the AnalyticDB for PostgreSQL instance. These settings determine how data is stored and queried in AnalyticDB for PostgreSQL — incorrect configuration can affect query performance and data distribution.
This step appears only if you selected Initial Schema Synchronization. For more information, see Define constraintsDefine constraints and Define table distributionDefine table distribution.
Step 7: Run the precheck
Click Precheck in the lower-right corner. DTS validates the configuration before starting the task.
If any precheck items fail, click ![]() next to the failed item to view details. Fix the issue and run a new precheck, or ignore the failed item and run a new precheck.
next to the failed item to view details. Fix the issue and run a new precheck, or ignore the failed item and run a new precheck.
Step 8: Start the synchronization task
After the precheck passes and the message The precheck is passed. appears, close the Precheck dialog box. The synchronization task starts automatically.
Wait for the initial synchronization to complete. The task status changes to Synchronizing on the Synchronization Tasks page.
