This article provides a comprehensive guide on deploying a large language model (LLM) application using the PAI-EAS (Platform for AI - Elastic Algorithm Service). The deployment process supports both WebUI interface and API calls. Once deployed, the LLM application can be integrated with the LangChain framework to incorporate an enterprise knowledge base, and details are here. PAI-EAS also offers inference acceleration engines like BladeLLM and vLLM to achieve high concurrency and low latency.
The growing popularity of big models such as GPT has made the deployment of LLM applications a sought-after service. There are numerous open-source big models available, each excelling in different specialties. PAI-EAS simplifies the deployment of these models, making it possible to launch an inference service in under five minutes.
To deploy an EAS service, follow these steps:
1. Navigate to the PAI-EAS model online service page by signing in to the PAI console, selecting workspaces, and choosing _Model Deployment > Model online services (EAS)_;
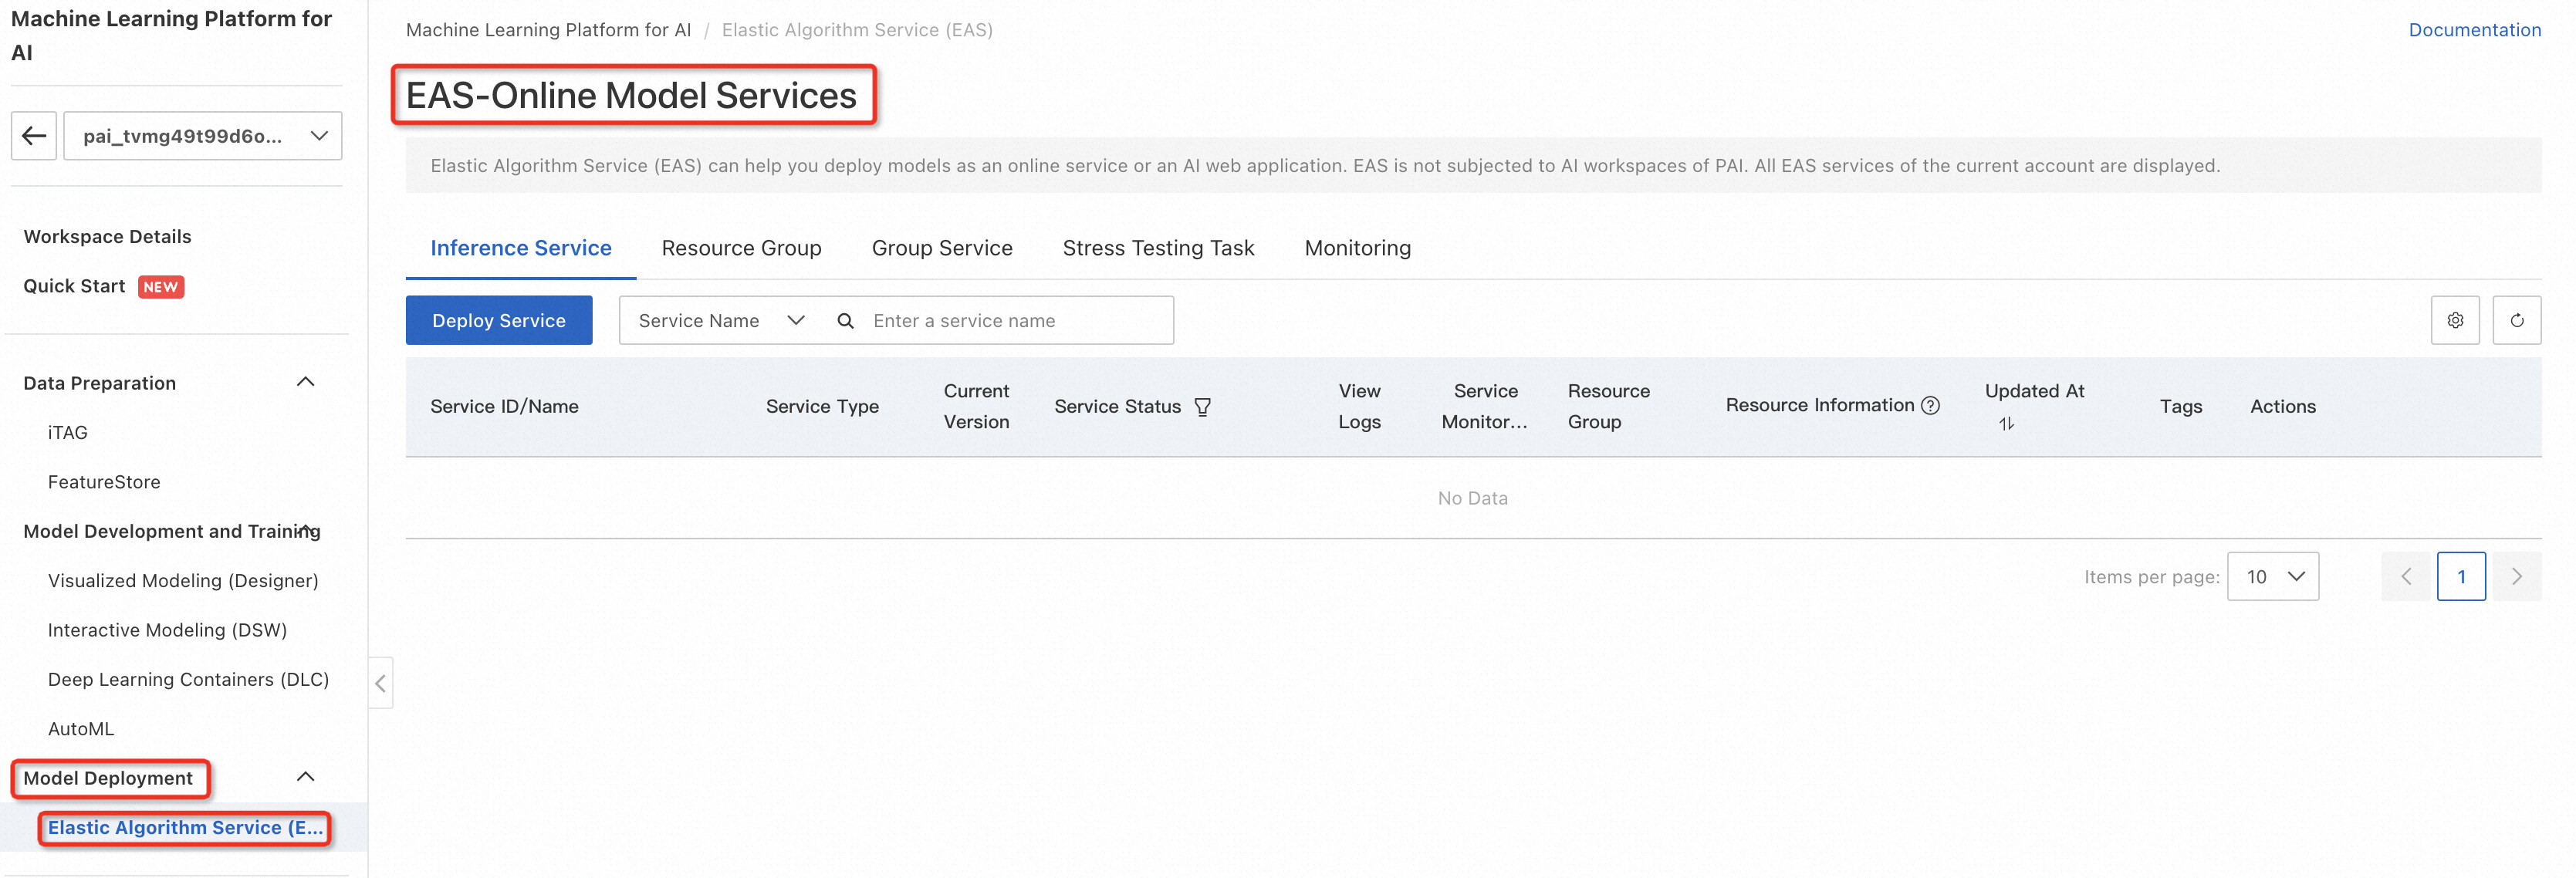
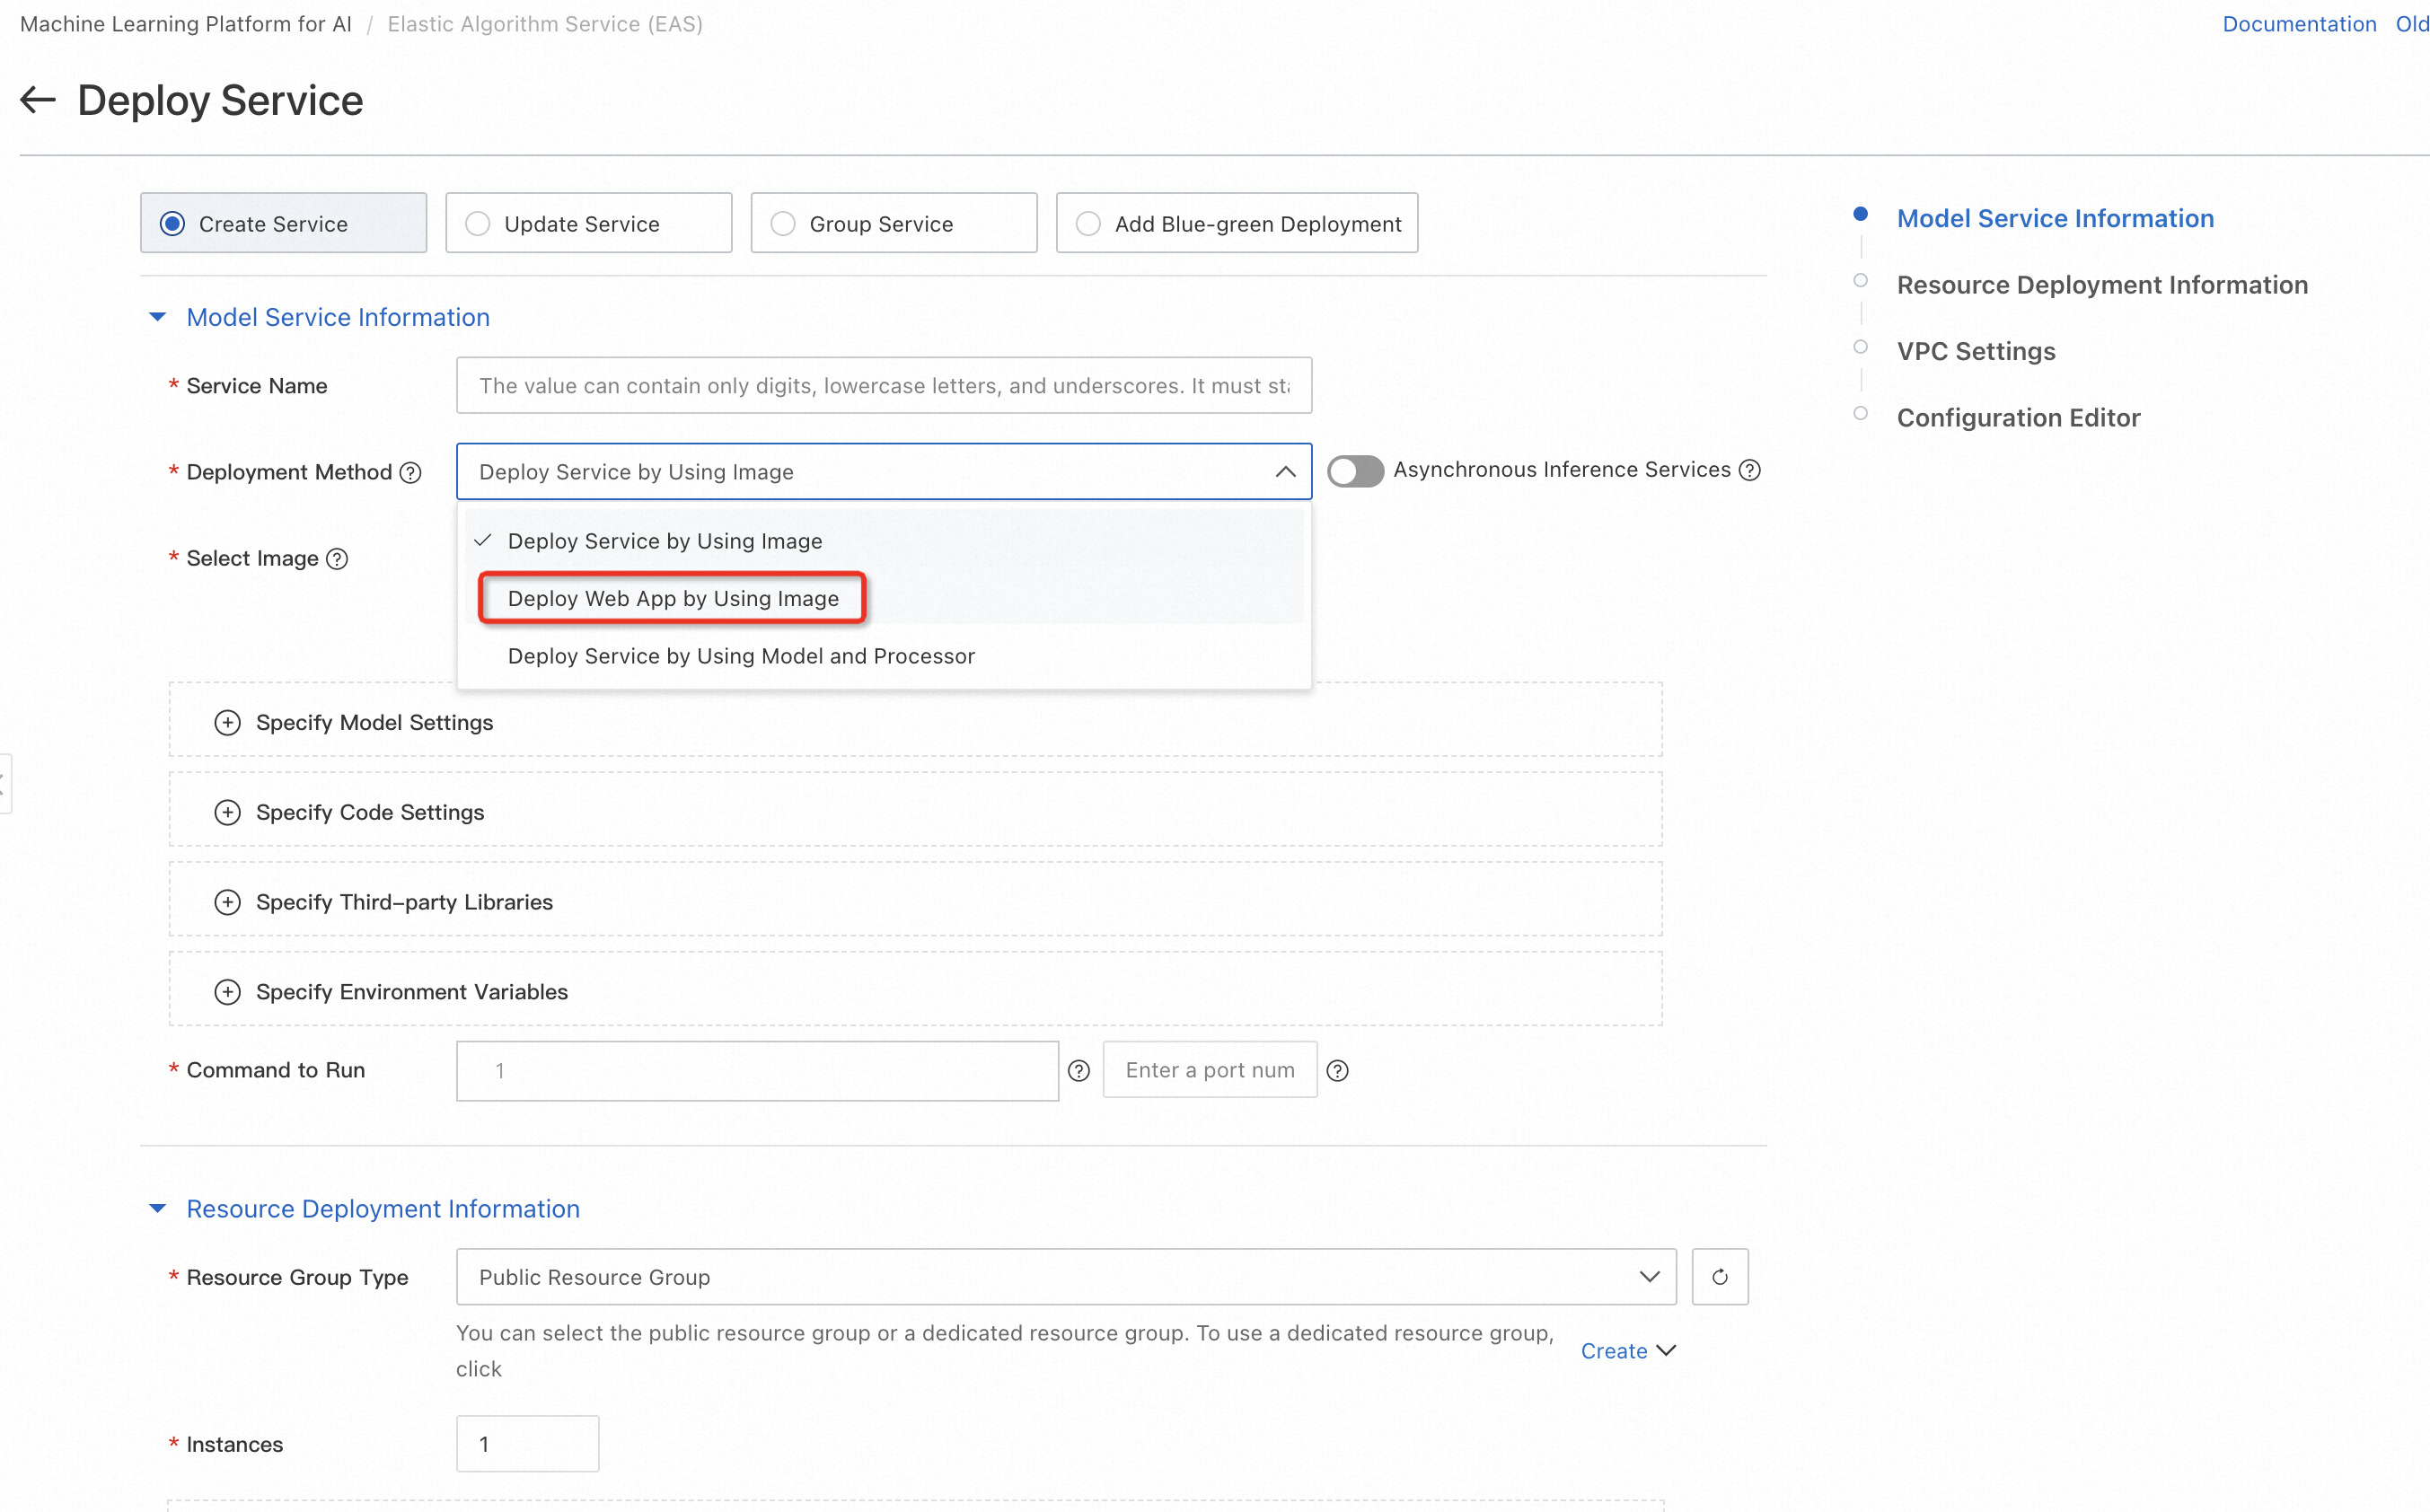
Click Deploy Service and configure key parameters such as the service name (e.g., llm_demo001), deployment method (_Deploy Web App by Using Image_), and Select Image (choose from the PAI platform image list).
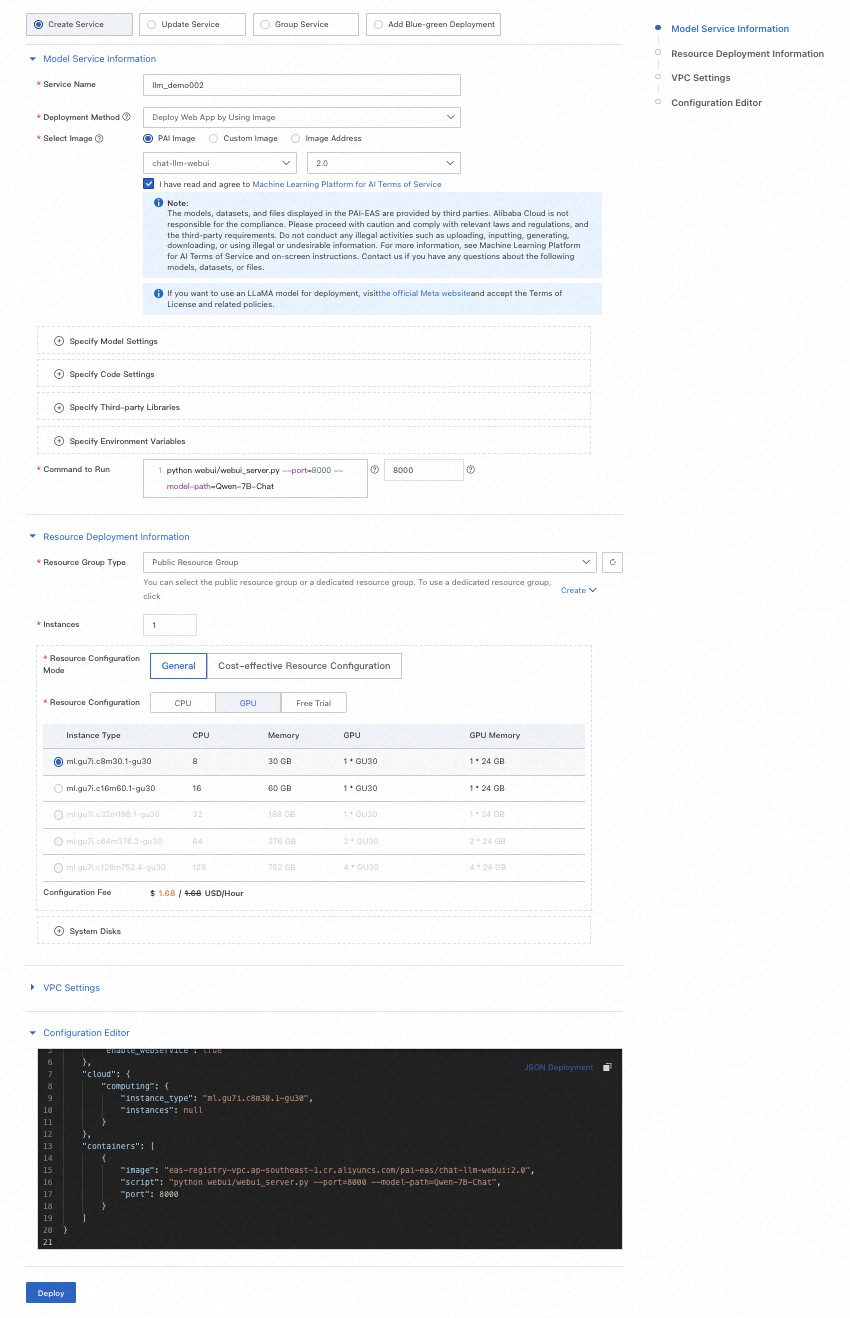
| Parameter | Depaint |
|---|---|
| Service name | The name of the custom service. The sample value used in this example is llm_demo001. |
| Deployment method | Select Image deployment AI-Web application. |
| Image selection | In the PAI platform image list, select _chat-llm-webui_, and select 2.x as the image version (the latest version is 2.1). Due to rapid version iteration, you can select the highest version of the image during deployment. |
| Run command | Run the command (by default, pull up the large model of the Universal-7B parameter quantity): python webui/webui_server.py --port=8000 --model-path=Qwen/Qwen-7B-Chat Port number: 8000 See the table below for the command to pull up more open-source large models with one click. |
| Resource group type | Select a public resource group. |
| Resource configuration method | Select regular resource configuration. |
| Resource configuration | The GPU type must be selected. By default, ml.gu7i.c16m60.1-gu30 (the most cost-effective) is recommended for the instance type of the large model with the Tongyi Qianwen-7B parameter quantity. See the table below for more information about the resources recommended for model deployment. |
2. Set the run command to launch the desired large model, such as Qwen/Qwen-7B-Chat, for the Universal-7B parameter model.
3. Select the appropriate resource group type and configuration, recommending GPU types like ml.gu7i.c16m60.1-gu30 for optimal performance.
| Model type | Run command | Recommend model |
|---|---|---|
| Qwen-1.8B | python webui/webui_server.py --port=8000 --model-path=Qwen/Qwen-1_8B-Chat | • Single card GU30 • Single card A10 • Single card V100 • Single card T4 |
| Qwen-7B | python webui/webui_server.py --port=8000 --model-path=Qwen/Qwen-7B-Chat | • Single card GU30 • Single card A10 |
| Qwen-14b | python webui/webui_server.py --port=8000 --model-path=Qwen/Qwen-14B-Chat | • Single card GU30 • Single card A10 |
| Qwen-72B | python webui/webui_server.py --port=8000 --model-path=Qwen/Qwen-72B-Chat | • 8 cards V100(gn6e) • 2 cards A100 |
| llama2-7B | python webui/webui_server.py --port=8000 --model-path=meta-llama/Llama-2-7b-chat-hf | • Single card GU30 • Single card A10 |
| llama2-13B | python webui/webui_server.py --port=8000 --model-path=meta-llama/Llama-2-13b-chat-hf --precision=fp16 | • Single card V100(gn6e) • Two cards GU30 |
| chatglm2-6B | python webui/webui_server.py --port=8000 --model-path=THUDM/chatglm2-6b | • Single card GU30 • Single card A10 |
| chatglm3-6B | python webui/webui_server.py --port=8000 --model-path=THUDM/chatglm3-6b | • Single card GU30 • Single card A10 |
| Baichu-13b | python webui/webui_server.py --port=8000 --model-path=baichuan-inc/Baichuan-13B-Chat | • Single card V100(gn6e) • Two cards GU30 • Two cards A10 |
| baichuan2-7B | python webui/webui_server.py --port=8000 --model-path=baichuan-inc/Baichuan2-7B-Chat | • Single card GU30 • Single card A10 |
| baichuan2-13B | python webui/webui_server.py --port=8000 --model-path=baichuan-inc/Baichuan2-13B-Chat | • Single card V100(gn6e) • Two cards GU30 • Two cards A10 |
| Yi-6B | python webui/webui_server.py --port=8000 --model-path=01-ai/Yi-6B | • Single card GU30 • Single card A10 |
| Mistral-7B | python webui/webui_server.py --model-path=mistralai/Mistral-7B-Instruct-v0.1 | • Single card GU30 • Single card A10 |
| falcon-7B | python webui/webui_server.py --port=8000 --model-path=tiiuae/falcon-7b-instruct | • Single card GU30 • Single card A10 |
4. Deploy the service and wait for the model deployment to complete.
Creating an inference service will take some time, so let's go to the next interesting session and start using the service itself.
Once the service is deployed, use the WebUI interface to perform model inference verification. Enter a query like Please provide a financial learning plan and click send to interact with the model.


Switching Open-Source Models: PAI-EAS allows easy switching between different models, such as Tongyi Qianwen, Llama2, and chatglm, by updating the run commands and instance specifications accordingly.
Integrating Business Data with LangChain: LangChain is a framework that combines LLMs with external data. Select LangChain on the WebUI page to integrate your business data, and follow the prompts to upload and vectorize your knowledge base files.
Improving Inference Concurrency and Latency: Add the --backend=vllm parameter to the run command for higher concurrency and lower latency. This is compatible with certain models like qwen, llama2, and baichuan-13B.
Mounting Custom Models: To deploy a custom model, mount it using OSS by uploading the model and configuration files to your OSS bucket, updating the service with the appropriate OSS path, and running command parameters.
Obtaining Service Access Address and Token: Access the service details page from the PAI-EAS model online service page to retrieve the service Token and access address.
HTTP Calls: Use standard HTTP or SSE methods to call the service by sending string or structured requests with the service Token and access address. You can use Python's requests package for this purpose.
WebSocket Calls: WebSocket can be used for maintaining connections and conducting multiple rounds of conversation. Replace the http in the service access address with ws and control the streaming output with the use_stream_chat parameter.
This guide outlines the entire process of deploying and using an LLM application with PAI-EAS, addressing common issues and providing solutions for seamless integration and improved performance. Whether you're using the WebUI interface or calling APIs, this guide ensures a smooth deployment and utilization of LLM applications.
LangChain first processes the input user data in natural language and stores it locally as a knowledge base for large models. Each inference user input will first find the answers similar to the input questions in the local knowledge base and input the knowledge base answers with the user input into a large model to generate customized answers based on the local knowledge base.
Setting method:

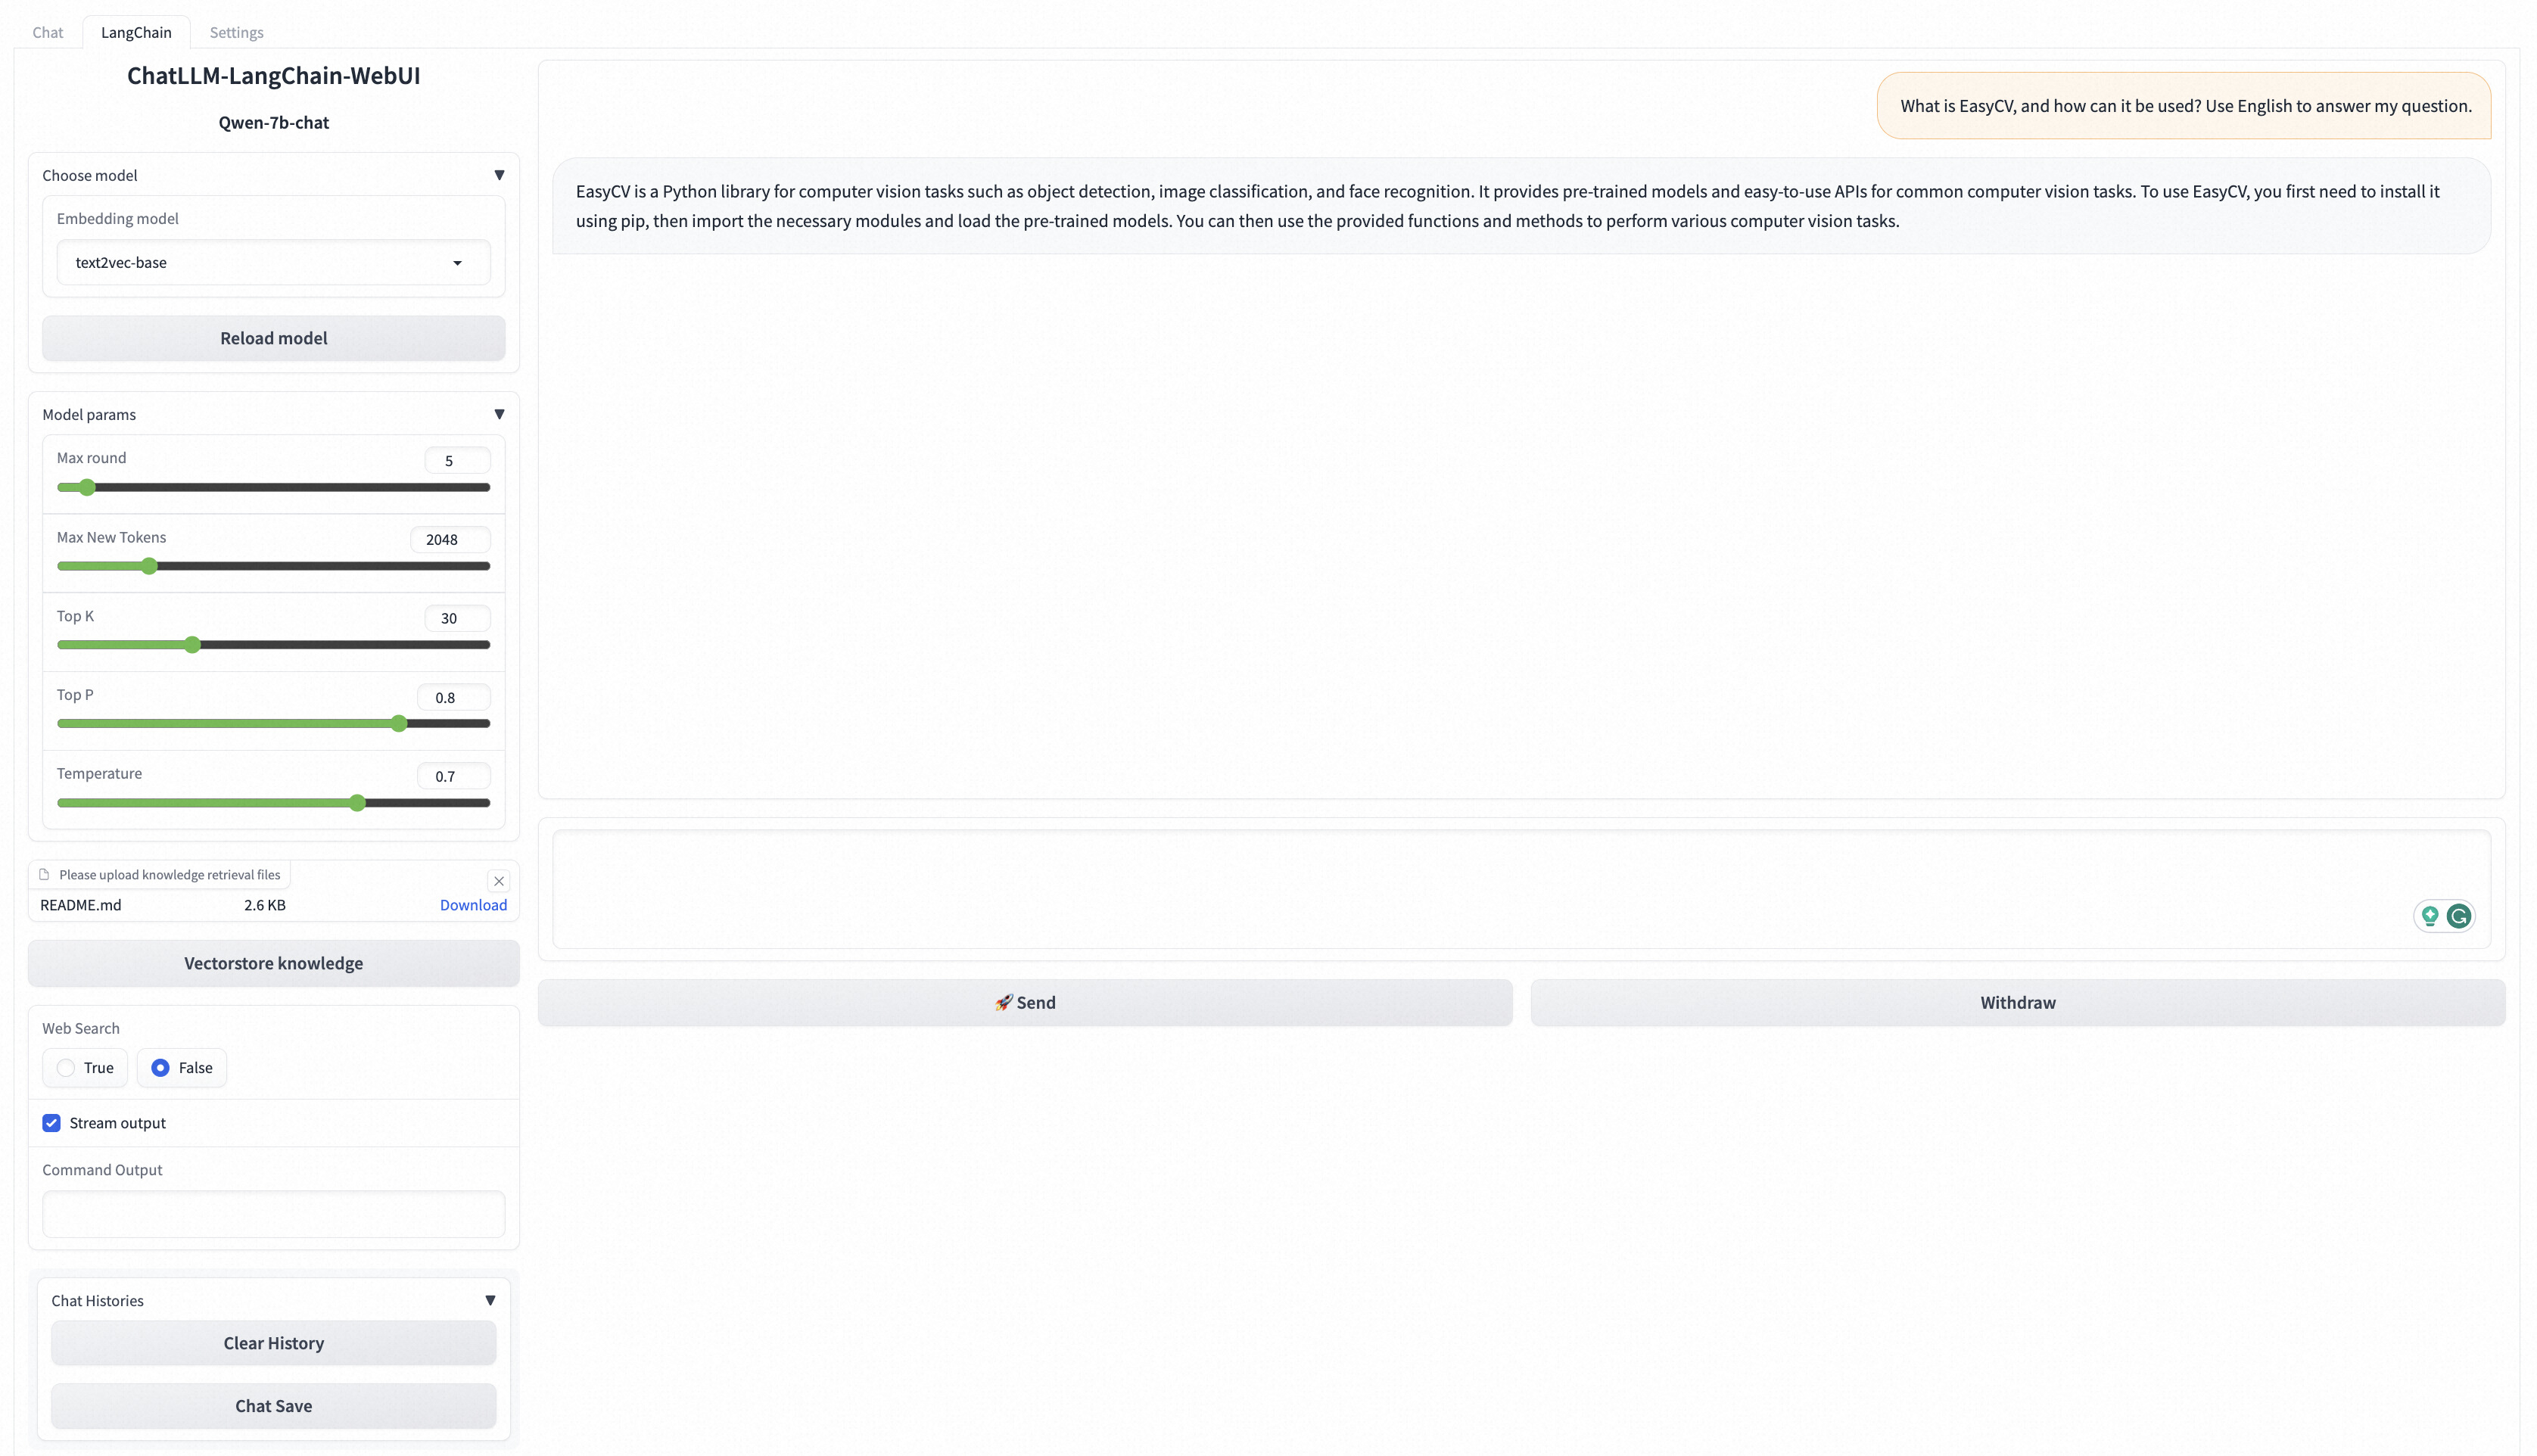
For example, Upload a README.md file. In the lower-left corner, click knowledge base file vectorization. The following result indicates that the custom data is loaded.

In the input box at the bottom of the WebUI page, enter questions related to business data for a conversation.
For example, enter What is EasyCV, and how can it be used? Use English to answer my question. in the input box and click Send. The following figure shows the returned result.
PAI-EAS inference acceleration engine that supports BladeLLM and vLLM can help you enjoy high concurrency and low latency with one click.
1. Click Update Service in the service actions column.
2. In the model service information section, add the parameter -- backend = vllm at the end of the run command parameter, and then click deploy. (Note that the current inference acceleration engine only supports the following models: qwen, llama2, baichuan-13B, and baichuan2-13B)

3. transformers, vllm, and other versions are upgraded. Due to the iterative update of the model, the earlier and the latest released models are incompatible with the version dependencies of transformers, vllm, and other toolkits. Users can freely upgrade toolkits such as transformers and vllm according to their actual needs.

To deploy a custom model, you can use OSS to mount the custom model. The procedure is as follows:
4. Upload custom models and related configuration files to your OSS Bucket Directory. For more information about how to create buckets and upload files, see Create a bucket in the console and Upload files in the console.
The sample model file to be prepared is as follows:
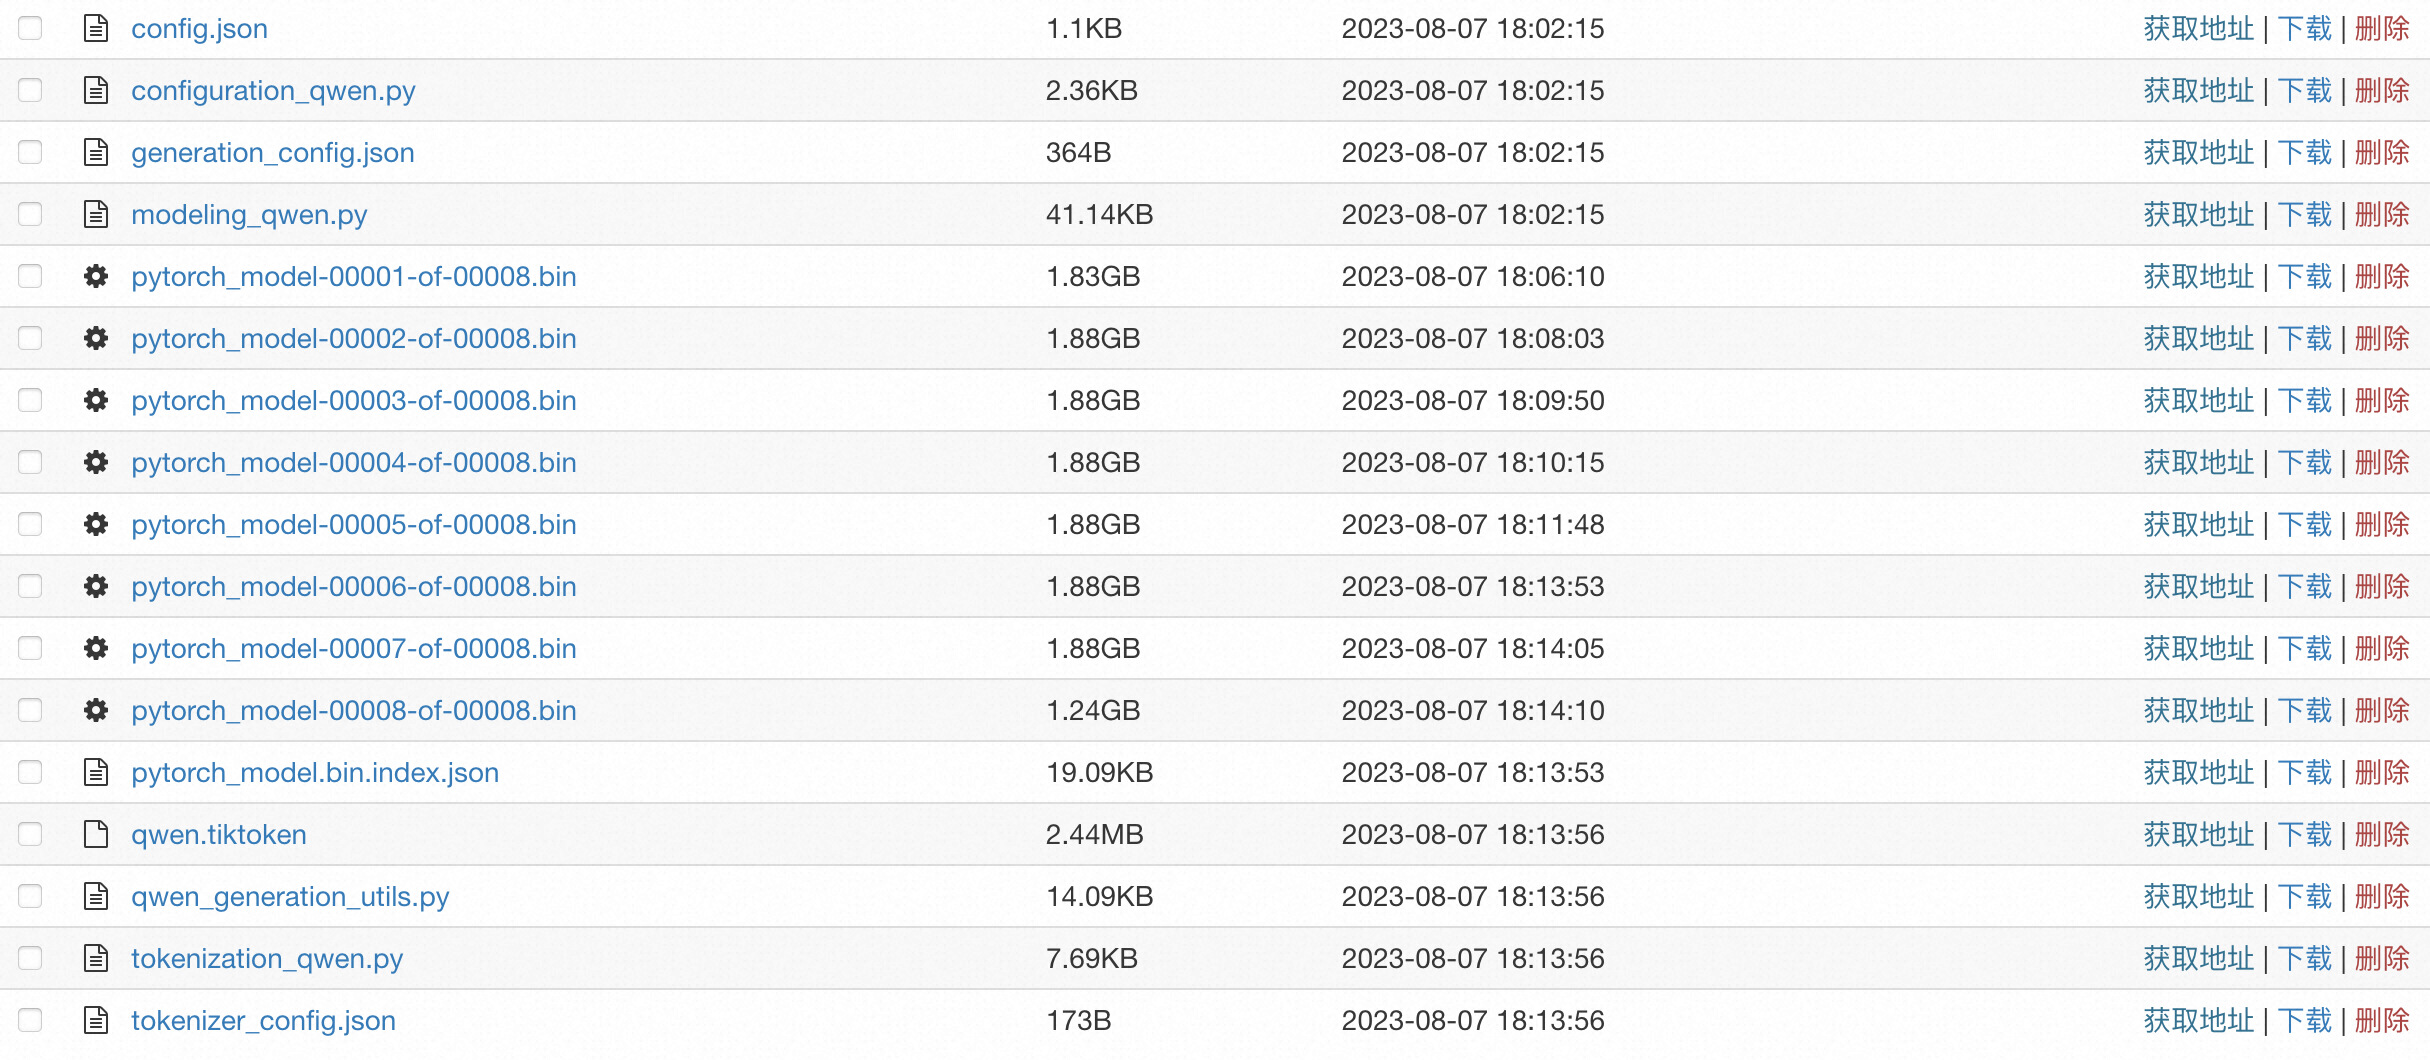
The configuration file must include a config.json file, and you will need to set up the Config file in accordance with the model formats of Huggingface or Modelscope. For details of the example file, please refer to config.json.
5. Click Update Service in the service actions column.
6. In the model service information section, configure the following parameters and click deploy.
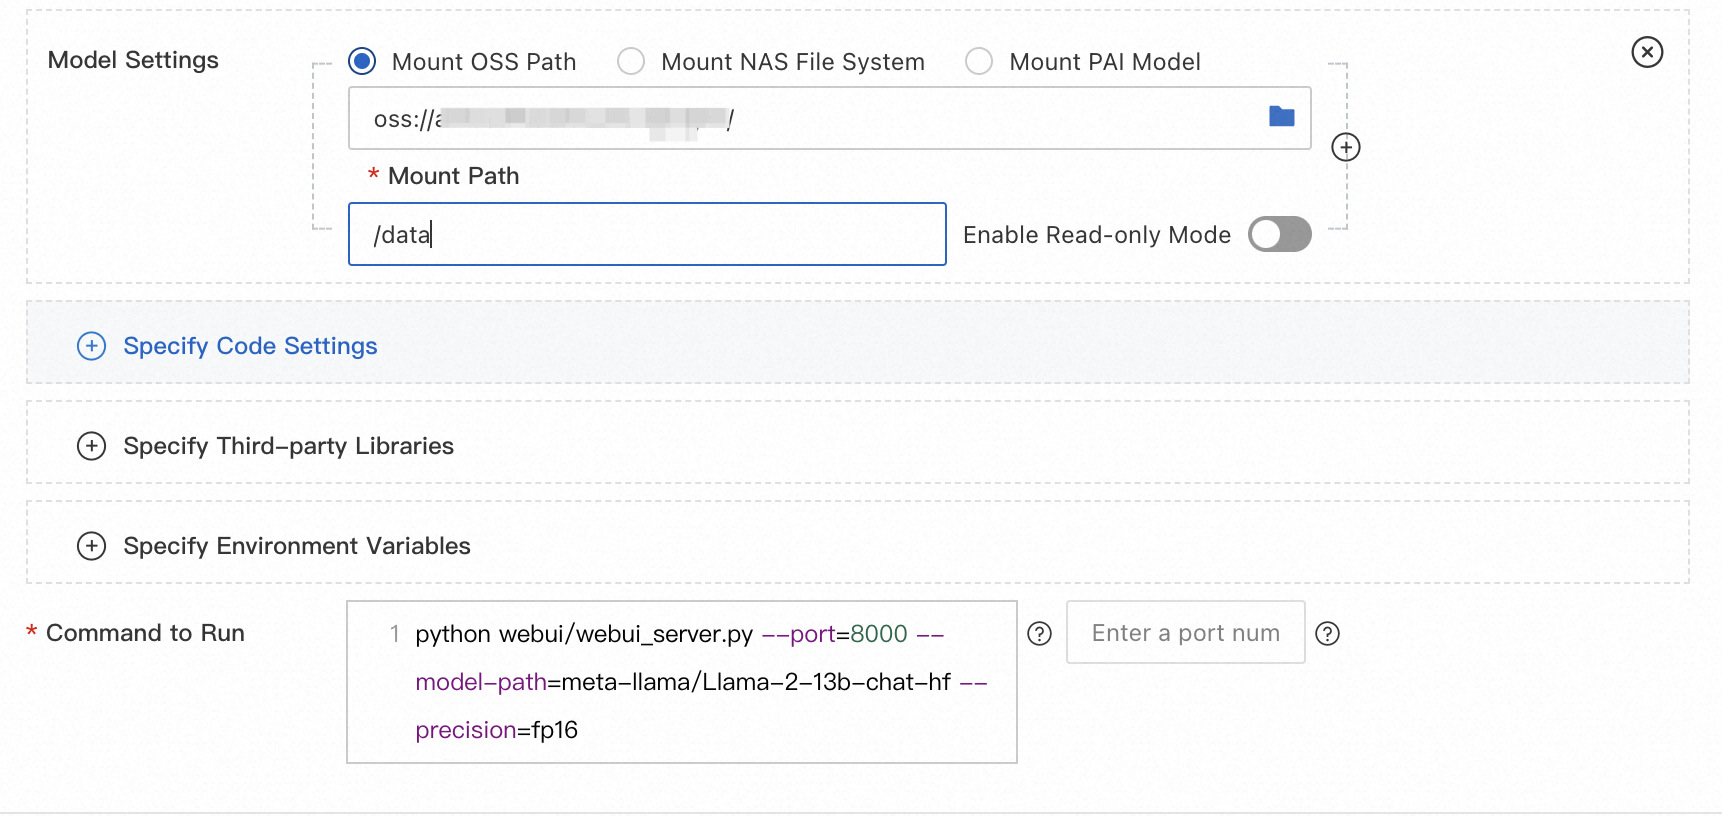
| Parameter | Depaint |
|---|---|
| Model configuration | Click enter model configuration to configure the model. • Select OSS mount for model configuration. Set the OSS path to the OSS path where the custom model file is located. For example, oss:// bucket-test/data-oss/. • Mount path: set it to/data. • Read-only: the switch is turned off. |
| Run command | Add the following parameters to the run command: • -- model-path: Set to/data. The configuration must be consistent with that of the Mount path. • -- model-type: the model type. For more information about how to configure running commands for different models, see Use EAS to deploy ChatGLM and LangChain applications in 5 minutes. |
Run command
| Model type | Run command |
|---|---|
| llama2 | python webui/webui_server.py --port=8000 --model-path=/data --model-type=llama2 --precision=fp16 |
| chatglm2 | python webui/webui_server.py --port=8000 --model-path=/data --model-type=chatglm |
| Qwen | python webui/webui_server.py --port=8000 --model-path=/data --model-type=qwen |
| falcon-7b | python webui/webui_server.py --port=8000 --model-path=/data --model-type=falcon |
1. Obtain the service access address and Token.
2. Start the API for model inference.
The client uses the standard HTTP format. When you call the curl command, you can send the following two types of requests:
curl $host -H 'Authorization: $authorization' --data-binary @chatllm_data.txt -vWhere: $authorization needs to be replaced with the service Token, $host: needs to be replaced with the service access address, chatllm_data.txt: This file is a text file containing the information.
curl $host -H 'Authorization: $authorization' -H "Content-type: application/json" --data-binary @chatllm_data.json -v -H "Connection: close"Use the chatllm_data.json file to set inference parameters. The content format of the chatllm_data.json file is as follows:
{
    "max_new_tokens": 4096,
    "use_stream_chat": false,
    "prompt": "How to install it?",
    "system_prompt": "Act like you are programmer with 5+ years of experience."
    "history": [
        [
            "Can you tell me what's the bladellm?",
            "BladeLLM is an framework for LLM serving, integrated with acceleration techniques like quantization, ai compilation, etc. , and supporting popular LLMs like OPT, Bloom, LLaMA, etc."
        ]
    ],
    "temperature": 0.8,
    "top_k": 10,
    "top_p": 0.8,
    "do_sample": True,
    "use_cache": True,
}
The parameters are described as follows. Add and delete them as appropriate.
| Parameter | Depaint | Default value |
|---|---|---|
| max_new_tokens | The maximum length of the generated output token in units. | 2048 |
| use_stream_chat | Specifies whether to use streaming output. | True |
| prompt | The Prompt of the user. | "" |
| system_prompt | The system Prompt. | "" |
| history | The history of the conversation. The type is List[Tuple(str, str)]. | [()] |
| temperature | It is used to adjust the randomness of the output result of the model. The larger the value, the stronger the randomness. The value 0 is the fixed output. Float type, ranging from 0 to 1. | 0.95 |
| top_k | Select the number of candidate outputs from the generated results. | 30 |
| top_p | Select output results by percentage from the generated results. Float type, ranging from 0 to 1. | 0.8 |
| do_sample | Enable output sampling. | True |
| Use_cache | Enable key-value cache. | True |
You can also implement your own client based on the Python requests package. The sample code is as follows:
import argparse
import json
from typing import Iterable, List

import requests

def post_http_request(prompt: str,
                      system_prompt: str,
                      history: list,
                      host: str,
                      authorization: str,
                      max_new_tokens: int = 2048,
                      temperature: float = 0.95,
                      top_k: int = 1,
                      top_p: float = 0.8,
                      langchain: bool = False,
                      use_stream_chat: bool = False) -> requests.Response:
    headers = {
        "User-Agent": "Test Client",
        "Authorization": f"{authorization}"
    }
    if not history:
        history = [
            (
                "San Francisco is a",
                "city located in the state of California in the United States. \
                It is known for its iconic landmarks, such as the Golden Gate Bridge \
                and Alcatraz Island, as well as its vibrant culture, diverse population, \
                and tech industry. The city is also home to many famous companies and \
                startups, including Google, Apple, and Twitter."
            )
        ]
    pload = {
        "prompt": prompt,
        "system_prompt": system_prompt,
        "top_k": top_k,
        "top_p": top_p,
        "temperature": temperature,
        "max_new_tokens": max_new_tokens,
        "use_stream_chat": use_stream_chat,
        "history": history
    }
    if langchain:
        print(langchain)
        pload["langchain"] = langchain
    response = requests.post(host, headers=headers,
                             json=pload, stream=use_stream_chat)
    return response

def get_response(response: requests.Response) -> List[str]:
    data = json.loads(response.content)
    output = data["response"]
    history = data["history"]
    return output, history

if __name__ == "__main__":
    parser = argparse.ArgumentParser()
    parser.add_argument("--top-k", type=int, default=4)
    parser.add_argument("--top-p", type=float, default=0.8)
    parser.add_argument("--max-new-tokens", type=int, default=2048)
    parser.add_argument("--temperature", type=float, default=0.95)
    parser.add_argument("--prompt", type=str, default="How can I get there?")
    parser.add_argument("--langchain", action="store_true")

    args = parser.parse_args()

    prompt = args.prompt
    top_k = args.top_k
    top_p = args.top_p
    use_stream_chat = False
    temperature = args.temperature
    langchain = args.langchain
    max_new_tokens = args.max_new_tokens

    host = "EAS服务公网地址"
    authorization = "EAS服务公网Token"

    print(f"Prompt: {prompt!r}\n", flush=True)
    # You can set the system prompt in the language model input within the request.
    system_prompt = "Act like you are programmer with \
                5+ years of experience."

    # In client requests, it is possible to set the historical information of the conversation. The client maintains the dialogue records of the current user to facilitate multi-turn dialogue. Typically, the history information returned from the previous round of dialogue can be used. The format for history is List[Tuple(str, str)]
    history = []
    response = post_http_request(
        prompt, system_prompt, history,
        host, authorization,
        max_new_tokens, temperature, top_k, top_p,
        langchain=langchain, use_stream_chat=use_stream_chat)
    output, history = get_response(response)
    print(f" --- output: {output} \n --- history: {history}", flush=True)

# The server returns the results in JSON format, which includes inference results and dialogue history.
def get_response(response: requests.Response) -> List[str]:
    data = json.loads(response.content)
    output = data["response"]
    history = data["history"]
    return output, history
Where:
The HTTP SSE method is used for streaming calls. Other settings are the same as those for non-streaming calls. For more information, see the following code:
import argparse
import json
from typing import Iterable, List

import requests


def clear_line(n: int = 1) -> None:
    LINE_UP = '\033[1A'
    LINE_CLEAR = '\x1b[2K'
    for _ in range(n):
        print(LINE_UP, end=LINE_CLEAR, flush=True)


def post_http_request(prompt: str,
                      system_prompt: str,
                      history: list,
                      host: str,
                      authorization: str,
                      max_new_tokens: int = 2048,
                      temperature: float = 0.95,
                      top_k: int = 1,
                      top_p: float = 0.8,
                      langchain: bool = False,
                      use_stream_chat: bool = False) -> requests.Response:
    headers = {
        "User-Agent": "Test Client",
        "Authorization": f"{authorization}"
    }
    if not history:
        history = [
            (
                "San Francisco is a",
                "city located in the state of California in the United States. \
                It is known for its iconic landmarks, such as the Golden Gate Bridge \
                and Alcatraz Island, as well as its vibrant culture, diverse population, \
                and tech industry. The city is also home to many famous companies and \
                startups, including Google, Apple, and Twitter."
            )
        ]
    pload = {
        "prompt": prompt,
        "system_prompt": system_prompt,
        "top_k": top_k,
        "top_p": top_p,
        "temperature": temperature,
        "max_new_tokens": max_new_tokens,
        "use_stream_chat": use_stream_chat,
        "history": history
    }
    if langchain:
        pload["langchain"] = langchain
    response = requests.post(host, headers=headers,
                             json=pload, stream=use_stream_chat)
    return response


def get_streaming_response(response: requests.Response) -> Iterable[List[str]]:
    for chunk in response.iter_lines(chunk_size=8192,
                                     decode_unicode=False,
                                     delimiter=b"\0"):
        if chunk:
            data = json.loads(chunk.decode("utf-8"))
            output = data["response"]
            history = data["history"]
            yield output, history


if __name__ == "__main__":
    parser = argparse.ArgumentParser()
    parser.add_argument("--top-k", type=int, default=4)
    parser.add_argument("--top-p", type=float, default=0.8)
    parser.add_argument("--max-new-tokens", type=int, default=2048)
    parser.add_argument("--temperature", type=float, default=0.95)
    parser.add_argument("--prompt", type=str, default="How can I get there?")
    parser.add_argument("--langchain", action="store_true")
    args = parser.parse_args()

    prompt = args.prompt
    top_k = args.top_k
    top_p = args.top_p
    use_stream_chat = True
    temperature = args.temperature
    langchain = args.langchain
    max_new_tokens = args.max_new_tokens

    host = ""
    authorization = ""

    print(f"Prompt: {prompt!r}\n", flush=True)
    system_prompt = "Act like you are programmer with \
                5+ years of experience."
    history = []
    response = post_http_request(
        prompt, system_prompt, history,
        host, authorization,
        max_new_tokens, temperature, top_k, top_p,
        langchain=langchain, use_stream_chat=use_stream_chat)

    for h, history in get_streaming_response(response):
        print(
            f" --- stream line: {h} \n --- history: {history}", flush=True)
Where:
To better maintain user conversation information, you can also use WebSocket to maintain the connection with the service to complete one or more rounds of conversation. The code example is as follows:
import os
import time
import json
import struct
from multiprocessing import Process

import websocket

round = 5
questions = 0


def on_message_1(ws, message):
    if message == "<EOS>":
        print('pid-{} timestamp-({}) receives end message: {}'.format(os.getpid(),
                                                                      time.time(), message), flush=True)
        ws.send(struct.pack('!H', 1000), websocket.ABNF.OPCODE_CLOSE)
    else:
        print("{}".format(time.time()))
        print('pid-{} timestamp-({}) --- message received: {}'.format(os.getpid(),
                                                                      time.time(), message), flush=True)


def on_message_2(ws, message):
    global questions
    print('pid-{} --- message received: {}'.format(os.getpid(), message))
    # end the client-side streaming
    if message == "<EOS>":
        questions = questions + 1
        if questions == 5:
            ws.send(struct.pack('!H', 1000), websocket.ABNF.OPCODE_CLOSE)


def on_message_3(ws, message):
    print('pid-{} --- message received: {}'.format(os.getpid(), message))
    # end the client-side streaming
    ws.send(struct.pack('!H', 1000), websocket.ABNF.OPCODE_CLOSE)


def on_error(ws, error):
    print('error happened: ', str(error))


def on_close(ws, a, b):
    print("### closed ###", a, b)


def on_pong(ws, pong):
    print('pong:', pong)

# stream chat validation test
def on_open_1(ws):
    print('Opening Websocket connection to the server ... ')
    params_dict = {}
    params_dict['prompt'] = """Show me a golang code example: """
    params_dict['temperature'] = 0.9
    params_dict['top_p'] = 0.1
    params_dict['top_k'] = 30
    params_dict['max_new_tokens'] = 2048
    params_dict['do_sample'] = True
    raw_req = json.dumps(params_dict, ensure_ascii=False).encode('utf8')
    # raw_req = f"""To open a Websocket connection to the server: """

    ws.send(raw_req)
# end the client-side streaming


# multi-round query validation test
def on_open_2(ws):
    global round
    print('Opening Websocket connection to the server ... ')
    params_dict = {"max_new_tokens": 6144}
    params_dict['temperature'] = 0.9
    params_dict['top_p'] = 0.1
    params_dict['top_k'] = 30
    params_dict['use_stream_chat'] = True
    params_dict['prompt'] = "您好!"
    params_dict = {
        "system_prompt":
        "Act like you are programmer with 5+ years of experience."
    }
    raw_req = json.dumps(params_dict, ensure_ascii=False).encode('utf8')
    ws.send(raw_req)
    params_dict['prompt'] = "请使用Python,编写一个排序算法"
    raw_req = json.dumps(params_dict, ensure_ascii=False).encode('utf8')
    ws.send(raw_req)
    params_dict['prompt'] = "请转写成java语言的实现"
    raw_req = json.dumps(params_dict, ensure_ascii=False).encode('utf8')
    ws.send(raw_req)
    params_dict['prompt'] = "请介绍一下你自己?"
    raw_req = json.dumps(params_dict, ensure_ascii=False).encode('utf8')
    ws.send(raw_req)
    params_dict['prompt'] = "请总结上述对话"
    raw_req = json.dumps(params_dict, ensure_ascii=False).encode('utf8')
    ws.send(raw_req)


# Langchain validation test.
    def on_open_3(ws):
    global round
    print('Opening Websocket connection to the server ... ')

    params_dict = {}
    # params_dict['prompt'] = """To open a Websocket connection to the server: """
    params_dict['prompt'] = """Can you tell me what's the MNN?"""
    params_dict['temperature'] = 0.9
    params_dict['top_p'] = 0.1
    params_dict['top_k'] = 30
    params_dict['max_new_tokens'] = 2048
    params_dict['use_stream_chat'] = False
    params_dict['langchain'] = True
    raw_req = json.dumps(params_dict, ensure_ascii=False).encode('utf8')
    ws.send(raw_req)


authorization = ""
host = "ws://" + ""


def single_call(on_open_func, on_message_func, on_clonse_func=on_close):
    ws = websocket.WebSocketApp(
        host,
        on_open=on_open_func,
        on_message=on_message_func,
        on_error=on_error,
        on_pong=on_pong,
        on_close=on_clonse_func,
        header=[
            'Authorization: ' + authorization],
    )

    # setup ping interval to keep long connection.
    ws.run_forever(ping_interval=2)


if __name__ == "__main__":
    for i in range(5):
        p1 = Process(target=single_call, args=(on_open_1, on_message_1))
        p2 = Process(target=single_call, args=(on_open_2, on_message_2))
        p3 = Process(target=single_call, args=(on_open_3, on_message_3))

        p1.start()
        p2.start()
        p3.start()

        p1.join()
        p2.join()
        p3.join()
Where:
The article serves as an in-depth manual for deploying and integrating large language models (LLMs) using Alibaba Cloud's Platform for AI - Elastic Algorithm Service (PAI-EAS). It addresses the increasing demand for accessible and efficient deployment of sophisticated LLM applications, such as those based on the foundation models' architecture, emphasizing the capability to establish an inference service rapidly.
Key points covered in the article include:
The content is rich with command examples, parameter descriptions, and model-specific recommendations that enable users to navigate the complexities of LLM deployment confidently. By covering common use cases and providing solutions to typical challenges, the article ensures that readers can not only deploy but also maximize the utility of LLM applications, aligning with their business objectives and technical requirements.
This comprehensive tutorial embodies a critical resource for data scientists, AI developers, and IT professionals aiming to leverage the power of large language models within the Alibaba Cloud ecosystem.
Contact Alibaba Cloud to explore the world of generative AI and discover how it can transform your applications and business. It bridges the gap between advanced AI technologies and practical business applications, enabling organizations to innovate and extract value from cutting-edge language processing capabilities.
Quickly Building a RAG Service on Compute Nest with LLM on PAI-EAS and AnalyticDB for PostgreSQL
Ashish-MVP - April 8, 2025
Alibaba Cloud Community - January 12, 2024
Farruh - October 2, 2023
Farruh - June 23, 2025
Farruh - October 1, 2023
Farruh - July 18, 2024
 Platform For AI
A platform that provides enterprise-level data modeling services based on machine learning algorithms to quickly meet your needs for data-driven operations.
Learn More AI Acceleration Solution
Accelerate AI-driven business and AI model training and inference with Alibaba Cloud GPU technology
Learn More Tongyi Qianwen (Qwen)
Top-performance foundation models from Alibaba Cloud
Learn More Alibaba Cloud for Generative AI
Accelerate innovation with generative AI to create new business success
Learn MoreMore Posts by Farruh