This tutorial will demonstrate how to quickly build a streaming data integration job from MySQL to Kafka based on Flink CDC YAML, including whole database synchronization and table structure change synchronization, as well as an introduction to the featured functions. All demonstrations in this tutorial will be carried out in Flink CDC CLI, without requiring a single line of Java/Scala code or the installation of an IDE.
1、Download Flink 1.19.2 and extract it to get the flink-1.19.2 directory. Use the following command to navigate to the Flink directory and set FLINK_HOME to the directory where flink-1.19.2 is located.
tar -zxvf  flink-1.19.2-bin-scala_2.12.tgz
export FLINK_HOME=$(pwd)/flink-1.19.2
cd flink-1.19.2
2、Enable checkpoints by appending the following parameters to the conf/config.yaml configuration file, setting checkpoints to occur every 3 seconds.
execution:
    checkpointing:
        interval: 3000
3、Use the following command to start the Flink cluster.
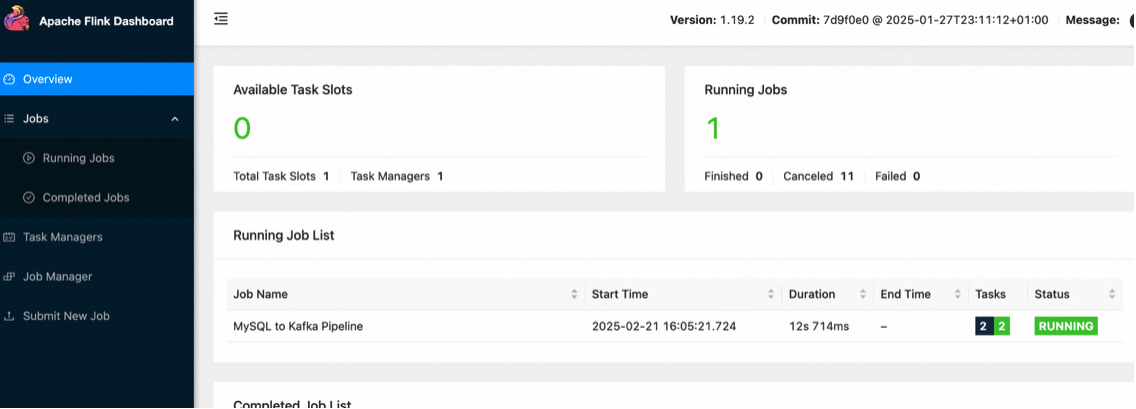
./bin/start-cluster.shIf the startup is successful, you can access the Flink Web UI at http://localhost:8081/, as shown in the image below:

By repeatedly executing start-cluster.sh, you can launch multiple TaskManagers.
Note: If you are using a cloud server and cannot access locally, you need to change localhost to 0.0.0.0 for rest.bind-address and rest.address in the conf/config.yaml file, and then use your public IP:8081 to access.
Create a docker-compose.yml file using the following content:
services:
   Zookeeper:
  image: zookeeper:3.7.1
  ports:
    - "2181:2181"
  environment:
    - ALLOW_ANONYMOUS_LOGIN=yes
   Kafka:
  image: bitnami/kafka:2.8.1
  ports:
    - "9092:9092"
    - "9093:9093"
  environment:
    - ALLOW_PLAINTEXT_LISTENER=yes
    - KAFKA_LISTENERS=PLAINTEXT://:9092
    - KAFKA_ADVERTISED_LISTENERS=PLAINTEXT://192.168.67.2:9092
    - KAFKA_ZOOKEEPER_CONNECT=192.168.67.2:2181
   MySQL:
  image: debezium/example-mysql:1.1
  ports:
    - "3306:3306"
  environment:
    - MYSQL_ROOT_PASSWORD=123456
    - MYSQL_USER=mysqluser
    - MYSQL_PASSWORD=mysqlpw
Note: The IP address 192.168.67.2 in the file is an internal network IP, which can be found using the ifconfig command.

The components included in this Docker Compose are:
Execute the following command in the directory where docker-compose.yml is located to start the components required for this tutorial:
docker-compose up -dThe command will automatically start all the components defined in the Docker Compose configuration in detached mode. You can use docker ps to check whether the containers are running properly.

Access the MySQL container
docker-compose exec MySQL mysql -uroot -p123456Create the database app_db and the tables orders, products, shipments, then insert data into them.
-- Create Database
 CREATE DATABASE app_db;

 USE app_db;

 -- Create Orders Table
 CREATE TABLE `orders` (
 `id` INT NOT NULL,
 `price` DECIMAL(10,2) NOT NULL,
 PRIMARY KEY (`id`)
 );

 -- Insert Data
 INSERT INTO `orders` (`id`, `price`) VALUES (1, 4.00);
 INSERT INTO `orders` (`id`, `price`) VALUES (2, 100.00);

 -- Create Shipments Table
 CREATE TABLE `shipments` (
 `id` INT NOT NULL,
 `city` VARCHAR(255) NOT NULL,
 PRIMARY KEY (`id`)
 );

 -- Insert Data
 INSERT INTO `shipments` (`id`, `city`) VALUES (1, 'beijing');
 INSERT INTO `shipments` (`id`, `city`) VALUES (2, 'xian');

 -- Create Products Table
 CREATE TABLE `products` (
 `id` INT NOT NULL,
 `product` VARCHAR(255) NOT NULL,
 PRIMARY KEY (`id`)
 );

 -- Insert Data
 INSERT INTO `products` (`id`, `product`) VALUES (1, 'Beer');
 INSERT INTO `products` (`id`, `product`) VALUES (2, 'Cap');
INSERT INTO `products` (`id`, `product`) VALUES (3, 'Peanut');1、Download the binary archive listed below and extract it to obtain the directory flink-cdc-3.3.0
inside flink-cdc-3.3.0-bin.tar.gz , there will be four directories: bin, lib, log, and conf.
2、Download the connectors listed below and move them to the lib directory:
Additionally, you need to place the following Driver package in the Flink lib directory or pass it to the Flink CDC CLI using the --jar parameter, as CDC Connectors no longer include these Drivers:
3、Write a task configuration YAML file
Below is an example file for whole database synchronization: mysql-to-kafka.yaml:
################################################################################
# Description: Sync MySQL all tables to Kafka
################################################################################
source:
  type: mysql
  hostname: 0.0.0.0
  port: 3306
  username: root
  password: 123456
  tables: app_db.\.*
  server-id: 5400-5404
  server-time-zone: UTC

sink:
  type: kafka
  name: Kafka Sink
  properties.bootstrap.servers: 0.0.0.0:9092
  topic: yaml-mysql-kafka
pipeline:
  name: MySQL to Kafka Pipeline
  parallelism: 1
In the source section, tables: app_db..* uses regular expressions to synchronize all tables under app_db.
4、Finally, submit the task to the Flink Standalone cluster via the command line.
bash bin/flink-cdc.sh mysql-to-kafka.yaml
# Reference some examples of custom paths, mainly used for different versions of Flink and inconsistent MySQL drivers, such as:
# bash /root/flink-cdc-3.3.0/bin/flink-cdc.sh /root/flink-cdc-3.3.0/bin/mysql-to-kafka.yaml --flink-home /root/flink-1.19. --jar /root/flink-cdc-3.3.0/lib/mysql-connector-java-8.0.27.jar
Upon successful submission, the returned information includes:
Pipeline has been submitted to cluster.
Job ID: ba2afd0697524bd4857183936507b0bf
Job Description: MySQL to Kafka Pipeline
In the Flink Web UI, you can see a task named "MySQL to Kafka Pipeline" running.
You can use Kafka's built-in client to check the status of the Topic and obtain content in debezium-json format.
docker-compose exec Kafka kafka-console-consumer.sh --bootstrap-server 192.168.31.229:9092 --topic yaml-mysql-kafka --from-beginningThe debezium-json format includes elements such as before, after, op, and source. An example display is as follows:
{
    "before": null,
    "after": {
        "id": 1,
        "price": 4
    },
    "op": "c",
    "source": {
        "db": "app_db",
        "table": "orders"
    }
}
...
{
    "before": null,
    "after": {
        "id": 1,
        "product": "Beer"
    },
    "op": "c",
    "source": {
        "db": "app_db",
        "table": "products"
    }
}
...
{
    "before": null,
    "after": {
        "id": 2,
        "city": "xian"
    },
    "op": "c",
    "source": {
        "db": "app_db",
        "table": "shipments"
    }
}Enter the MySQL container:
docker-compose exec MySQL mysql -uroot -p123456Subsequent modifications in the MySQL database table will cause the order data displayed in Kafka to be updated in real-time:
1、Insert a new record into the orders table in MySQL:
INSERT INTO app_db.orders (id, price) VALUES (3, 100.00);2、Add a new column to the orders table in MySQL:
ALTER TABLE app_db.orders ADD amount varchar(100) NULL;3、Update a record in the orders table in MySQL:
UPDATE app_db.orders SET price=100.00, amount=100.00 WHERE id=1;4、Delete a record from the orders table in MySQL:
DELETE FROM app_db.orders WHERE id=2;By monitoring the topic with a consumer, we can observe these changes happening in real-time on Kafka:
{
    "before": {
        "id": 1,
        "price": 4,
        "amount": null
    },
    "after": {
        "id": 1,
        "price": 100,
        "amount": "100.00"
    },
    "op": "u",
    "source": {
        "db": "app_db",
        "table": "orders"
    }
}
Similarly, modifications to the shipments and products tables will also be reflected in real-time in the corresponding Kafka topics.
Flink CDC offers configuration options to route the table structure/data from source tables to different table names. This capability enables functions such as table name and database name replacement, as well as full database synchronization. Below is an explanation of a configuration file:
################################################################################
# Description: Sync MySQL all tables to Kafka
################################################################################
source:
  type: mysql
  hostname: 0.0.0.0
  port: 3306
  username: root
  password: 123456
  tables: app_db.\.*
  server-id: 5400-5404
  server-time-zone: UTC

sink:
  type: kafka
  name: Kafka Sink
  properties.bootstrap.servers: 0.0.0.0:9092
pipeline:
  name: MySQL to Kafka Pipeline
  parallelism: 1
route:
 - source-table: app_db.orders
   sink-table: kafka_ods_orders
 - source-table: app_db.shipments
   sink-table: kafka_ods_shipments
 - source-table: app_db.products
   sink-table: kafka_ods_products
With the above route configuration, the structure and data of the app_db.orders table are synchronized to kafka_ods_orders, thereby achieving database migration functionality. Notably, the source-table supports regular expression matching for multiple tables, enabling the synchronization of sharded tables across different databases. For example, consider the following configuration:
route:
  - source-table: app_db.order\.*
    sink-table: kafka_ods_orders
In this way, tables such as app_db.order01, app_db.order02, and app_db.order03 can be consolidated into kafka_ods_orders. Using Kafka's built-in tools, you can verify the successful creation of the corresponding Topic, and data details can be queried using kafka-console-consumer.sh.
docker-compose exec Kafka kafka-topics.sh --bootstrap-server 192.168.67.2:9092 --listInformation on the newly created Kafka Topic is as follows:
__consumer_offsets
kafka_ods_orders
kafka_ods_products
kafka_ods_shipments
yaml-mysql-kafka
Select the kafka_ods_orders Topic for querying. Example returned data is as follows:
{
    "before": null,
    "after": {
        "id": 1,
        "price": 100,
        "amount": "100.00"
    },
    "op": "c",
    "source": {
        "db": null,
        "table": "kafka_ods_orders"
    }
}The partition.strategy parameter allows you to define the strategy for sending data to Kafka partitions. The available options are:
● all-to-zero (send all data to partition 0), which is the default value
● hash-by-key (distribute all data based on the hash value of the primary key)
In the mysql-to-kafka.yaml file, under the sink section, define a line as follows:
source:
  ...
sink:
  ...
  topic: yaml-mysql-kafka-hash-by-key
  partition.strategy: hash-by-key
pipeline:
  ...
Additionally, use Kafka's script to create a Kafka Topic with 12 partitions:
docker-compose exec Kafka kafka-topics.sh --create --topic yaml-mysql-kafka-hash-by-key --bootstrap-server 192.168.67.2:9092 --partitions 12After submitting the YAML program, you can specify partition consumption and examine the data stored in each partition using the following command:
docker-compose exec Kafka kafka-console-consumer.sh --bootstrap-server=192.168.67.2:9092 --topic yaml-mysql-kafka-hash-by-key --partition 0 --from-beginningPartial Partition Data Details are as follows:
# Partition 0
{
    "before": null,
    "after": {
        "id": 1,
        "price": 100,
        "amount": "100.00"
    },
    "op": "c",
    "source": {
        "db": "app_db",
        "table": "orders"
    }
}
# Partition 4
{
    "before": null,
    "after": {
        "id": 2,
        "product": "Cap"
    },
    "op": "c",
    "source": {
        "db": "app_db",
        "table": "products"
    }
}
{
    "before": null,
    "after": {
        "id": 1,
        "city": "beijing"
    },
    "op": "c",
    "source": {
        "db": "app_db",
        "table": "shipments"
    }
}The value.format parameter is used to serialize the value part of Kafka message data. The optional values include debezium-json and canal-json, with the default being debezium-json. Currently, user-defined output formats are not supported.
debezium-json format includes elements such as before (data before change), after (data after change), op (operation type), and source (metadata). The ts_ms field is not included by default in the output structure (it needs to be specified in the Source using metadata.list).canal-json format includes elements such as old, data, type, database, table, and pkNames, but ts is not included by default (for the same reason as above).To specify the output format as canal-json, define value.format: canal-json in the sink section of the YAML file.
source:
  ...

sink:
  ...
  topic: yaml-mysql-kafka-canal
  value.format: canal-json
pipeline:
  ...
Querying the corresponding Topic yields the following example data:
{
    "old": null,
    "data": [
        {
            "id": 1,
            "price": 100,
            "amount": "100.00"
        }
    ],
    "type": "INSERT",
    "database": "app_db",
    "table": "orders",
    "pkNames": [
        "id"
    ]
}The sink.tableId-to-topic.mapping parameter allows you to specify the mapping relationship from upstream table names to downstream Kafka Topic names, without using route configuration. The key difference from the route-based implementation is that this parameter allows setting the Topic name while preserving the table name information from the source.
Add the sink.tableId-to-topic.mapping configuration to the previous YAML file to specify the mapping relationship. Each mapping is separated by ;, and the upstream table's TableId and downstream Kafka's Topic name are separated by :.
source:
  ...

sink:
  ...
  sink.tableId-to-topic.mapping: app_db.orders:yaml-mysql-kafka-orders;app_db.shipments:yaml-mysql-kafka-shipments;app_db.products:yaml-mysql-kafka-products
pipeline:
  ...
After execution, the following Topics will be generated in Kafka:
...
yaml-mysql-kafka-orders
yaml-mysql-kafka-products
yaml-mysql-kafka-shipments
Partial Data Details in Different Kafka Topics:
{
    "before": null,
    "after": {
        "id": 1,
        "price": 100,
        "amount": "100.00"
    },
    "op": "c",
    "source": {
        "db": "app_db",
        "table": "orders"
    }
}
{
    "before": null,
    "after": {
        "id": 2,
        "product": "Cap"
    },
    "op": "c",
    "source": {
        "db": "app_db",
        "table": "products"
    }
}
{
    "before": null,
    "after": {
        "id": 2,
        "city": "xian"
    },
    "op": "c",
    "source": {
        "db": "app_db",
        "table": "shipments"
    }
}After completing this tutorial, execute the following command in the directory where the docker-compose.yml file is located to stop all containers:
docker-compose downIn the Flink directory flink-1.19.2, execute the following command to stop the Flink cluster:
./bin/stop-cluster.shMastering Flink State Scaling: FLIP-8 Non-Partitioned State Management for Distributed Systems

206 posts | 58 followers
FollowApache Flink Community - March 31, 2025
Apache Flink Community - August 14, 2025
Apache Flink Community - March 14, 2025
Apache Flink Community - May 28, 2024
Apache Flink Community - May 30, 2024
Apache Flink Community China - May 13, 2021
206 posts | 58 followers
Follow Realtime Compute for Apache Flink
Realtime Compute for Apache Flink offers a highly integrated platform for real-time data processing, which optimizes the computing of Apache Flink.
Learn More Message Queue for Apache Kafka
A fully-managed Apache Kafka service to help you quickly build data pipelines for your big data analytics.
Learn More Real-Time Livestreaming Solutions
Stream sports and events on the Internet smoothly to worldwide audiences concurrently
Learn More ApsaraDB for SelectDB
A cloud-native real-time data warehouse based on Apache Doris, providing high-performance and easy-to-use data analysis services.
Learn MoreMore Posts by Apache Flink Community

