By Gaoyang Cai Apache RocketMQ Committer, Alibaba Cloud Intelligent Technology Expert
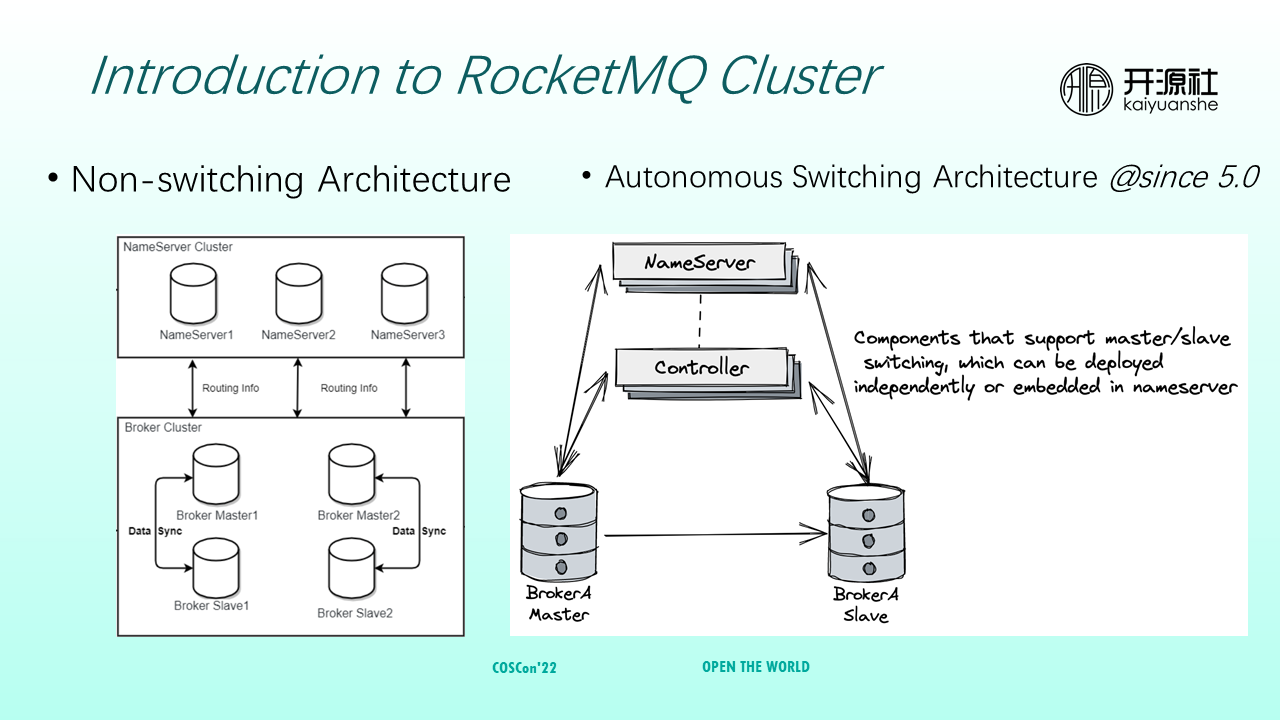
The left side of the preceding figure shows a RocketMQ 4.x cluster, which belongs to a non-switchover architecture. A nameserver can be deployed with multiple copies as a stateless node. A broker cluster can be deployed with multiple groups of brokers. Each group has one broker master and multiple broker slaves. During operation, if a master in a group fails, messages are routed to a normal master. Common messages can still be consumed from the original broker slaves.
However, non-switchover architecture has several problems. For example, scheduled messages or transactional messages need to be delivered by masters again. If masters fail, manual intervention is required to restore the masters. Therefore, RocketMQ 5.0 proposes an autonomous switching architecture.
Autonomous switching architecture adds a controller module that is responsible for the master election. If a broker master fails, an appropriate broker slave is promoted to the master without manual intervention.
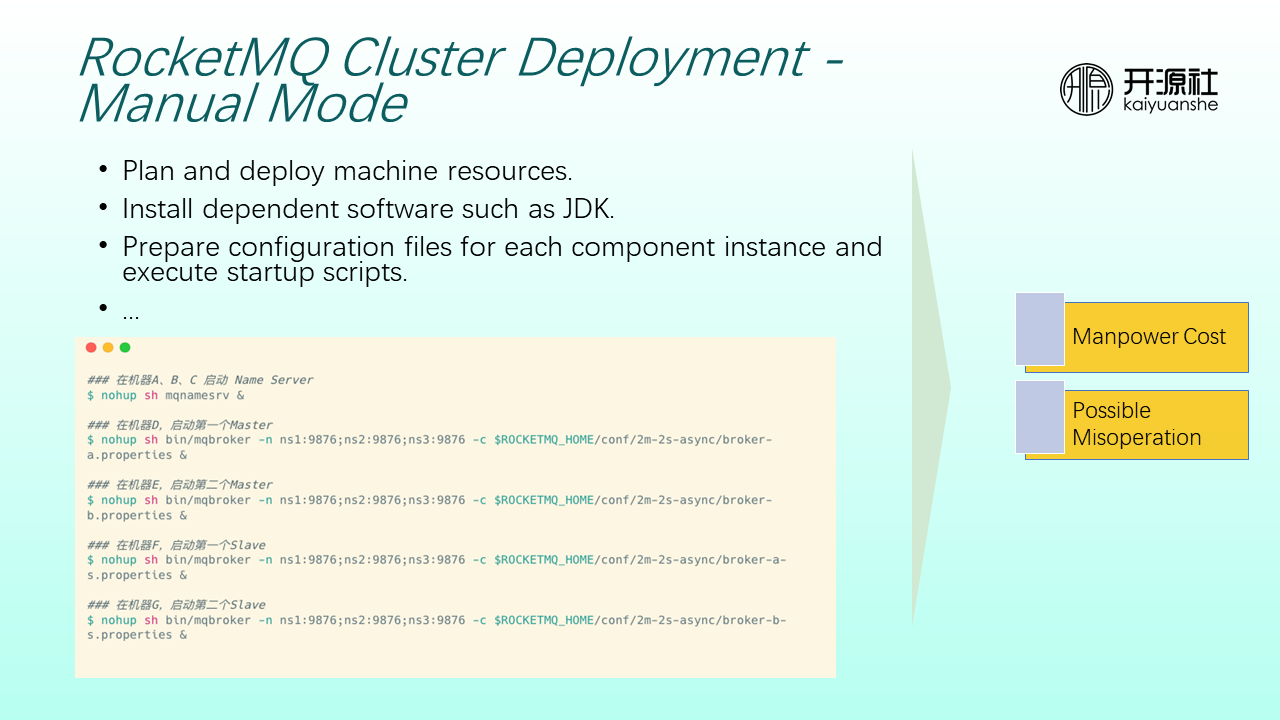
If you want to deploy a cluster in a production environment, you need to plan the machine resources of the entire cluster (such as which modules are deployed on which machines and which machines require what resource specifications) and then install dependent software (such as JDK). Each component needs to have its configuration files and startup scripts before starting. The whole process is very labor-consuming and may occur misoperation.
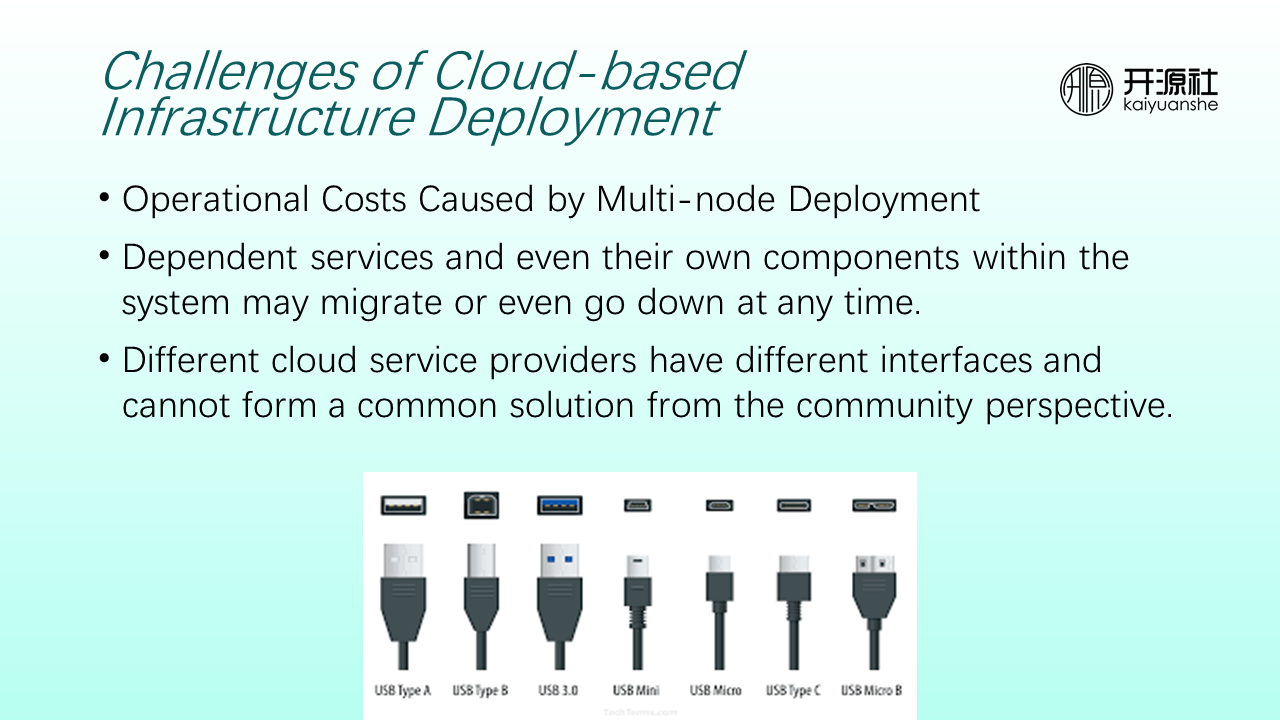
Deploying RocketMQ on the cloud infrastructure faces the following challenges:
First, it is more convenient to create virtual machines of different specifications on the cloud infrastructure. Therefore, only one module is often deployed on a virtual machine to achieve resource isolation. However, multi-node deployment comes with higher operating costs. The downtime, recovery, and migration of internal components of the system need to be supported.
From the perspective of the community, since the community is oriented to different users, different users often deploy on different cloud infrastructure service providers. However, from the perspective of IaaS layer facilities, interfaces provided by different cloud vendors are not uniform.
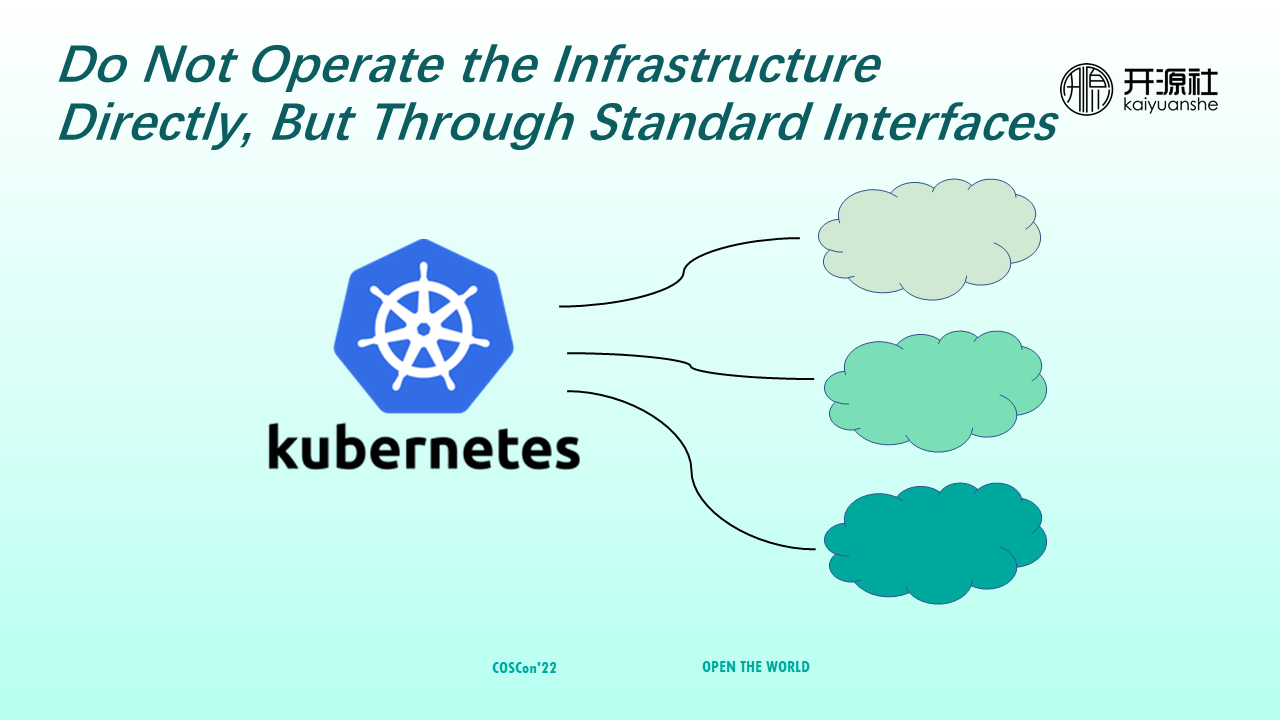
The community borrowed the idea of interface-oriented programming to solve these problems. It is not directly operating infrastructure but operating through standard interfaces. Kubernetes is the standard interface orchestrated by containers. Thus, when addressing the problems in RocketMQ cloud infrastructure deployment, the community selects to deploy based on Kubernetes. Different cloud providers are responsible for scheduling from Kubernetes to specific cloud IaaS layers. As such, you can manage a stateful RocketMQ cluster to a Kubernetes cluster, make full use of deployment, upgrade, self-healing, and other capacities provided by Kubernetes, and enjoy ecological dividends from the Kubernetes community.
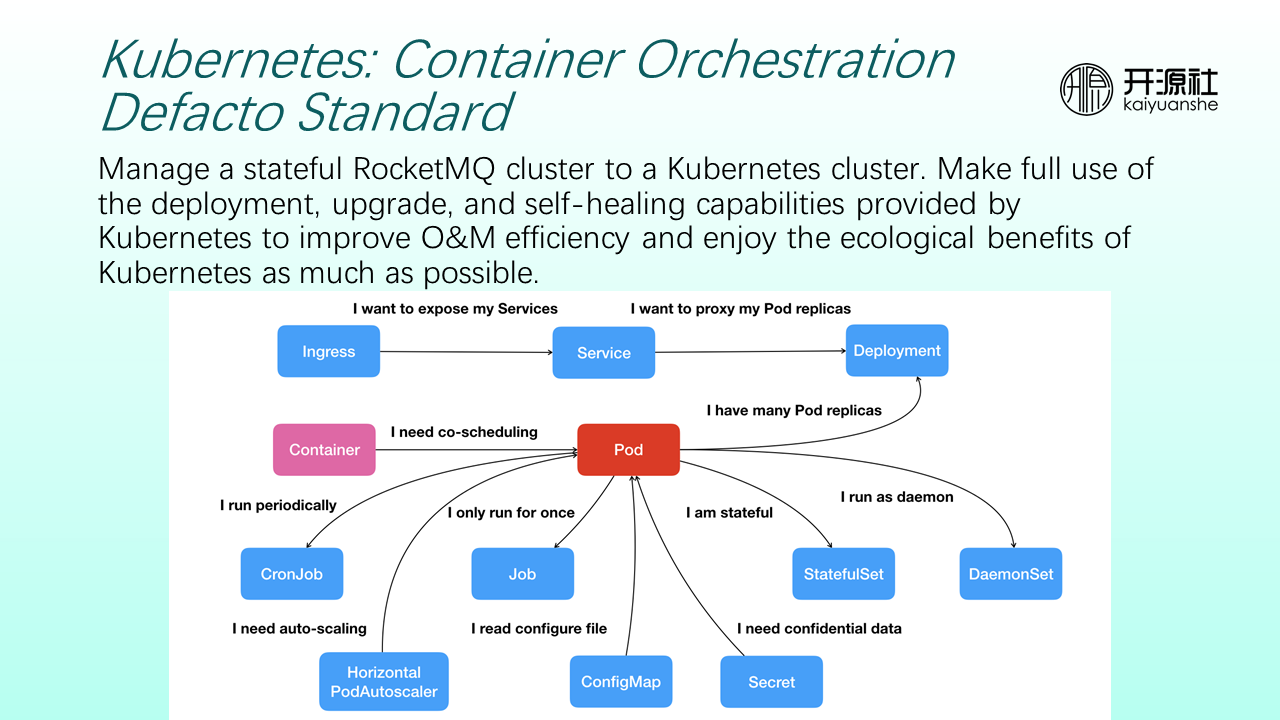
Kubernetes encapsulates Pod, Deployment, Service, and Ingress into abstract resources. When you deploy a RocketMQ cluster, you only need to orchestrate the relevant resources of Kubernetes. The final scheduling of resources on cloud infrastructure is left to cloud service providers.
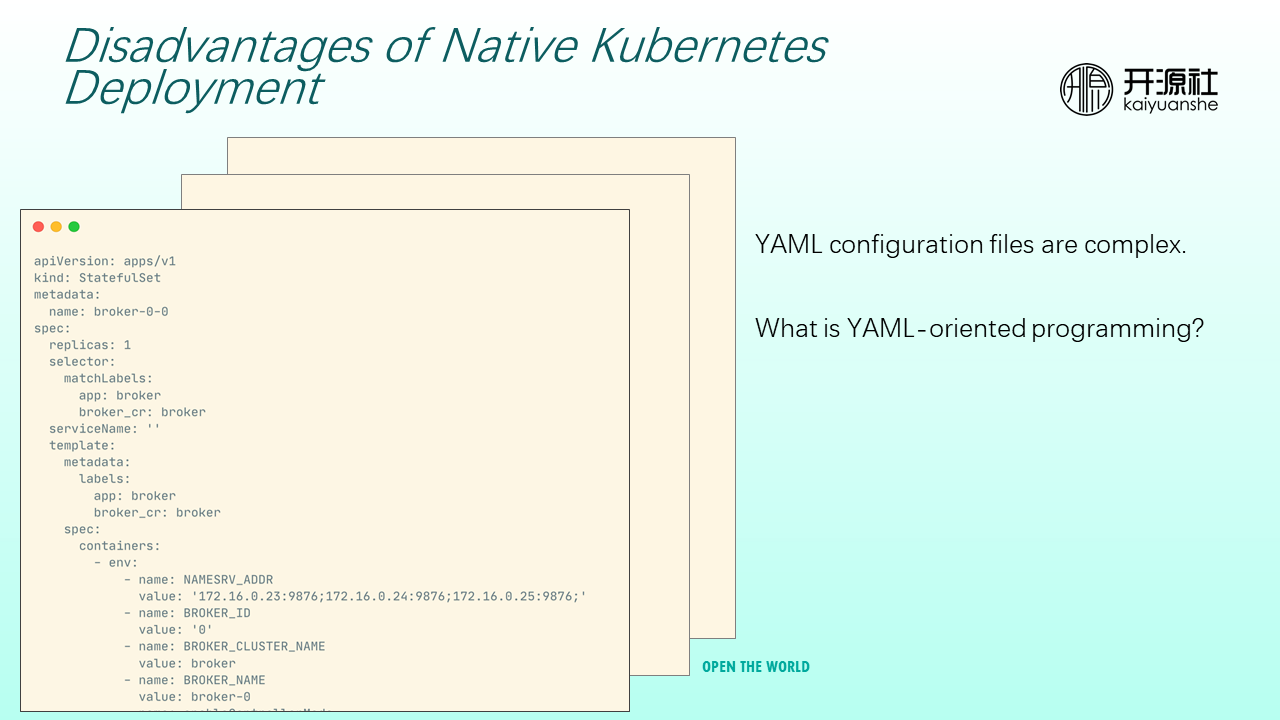
However, direct deployment based on Kubernetes native resources has some deficiencies.
For example, when you deploy Kubernetes, you often need to operate YAML files. Resources (such as Deployment, StatefulSet, Service, and Ingress) require a large amount of configuration. When you encounter complex resource definitions, it is like YAML-oriented programming.
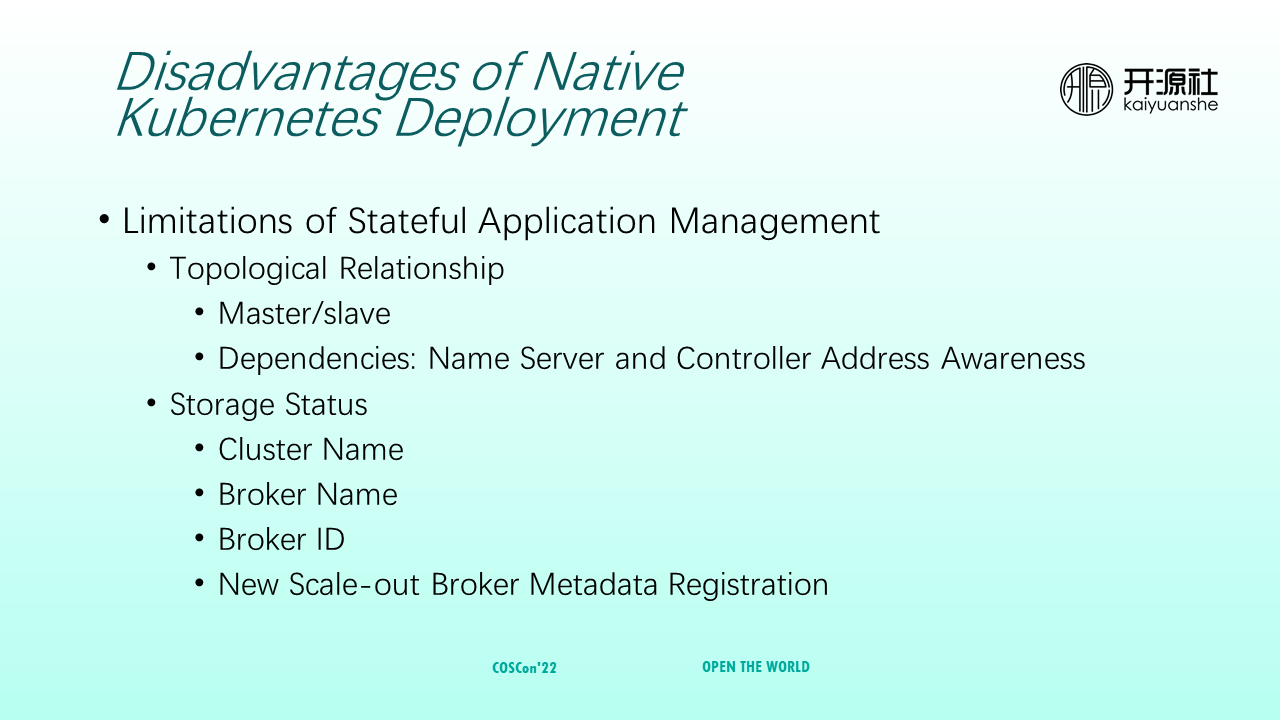
In addition, Kubernetes has limitations in supporting the management of stateful applications. The status of a RocketMQ cluster can be summarized into the following two parts. The first part is cluster topology, including the master/slave relationships among RocketMQ brokers and interdependencies among different RocketMQ modules. For example, brokers need to depend on nameservers and controllers. The second part is storage status, including cluster name, broker name, broker ID, and the metadata of the new scaled-out brokers.
How to automatically manage the states is also a problem that must be solved.
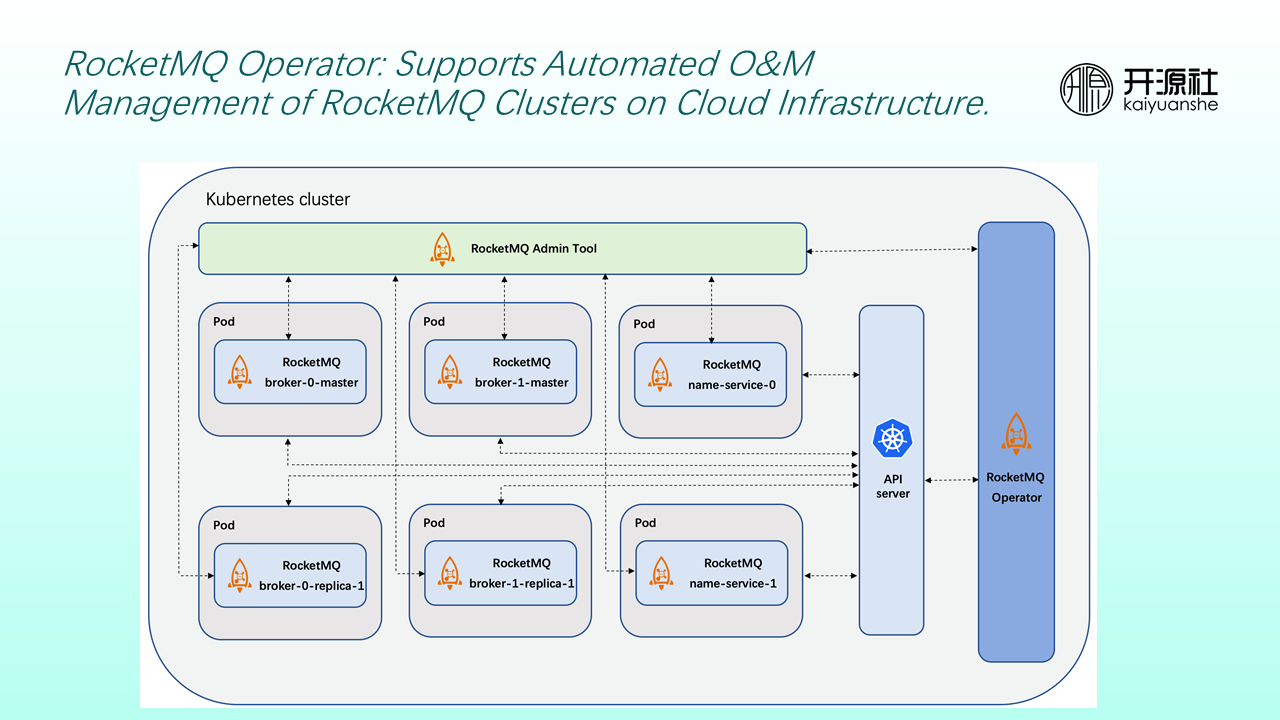
Therefore, the community established RocketMQ Operator to support the automatic operation and maintenance and management of RocketMQ clusters on cloud infrastructure.
As shown in the preceding figure, on the far right is a RocketMQ Operator module that interacts with Kubernetes API Servers in real-time. On the one hand, the community still deploys RocketMQ clusters (including nameservers, brokers, and other modules) as usual. At the same time use RocketMQ Admin Tool is used to maintain cluster status in real-time (such as NameServer addresses).
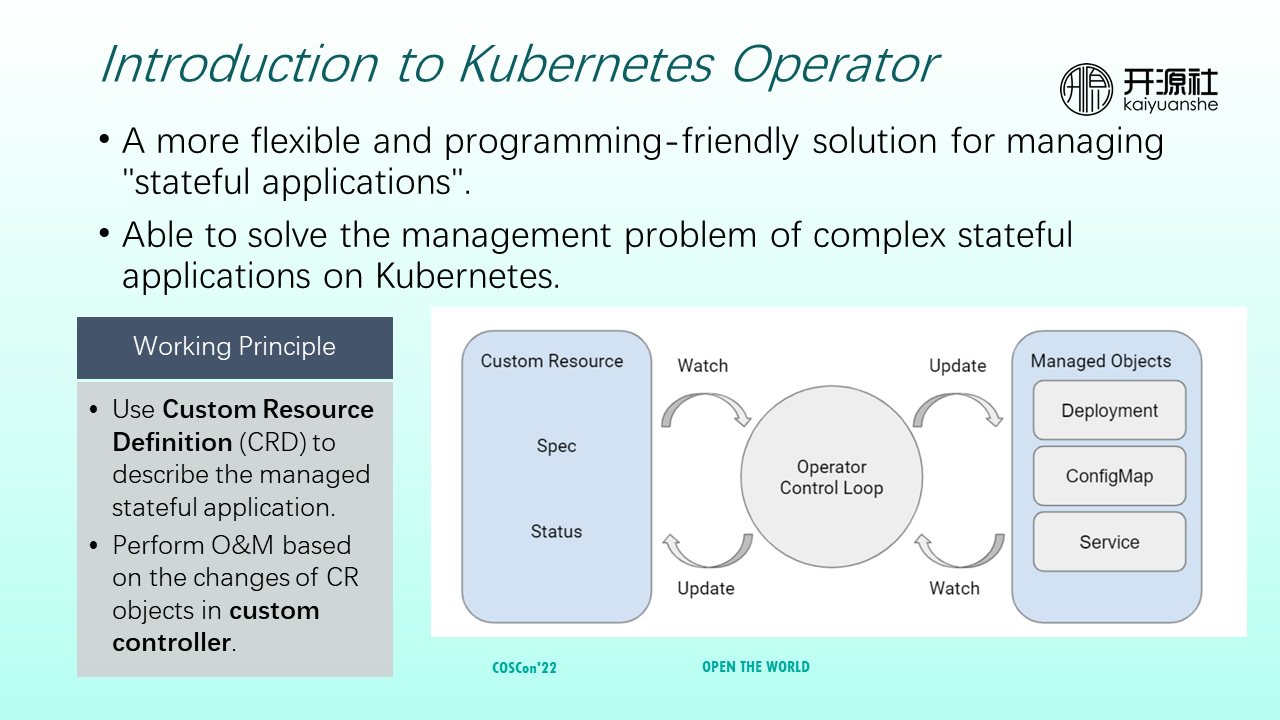
Kubernetes Operator is a relatively simple, flexible, and programmatically friendly solution for managing application states. Its working principle is divided into two parts. One part is to describe management state applications with custom resource definition (CRD). It can be considered a user-oriented interface through which users describe the resources that need to be deployed or operated. The other part is a custom controller, which completes operation and maintenance according to the changes of the custom resource object.
The Operator control loop in the middle of the preceding figure can be regarded as a bridge between custom resources and Kubernetes resources. It continuously monitors the status changes of custom resources and updates Kubernetes resources based on status and internal logic. It updates the status of custom resources based on the changes in Kubernetes resources.
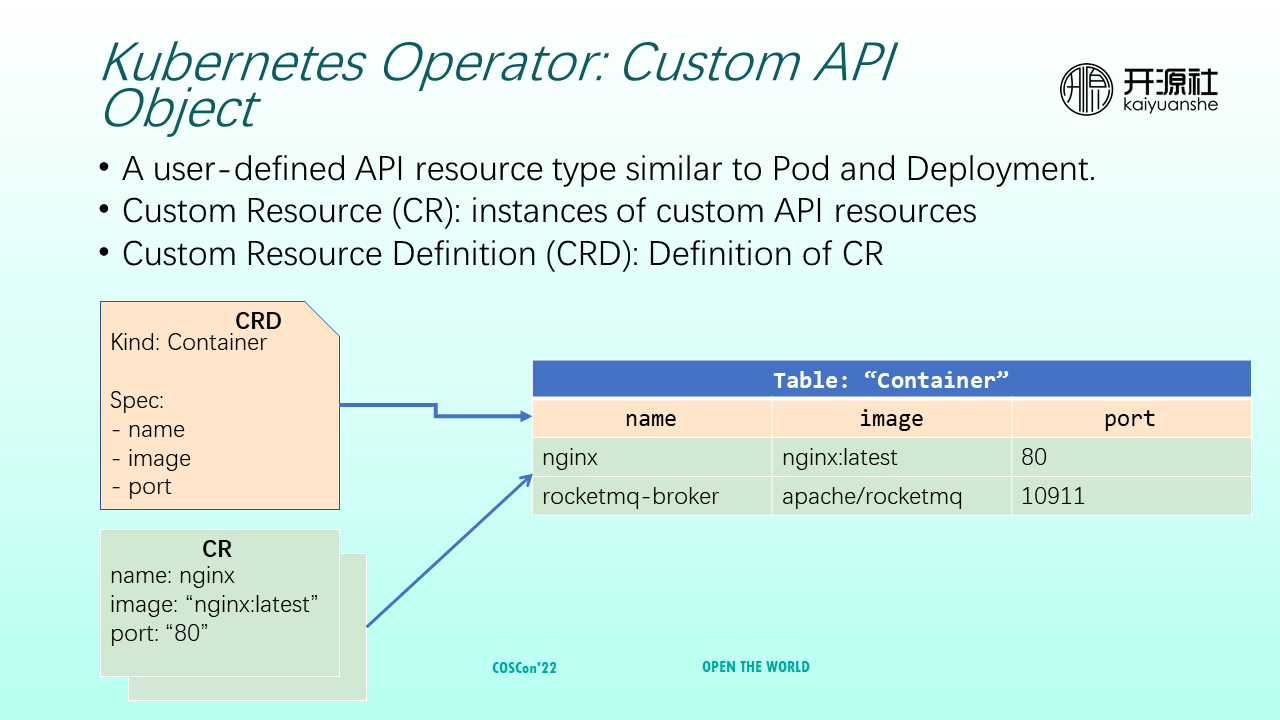
A custom object is similar to a Pod or Deployment, except that it is not an object provided internally by Kubernetes. Instead, it needs to be customized by users and then inform Kubernetes. Custom Resource (CR) refers to an instance of custom API resources. Custom Resource Definition (CRD) refers to the definition of a CR.
As shown in the preceding figure, a CRD of a container defines three attributes: name, corresponding image, and the port on which the container listens. The following CR is a specific custom resource. Its name is Nginx, the image is the latest version on DockerHub, and it listens on port 80. Compared with familiar database tables, a container can be considered a table. The specific definition (Spec) can be compared to the definition of each column, and each row of data is a different CR.
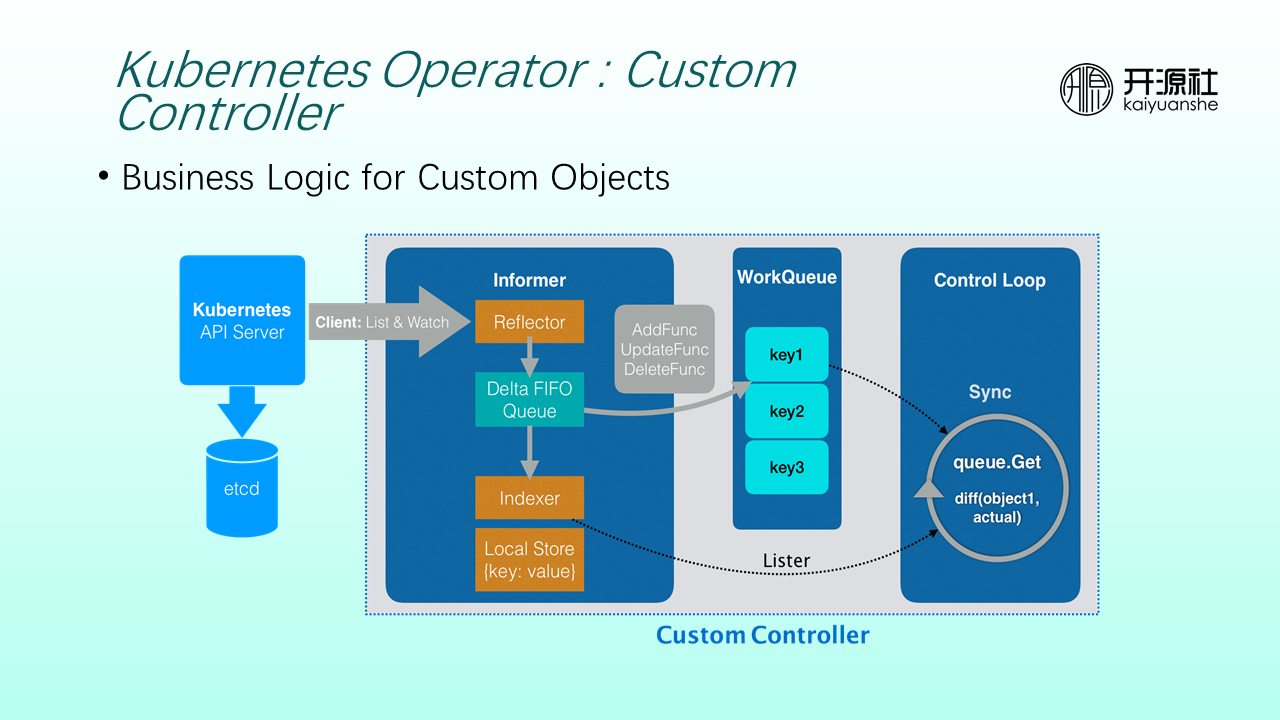
CRs provide API objects, and converting CRs into Kubernetes internal resources is implemented by custom controllers.
A custom controller contains an informer module that continuously calls the listAndWatch interface of Kubernetes API Servers to obtain the changes of the monitored CRs. CR changes and CR objects are added to a Delta FIFO Queue, stored in local storage in a key-value manner, and keys are added to a WorkQueue. The control loop on the far right continuously retrieves relevant keys from the WorkQueue and queries corresponding CR objects from the local store of Informers based on the keys. Next, the desired state of the objects is compared with the current actual state. If there is a difference, the internal logic is executed until the actual state is consistent with the expected state defined by CRs.
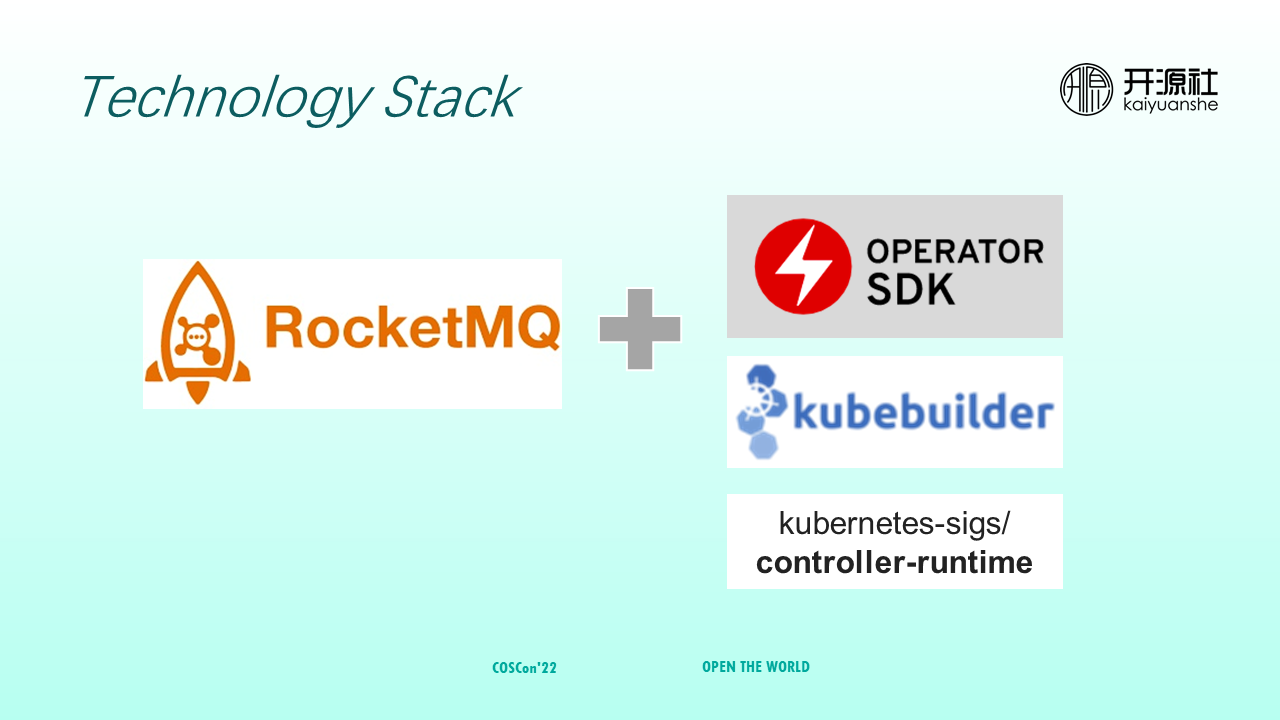
When the community implements RocketMQ Operator, it does not directly use controller-runtime underlying interfaces but relies on Operator SDK to generate relevant code. When developers develop RocketMQ Operator, they only need to focus on the orchestration logic of the RocketMQ cluster.
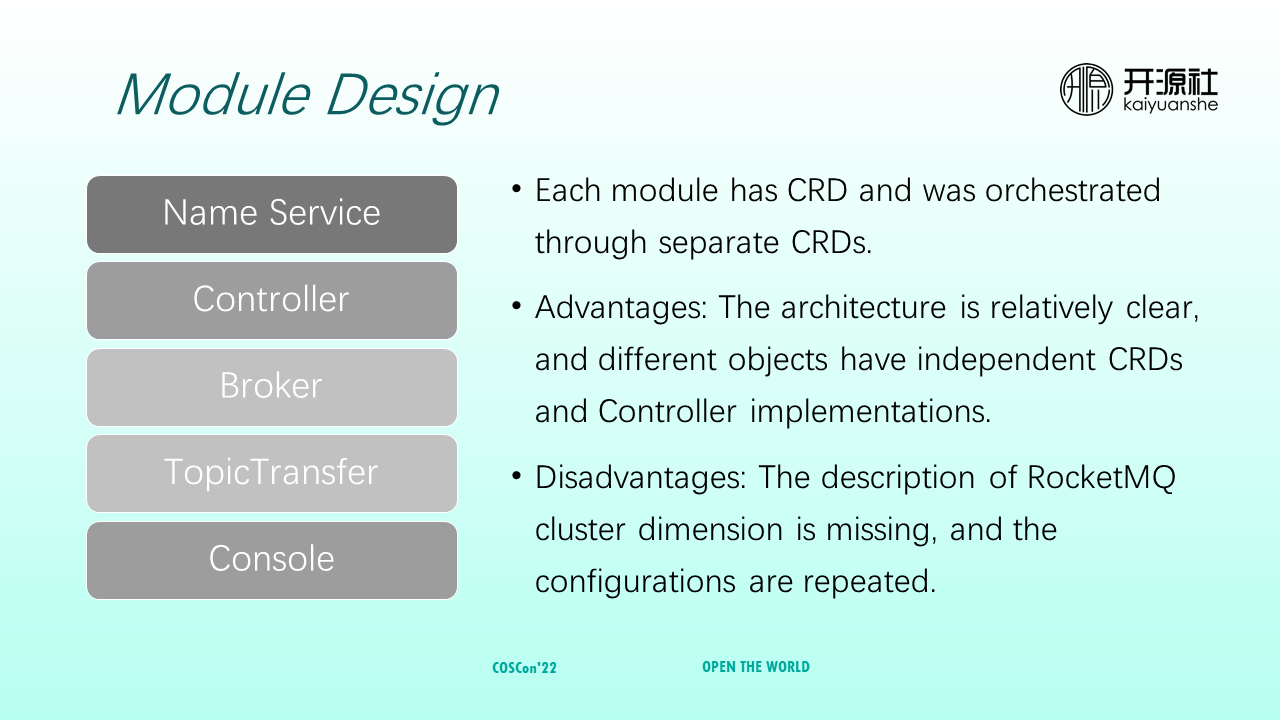
Currently, RocketMQ Operator includes modules such as NameService, controller, broker, topicTransfer, and console. They are the same as RocketMQ. Each module is orchestrated by different CRDs. The advantages are that architecture and code are relatively clear, and different objects have independent CRDs and corresponding controller implementations. However, it lacks the description of RocketMQ cluster dimensions. Also, there may be duplication in code implementation and configuration. Regarding the evolution of CRD, community fellows are welcome to make suggestions based on your practices.
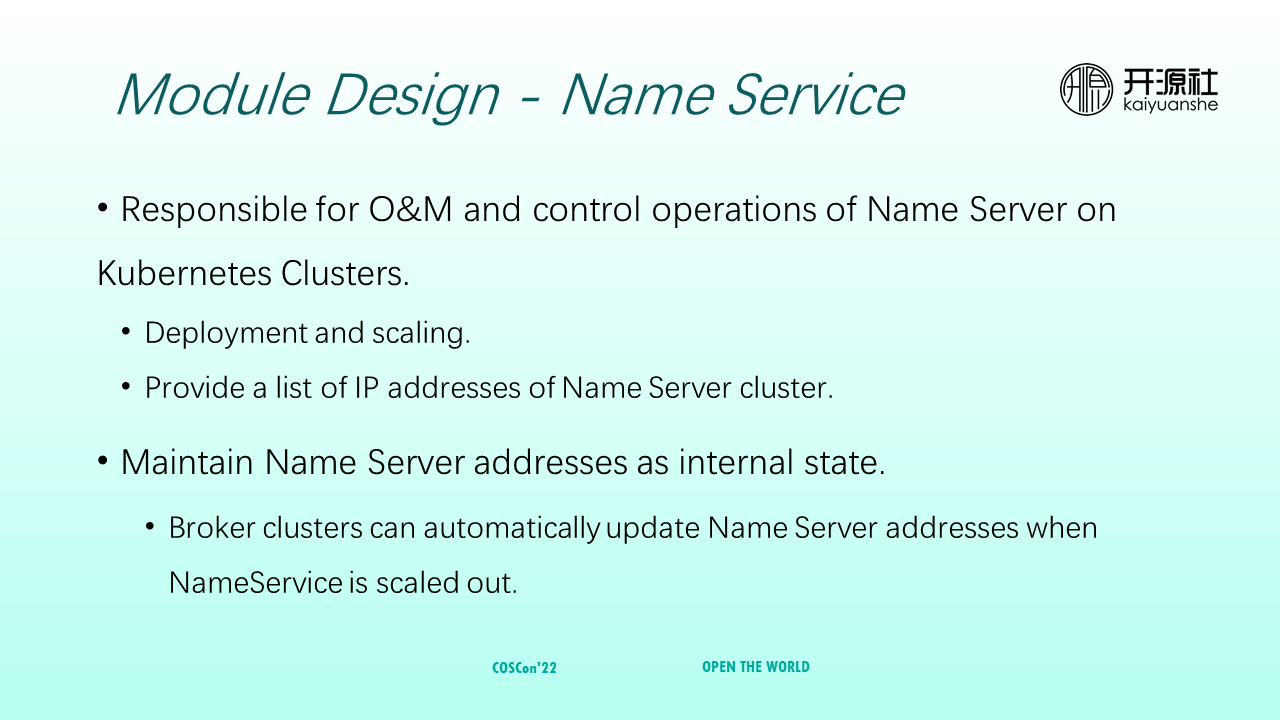
NameService is responsible for the O&M and control of NameServers in Kubernetes clusters, including deployment, scaling, and providing the NameServer cluster IP list. Brokers need to register routing information with NameServers. Therefore, the addresses of NameServers are extremely important and need to be maintained as an internal state in real-time. When NameServers are scaled, Broker clusters can automatically sense the update of NameServer addresses.
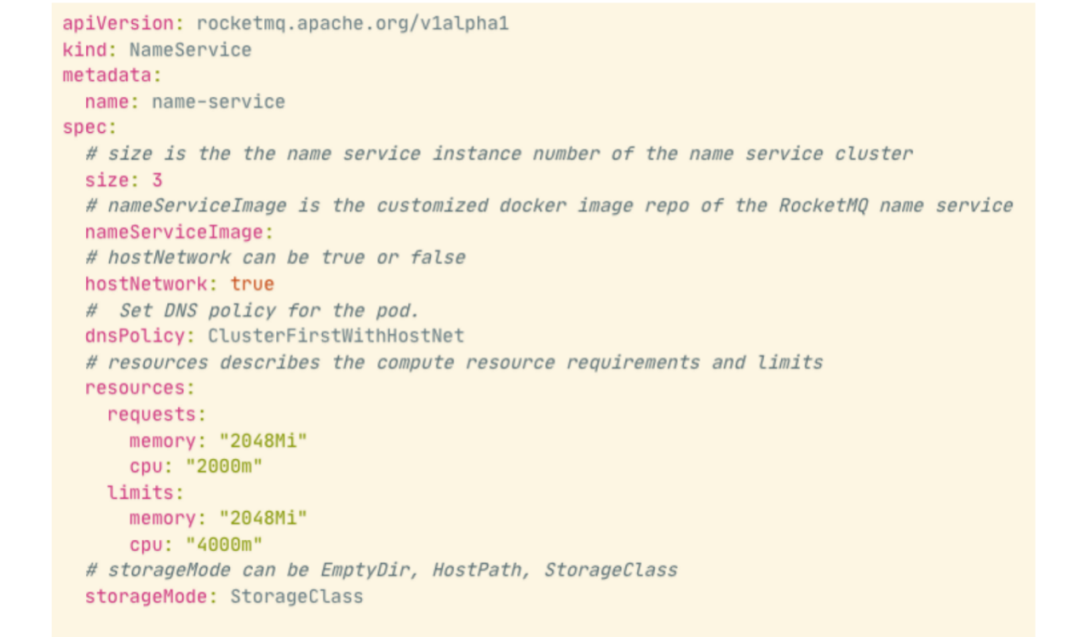
The preceding figure shows an example of NameServer CRDs. The main attributes are listed below:
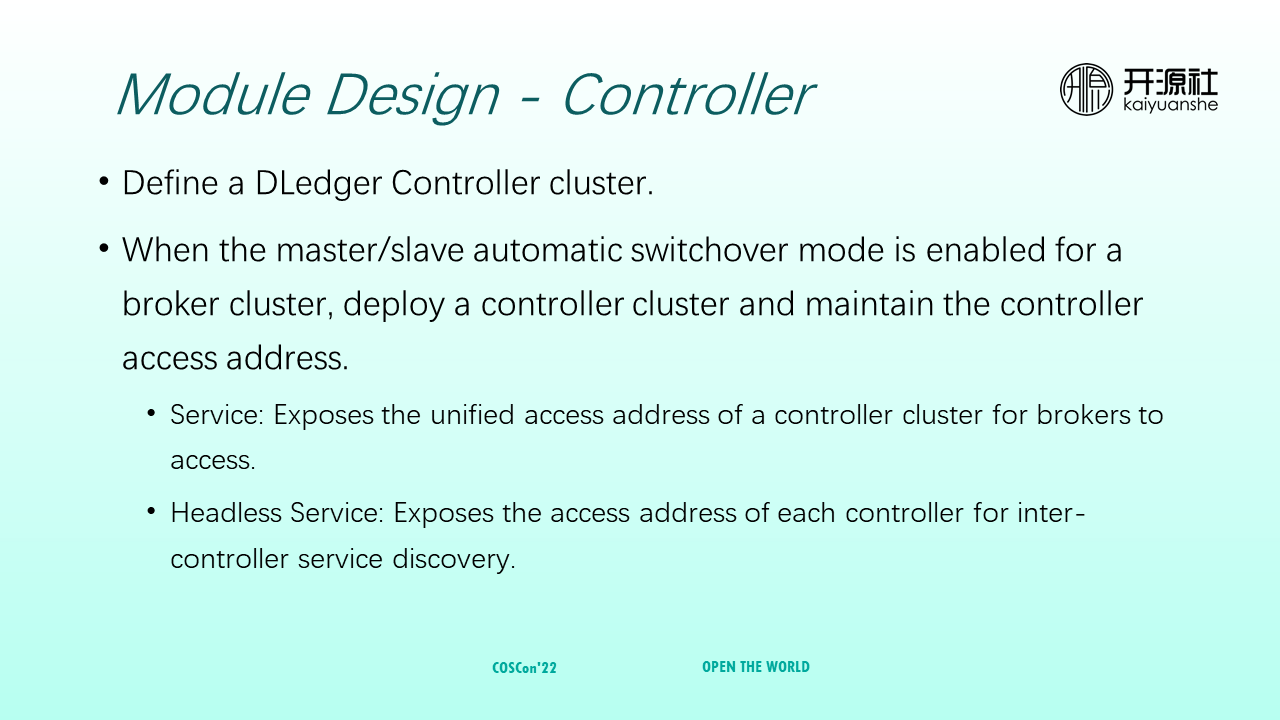
The controller defines the Dledger controller cluster. When brokers enable autonomous switching mode, the access addresses of controllers need to be maintained. The following two mechanisms are used:
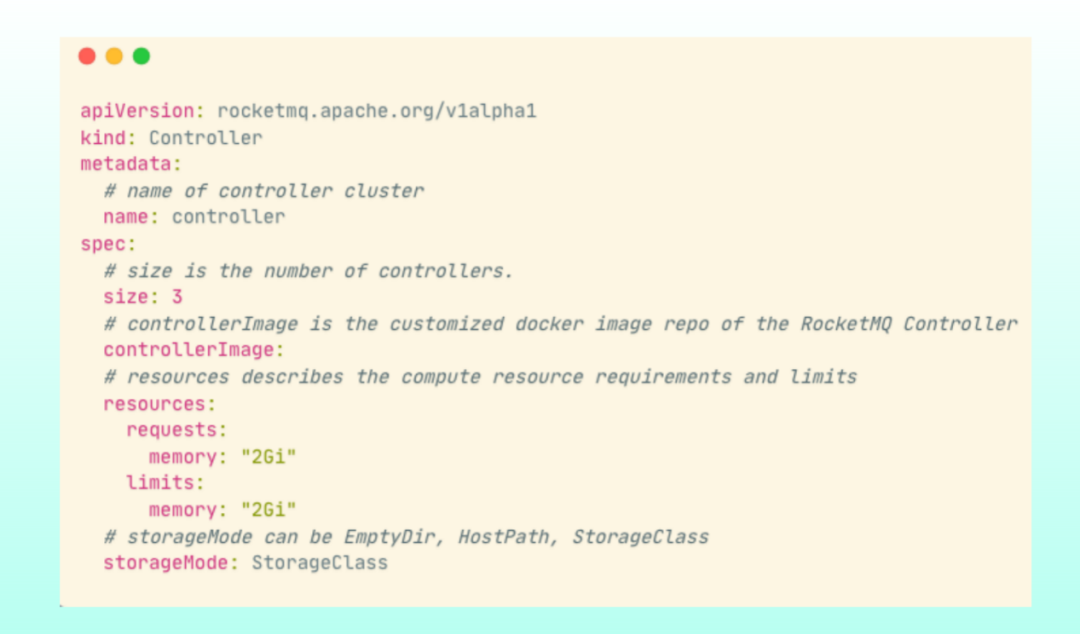
The definition of a controller is relatively simple. You only need to provide the number of controllers (the number must be odd) and the controller image. Other definitions are similar to NameServer (such as the definition of resources and storage).
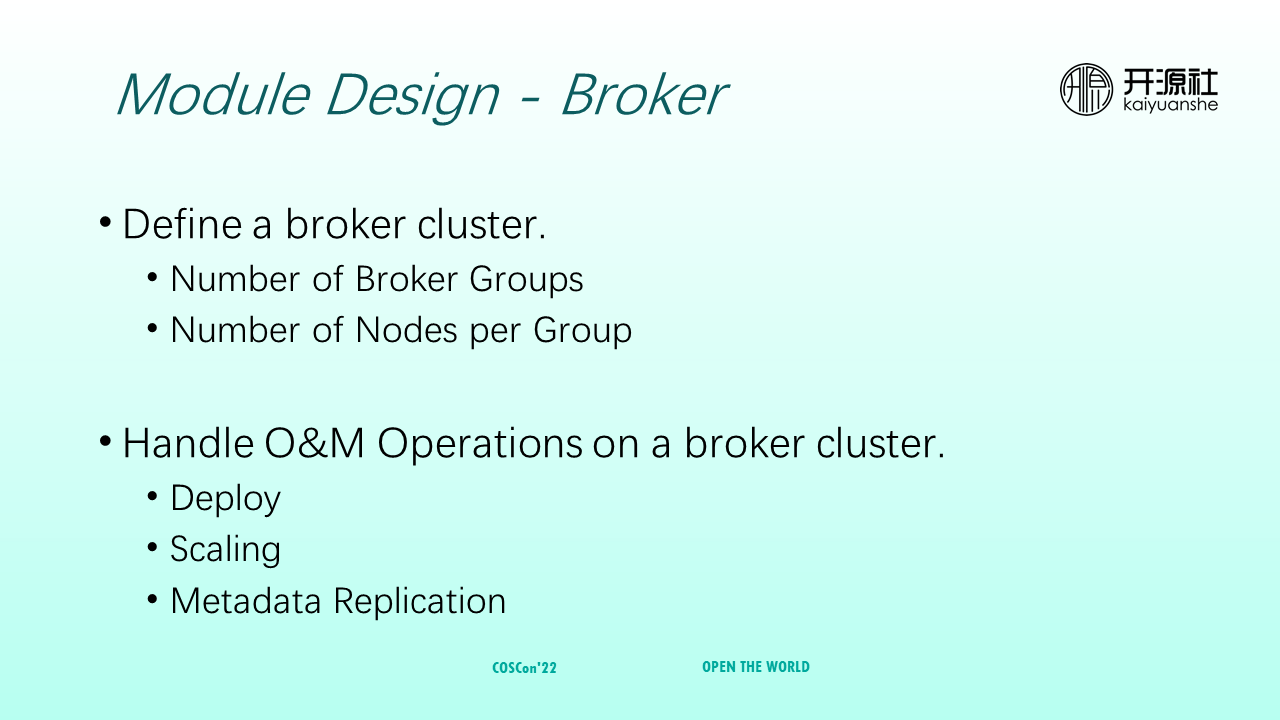
Broker is used to define broker clusters, maintain the number of broker groups and the number of nodes in each group, and handle the O&M of broker clusters, including deployment, scaling, and metadata replication. During scale-out, if a new broker does not have metadata (such as topics), user traffic would not be routed to this broker. Therefore, the broker is also responsible for metadata replication after scale-out.
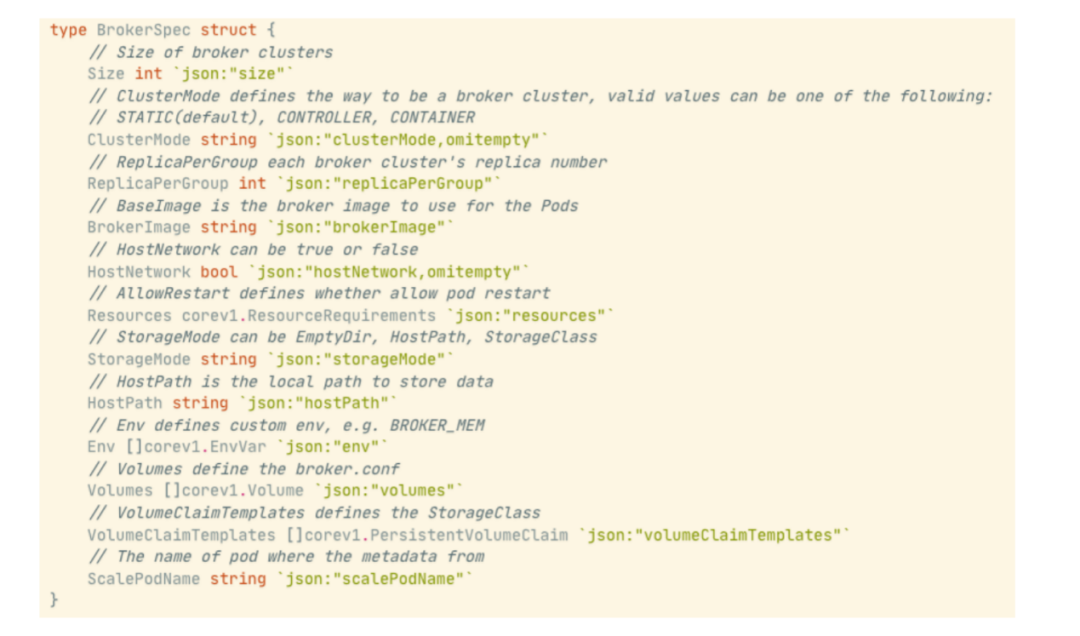
The definition of a broker is relatively complex, including:
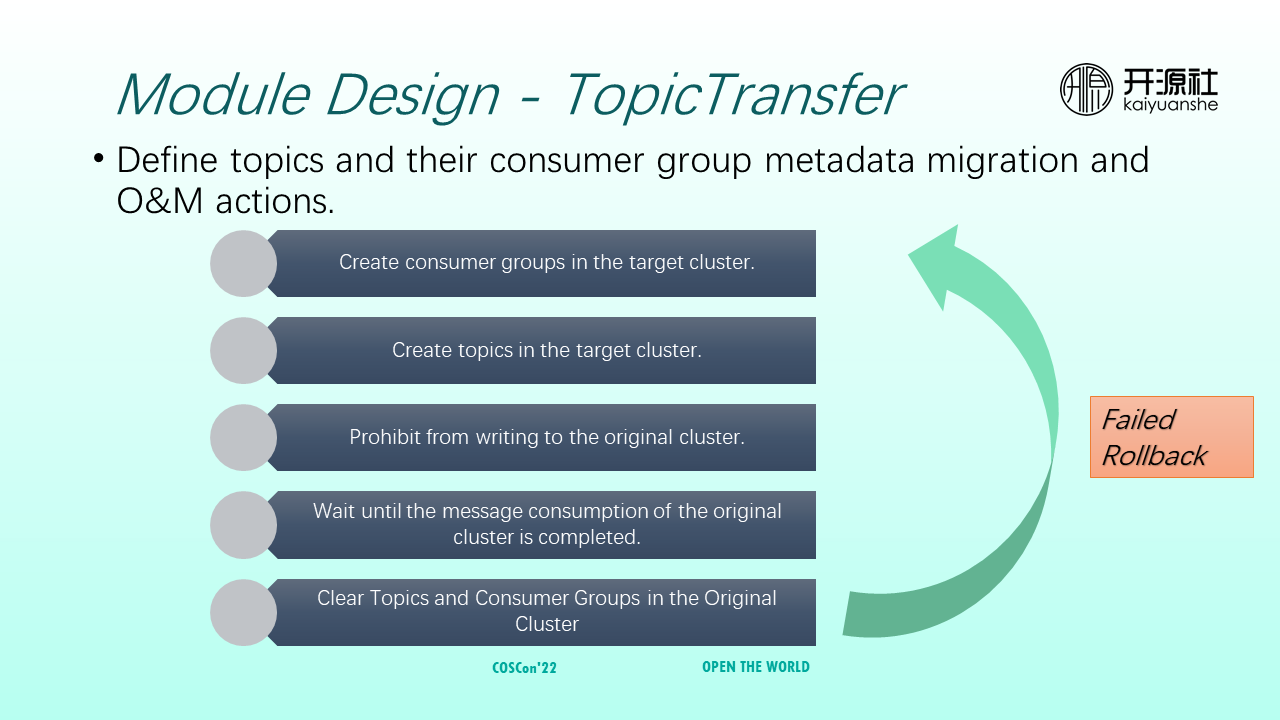
TopicTransfer is not a module directly mapped to RocketMQ. TopicTransfer defines O&M operations for migrating topics and consumer group metadata. When you use TopicTransfer to migrate metadata, you must first create a specified consumer group and topic in the destination cluster. After the consumer group and topic are created, you cannot write messages to the original cluster. After messages are consumed in the original cluster, the metadata of the original cluster is cleared. During this process, any step that fails will be rolled back to ensure that the metadata is migrated correctly.
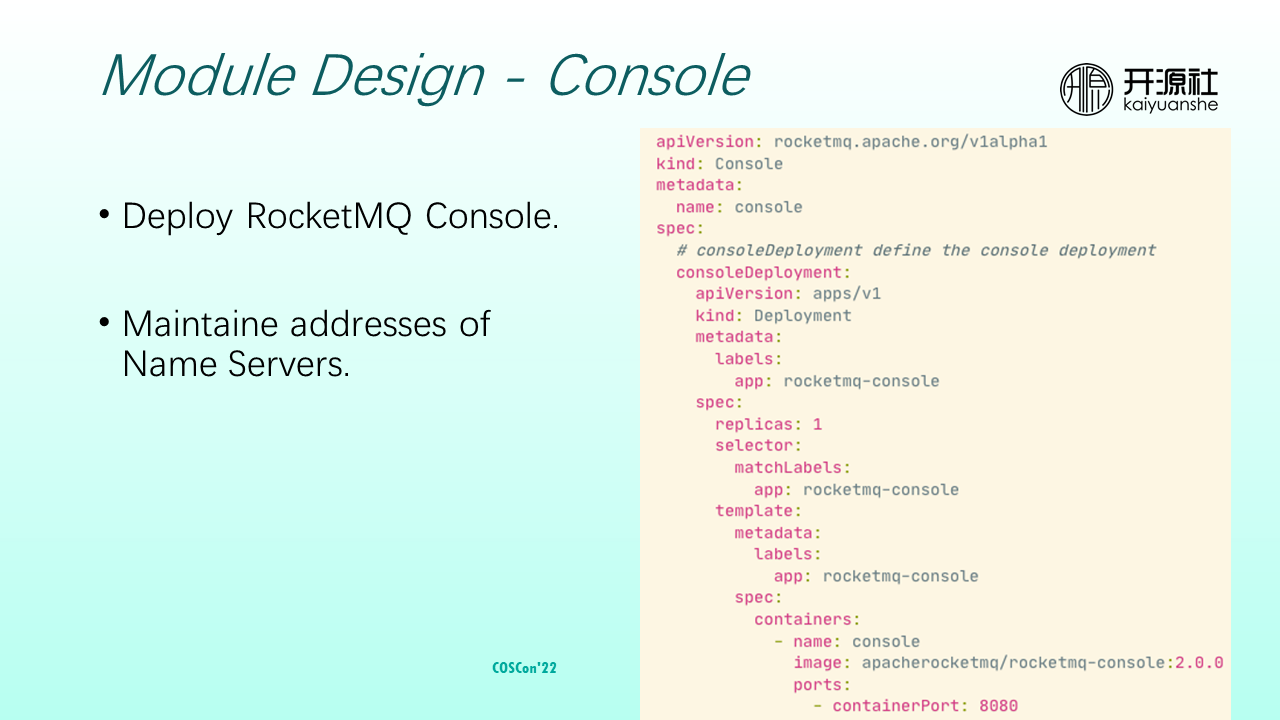
The console is responsible for deploying RocketMQ consoles and maintaining NameServer addresses used for it. The function is relatively simple. Currently, RocketMQ consoles are stateless nodes, and the definition method is the same as that of the Deployment.
Let’s look at several important controller implementations.
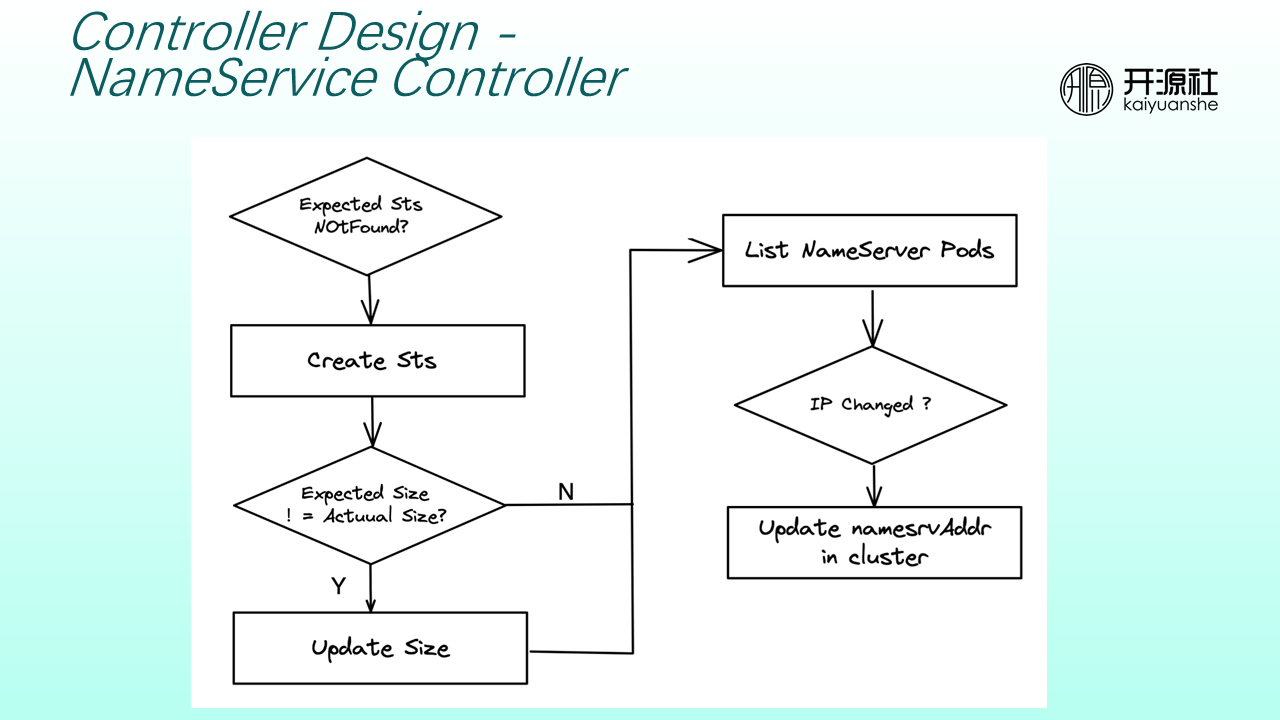
A NameServer controller determines whether the StatefulSet corresponding to NameService exists. If the StatefulSet does not exist, the NameServer controller creates or updates the StatefulSet until the number of NameServer nodes is the same as the expected value. Then, it lists the address of the Pod corresponding to the NameServer and determines whether the address has changed. If it has changed, the NameServer address in the cluster is updated to ensure the broker or other modules can obtain the correct NameServer address.
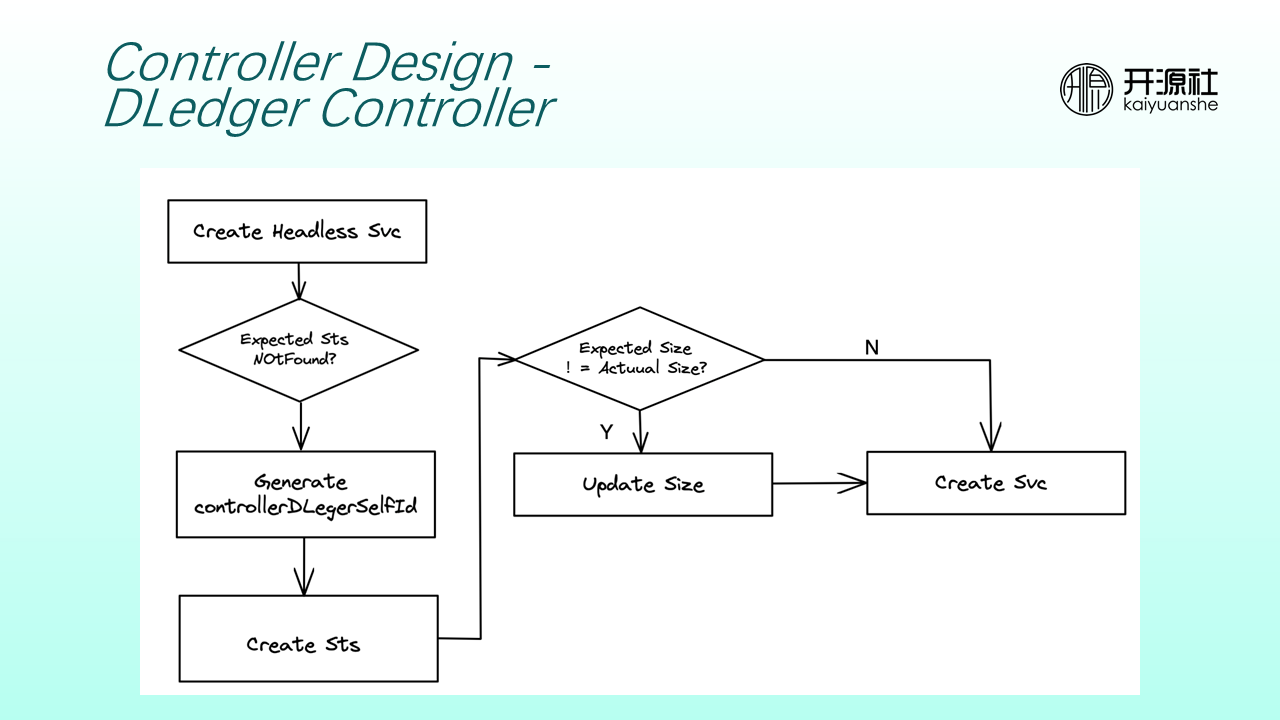
A Dledger controller creates a Headless Service as an entry for service discovery when building a controller cluster. Then, it determines whether the number of controller nodes is consistent with the expected value. If not, it creates a StatefulSet. Each Dledger Controller is automatically assigned a controllerDledgerSelfId when the StatefulSet is created. After the expected number of nodes is the same as the actual number of nodes, the Service address of the controller is exposed for brokers to access.
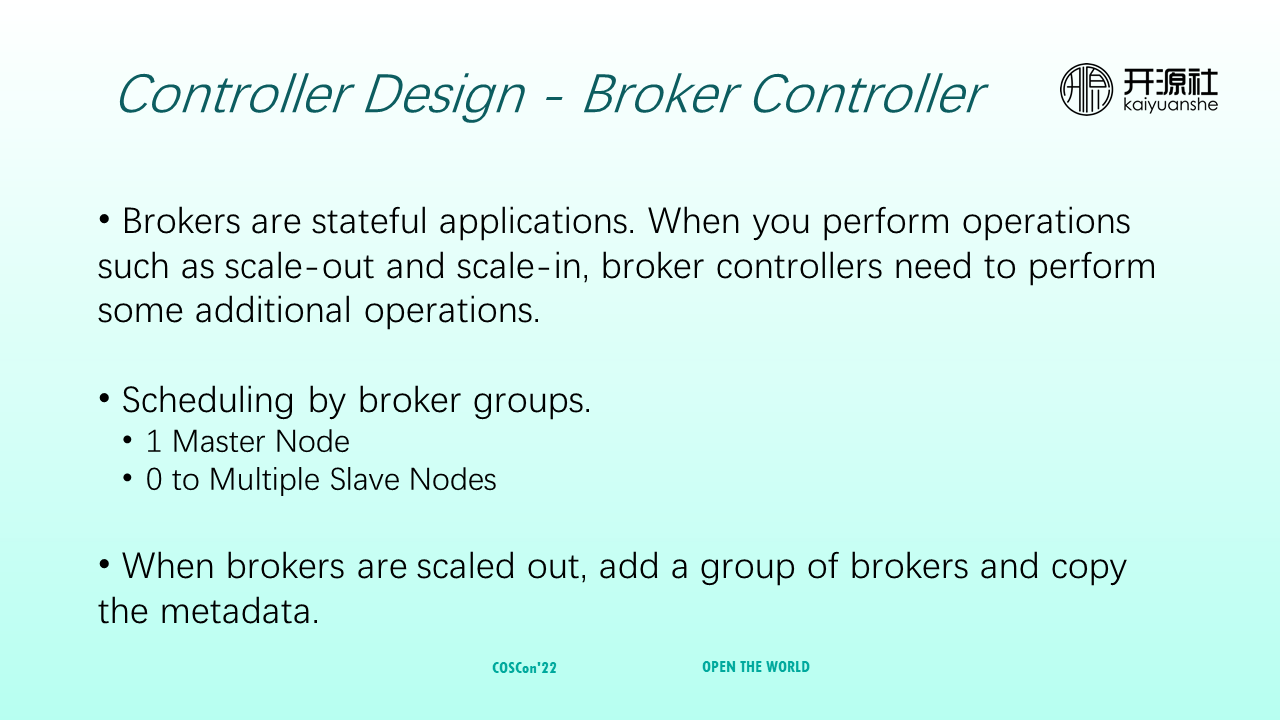
Brokers are stateful. Therefore, broker controllers must perform additional actions during scale-out or scale-in. Broker controllers perform scheduling in units of broker groups. Each broker group has one master node and is configured with zero to multiple slave nodes. When brokers are scaled out, a group of brokers is added, and the metadata is copied to the newly scaled brokers based on user configuration.
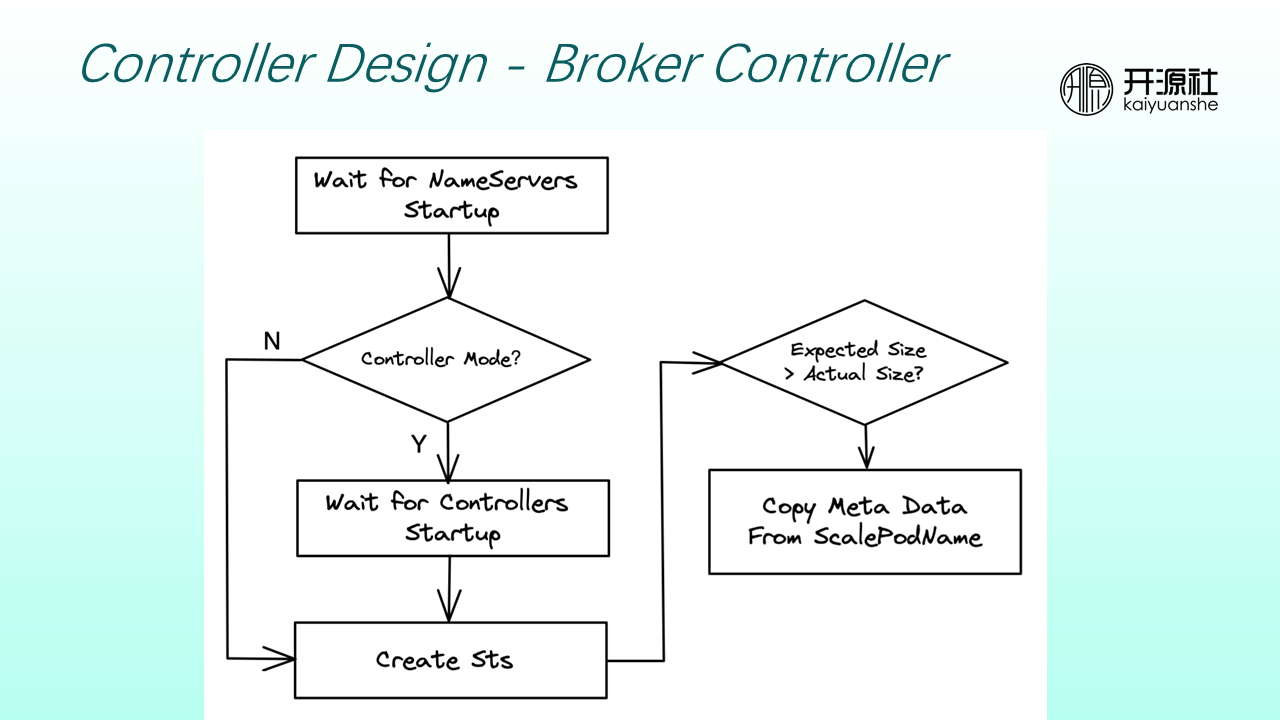
Brokers depend on NameServers and DLedger Controllers. Therefore, the StatefulSets corresponding to brokers cannot be created until the NameServers and DLedger controllers are started, both provide services normally, and the actual number of nodes is the same as the expected number of nodes.
If a scale-out occurs, the pod metadata (including topics and consumer groups) is copied to the newly scaled-out brokers based on the ScalePodName field defined in CRs.
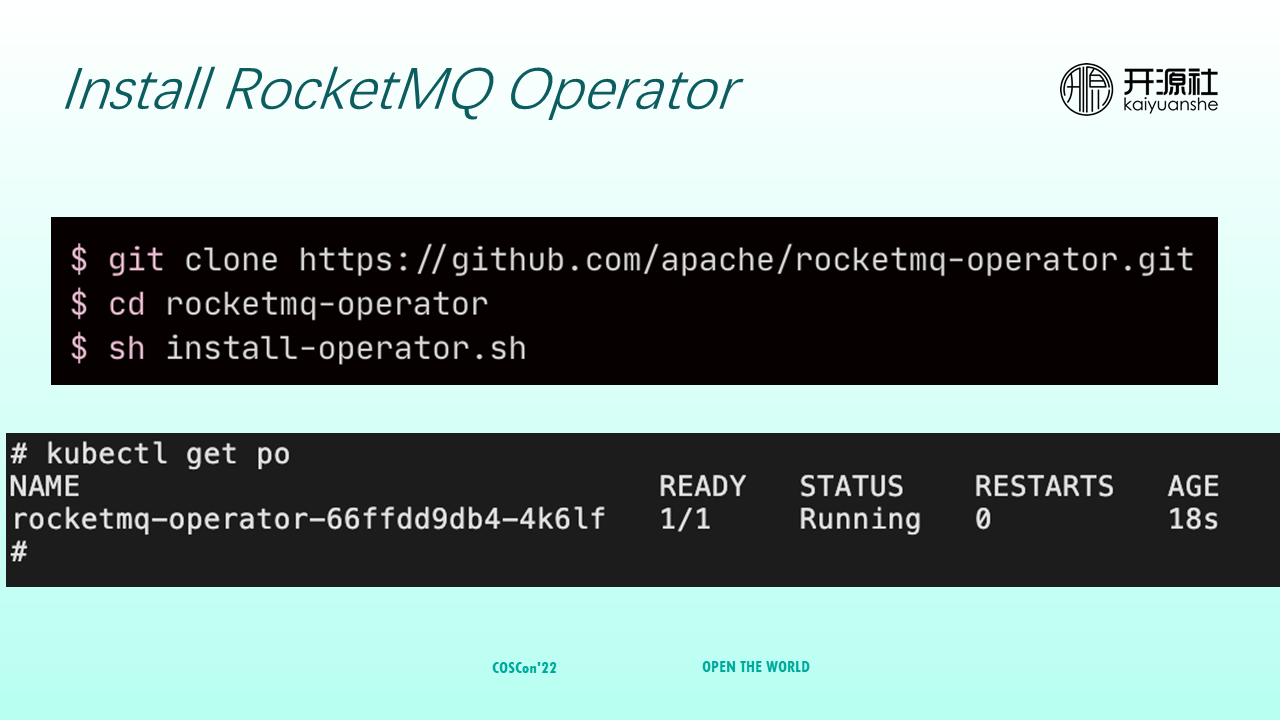
Step 1: Clone RocketMQ Operator to your local computer, decompress it, and run the install-operator.sh script to install it.
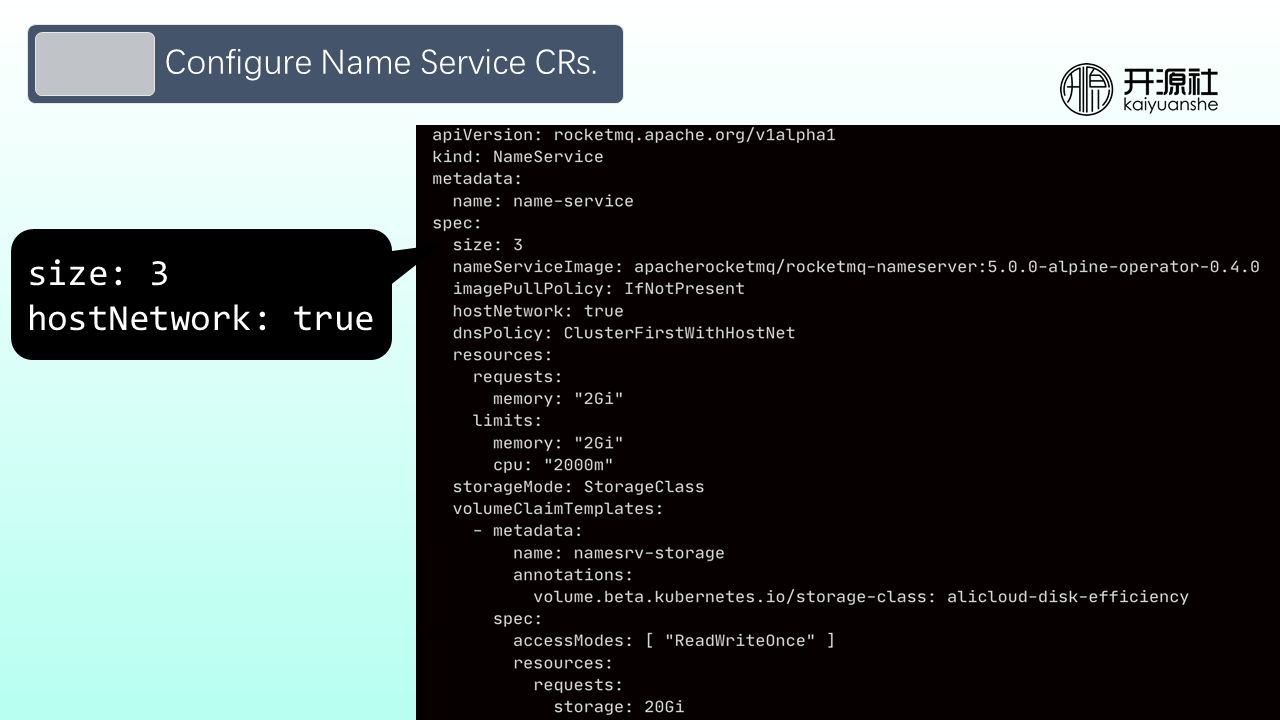
Step 2: Configure NameService CRs. There are two important fields in the Name Service CR configuration. One is size (how many NameServer nodes need to be deployed). The other is hostNetwork, which is false by default. In this case, clients can only communicate with NameServers in the Kubernetes cluster. If a client outside the Kubernetes cluster needs to access the RocketMQ cluster, set hostNetwork to true and set the access point of NameServers to the IP address of the nodes where NameServers reside.
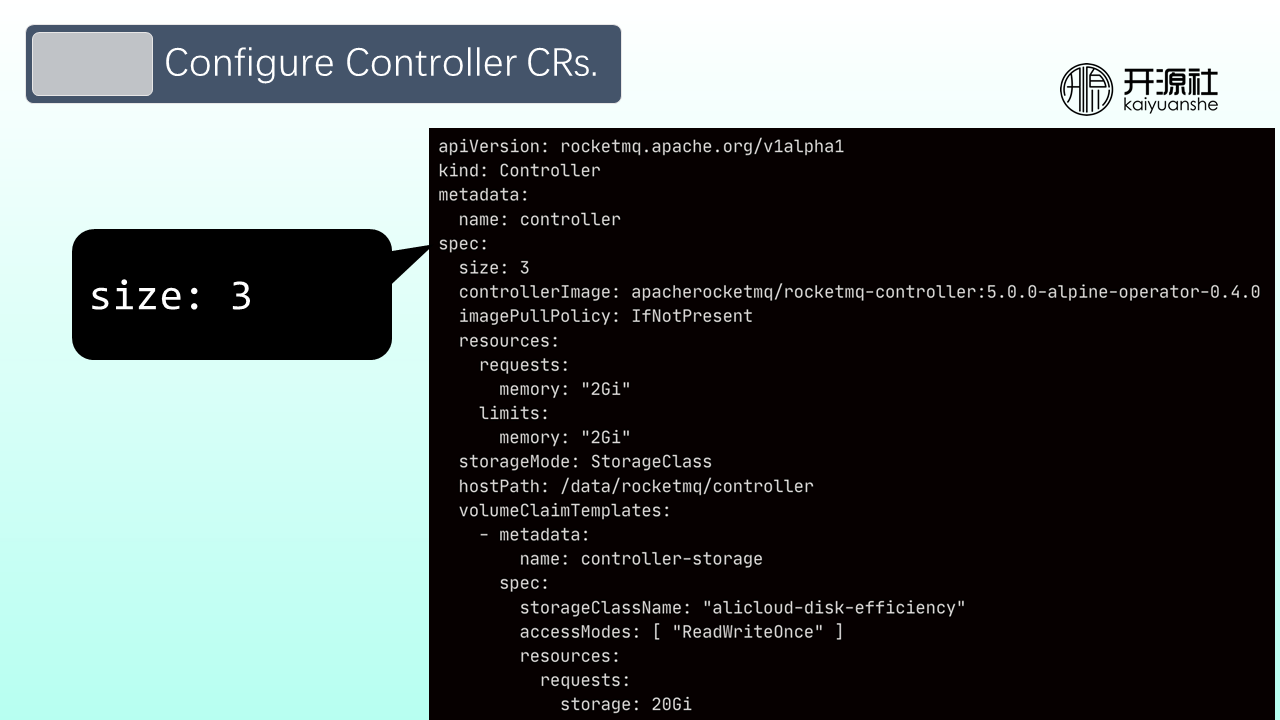
Step 3: Configure controller CRs. Note: The size parameter needs to be set to an odd number. Controller data requires persistent storage. You can use the StorageClass provided by cloud service providers without maintaining the storage. If you want to configure your storage, you can refer to GitHub, where RocketMQ Operator code provides relevant examples on how to configure an NFS storage.
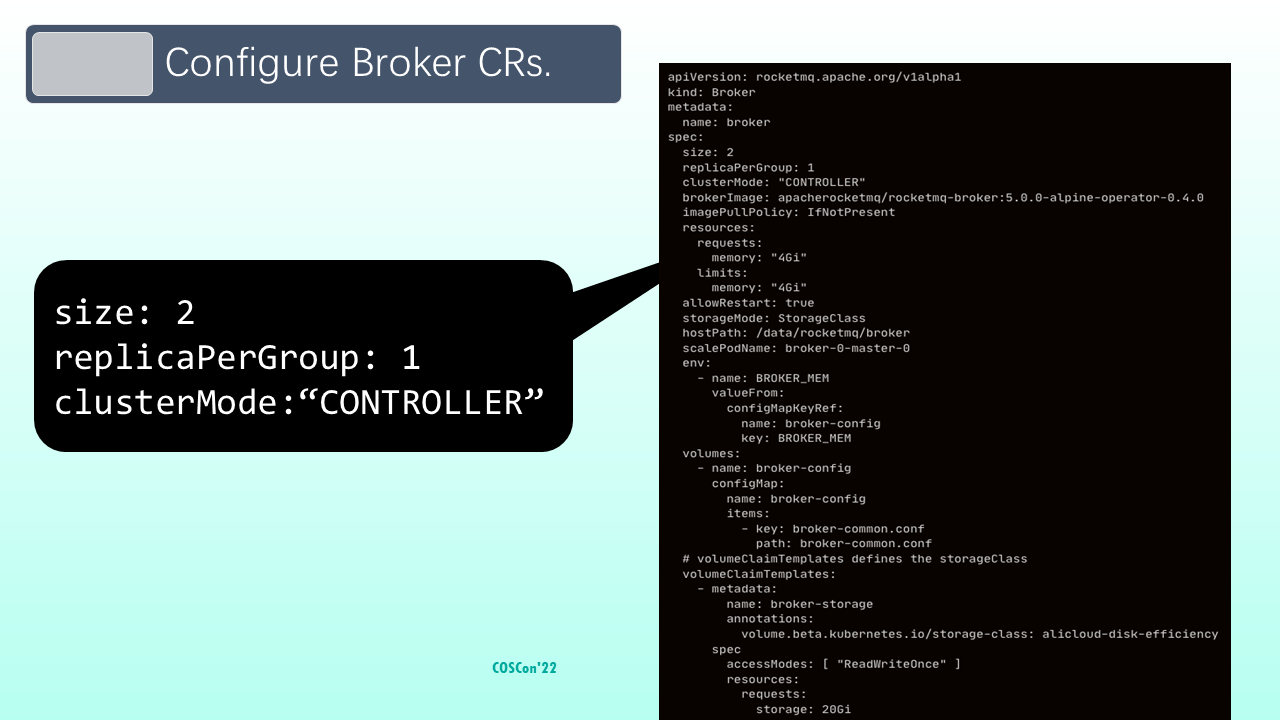
Step 4: Configure broker CRs. In the example, two groups of brokers are configured. Each group has a slave node. At the same time, clusterMode is set to the controller to start the autonomously switched architecture cluster.
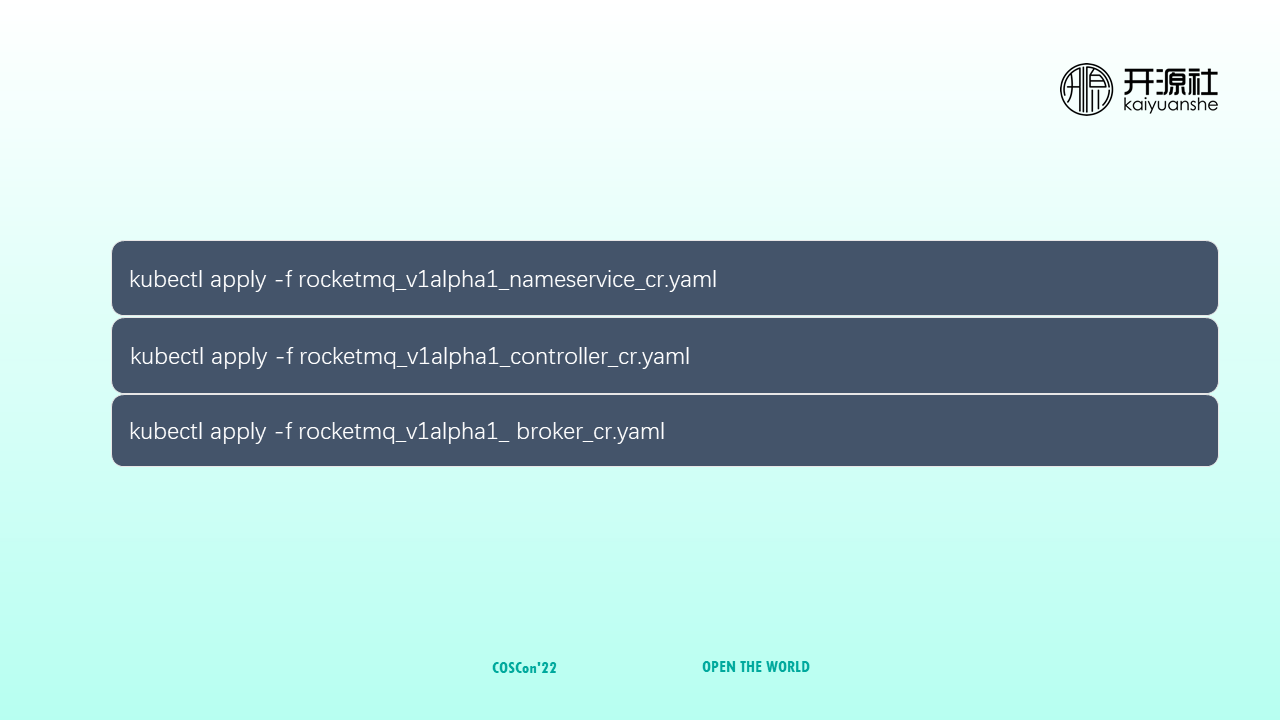
After you prepare the configuration files of the preceding three modules, run the kubectl and apply the command to submit them to the Kubernetes cluster. The remaining operations (such as deployment and O&M) are automatically performed by RocketMQ Operator.
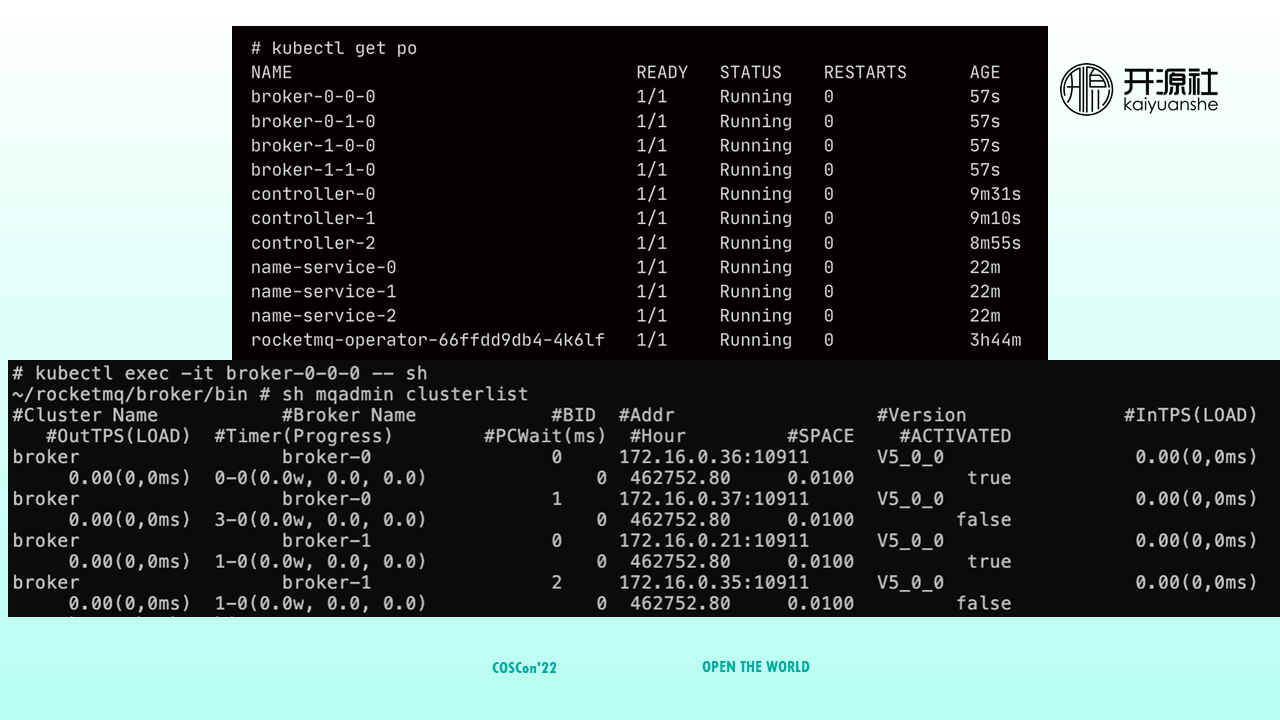
After deployment, you can run the kubectl get po command to view the deployed pods. You can see that four Broker nodes, three Controller nodes, and three NameSever nodes are deployed.
Enter a Broker Pod. You can run the clusterlist command to check cluster status. You can see that the cluster has two groups of brokers, each with a master (BID=0) and a slave.
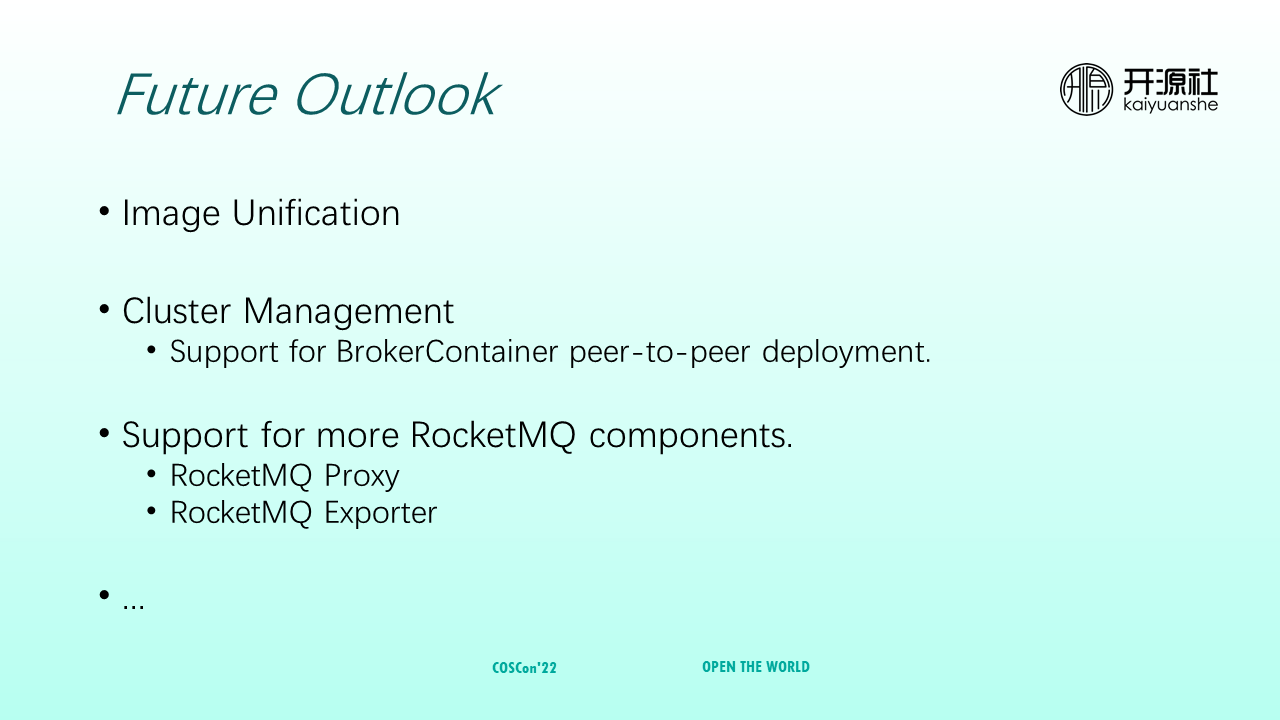
RocketMQ Operator will be continuously improved to fully support RocketMQ 5.0. The follow-up plans include the following:
① Image Unification: Currently, RocketMQ Operator maintains a set of RocketMQ images, but there is already RocketMQ Docker, so it is unnecessary to maintain another set of images. Therefore, in the future, the community hopes to unify the images on both sides to reduce management costs.
② Cluster Management: RocketMQ 5.0 provides another cluster deployment method: BrokerContainer peer-to-peer deployment. It is different from the traditional master/slave mode in version 4.0. BrokerContainer starts one active and one standby at the same time in the process, and the brokers in the two BrokerContainer will be active and standby for each other. When the primary node of a container fails, the slave node of the paired container enters the Slave Acting Master state and processes secondary messages (such as scheduled messages and transactional messages).
③ Support: It will support the deployment of more RocketMQ components, including RocketMQ Schema Registry, RocketMQ Proxy, and RocketMQ Exporter.
Observability and Traceability | Analyzing Continuous Profiling
Design and Implementation of RocketMQ 5.0: Multi-Language Client

639 posts | 55 followers
FollowAlibaba Cloud Native Community - November 20, 2023
Alibaba Cloud Native - June 7, 2024
Alibaba Cloud Native Community - January 5, 2023
Alibaba Cloud Native Community - December 19, 2022
Alibaba Cloud Native Community - March 14, 2022
Alibaba Cloud Native Community - November 23, 2022

639 posts | 55 followers
Follow ApsaraMQ for RocketMQ
ApsaraMQ for RocketMQ is a distributed message queue service that supports reliable message-based asynchronous communication among microservices, distributed systems, and serverless applications.
Learn More Big Data Consulting for Data Technology Solution
Alibaba Cloud provides big data consulting services to help enterprises leverage advanced data technology.
Learn More Big Data Consulting Services for Retail Solution
Alibaba Cloud experts provide retailers with a lightweight and customized big data consulting service to help you assess your big data maturity and plan your big data journey.
Learn More ApsaraDB for HBase
ApsaraDB for HBase is a NoSQL database engine that is highly optimized and 100% compatible with the community edition of HBase.
Learn MoreMore Posts by Alibaba Cloud Native Community