By Suchuan
Imgcook, Alibaba's the intelligent code generation platform, can generate maintainable frontend code with one-click, by using sketch, Photoshop document (PSD), static images, and other visual drafts as input. However, what imgcook obtains from design drafts are elements such as division (div), image (img), and span, while most of the frontend development is component-based development. Therefore, we hope that imgcook can directly generate componentized code from design drafts. This requires the componentized elements in design drafts, such as Searchbar, Button, and Tab to be identified.
Recognizing user interface (UI) elements in web pages is a typical object detection problem in the artificial intelligence (AI) field. We can try to use the object detection methods of deep learning to automatically solve the problem stated above. In addition to the method of recognizing UI components, this article also introduces a correct method of using machine learning to solve UI-related problems:
imgcook takes visual drafts such as sketch, PSD, static pictures as inputs, and generates maintainable frontend code with one-click by using intelligent technologies. The code generation of Sketch or Photoshop design drafts needs to install plug-ins. With the imgcook plug-in, you can export the JavaScript object notation (JSON) description (D2C Schema) of visual drafts and paste it into the imgcook visual editor, and then you can edit views and logic in the editor to change the JSON description.
You can select the domain-specific language (DSL) specifications to generate the corresponding code. For example, to generate React-compliant code, you need to convert a JSON tree into React code (custom DSL).

As shown in the following figure, the left side is the Sketch visual draft, and the right side is the code of buttons generated using the React development specifications.

Generating React-compliant code from a Sketch visual draft & code snippet of buttons
The generated code is composed of tags such as div, img, and span. However, during actual application development, the following problems exist:
To use component libraries, for example, Ant Design, we expect to generate code as follows:
//Antd Mobile React specifications

import { Button } from "antd-mobile";

<div style={styles.ft}>
 <Button style={styles.col1}>进店抢红包</Button>
 <Button style={styles.col2}>加购物车</Button>
</div>
To this end, we add a smart field to the JSON description to describe the node type.
"smart": {
 "layerProtocol": {
 "component": {
 "type": "Button"
 }
 }
}
What we need to do is to find the elements that need to be componentized in a visual draft and describe them with JSON information. During DSL conversion, the smart fields in JSON information are used to generate componentized code.
The question now changes to how to find the elements that need to be componentized in a visual draft? What components are they? Where are they in the document object model (DOM) tree or in the design draft?
We intervene in the generated JSON description by specifying the design draft specifications, thereby controlling the generated code structure. For example, in the Advanced Intervention Specifications for Design Drafts, the naming convention for layers of components is as follows: Explicitly mark the components and their properties at a layer.
#component:component name? Property=value#
#component:Button? id=btn#
When JSON description data is exported using the imgcook plug-in, the convention information in the layer is obtained through specification parsing.
To use the formulated rules, we need to modify the design draft according to the rules. Since there may be many components on a page, this manual method brings developers a lot of extra work, which is not in line with the purpose of using imgcook to improve development efficiency. We expect to automatically identify componentizable elements in the visual draft through intelligent means. The recognition results will be converted and filled in the smart fields, whose content is the same as the content of the smart fields in the JSON description generated according to manually formulated rules.
Two things need to be done here:
To achieve the second task, we can parse the child elements of the component according to the JSON tree. We can automate the first task by using intelligence technologies. This is a typical problem of object detection in the AI field. We can try to use deep learning object detection to automate this manually formulated process.
At present, there are some studies and applications in the industry that use deep learning to identify UI elements in web pages. There are some discussions about this:
There are two main demands in these discussions:
Since deep learning is used to solve the problem of UI element recognition, a UI dataset with element information is necessary. At present, Rico and ReDraw are the most widely used and open datasets in the industry.
A ReDraw dataset consists of a set of Android screenshots, graphical user interface (GUI) metadata, and annotated GUI component images. It includes 15 categories such as RadioButton, ProgressBar, Switch, Button, and Checkbox, 14,382 UI pictures, and 191,300 annotated GUI components. The number of each component reaches 5,000 after the dataset is processed. For more information about the dataset, see The ReDraw Dataset.
This dataset is used for training and evaluating the machine learning technologies of convolutional neural network (CNN) and K-nearest neighbor (KNN) mentioned in the ReDraw paper. The paper was released on IEEE Transactions on Software Engineering in 2018. The paper proposes a method of automating the conversion from UI to code in three steps:
1. Detection
First, extract or use the CV technology to extract UI meta information from the design draft, such as bounding boxes (positions and sizes).
2. Classification
Use a large software warehouse to perform data mining and dynamic analysis to get the components that appear in the UI. Then, use the result data as a CNN technology dataset to learn to classify the extracted elements into specific types, such as Radio, Progress Bar, and Button.
3. Assembly
Finally, use KNN to derive the UI hierarchy, such as vertical lists and horizontal sliders.
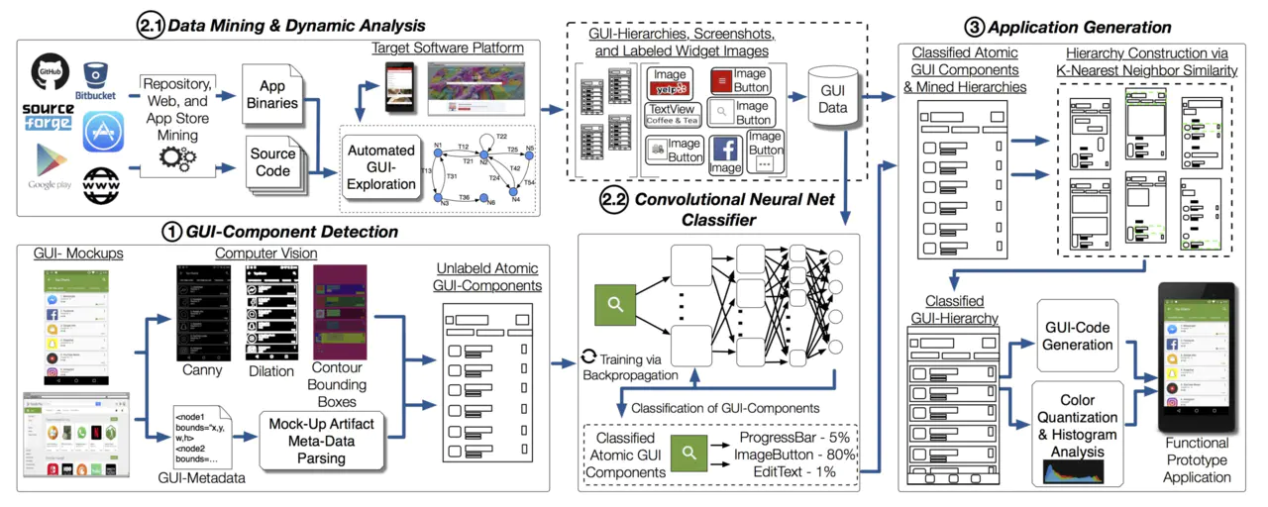
This method is used to generate Android code in the ReDraw system. Evaluation results show that the average accuracy of ReDraw's GUI component classification reaches 91%, and prototype applications have been assembled. These applications closely not only reflect the target model in terms of visual affinity, but also show a reasonable code structure.

Rico is by far the largest mobile UI dataset, created to support five types of data-driven applications: design search, UI layout generation, UI code generation, user interaction modeling, and user perception prediction. The Rico dataset contains 27 categories, more than 10,000 applications, and about 70,000 screenshots.
This dataset was opened at the 30th Annual ACM Symposium on User Interface Software and Technologies in 2017 (RICO: A Mobile App Dataset for Building Data-Driven Design Applications).
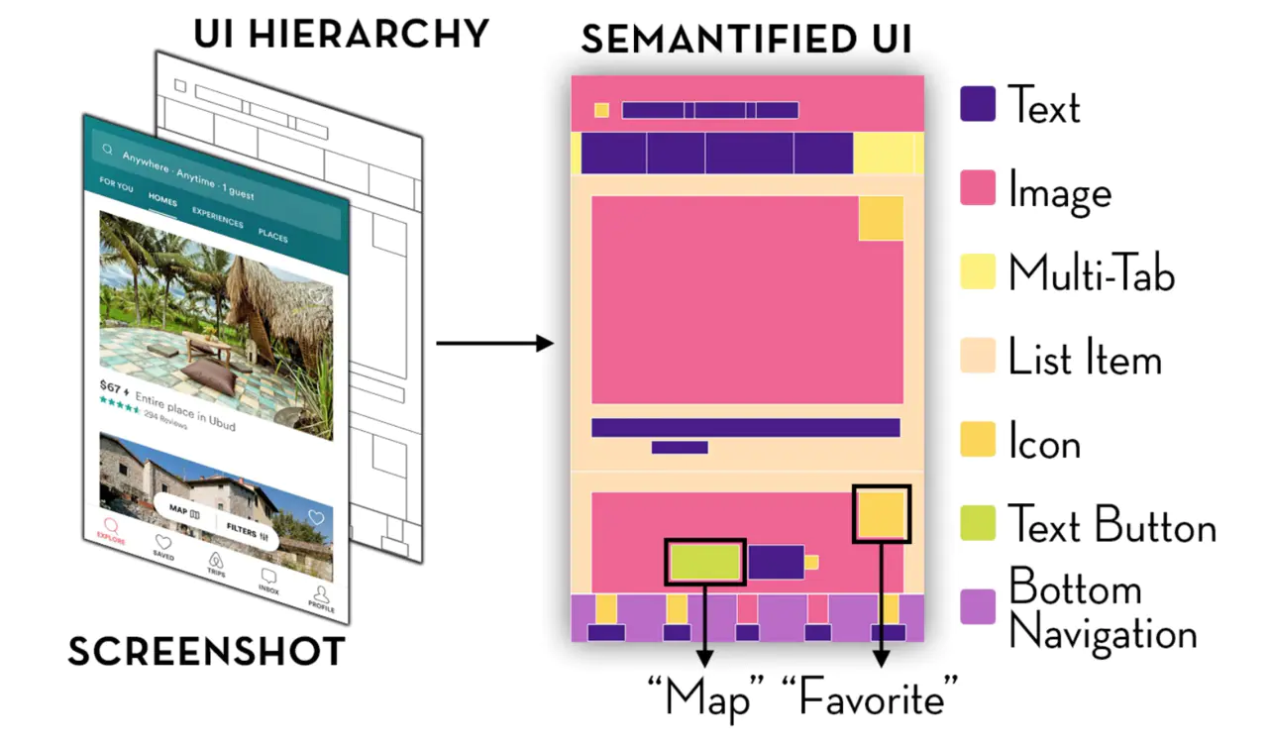
Since then, there have been some studies and applications based on the Rico dataset, for example, Learning Design Semantics for Mobile Apps. This paper introduces a code- and visual-based method to add semantic annotations to mobile UI elements. Using this method, 25 UI component categories, 197 text button concepts, and 99 icon categories can be automatically identified based on the UI screenshots and view hierarchy.
Here are some research and application scenarios based on the preceding datasets.
Intelligent Code Generation
Machine Learning-Based Prototyping of Graphical User Interfaces for Mobile Apps | ReDraw Dataset
Intelligent Layout Generation
Neural Design Network: Graphic Layout Generation with Constraints | Rico Dataset
User Perception Prediction
Modeling Mobile Interface Tappability Using Crowdsourcing and Deep Learning | Rico Dataset
UI Automation Testing
A Deep Learning based Approach to Automated Android App Testing | Rico Dataset
The preceding part describes how to use the ReDraw dataset to generate Android code. Through the introduction, we understand the implementation of the three-step method. For step 2, a large software warehouse is used to perform mining and dynamic analysis to obtain a large number of sample components, which are used as the training sample of the CNN algorithm. In this way, we obtain specific types of components in UIs, such as Progress Bar and Switch.
To apply imgcook, the essential problem is also to find specific types of component information in UIs, that is, categories and bounding boxes. We can define this problem as an object detection problem, and use deep learning to detect objects on UIs. **So what are our goals?
The detection targets are page elements, such as Progress Bar, Switch, and Tab Bar, which can be componentized in code.
How do humans learn? Humans input information to the brain and obtain knowledge and experience through learning and summarization. When similar tasks appear, they can make decisions or actions based on existing experience.

The process of machine learning is similar to that of human learning. A machine learning algorithm is essentially to obtain a model represented by the f(x) function. If a sample x is input to f(x) and the result is a category, then the solved problem is a classification problem. If the result is a specific value, then the solved problem is a regression problem.
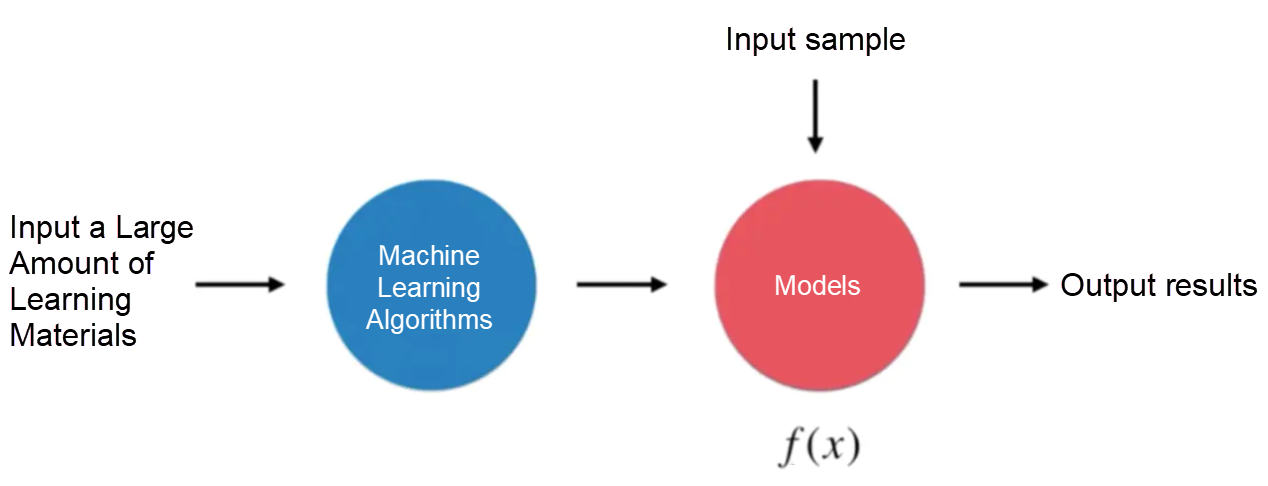
The overall mechanism of machine learning is consistent with that of human learning. One difference is that the human brain only needs a little data to summarize highly applicable knowledge or experience. For example, we can correctly distinguish cats from dogs as long as we have seen several cats or dogs, but a large amount of learning materials are required for machines. However, what machines can do is to be intelligent without requiring human participation.
Deep learning is a branch of machine Learning. It is an algorithm that attempts to perform high-level abstraction on data using multiple processing layers that contain complex structures or consist of multiple nonlinear transformations.
The difference between deep learning and traditional machine learning can be found in Deep Learning vs. Machine Learning. The article covers data dependencies, hardware dependencies, feature processing, problem solving methods, execution time, and interpretability.
Deep learning has high requirements on data volume and hardware and takes a long time to execute. The main difference between deep learning and traditional machine learning algorithms is the way in which features are processed. When traditional machine learning is used for real-world tasks, human experts need to design the feature description of the sample, which is called "Feature Engineering". The quality of features has a crucial impact on the generalization performance, and it is not easy to design features well. Deep learning can use feature learning technologies to analyze data and automatically generate high-quality features.
Machine learning has many applications. For example:
Object detection is a computer technology related to computer vision and image processing. It is used to detect specific categories of semantic objects (such as people, animals, and cars) in digital images and videos.
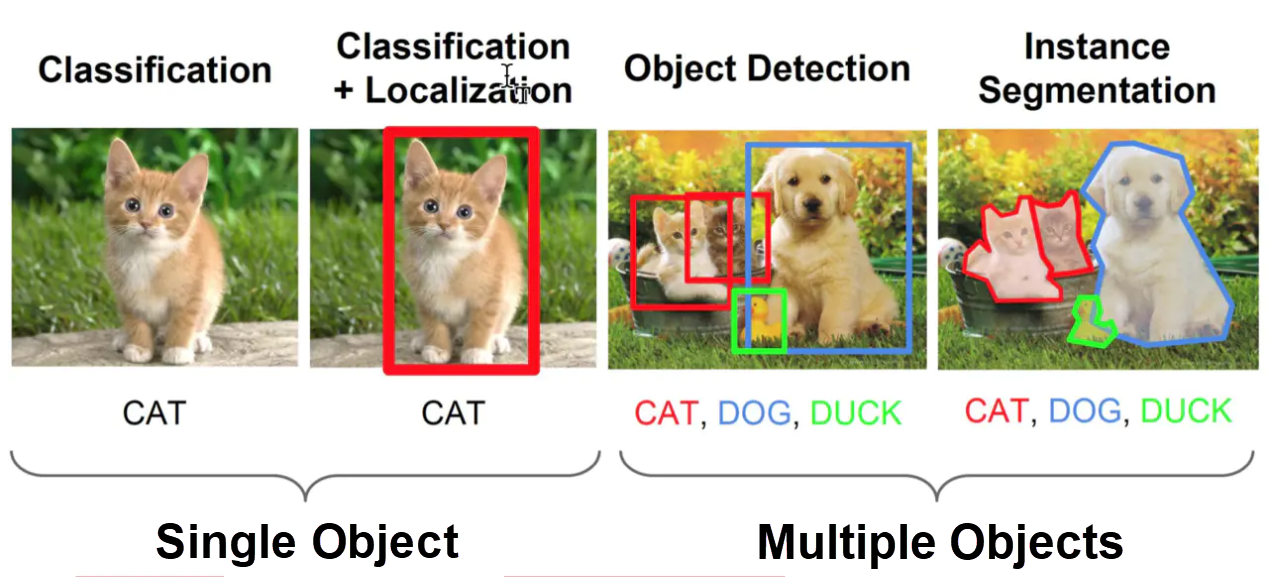
However, we aim for some design elements on UIs. They can be atomic-granularity icons, images, text, or componentized Searchbar and Tabbar.

Methods for object detection are divided into machine learning-based methods (traditional object detection methods) and deep learning-based methods (deep learning-based object detection methods). Object detection methods have evolved from the former to the latter.
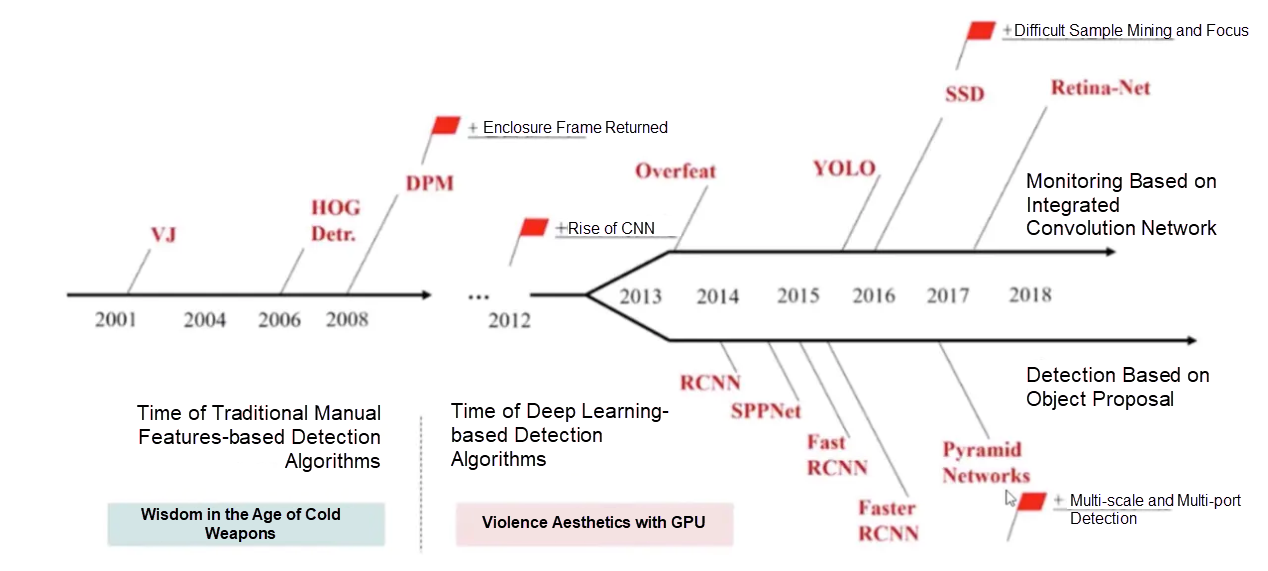
For machine learning-based methods, use any of the following methods to define features and use techniques such as support vector machines (SVMs) to classify the features:
For deep learning-based methods, end-to-end (E2E) object detection can be performed without defining features, usually based on a convolutional neural network (CNN). Deep learning-based object detection methods can be classified into one-stage methods and two-stage methods, as well as the RefineDet algorithm that inherits the benefits of the former algorithms.
One-stage object detection algorithms directly provide category and location information through the backbone network, without using the region proposal network (RPN). A one-stage object detection algorithm is faster, but its accuracy is slightly lower than that of a two-stage object detection algorithm. Typical one-stage object detection algorithms are as follows:
A two-stage object detection algorithm performs object detection through a CNN and extracts convolutional features. The network training includes two parts: The first step is to train the RPN, and the second step is to train the network of object region detection.
That is, a two-stage object detection algorithm first generates a series of candidate frames as samples, and then the samples are classified by the CNN. A two-stage algorithm has higher network accuracy and lower speed compared with a one-stage algorithm. Typical two-stage object detection algorithms are as follows:
Single-Shot Refinement Neural Network for Object Detection (RefineDet) is an improvement based on the single shot detection (SSD) algorithm. It inherits the benefits of one-stage and two-stage object detection methods and overcomes their shortcomings.
The algorithm process of machine learning-based methods and deep learning-based methods is shown in the figure. The traditional object detection method requires you to manually design features and obtain candidate frames through a sliding window. The traditional classifier is then used to determine the object region. The whole training process is divided into multiple steps. The deep learning-based object detection method uses machines to learn features and obtain candidate objects through the more efficient Proposal or direct regression. It has higher accuracy and real-time performance.

Now, the research on object detection algorithms is mostly based on deep learning, and traditional object detection algorithms are rarely used. The deep learning-based object detection method is more suitable for engineering. The comparisons are as follows:


The principle of each algorithm is not described here. Let's look at the advantages and disadvantages.
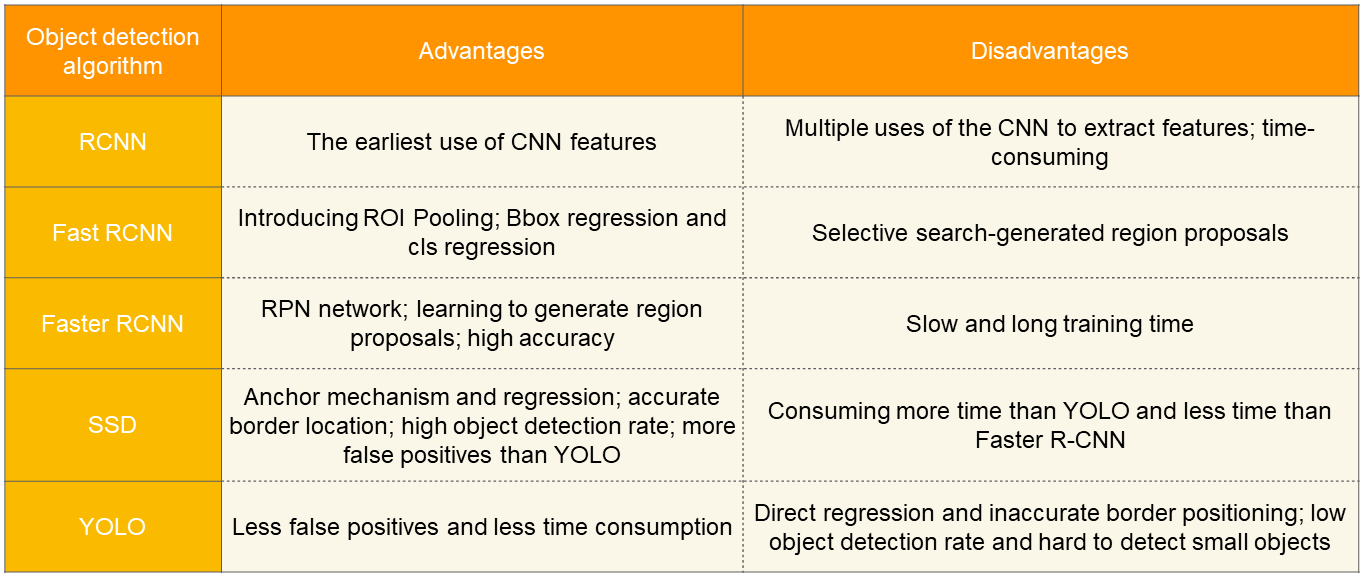
Due to the high requirement for the precision of UI element detection, the Faster RCNN algorithm is finally chosen.
Here are a few examples of machine learning frameworks: Scikit Learn, TensorFlow, Pytorch, and Keras.
Scikit Learn is a general-purpose machine learning framework that internally implements various classification, regression, and clustering algorithms (including SVMs, random forests, gradient enhancement, and k-means). It also includes tool libraries such as data dimension reduction, model selection, and data preprocessing, which are easy to install and use, with rich examples, and detailed tutorials and documentation.
TensorFlow, Keras, and Pytorch are currently the main deep learning frameworks. They can be used to call various deep learning algorithms. I particularly agree with an author that as long as you run the sample resources once and look up the official documents when you do not understand something, you will soon grasp these three frameworks and be able to use them.
You can see how these frameworks are used in actual tasks in the subsequent model training code.
An object detection framework can be understood as a library that integrates object detection algorithms. For example, the deep learning algorithm framework TensorFlow is not a object detection framework, but it provides object detection APIs.
Object detection frameworks include Detectron, maskrcnn-benchmark, mmdetection, and Detectron2. The currently widely used object detection framework is
Detectron2, which was open sourced by the Facebook AI Research Institute on October 10, 2019. We also use Detectron2 for UI component recognition, and the sample code will be given later.
As a frontend developer, you can also choose Pipcook. It is a frontend algorithm engineering framework that is open sourced by the intelligence team under Alibaba's Frontend Committee to help frontend engineers use machine learning.
Pipcook uses a frontend-friendly JavaScript environment, and uses the Tensorflow.js framework as the underlying algorithm capabilities to pack corresponding algorithms for frontend business scenarios. In this way, it allows frontend engineers to quickly and easily use machine learning capabilities.
Pipcook is a pipeline-based framework that encapsulates seven steps of the machine learning engineering process for frontend developers: data collection, data access, data processing, model configuration, model training, model service deployment, and online training.
For more information about the principle and use of Pipcook, see:
After the environment and the model are prepared, the main task of machine learning is still data collection and processing. There are two sample sources:
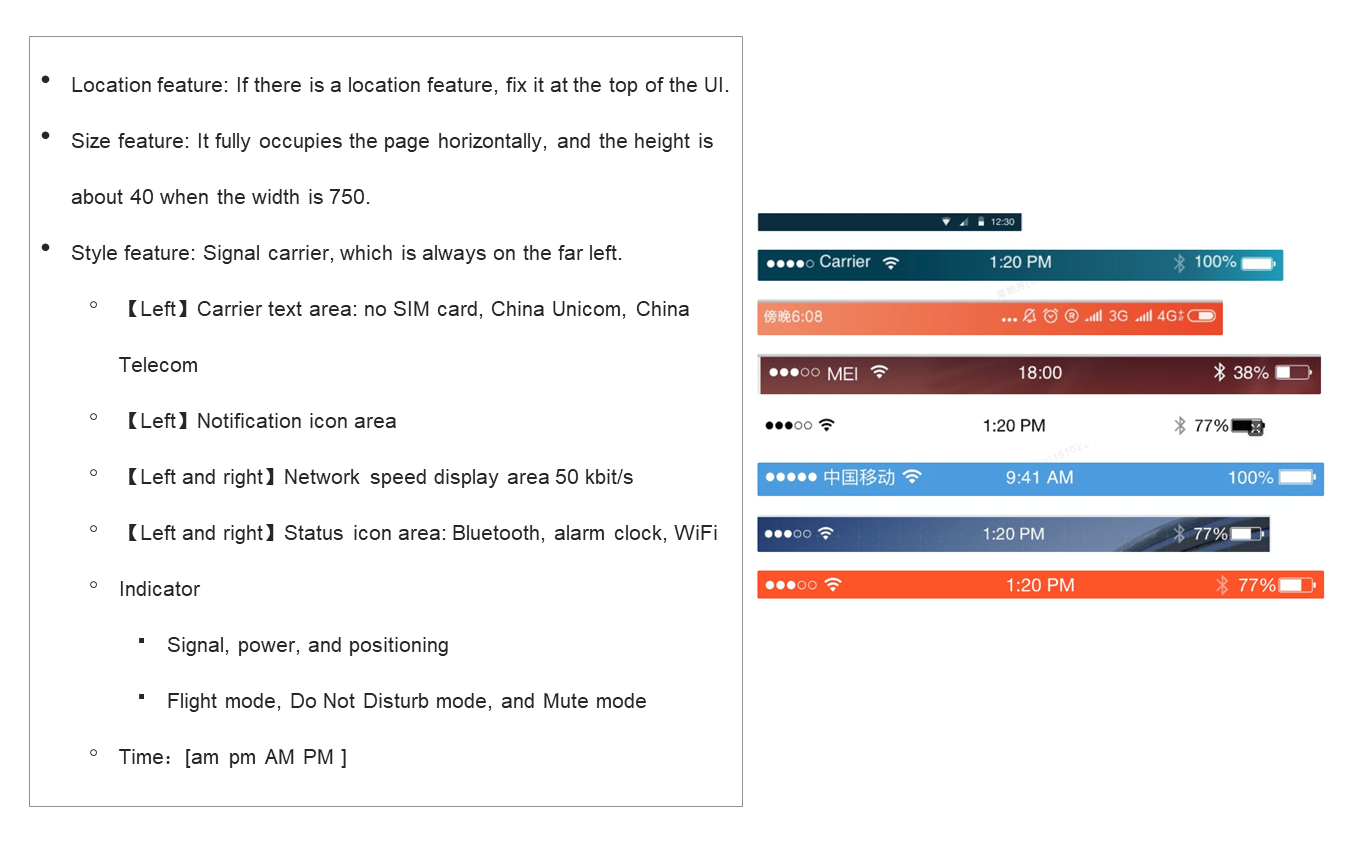
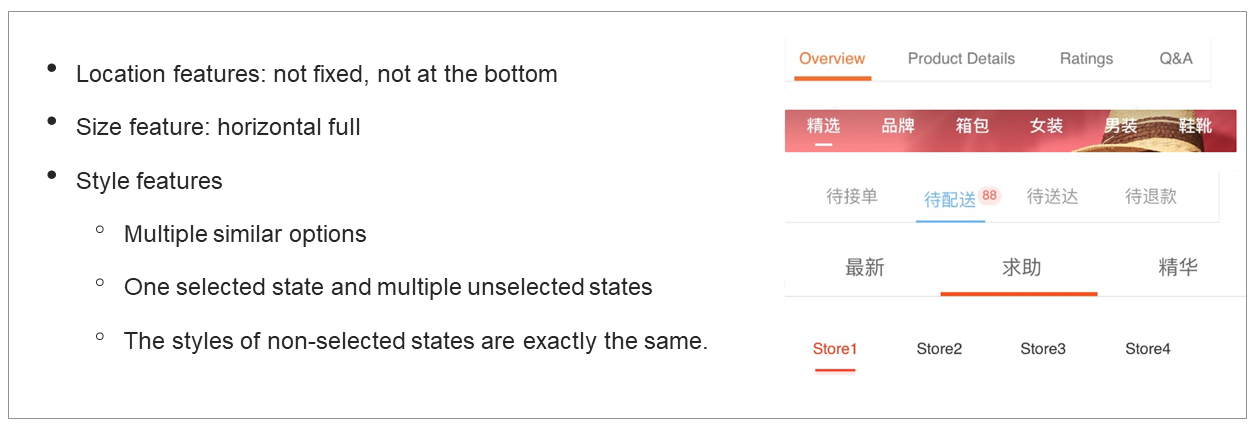
Currently, the defined component types include Statusbar, Navbar, Searchbar, and Tabbar. Both manual and automatic object labeling require clear definitions of the component types.
For example, define the Status Bar of mobile phones as follows:
For example, define the Tab Bar as follows:
Alibaba has many applications and product services, and visual drafts of the services are centrally managed on the platform. We can use these visual drafts as the sources of samples. At present, we have only selected Sketch visual drafts due to the difficulty to export pictures with the page as the dimension from PSD files.
In-depth explanation is provided here, because I believe that some of the details are inspiring.
1. Download a Sketch File
Downloading a Sketch file from Alibaba's internal platform is the first step. The script for each subsequent step starts with a serial number, for example, 1-download-sketch.ts. There are many sample processing scripts. Therefore, user-friendly naming is easier to understand.
/**
 * [Purpose] Download a Sketch file.
 * [Command] ts-node 1-download-sketch.ts
 */
2. Use sketchtool to Export Pictures in Batches
Sketch comes with a command line tool sketchtool, which we can use to export pictures in batches.
# [Purpose] Use sketchtool to export Artboards in Sketch and save them as 1x png pictures.
# [Command] sh 2-export-image-from-sketch.sh $inputDir $outputDir

for file in $1"/*"
do
  sketchtool export artboards $file --output=$2 --formats='png' --scales=1.0
doneAs you know, a designer's design draft, like Taobao live 4.0_v1, Taobao live 4.0_v2, and Taobao live 4.0_v3, may only have minor changes for each minor version. Pages in each Sketch file may also include details page initial version, details page version 2, and details page final version. This leads to a large number of duplicate pictures after the pictures are exported.
In addition, there are some non-standard design drafts, such as drawing one icon on one artboard, interactive drafts, and PC-side visual drafts, which are not what we need. Therefore, some preprocessing is needed.
3. Filter Pictures by Size
Divide pictures into two types: mobile-side and PC-side. Remove invalid pictures by size.
# [Purpose] Remove pictures by size.
# [Command] python3 3-classify-by-size.py $inputDir $outputDir

# Delete pictures of non-standard sizes. Pictures whose width is greater than 100 are invalid.
if width not in width_list:
 print('move {}'.format(img_name))
 move_file(img_dir, other_img_dir, img_name)
# Delete the pictures whose height is less than 30.
elif height < 30:
 print('move {}'.format(img_name))
 move_file(img_dir, other_img_dir, img_name)
# Archive pictures by size.
else:
 width_dir = os.path.join(img_dir, str(width))
 if not os.path.exists(width_dir):
 print('mkdir:{}'.format(width))
 os.mkdir(width_dir)
 print('move {}'.format(img_name))
 move_file(img_dir, width_dir, img_name)
4. Remove Duplicate Pictures
You can also write your own logic for picture deduplication and make a picture similarity comparison. I directly use a ready-made picture similarity detection tool Duplicate Photos Fixer Pro. Here is a brief description of how to use it. As shown in the red box, the tool supports adjusting the detection conditions and similarity.
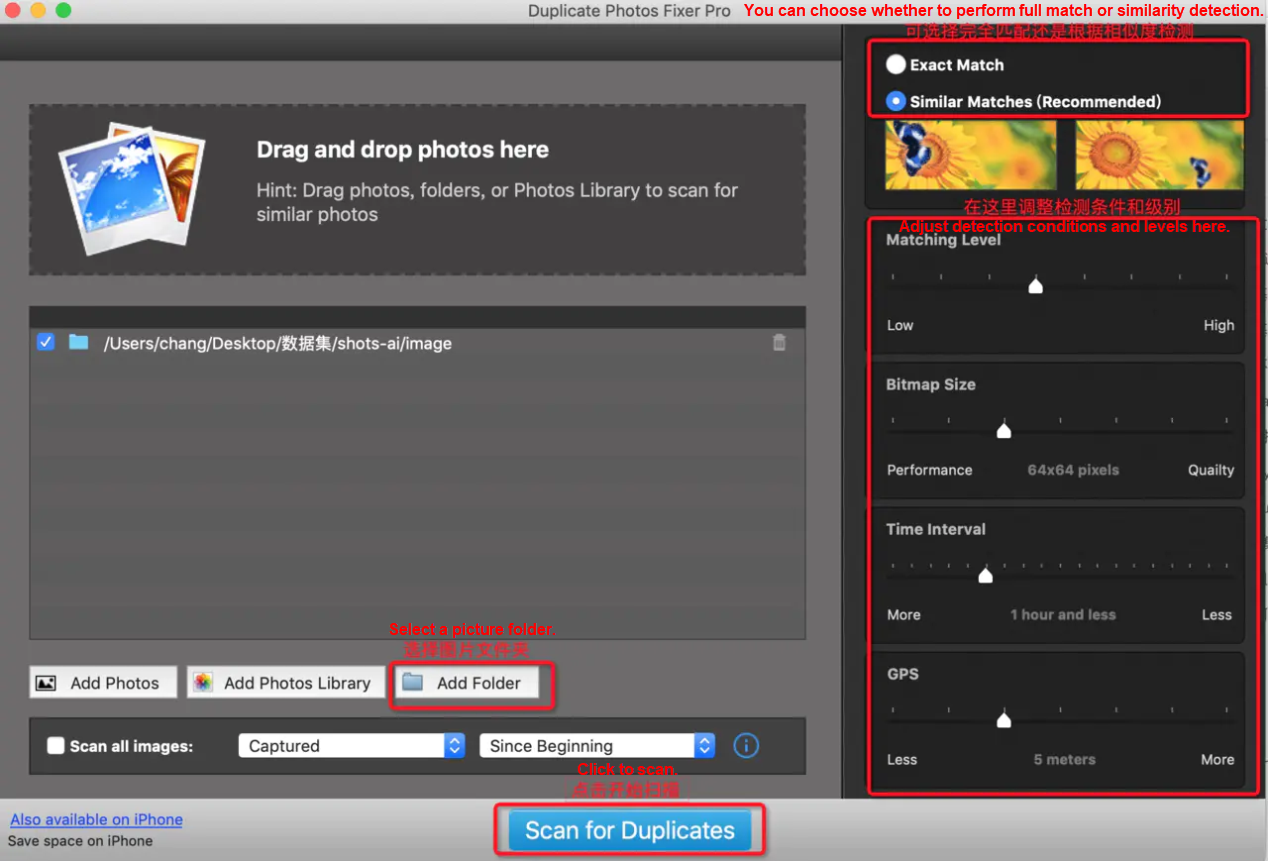
After the Hash value of each picture is calculated, you can adjust the similarity to filter pictures.
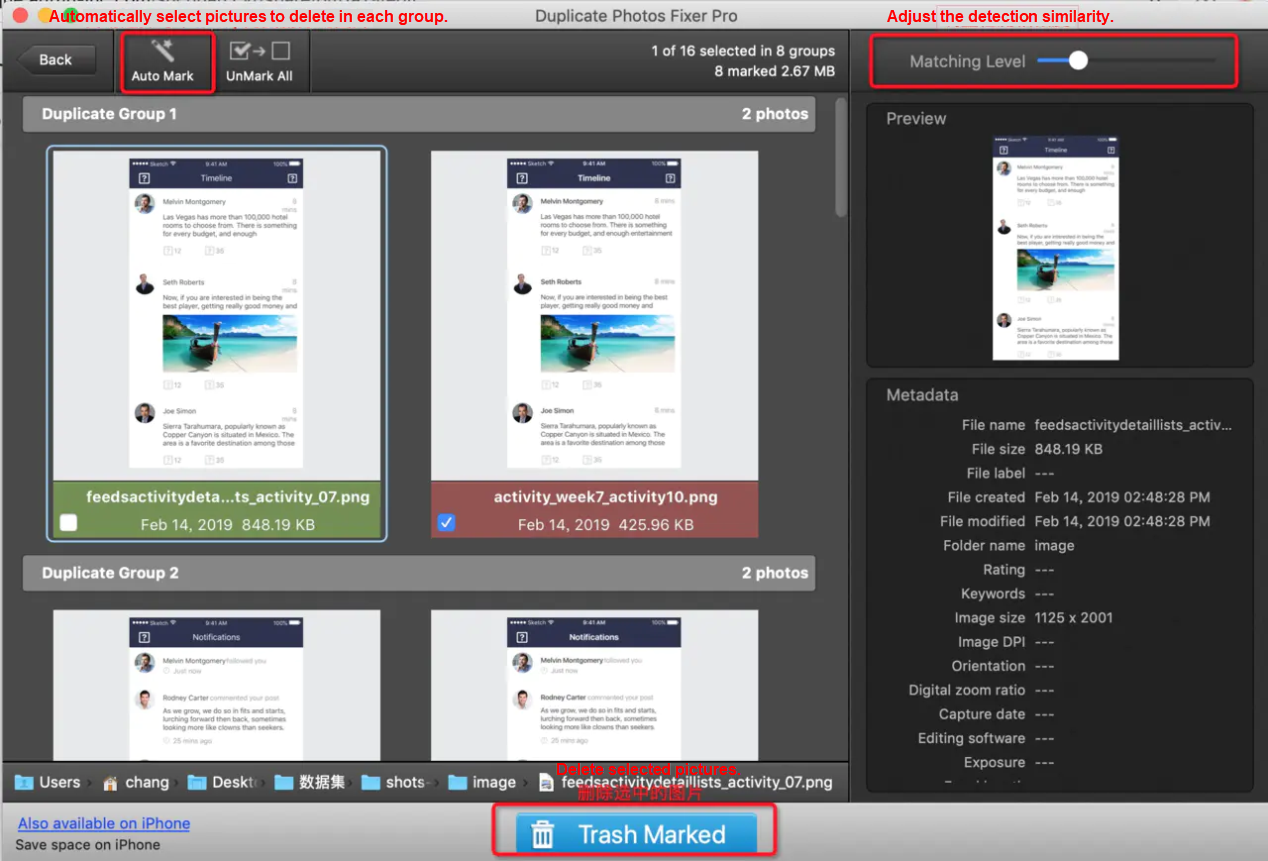
5. Rename Pictures
Here, I would like to talk about the sample management. Since the dataset is gradually enriched, there may be many versions of the dataset. User-friendly naming makes it easier to manage. For example, generator-mobile-sample-10cate-20200101-1.png indicates that this is the first mobile-side sample automatically generated on January 1, 2020, and this batch of the dataset contains 10 categories.
6. Semi-automatically Label Components
Some components can be automatically labelled, such as Statusbar and Navbar. Since almost every picture has the same location and size, a VOC-format extensible markup language (XML) annotation can be automatically generated for each picture, which contains two object component categories. Then, only a few adjustments are required when other components are labelled manually, which can save a great deal of manpower.
Currently, we are making efforts to explore more semi-automatic labeling methods to reduce the manual labeling cost.
7. Manually Label Components
You can use the labelImg tool for manual labeling. Install the tool according to the installation steps provided in the link. Here is a brief introduction to the usage.
// Download labelImg.
git clone https://github.com/tzutalin/labelImg.git

// Switch to the directory for labelImg.
cd labelImg-master

// Follow the prompts in GitHub to install the environment.

// Execute the following command to open the visual interface.
python3 labelImg.py
The following figure shows the visual interface. It supports the Pascal VOC and Yolo formats to save the annotations.
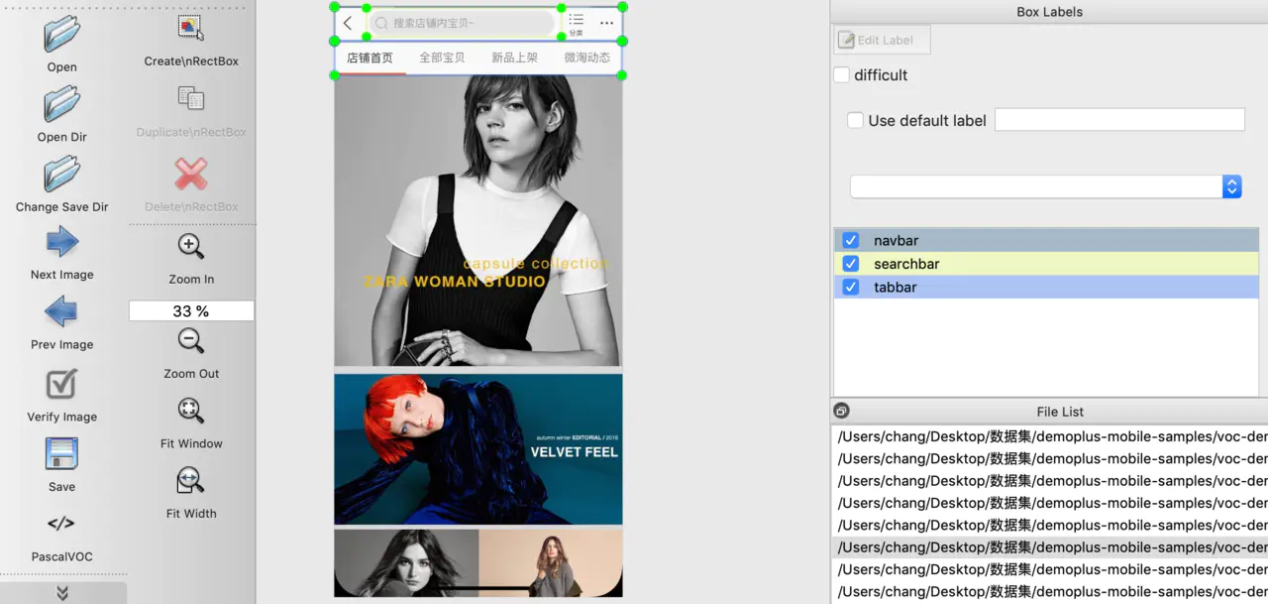
How to use the interface is not described here. I would like to recommend some shortcut keys to improve the labeling efficiency. In addition, you can choose View > Auto Save mode to automatically save the changes.
w: Create a new rectangular box.

d: Next picture

a: Previous picture

del/fn + del: Delete the selected rectangular box. The corresponding shortcut key in my computer is fn + del.

Ctrl/Command ++: Zoom in

Ctrl/Command --: Zoom out

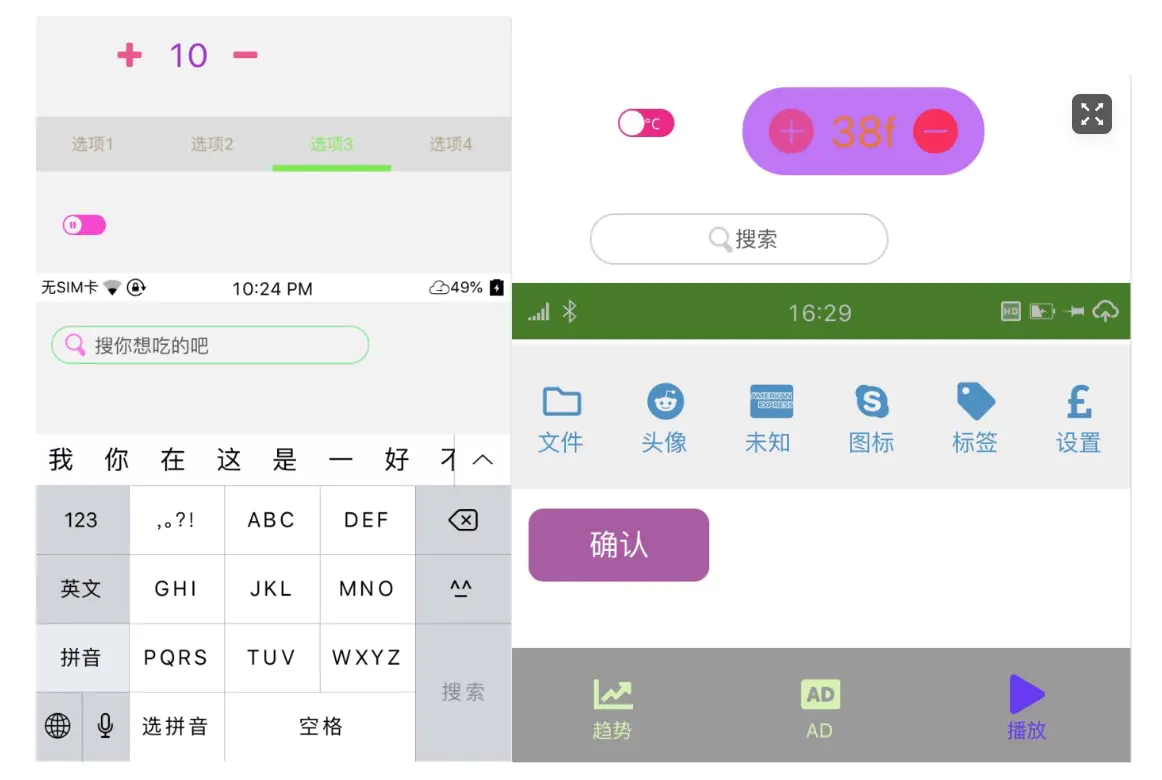
↑ → ↓ ←: Move the rectangular box.Using Puppeteer, you can randomly generate components based on component type definitions. The style of these components is also random. The following is an example. Each positive sample has a selector whose class starts with element-, for example, element-button, which facilitates subsequent retrieval of component category information.
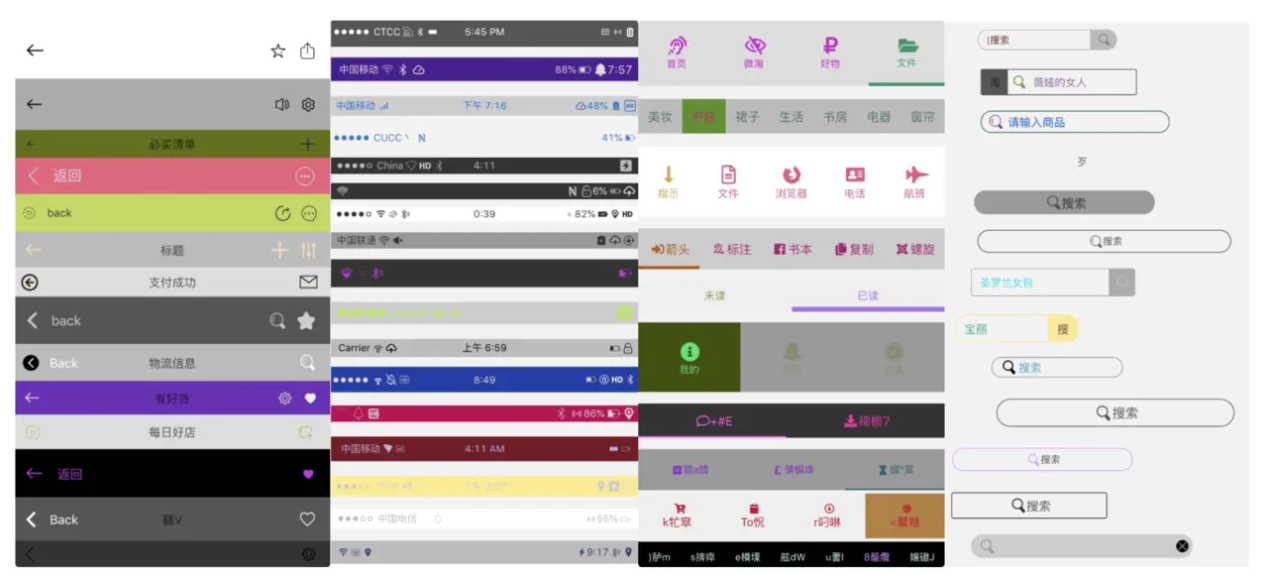
To write a page and randomly select some components to display, you need to start the service locally and open the page, for example, http:// 127.0.0.1:3333/#/generator. The following figure shows a sample page.
However, the difference between this page and the actual UI is too large. There is only positive samples, resulting in an overly simple background. In this example, the quality of the generated samples is improved by combining the fragments that are cropped out from the real UIs with the automatically generated object components. The following figure shows the example. Can you recognize the automatically generated components on the page?
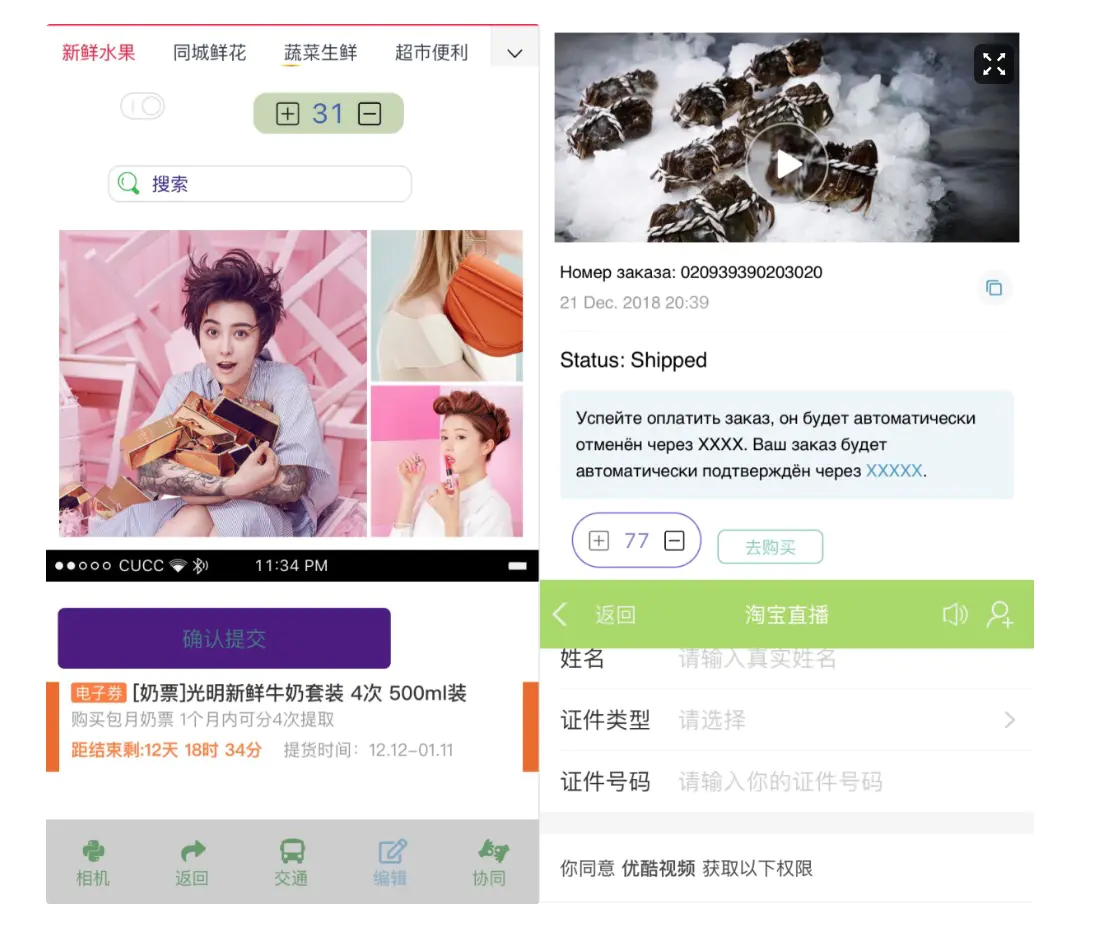
After you confirm that the random page (http://127.0.0.1:3333/#/generator) can be accessed, you can use Puppeteer to write a script to automatically open the page, save the screenshot, and obtain the categories and bounding boxes of the components. The logic is as follows:
const pptr = require('puppeteer')
// Save the sample data in COCO format.
const mdObj = {};
const browser = await pptr.launch();
const page = await browser.newPage();
await page.goto(`http://127.0.0.1:3333/#/generator/${Date.now()}`)
await page.evaluate(() => {
 const container: HTMLElement | null = document.querySelector('.container');
 const elements = document.querySelectorAll('.element');
 const msg: any = {bbox: []};
 // Obtain all elements with .element selectors on the page.
 elements.forEach((element) => {
 const classList = Array.from(element.classList).join(',')
 if (classList.match('element-')) {
 // Obtain categories.
 const type = classList.split('element-')[1].split(',')[0];
 // Calculate the bounding box and save to msg.
 pushBbox(element, type);
 }
 });
});
// Save the sample data in COCO format.
logToFile(mdObj);
// Save UI screenshots.
await page.screenshot({path: 'xxx.png'});
// Close the browser.
await browser.close();In the UI samples of Alibaba applications, the number and richness of components are unbalanced. You can balance the number of components for each type by automatically generating samples. How do we evaluate the quality of automatically generated samples? If the logic of automatically generating object components can be enumerated as 10,000, it is meaningless to automatically generate 20,000 such components.
How do we evaluate whether the richness and number of automatically generated samples are reasonable? This is the subject we are currently exploring.
The following example uses Detectron 2, an open-source object detection framework provided by Facebook, to specify the use of Faster R-CNN through merge_from_file.
from detectron2.data import MetadataCatalog
from detectron2.evaluation import PascalVOCDetectionEvaluator

from detectron2.engine import DefaultTrainer,hooks
from detectron2.config import get_cfg

cfg = get_cfg()

cfg.merge_from_file("./lib/detectron2/configs/COCO-Detection/faster_rcnn_R_50_C4_3x.yaml")
cfg.DATASETS.TRAIN = ("train_dataset",)
cfg.DATASETS.TEST = ('val_dataset',) # no metrics implemented for this dataset
cfg.DATALOADER.NUM_WORKERS = 4 # 多开几个worker 同时给GPU喂数据防止GPU闲置
cfg.MODEL.WEIGHTS = "detectron2://ImageNetPretrained/MSRA/R-50.pkl" # initialize from model zoo
cfg.SOLVER.IMS_PER_BATCH = 4
cfg.SOLVER.BASE_LR = 0.000025
cfg.SOLVER.NUM_GPUS = 2
cfg.SOLVER.MAX_ITER = 100000 # 300 iterations seems good enough, but you can certainly train longer
cfg.MODEL.ROI_HEADS.BATCH_SIZE_PER_IMAGE = 128 # faster, and good enough for this toy dataset
cfg.MODEL.ROI_HEADS.NUM_CLASSES = 29 # only has one class (ballon)

# Training set
register_coco_instances("train_dataset", {}, "data/train.json", "data/img")
# Test set
register_coco_instances("val_dataset", {}, "data/val.json", "data/img")

import os
os.makedirs(cfg.OUTPUT_DIR, exist_ok=True)

class Trainer(DefaultTrainer):
 @classmethod
 def build_evaluator(cls, cfg, dataset_name, output_folder=None):
 ### Rewrite as needed

 @classmethod
 def test_with_TTA(cls, cfg, model):
 ### Rewrite as needed

trainer = Trainer(cfg)
trainer.resume_or_load(resume=True)
trainer.train()
The product of using Detectron 2 to train the model is a model file in .pth format. To learn what the model file in .pth format looks like, see In-depth Analysis of .pth Model File Saved in Pytorch (article in Chinese).
Pipcook has encapsulated the code for data collection, data access, model training, and model evaluation. We do not need to write Python scripts for these engineering steps. Currently, the object detection process in Pipcook uses the Faster Region-CNN (RCNN) algorithm in Detectron 2. For details, view the implementation in Pipcook Plugins and you will understand it.
The following is the sample code for object detection by using Pipcook.
const {DataCollect, DataAccess, ModelLoad, ModelTrain, ModelEvaluate, PipcookRunner} = require('@pipcook/pipcook-core');

const imageCocoDataCollect = require('@pipcook/pipcook-plugins-image-coco-data-collect').default;
const imageDetectronAccess = require('@pipcook/pipcook-plugins-detection-detectron-data-access').default;
const detectronModelLoad = require('@pipcook/pipcook-plugins-detection-detectron-model-load').default;
const detectronModelTrain = require('@pipcook/pipcook-plugins-detection-detectron-model-train').default;
const detectronModelEvaluate = require('@pipcook/pipcook-plugins-detection-detectron-model-evaluate').default;

async function startPipeline() {
 // collect detection data
 const dataCollect = DataCollect(imageCocoDataCollect, {
 url: 'http://ai-sample.oss-cn-hangzhou.aliyuncs.com/image_classification/datasets/autoLayoutGroupRecognition.zip',
 testSplit: 0.1,
 annotationFileName: 'annotation.json'
 });
 const dataAccess = DataAccess(imageDetectronAccess);
 const modelLoad = ModelLoad(detectronModelLoad, {
 device: 'cpu'
 });
 const modelTrain = ModelTrain(detectronModelTrain);
 const modelEvaluate = ModelEvaluate(detectronModelEvaluate);

 const runner = new PipcookRunner( {
 predictServer: true
 });
 runner.run([dataCollect, dataAccess, modelLoad, modelTrain, modelEvaluate])
}
startPipeline();I realize that the article is getting too long, so for this chapter, let me explain it briefly.
The precision rate can be understood as the accuracy rate. For example, if 100 buttons are predicted and 80 buttons are predicted correctly, the precision rate is 80/100.
The recall rate can be understood as the completion rate. For example, if there are actually 60 buttons and 40 buttons are successfully predicted, the recall rate is 40/60.
The performance evaluation indicators of object detection are mean average precision (mAP) and frames per second (FPS). The mAP indicator measures the average accuracy of all categories. However, since the object detection results contain a bounding box besides categories, how to evaluate the prediction accuracy of the bounding box also involves the concept of Intersection over Union (IoU). IoU indicates the intersection ratio of the predicted bounding box and the actual bounding box.
In the following example, you can see such a result: When IoU is 0.50:0.95, the bounding box prediction is correct if the intersection ratio of the predicted bounding box and the actual bounding box is between 0.5 and 0.95. In this case, the precision rate AP is 0.772.
Average Precision (AP) @[ IoU=0.50:0.95 | area= all | maxDets=100 ] = 0.772
 Average Precision (AP) @[ IoU=0.50 | area= all | maxDets=100 ] = 0.951
Average Precision (AP) @[ IoU=0.75 | area= all | maxDets=100 ] = 0.915The evaluation code is as follows:
from pycocotools.cocoeval import COCOeval
from pycocotools.coco import COCO
annType = 'bbox'
# Test set ground truth
gt_path = '/Users/chang/coco-test-sample/data.json'
# Test set prediction results
dt_path = '/Users/chang/coco-test-sample/predict.json'

gt = COCO(gt_path)
gt.loadCats(gt.getCatIds())

dt = COCO(dt_path)
imgIds=sorted(gt.getImgIds())
cocoEval = COCOeval(gt,dt,annType)

for cat in gt.loadCats(gt.getCatIds()):
 cocoEval.params.imgIds = imgIds
 cocoEval.params.catIds = [cat['id']]
 print '------------------------------ ' cat['name'] ' ---------------------------------'
 cocoEval.evaluate()
 cocoEval.accumulate()
cocoEval.summarize()At present, when we use the combination of Alibaba UIs and automatically generated samples for training, mAP is about 75% most of the time.
------------------------------   searchbar   ---------------------------------
Running per image evaluation...
Evaluate annotation type *bbox*
DONE (t=2.60s).
Accumulating evaluation results...
DONE (t=0.89s).
 Average Precision  (AP) @[ IoU=0.50:0.95 | area=   all | maxDets=100 ] = 0.772
 Average Precision  (AP) @[ IoU=0.50      | area=   all | maxDets=100 ] = 0.951
 Average Precision  (AP) @[ IoU=0.75      | area=   all | maxDets=100 ] = 0.915
 Average Precision  (AP) @[ IoU=0.50:0.95 | area= small | maxDets=100 ] = -1.000
 Average Precision  (AP) @[ IoU=0.50:0.95 | area=medium | maxDets=100 ] = 0.795
 Average Precision  (AP) @[ IoU=0.50:0.95 | area= large | maxDets=100 ] = 0.756
 Average Recall     (AR) @[ IoU=0.50:0.95 | area=   all | maxDets=  1 ] = 0.816
 Average Recall     (AR) @[ IoU=0.50:0.95 | area=   all | maxDets= 10 ] = 0.830
 Average Recall     (AR) @[ IoU=0.50:0.95 | area=   all | maxDets=100 ] = 0.830
 Average Recall     (AR) @[ IoU=0.50:0.95 | area= small | maxDets=100 ] = -1.000
 Average Recall     (AR) @[ IoU=0.50:0.95 | area=medium | maxDets=100 ] = 0.838
 Average Recall     (AR) @[ IoU=0.50:0.95 | area= large | maxDets=100 ] = 0.823
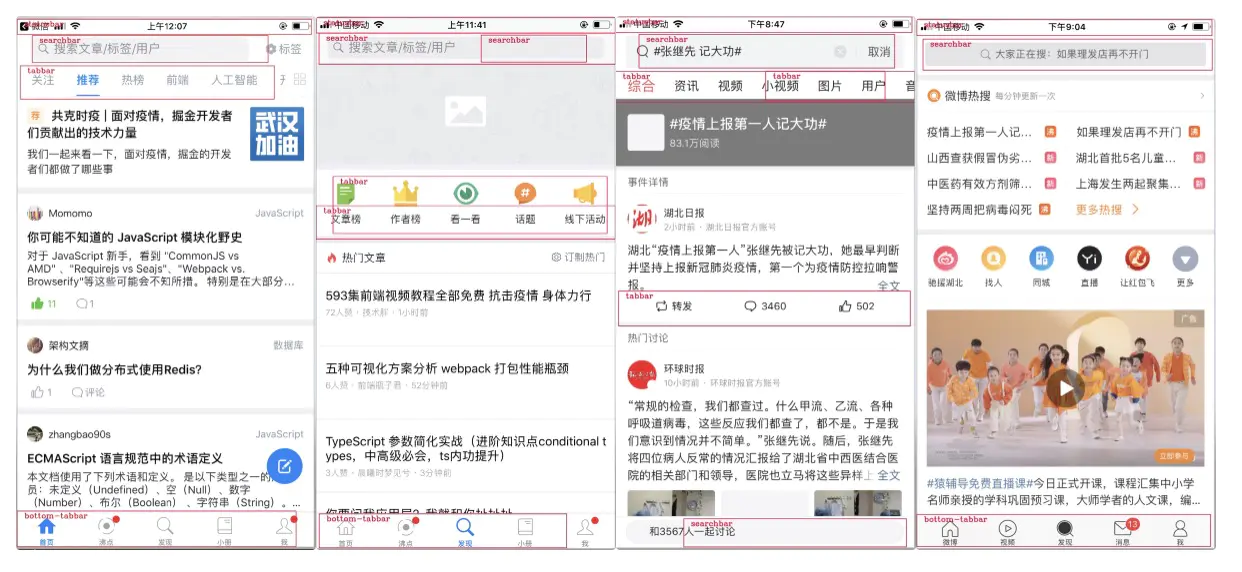
When we view the prediction results using non-Alibaba UIs, we can find some easily misidentified cases.
What we expect is that the model will return the predicted results when we input a picture. Therefore, after we obtain a model file, we need to generate a model service to receive a sample and return the prediction results.
from detectron2.config import get_cfg
from detectron2.engine.defaults import DefaultPredictor

with open('label.json') as f:
 mp = json.load(f)

cfg = get_cfg()
cfg.merge_from_file("./config/faster_rcnn_R_50_C4_3x.yaml")
cfg.MODEL.WEIGHTS = "./output/model_final.pth" # initialize from model zoo
cfg.MODEL.ROI_HEADS.NUM_CLASSES = len(mp) # only has one class (ballon)
cfg.MODEL.DEVICE='cpu'

model = DefaultPredictor(cfg)

def predict(image):
 im2 = cv2.imread(image)
 out = model(x)
 data = {'status': 200}
 data['content'] = trans_data(out)

# EAS python sdk
import spark

num_io_threads = 8
endpoint = '' # '127.0.0.1:8080'

spark.default_properties().put('rpc.keepalive', '60000')
context = spark.Context(num_io_threads)
queued = context.queued_service(endpoint)

while True:
 receive_data = srv.read()
 try:
 msg = json.loads(receive_data.decode())
 ret = predict(msg["image"])
 srv.write(json.dumps(ret).encode())
 except Exception as e:
 srv.error(500, str(e))
After the model is deployed, it can be called directly for prediction once the access link is obtained, for example, example.com/api/predict/detect
After a model is deployed, we can call it in our application to obtain prediction results (the component categories and bounding box in the visual draft). Then, we can compare the results with the JSON tree exported from the visual draft, so as to obtain a JSON description (the final JSON after processing is used as the input of DSL to generate code) containing the component information (the smart.layerProtocol.component field in D2C Schema).
const detectUrl = 'http://example.com/api/predict/detect';
const res = await request(detectUrl, {
 method: 'post',
 dataType: 'json',
 timeout: 1000 * 10,
 content: JSON.stringify({
 image: image,
 }),
});
const json = res.content;
For how to deploy and call the model service, see Alibaba Cloud Documentation for PAI.
Since our choice is the deep learning algorithms, which require a large number of training set samples, the number and quality of samples are an urgent problem for us to solve.
Currently, we have more than 25,000 sample UIs, which contain 10 categories. The automatically generated samples support 10 categories. However, the manually labelled UI samples are all from Alibaba products. Although the sample pictures are different, the design styles are similar and the design specifications are relatively uniform, which makes the component styles not rich enough, and the generalization ability of design drafts outside the Alibaba group is worse than that of the Alibaba products. Moreover, samples automatically generated according to certain randomized rules may differ from the actual samples in layout and style, making the quality of automatically generated samples impossible to evaluate.
In the future, we will consider adding datasets with a large number of samples in the industry to optimize the automatic sample generation logic and explore ways to evaluate the quality of automatically generated samples.
Two format specifications of dataset management in the object detection field are used: MS Common Objects in COntext (COCO) and Pascal VOC.
When the COCO format is used to manage datasets, an img folder is used for storing pictures and a JSON file is used for storing object information. All sample information is stored in the data.json file, which is difficult to manage when the data volume is large.
.
├── data.json
└── img
    ├── demoplus-20200216-1.png
    ├── demoplus-20200216-2.png
Images stores picture data. Annotations stores labeling data. Categories stores category data. The pictures, labeling, and categories of a sample are associated by using category_id and image_id.
{
    "images":[
        {
            "file_name":"demoplus-20200216-1.png",
            "url":"img/demoplus-20200216-1.png",
            "width":750,
            "height":2562,
            "id":1
        },
        {
            "file_name":"demoplus-20200216-2.png",
            "url":"img/demoplus-20200216-2.png",
            "width":750,
            "height":1334,
            "id":2
        }
    ],
    "annotations":[
        {
            "id":1,
            "image_id":2,
            "category_id":8,
            "category_name":"navbar",
            "bbox":[
                0,
                1,
                750,
                90
            ],
            "area":67500,
            "iscrowd":0
        }
    ],
    "categories":[
        {
            "id":8,
            "supercategory":"navbar",
            "name":"navbar"
        }
    ]
}VOC-format datasets have two folders. The Annotations folder is used to store the labeling data (XML files), and the JPEGImages folder is used to store picture data.
.
├── Annotations
│   ├── demoplus-20200216-1.xml
│ ├── demoplus-20200216-2.xml
└── JPEGImages
    ├── demoplus-20200216-1.png
    ├── demoplus-20200216-2.png
Example of XML file content:
<annotation>
  <folder>PASCAL VOC</folder>
  <filename>demo.jpg</filename> // File name
  <source> // Picture source
    <database>MOBILE-SAMPLE-GENERATOR</database>
    <annotation>MOBILE-SAMPLE-GENERATOR</annotation>
    <image>ANTD-MOBILE</image>
  </source>
  <size> // Picture size (length, width, and number of channels)
    <width>832</width>
    <height>832</height>
    <depth>3</depth>
  </size>
  <object> // Object information (category and bounding box)
    <name>navbar</name>
    <bndbox>
      <xmin>0</xmin>
      <ymin>0</ymin>
      <xmax>812</xmax>
      <ymax>45</ymax>
    </bndbox>
  </object>
<annotation>Imgcook 3.0 Series: Layout Algorithm – Design-based Code Generation
Low-Code/No-Code: From the Perspective of Frontend Intelligence

66 posts | 5 followers
FollowAlibaba F(x) Team - June 20, 2022
Alibaba F(x) Team - February 26, 2021
Alibaba Clouder - December 31, 2020
Alibaba F(x) Team - June 9, 2021
Alibaba F(x) Team - February 3, 2021
Alibaba F(x) Team - June 21, 2021

66 posts | 5 followers
Follow Platform For AI
A platform that provides enterprise-level data modeling services based on machine learning algorithms to quickly meet your needs for data-driven operations.
Learn More Epidemic Prediction Solution
This technology can be used to predict the spread of COVID-19 and help decision makers evaluate the impact of various prevention and control measures on the development of the epidemic.
Learn More Online Education Solution
This solution enables you to rapidly build cost-effective platforms to bring the best education to the world anytime and anywhere.
Learn More Accelerated Global Networking Solution for Distance Learning
Alibaba Cloud offers an accelerated global networking solution that makes distance learning just the same as in-class teaching.
Learn MoreMore Posts by Alibaba F(x) Team