By Xulun (from F(x) Team)
Can Machine Learning fix bugs automatically? It may be unreliable for many people. Whether it is reliable or not, we can try it ourselves, and everyone can learn it.
The problem can be hard and simple. Turn the code fragments with bugs and the code fragments after repair into data sets and use Machine Translation-like techniques for training. Then, predict how the new code will be fixed through the trained model. This idea and data set are from the paper entitled An Empirical Study on Learning Bug-Fixing Patches in the Wild via Neural Machine Translation.
The automatic code repair is simple. One is a code with bugs, and the other is a code after repair.
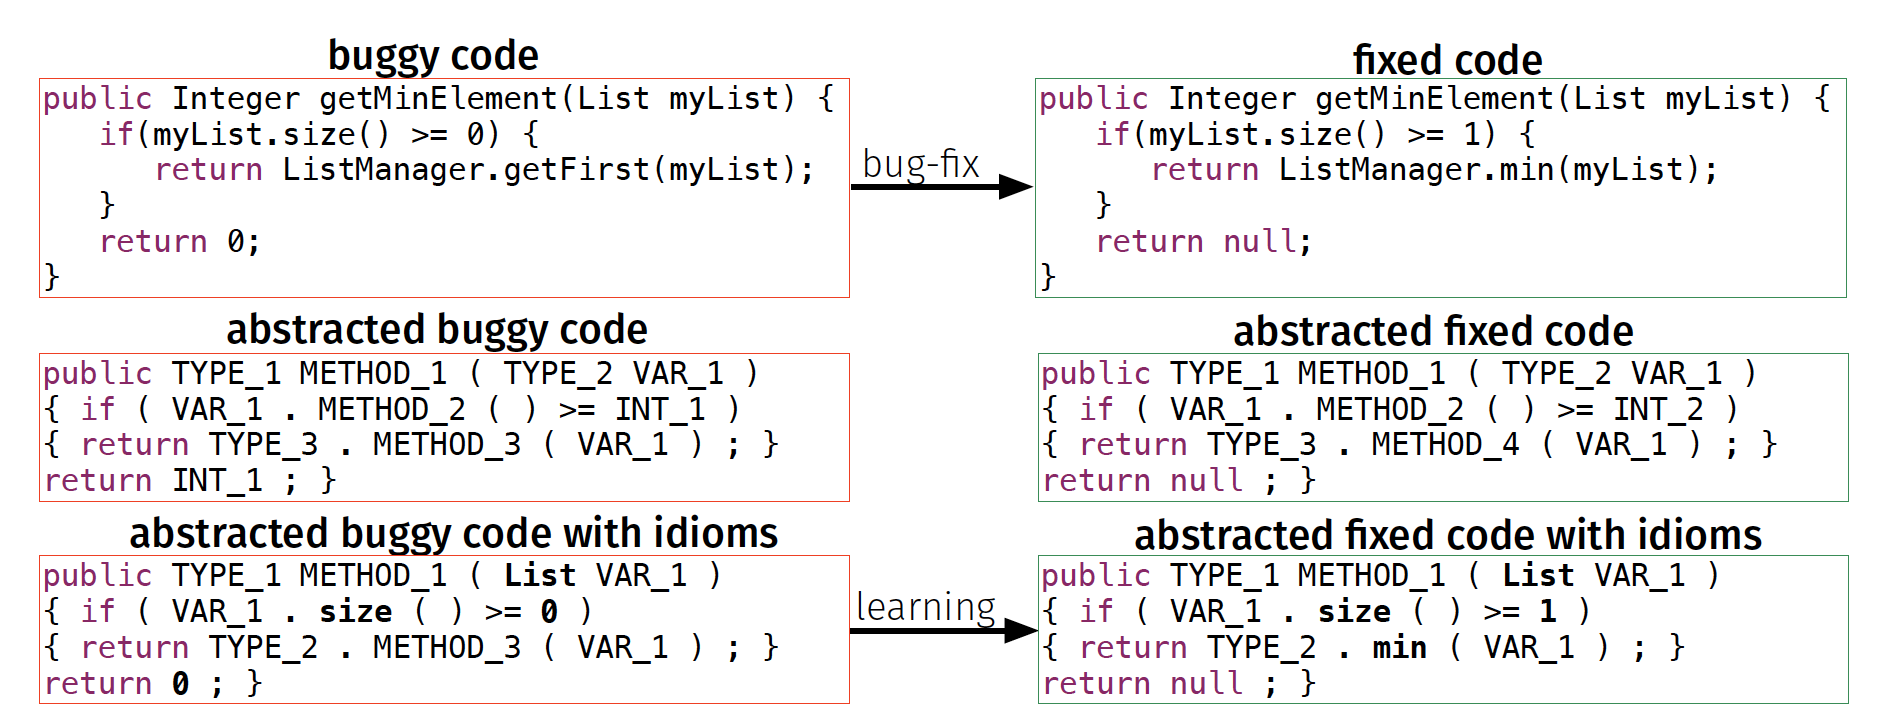
The main process is shown in the picture:

The author abstracts the code to adapt to the code more widely:

Look at an example from a dataset:
The code with bugs looks like this:
public java.lang.String METHOD_1 ( ) { return new TYPE_1 ( STRING_1 ) . format ( VAR_1 [ ( ( VAR_1 . length ) - 1 ) ] . getTime ( ) ) ; }After repair, it looks like this:
public java.lang.String METHOD_1 ( ) { return new TYPE_1 ( STRING_1 ) . format ( VAR_1 [ ( ( type ) - 1 ) ] . getTime ( ) ) ; }Microsoft has been leading the way in AI AI4SE, which serves software engineering. Let's learn how to use Microsoft's CodeBERT model to fix bugs automatically.
Step 1: Install the transformers framework since CodeBERT is based on the framework:
pip install transformers --userStep 2: Install PyTorch or Tensorflow as the backend of Transformers. If a driver can support the software, install the latest one:
pip install torch torchvision torchtext torchaudio --userStep 3: Download Microsoft's dataset:
git clone https://github.com/microsoft/CodeXGLUEThe dataset has been downloaded to CodeXGLUE/Code-Code/code-definition /data /, which is divided into small and medium datasets.
Let's practice with the small dataset first:
cd code
export pretrained_model=microsoft/codebert-base
export output_dir=./output
python run.py \
    --do_train \
    --do_eval \
    --model_type roberta \
    --model_name_or_path $pretrained_model \
    --config_name roberta-base \
    --tokenizer_name roberta-base \
    --train_filename ../data/small/train.buggy-fixed.buggy,../data/small/train.buggy-fixed.fixed \
    --dev_filename ../data/small/valid.buggy-fixed.buggy,../data/small/valid.buggy-fixed.fixed \
    --output_dir $output_dir \
    --max_source_length 256 \
    --max_target_length 256 \
    --beam_size 5 \
    --train_batch_size 16 \
    --eval_batch_size 16 \
    --learning_rate 5e-5 \
    --train_steps 100000 \
    --eval_steps 5000
It depends on the computing power of your machine. I trained for about one night with an NVIDIA 3090GPU. The model that works best is stored in output_dir/checkpoint-best-bleu/pytorch_model.bin.
Then we can test our training results with the test set:
python run.py \
    --do_test \
    --model_type roberta \
    --model_name_or_path roberta-base \
    --config_name roberta-base \
    --tokenizer_name roberta-base  \
    --load_model_path $output_dir/checkpoint-best-bleu/pytorch_model.bin \
    --dev_filename ../data/small/valid.buggy-fixed.buggy,../data/small/valid.buggy-fixed.fixed \
    --test_filename ../data/small/test.buggy-fixed.buggy,../data/small/test.buggy-fixed.fixed \
    --output_dir $output_dir \
    --max_source_length 256 \
    --max_target_length 256 \
    --beam_size 5 \
    --eval_batch_size 16
After half an hour of reasoning and calculation, the following is the output:
10/26/2021 11:51:57 - INFO - __main__ -   Test file: ../data/small/test.buggy-fixed.buggy,../data/small/test.buggy-fixed.fixed
100%|███████████████████████████████████████████████████████████████████████████████████████████████████████████████████████████████████████████████████████████████████████████████████████████████████████████████████████████████████████████| 365/365 [30:40<00:00,  5.04s/it]
10/26/2021 12:22:39 - INFO - __main__ -     bleu-4 = 79.26
10/26/2021 12:22:39 - INFO - __main__ -     xMatch = 16.3325
10/26/2021 12:22:39 - INFO - __main__ -     ********************
How can we evaluate the quality of the code we generate? Compare the output/test_1.output and output/test_1.gold. Use the following evaluator.py script:
python evaluator/evaluator.py -ref ./code/output/test_1.gold -pre ./code/output/test_1.outputThe following output is returned:
BLEU: 79.26 ; Acc: 16.33The former is a BLEU indicator describing the quality of NLP generation, and the latter is accuracy.
What is the level of this indicator? Compare with the baseline:
| Method | BLEU | Acc (100%) | CodeBLEU |
| Naive Copy | 78.06 | 0.0 | - |
| LSTM | 76.76 | 10.0 | - |
| Transformer | 77.21 | 14.7 | 73.31 |
| CodeBERT | 77.42 | 16.4 | 75.58 |
The accuracy does not seem to be high, but CodeBERT has improved 60% over the RNN technology used in the original paper.
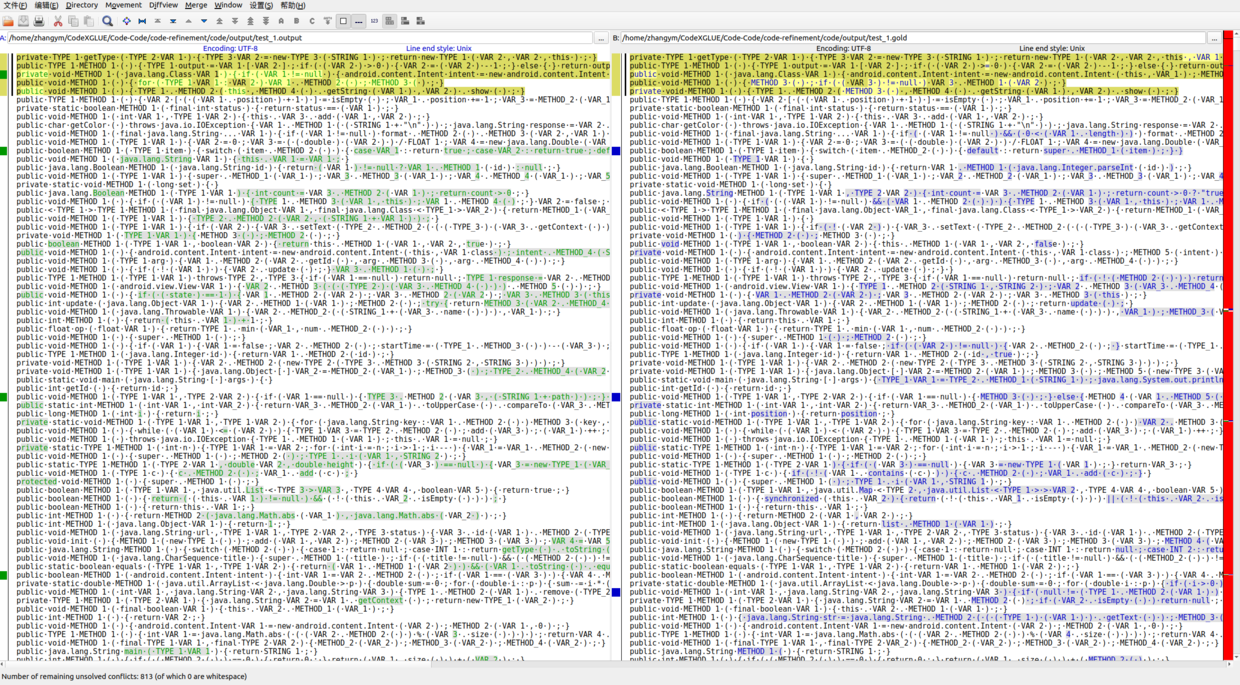
Use diff to intuitively feel the difference between the generated and the original:

With the increase of data, we can fix bugs automatically without much effort.
If fixing the bug automatically is far from practical, we can find the bug first. Don't underestimate the weak proposition of automatic bug discovery, which offers huge improvements in applicability and accuracy.
The data set for whether there is a bug is simple, as long as one field is used to mark whether there is a bug.
The dataset stored in the jsonl format is listed below:
{"project": "qemu", "commit_id": "aa1530dec499f7525d2ccaa0e3a876dc8089ed1e", "target": 1, "func": "static void filter_mirror_setup(NetFilterState *nf, Error **errp)\n{\n    MirrorState *s = FILTER_MIRROR(nf);\n    Chardev *chr;\n    chr = qemu_chr_find(s->outdev);\n    if (chr == NULL) {\n        error_set(errp, ERROR_CLASS_DEVICE_NOT_FOUND,\n                  \"Device '%s' not found\", s->outdev);\n    qemu_chr_fe_init(&s->chr_out, chr, errp);", "idx": 8}
{"project": "qemu", "commit_id": "21ce148c7ec71ee32834061355a5ecfd1a11f90f", "target": 1, "func": "static inline int64_t sub64(const int64_t a, const int64_t b)\n\n{\n\n\treturn a - b;\n\n}\n", "idx": 10}
There is no need to write any code. Start training directly:
python run.py \
    --output_dir=./saved_models \
    --model_type=roberta \
    --tokenizer_name=microsoft/codebert-base \
    --model_name_or_path=microsoft/codebert-base \
    --do_train \
    --train_data_file=../dataset/train.jsonl \
    --eval_data_file=../dataset/valid.jsonl \
    --test_data_file=../dataset/test.jsonl \
    --epoch 5 \
    --block_size 200 \
    --train_batch_size 32 \
    --eval_batch_size 64 \
    --learning_rate 2e-5 \
    --max_grad_norm 1.0 \
    --evaluate_during_training \
    --seed 123456
--seed 123456
The time is much shorter than the automatic repair, which only takes 20 minutes. Then, run the following test set:
python run.py \
    --output_dir=./saved_models \
    --model_type=roberta \
    --tokenizer_name=microsoft/codebert-base \
    --model_name_or_path=microsoft/codebert-base \
    --do_eval \
    --do_test \
    --train_data_file=../dataset/train.jsonl \
    --eval_data_file=../dataset/valid.jsonl \
    --test_data_file=../dataset/test.jsonl \
    --epoch 5 \
    --block_size 200 \
    --train_batch_size 32 \
    --eval_batch_size 64 \
    --learning_rate 2e-5 \
    --max_grad_norm 1.0 \
    --evaluate_during_training \
    --seed 123456
Calculate the accuracy:
python ../evaluator/evaluator.py -a ../dataset/test.jsonl -p saved_models/predictions.txtThe following result is returned:
{'Acc': 0.6288433382137628}Compare it with the mainstream results of the industry:
| Methods | ACC |
| BiLSTM | 59.37 |
| TextCNN | 60.69 |
| RoBERTa | 61.05 |
| CodeBERT | 62.08 |
The accuracy passes. The advantage of this method is easy-to-use and profitable. As long as more effective data is accumulated, its identification ability will continue to grow, which does not need input on maintenance.

66 posts | 5 followers
FollowAlibaba Cloud Community - July 29, 2022
Rupal_Click2Cloud - December 8, 2021
PM - C2C_Yuan - June 10, 2020
Ruiguang - February 25, 2021
Neel_Shah - June 24, 2025
Alibaba Cloud Community - March 2, 2022

66 posts | 5 followers
Follow Platform For AI
A platform that provides enterprise-level data modeling services based on machine learning algorithms to quickly meet your needs for data-driven operations.
Learn More Epidemic Prediction Solution
This technology can be used to predict the spread of COVID-19 and help decision makers evaluate the impact of various prevention and control measures on the development of the epidemic.
Learn More AI Acceleration Solution
Accelerate AI-driven business and AI model training and inference with Alibaba Cloud GPU technology
Learn More Resource Management
Organize and manage your resources in a hierarchical manner by using resource directories, folders, accounts, and resource groups.
Learn MoreMore Posts by Alibaba F(x) Team