By Tang Bingchang (Changpu)

With the rapid development of edge computing, more data needs to be stored, processed, and analyzed at the edge of the network. Devices and applications on the edge are growing rapidly. Managing the resources and applications efficiently on the edge has become a major challenge in the industry. Currently, the cloud-edge-end unification architecture has gained wide recognition in the industry. In this architecture, the cloud computing capability is delivered to the edge in a cloud-native way and is scheduled and managed on the cloud in a unified manner.
In May 2020, OpenYurt, Alibaba's first cloud-native edge computing project with non-intrusive Kubernetes, was opened to developers. It entered the Cloud-Native Computing Foundation (CNCF) Sandbox in September of the same year. OpenYurt is an enhancement for native Kubernetes in a non-intrusive way to address issues, such as network instability and O&M difficulties in edge scenarios. It provides features, such as edge node autonomy, cloud-edge O&M channels, and edge unitization.
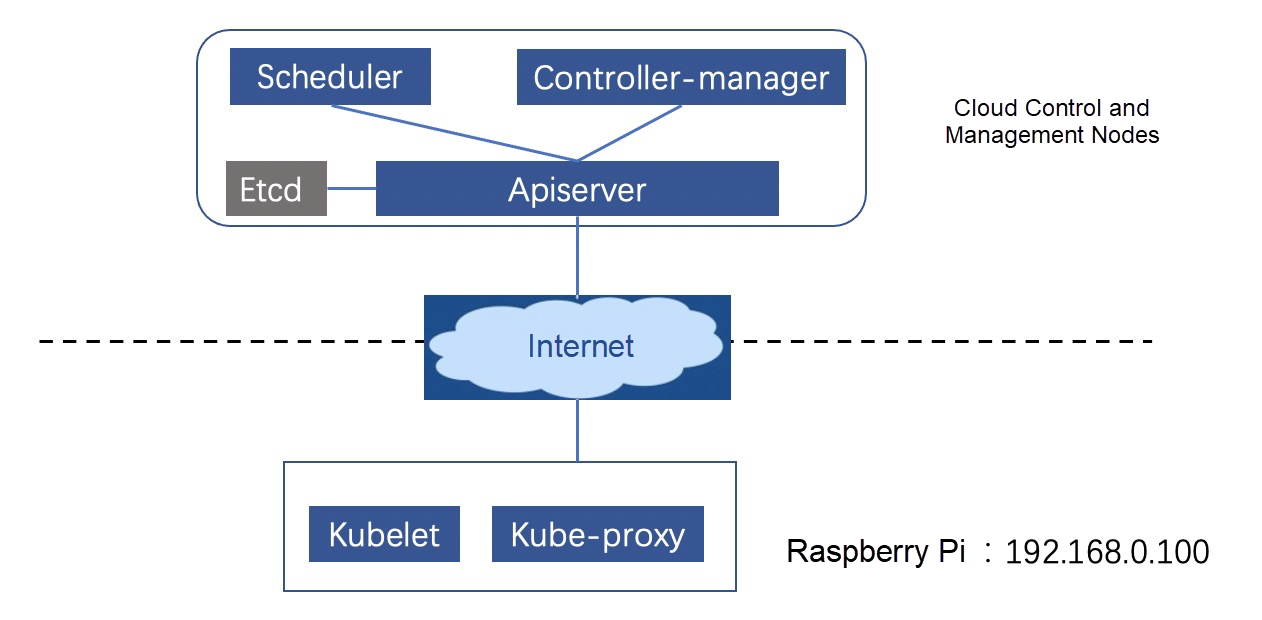
As shown in Figure 1, this article explains how to deploy a control plane of Kubernetes clusters on the cloud and connect Raspberry Pi to clusters to build cloud-channel-edge scenarios. Based on this, the core capabilities of OpenYurt will be demonstrated to help you get started with OpenYurt quickly.

Figure 1: Native Kubernetes cluster
The control components of the native Kubernetes clusters can be deployed on the cloud by purchasing the Edge Node Service (ENS). ENS nodes are equipped with public IP addresses so services can be exposed through the public network. The system uses Ubuntu18.04 with master-node as the hostname. The version of Docker is 19.03.5.
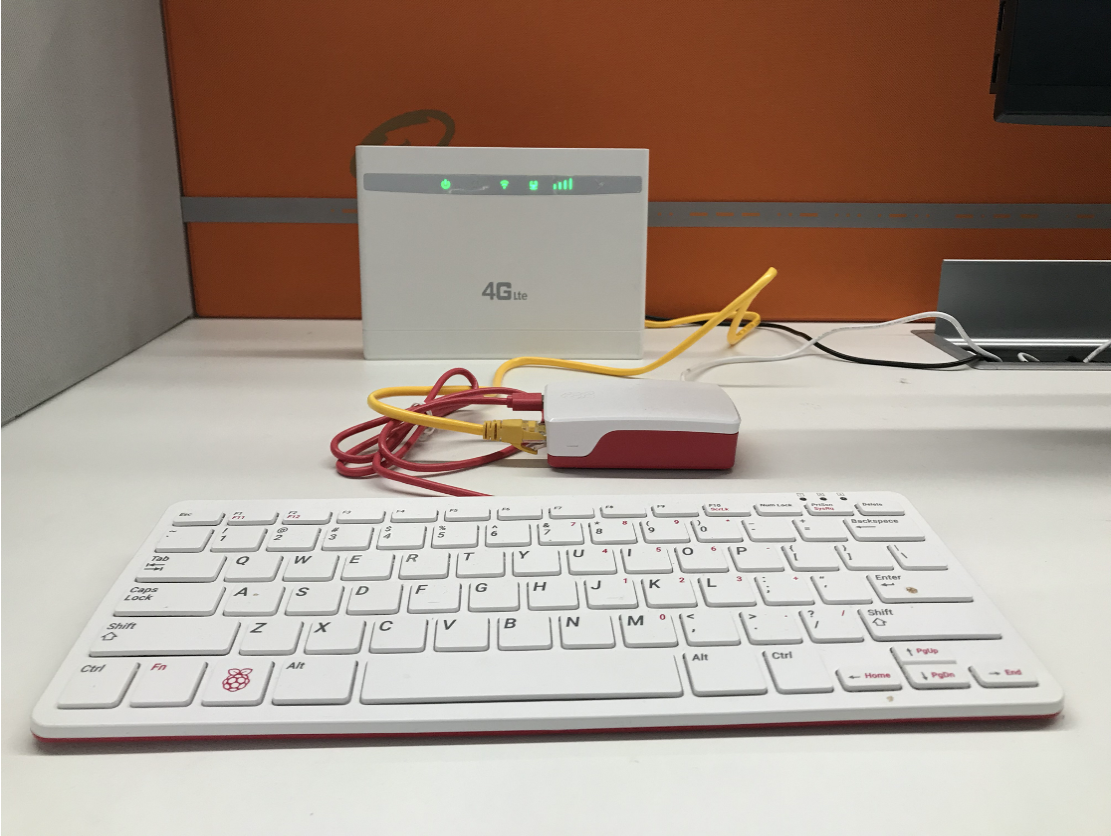
As shown in Figure 2, on the edge, Raspberry Pi 4 is connected with the local router to form an edge private network environment. The router accesses the Internet through a 4G network card. The pre-installed system of the Raspberry Pi 4 is Ubuntu18.04 with edge-node as the hostname, and the version of Docker is 19.03.5.

Figure 2: Stereogram of the Edge Environment
The environment of this article is based on Kubernetes 1.16.6. Clusters are constructed through kubeadm provided by the community. The procedure is listed below:
curl -s https://mirrors.aliyun.com/kubernetes/apt/doc/apt-key.gpg | sudo apt-key add -
echo "deb https://mirrors.aliyun.com/kubernetes/apt/ kubernetes-xenial main" > /etc/apt/sources.list.d/kubernetes.list
sudo apt-get update
sudo apt install -y kubelet=1.16.6-00 kubeadm=1.16.6-00 kubectl=1.16.6-00# master-node
kubeadm init --image-repository=registry.cn-hangzhou.aliyuncs.com/edge-kubernetes --kubernetes-version=v1.16.6 --pod-network-cidr=10.244.0.0/16After the initialization is completed, copy the config file to the $HOME/.kube file.
mkdir -p $HOME/.kube
sudo cp -i /etc/kubernetes/admin.conf $HOME/.kube/configkubeadm join 183.195.233.42:6443 --token XXXX \
--discovery-token-ca-cert-hash XXXX/etc/cni/net.d/0-loopback.conf and copy the following content to the file.
{
 "cniVersion": "0.3.0",
 "name": "lo",
 "type": "loopback"
}NAME STATUS ROLES AGE VERSION INTERNAL-IP EXTERNAL-IP OS-IMAGE KERNEL-VERSION CONTAINER-RUNTIME
edge-node Ready <none> 74s v1.16.6 192.168.0.100 <none> Ubuntu 18.04.4 LTS 4.19.105-v8-28 docker://19.3.5
master-node Ready master 2m5s v1.16.6 183.195.233.42 <none> Ubuntu 18.04.2 LTS 4.15.0-52-generic docker://19.3.5kubectl delete deployment coredns -n kube-system
kubectl taint node master-node node-role.kubernetes.io/master-Based on the preceding environment, let's test the native Kubernetes support for O&M on cloud-edge and its reaction to the disconnection of the cloud-edge network in the cloud-channel-edge architecture. First, deploy the test application NGINX on the cloud and run kubectl apply -f nginx.yaml on the master node. The specific deployment is listed below:
Note: Select edge-node for nodeSelector. Set host network to true, and set the pod tolerance time to 5 seconds. The default value is 5 minutes. The configuration here is for demonstrating pod evictions.
apiVersion: v1
kind: Pod
metadata:
 name: nginx
spec:
 tolerations:
 - key: "node.kubernetes.io/unreachable"
 operator: "Exists"
 effect: "NoExecute"
 tolerationSeconds: 5
 - key: "node.kubernetes.io/not-ready"
 operator: "Exists"
 effect: "NoExecute"
 tolerationSeconds: 5
 nodeSelector:
 kubernetes.io/hostname: edge-node
 containers:
 - name: nginx
 image: nginx
 hostNetwork: true
Check the deployment results
root@master-node:~# kubectl get pods -owide
NAME    READY   STATUS    RESTARTS   AGE   IP              NODE        NOMINATED NODE   READINESS GATES
nginx 1/1 Running 0 11s 192.168.0.100 edge-node <none> <none>For the O&M of edge node applications on the master node, run logs, exec, port-forward, and other instructions to view the results
root@master-node:~# kubectl logs nginx
Error from server: Get https://192.168.0.100:10250/containerLogs/default/nginx/nginx: dial tcp 192.168.0.100:10250: connect: connection refused

root@master-node:~# kubectl exec -it nginx sh
kubectl exec [POD] [COMMAND] is DEPRECATED and will be removed in a future version. Use kubectl exec [POD] -- [COMMAND] instead.
Error from server: error dialing backend: dial tcp 192.168.0.100:10250: connect: connection refused

root@master-node:~# kubectl port-forward pod/nginx 8888:80
error: error upgrading connection: error dialing backend: dial tcp 192.168.0.100:10250: connect: connection refused
The results show that native Kubernetes cannot provide cloud O&M for edge applications in cloud-channel-edge scenarios because edge nodes are deployed in users' private network environments. The edge nodes cannot be accessed directly from the cloud through the IP addresses of the edge nodes.
The edge nodes are connected to the cloud management through the public network. However, the network is often unstable, and the cloud is disconnected. There are two disconnection-related tests listed below:
Observe the status changes of the nodes and pods during the two tests. In this article, the network disconnection works by disconnecting the public network of routers.
After the network is disconnected, the node state changes to NotReady about 40 seconds later. A normal node reports a heartbeat every 10 seconds. If it does not report a heartbeat four times, the control component considers the node abnormal.
root@master-node:~# kubectl get nodes
NAME STATUS ROLES AGE VERSION
edge-node NotReady <none>   5m13s   v1.16.6
master-node   Ready      master   6m4s    v1.16.6
After waiting for 5 seconds, application pods are expelled, and the state is changed to Terminating. Generally, the pods are expelled 5 minutes after the normal nodes become NotReady. Here, the tolerance time of pods is set to 5 seconds to test the result.
root@master-node:~# kubectl get pods
NAME READY STATUS RESTARTS AGE
nginx 1/1 Terminating 0 3m45s
Restore the network and observe the changes of the nodes and pods
root@master-node:~# kubectl get pods
No resources found in default namespace.
After the network connection is restored, the node state becomes Ready, and the business pod is cleared because kubelet on the edge node obtains the Terminating status of the business pod. Then, it deletes the business pod and returns the result of the successful deletion operation. The cloud is also cleaned up accordingly. At this point, the business pod is evicted due to the instability of the cloud-edge network. However, during the network disconnection, the edge node can work normally.
Re-create the application NGINX for the following test:
root@master-node:~# kubectl get pods -owide
NAME READY STATUS RESTARTS AGE IP NODE NOMINATED NODE READINESS GATES
nginx 1/1 Running 0 4s 192.168.0.100 edge-node <none> <none>Next, we tested the impact of the edge node restart on the business because of the network disconnection. One minute after the network disconnection, the nodes and pods are in the same state as the preceding test results. The Node is in the NotReady state, and the Pod is in the Terminating state. Switch to the private network environment to log on to the Raspberry Pi and restart it. After the restarting, wait for about 1 minute to check the container list on the nodes before and after the restart.
The following shows the container list on the edge nodes before restarting. The cloud and edge are disconnected. Although the pod obtained on the cloud is in the Terminating state, the Terminating operation is not watched by the edge. Therefore, the applications on the edge are running normally.
root@edge-node:~# docker ps
CONTAINER ID IMAGE COMMAND CREATED STATUS PORTS NAMES
9671cbf28ca6 e86f991e5d10 "/docker-entrypoint.…" About a minute ago Up About a minute k8s_nginx_nginx_default_efdf11c6-a41c-4b95-8ac8-45e02c9e1f4d_0
6272a46f93ef registry.cn-hangzhou.aliyuncs.com/edge-kubernetes/pause:3.1 "/pause" 2 minutes ago Up About a minute k8s_POD_nginx_default_efdf11c6-a41c-4b95-8ac8-45e02c9e1f4d_0
698bb024c3db f9ea384ddb34 "/usr/local/bin/kube…" 8 minutes ago Up 8 minutes k8s_kube-proxy_kube-proxy-rjws7_kube-system_51576be4-2b6d-434d-b50b-b88e2d436fef_0
31952700c95b registry.cn-hangzhou.aliyuncs.com/edge-kubernetes/pause:3.1 "/pause" 8 minutes ago Up 8 minutes k8s_POD_kube-proxy-rjws7_kube-system_51576be4-2b6d-434d-b50b-b88e2d436fef_0
The following shows the container list on nodes after restarting. After the network is restored, kubelet cannot obtain pod information from the cloud and does not re-create pods.
root@edge-node:~# docker ps
CONTAINER ID IMAGE COMMAND CREATED STATUS PORTS NAMES
root@edge-node:~#
After comparing the states before and after restarting, you can see that all pods on the edge node cannot be restored after the network is disconnected and restarted. In this case, when the cloud-edge becomes disconnected, applications cannot work once nodes are restarted.
Restore the network and observe the changes of the nodes and pods. As shown in the preceding test results, after the network is recovered, the nodes become Ready, and the business pods are cleared.
root@master-node:~# kubectl get nodes
NAME STATUS ROLES AGE VERSION
edge-node Ready <none>   11m   v1.16.6
master-node   Ready    master   12m   v1.16.6
root@master-node:~# kubectl get pods
No resources found in default namespace.
Next, deploy NGINX again to test OpenYurt clusters support for cloud-edge O&M and its response to cloud-edge network disconnection
root@master-node:~# kubectl get pods -owide
NAME READY STATUS RESTARTS AGE IP NODE NOMINATED NODE READINESS GATES
nginx 1/1 Running 0 12s 192.168.0.100 edge-node <none> <none>After exploring the shortcomings of native Kubernetes in the cloud-edge unification architecture, it is time to check whether this architecture is supported in the OpenYurt clusters. Now, the cluster conversion tool yurtctl provided by the OpenYurt community converts the native Kubernetes clusters to the OpenYurt clusters. Run the command below on the master node. The command designates the component image and cloud node and installs the cloud-edge operation channel yurt-tunnel.
yurtctl convert --yurt-controller-manager-image=registry.cn-hangzhou.aliyuncs.com/openyurt/yurt-controller-manager:v0.2.1 --yurt-tunnel-agent-image=registry.cn-hangzhou.aliyuncs.com/openyurt/yurt-tunnel-agent:v0.2.1 --yurt-tunnel-server-image=registry.cn-hangzhou.aliyuncs.com/openyurt/yurt-tunnel-server:v0.2.1 --yurtctl-servant-image=registry.cn-hangzhou.aliyuncs.com/openyurt/yurtctl-servant:v0.2.1 --yurthub-image=registry.cn-hangzhou.aliyuncs.com/openyurt/yurthub:v0.2.1 --cloud-nodes=master-node --deploy-yurttunnelThe conversion takes about 2 minutes. After the conversion is completed, check the status of the business pods. You can see the conversion has no impact on the business pods. The kubectl get pod -w command can also be used to observe the status of the business pods at a new terminal during the conversion process.
root@master-node:~# kubectl get pods -owide
NAME READY STATUS RESTARTS AGE IP NODE NOMINATED NODE READINESS GATES
nginx 1/1 Running 0 2m4s 192.168.0.100 edge-node <none>           <none>
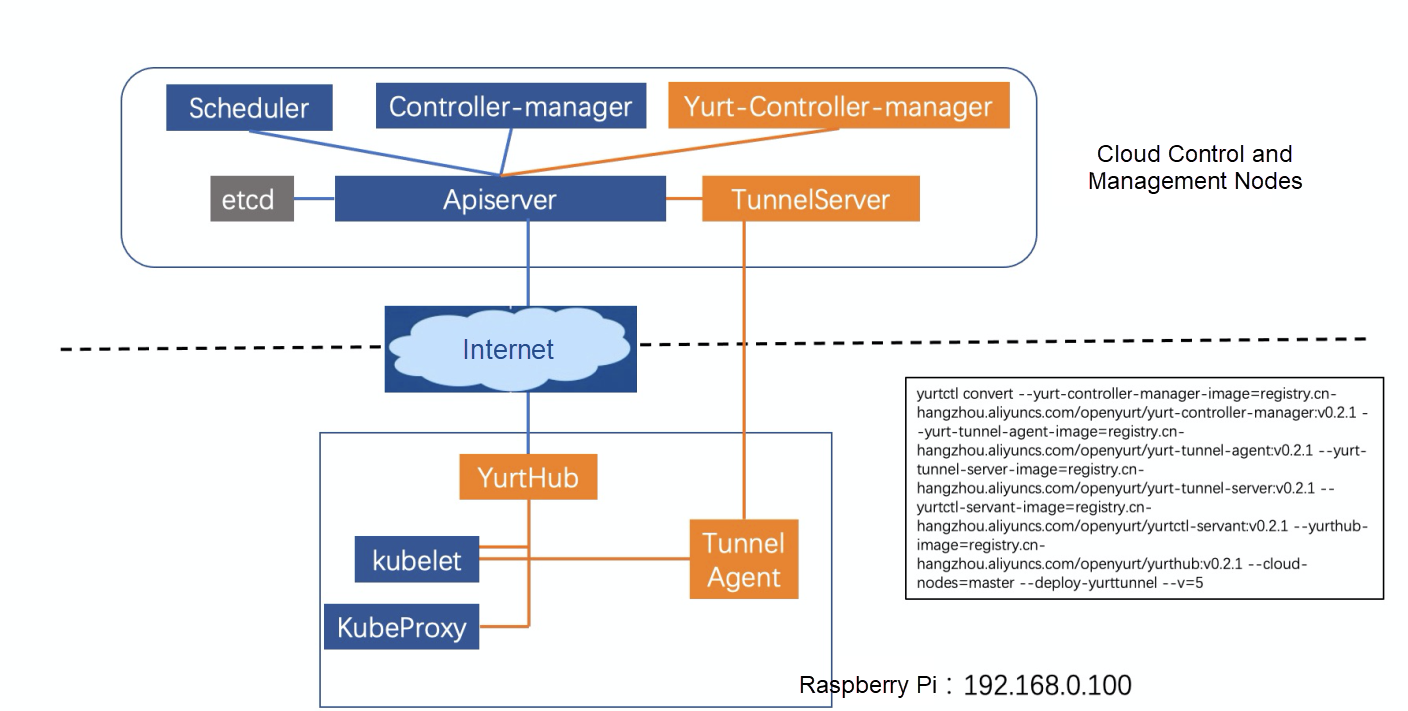
The distribution of the components after the conversion is shown in Figure 3. The orange parts are OpenYurt components, and the blue parts are native Kubernetes components. Accordingly, we observe the pods on the cloud and edge nodes.

Figure 3: Distribution of OpenYurt Cluster Components
There are two pods related to the yurt cloud nodes, yurt-controller-manager and yurt-tunnel-server.
root@master-node:~# kubectl get pods --all-namespaces -owide | grep master | grep yurt
kube-system yurt-controller-manager-7d9db5bf85-6542h 1/1 Running 0 103s 183.195.233.42 master-node <none>           <none>
kube-system   yurt-tunnel-server-65784dfdf-pl5bn         1/1     Running   0          103s    183.195.233.42   master-node   <none>           <none>
The yurt-hub (static pod) and yurt-tunnel-agent pods are added to the edge node.
root@master-node:~# kubectl get pods --all-namespaces -owide | grep edge | grep yurt
kube-system yurt-hub-edge-node 1/1 Running 0 117s 192.168.0.100 edge-node <none>           <none>
kube-system yurt-tunnel-agent-7l8nv 1/1 Running 0 2m 192.168.0.100 edge-node <none> <none>root@master-node:~# kubectl logs nginx
/docker-entrypoint.sh: /docker-entrypoint.d/ is not empty, will attempt to perform configuration
/docker-entrypoint.sh: Looking for shell scripts in /docker-entrypoint.d/
/docker-entrypoint.sh: Launching /docker-entrypoint.d/10-listen-on-ipv6-by-default.sh
10-listen-on-ipv6-by-default.sh: info: Getting the checksum of /etc/nginx/conf.d/default.conf
10-listen-on-ipv6-by-default.sh: info: Enabled listen on Ipv6 in /etc/nginx/conf.d/default.conf
/docker-entrypoint.sh: Launching /docker-entrypoint.d/20-envsubst-on-templates.sh
/docker-entrypoint.sh: Configuration complete; ready for start up
root@master-node:~# kubectl exec -it nginx sh
kubectl exec [POD] [COMMAND] is DEPRECATED and will be removed in a future version. Use kubectl exec [POD] – [COMMAND] instead.
# ls
bin dev docker-entrypoint.sh home media opt root sbin sys usr
boot docker-entrypoint.d etc lib mnt proc run srv tmp var
# exit
root@master-node:~# kubectl port-forward pod/nginx 8888:80
Forwarding from 127.0.0.1:8888 -> 80
Handling connection for 8888When testing port-forward, run curl 127.0.0.1:8888 on the master node to access the NGINX service.
The demonstration shows that OpenYurt can support common cloud-edge O&M instructions.
Similarly, we repeat the two tests of network disconnection in the native Kubernetes. Before the tests, enable the autonomy for the edge node. In the OpenYurt clusters, the autonomy of edge nodes is identified by an annotation.
root@master-node:~# kubectl annotate node edge-node node.beta.alibabacloud.com/autonomy=true
node/edge-node annotatedSimilarly, disconnect the public network of router and check the states of nodes and pods. After about 40 seconds, the state of the node changes to NotReady. After about 1 minute, the state of the pods remains Running and pods are not evicted.
root@master-node:~# kubectl get nodes
NAME STATUS ROLES AGE VERSION
edge-node NotReady <none>   24m   v1.16.6
master-node   Ready      master   25m   v1.16.6
root@master-node:~# kubectl get pods
NAME    READY   STATUS    RESTARTS   AGE
nginx   1/1     Running   0          5m7s
Restore the network and check the states of nodes and pods. The nodes change to Ready, and the pods remain Running. This shows that when the cloud-edge network is unstable, it has no impact on the business pods on the edge node.
root@master-node:~# kubectl get nodes
NAME STATUS ROLES AGE VERSION
edge-node Ready <none>   25m   v1.16.6
master-node   Ready    master   26m   v1.16.6
root@master-node:~# kubectl get pods
NAME    READY   STATUS    RESTARTS   AGE
nginx 1/1 Running 0 6m30sNext, we test the impact of the edge node restart on the business because of the network disconnection. One minute after the network disconnection, the nodes and pods are in the same states as the preceding test results. Nodes are in the NotReady state, and pods are in the Running state. Similarly, log on to Raspberry Pi to restart Raspberry Pi and view the container list on the nodes before and after the restart.
The edge node container list before restart is shown below:
root@edge-node:~# docker ps
CONTAINER ID IMAGE COMMAND CREATED STATUS PORTS NAMES
38727ec9270c 70bf6668c7eb "yurthub --v=2 --ser…" 7 minutes ago Up 7 minutes k8s_yurt-hub_yurt-hub-edge-node_kube-system_d75d122e752b90d436a71af44c0a53be_0
c403ace1d4ff registry.cn-hangzhou.aliyuncs.com/edge-kubernetes/pause:3.1 "/pause" 7 minutes ago Up 7 minutes k8s_POD_yurt-hub-edge-node_kube-system_d75d122e752b90d436a71af44c0a53be_0
de0d693e9e74 473ae979be68 "yurt-tunnel-agent -…" 7 minutes ago Up 7 minutes k8s_yurt-tunnel-agent_yurt-tunnel-agent-7l8nv_kube-system_75d28494-f577-43fa-9cac-6681a1215498_0
a0763f143f74 registry.cn-hangzhou.aliyuncs.com/edge-kubernetes/pause:3.1 "/pause" 7 minutes ago Up 7 minutes k8s_POD_yurt-tunnel-agent-7l8nv_kube-system_75d28494-f577-43fa-9cac-6681a1215498_0
80c247714402 e86f991e5d10 "/docker-entrypoint.…" 7 minutes ago Up 7 minutes k8s_nginx_nginx_default_b45baaac-eebc-466b-9199-2ca5c1ede9fd_0
01f7770cb0f7 registry.cn-hangzhou.aliyuncs.com/edge-kubernetes/pause:3.1 "/pause" 7 minutes ago Up 7 minutes k8s_POD_nginx_default_b45baaac-eebc-466b-9199-2ca5c1ede9fd_0
7e65f83090f6 f9ea384ddb34 "/usr/local/bin/kube…" 17 minutes ago Up 17 minutes k8s_kube-proxy_kube-proxy-rjws7_kube-system_51576be4-2b6d-434d-b50b-b88e2d436fef_1
c1ed142fc75b registry.cn-hangzhou.aliyuncs.com/edge-kubernetes/pause:3.1 "/pause" 17 minutes ago Up 17 minutes k8s_POD_kube-proxy-rjws7_kube-system_51576be4-2b6d-434d-b50b-b88e2d436fef_1
The edge node containers list after restart is shown below:
root@edge-node:~# docker ps
CONTAINER ID IMAGE COMMAND CREATED STATUS PORTS NAMES
0c66b87066a0 473ae979be68 "yurt-tunnel-agent -…" 12 seconds ago Up 11 seconds k8s_yurt-tunnel-agent_yurt-tunnel-agent-7l8nv_kube-system_75d28494-f577-43fa-9cac-6681a1215498_2
a4fb3e4e8c8f e86f991e5d10 "/docker-entrypoint.…" 58 seconds ago Up 56 seconds k8s_nginx_nginx_default_b45baaac-eebc-466b-9199-2ca5c1ede9fd_1
fce730d64b32 f9ea384ddb34 "/usr/local/bin/kube…" 58 seconds ago Up 57 seconds k8s_kube-proxy_kube-proxy-rjws7_kube-system_51576be4-2b6d-434d-b50b-b88e2d436fef_2
c78166ea563f registry.cn-hangzhou.aliyuncs.com/edge-kubernetes/pause:3.1 "/pause" 59 seconds ago Up 57 seconds k8s_POD_yurt-tunnel-agent-7l8nv_kube-system_75d28494-f577-43fa-9cac-6681a1215498_1
799ad14bcd3b registry.cn-hangzhou.aliyuncs.com/edge-kubernetes/pause:3.1 "/pause" 59 seconds ago Up 57 seconds k8s_POD_nginx_default_b45baaac-eebc-466b-9199-2ca5c1ede9fd_1
627673da6a85 registry.cn-hangzhou.aliyuncs.com/edge-kubernetes/pause:3.1 "/pause" 59 seconds ago Up 58 seconds k8s_POD_kube-proxy-rjws7_kube-system_51576be4-2b6d-434d-b50b-b88e2d436fef_2
04da705e4120 70bf6668c7eb "yurthub --v=2 --ser…" About a minute ago Up About a minute k8s_yurt-hub_yurt-hub-edge-node_kube-system_d75d122e752b90d436a71af44c0a53be_1
260057d935ee registry.cn-hangzhou.aliyuncs.com/edge-kubernetes/pause:3.1 "/pause" About a minute ago Up About a minute k8s_POD_yurt-hub-edge-node_kube-system_d75d122e752b90d436a71af44c0a53be_1
After comparing the state before and after restarting, you can see that the pods on the nodes can be started normally after the network is disconnected and restarted. OpenYurt's node autonomy capability can ensure stable business operation under the network disconnection.
Restore the network, and the nodes are in the Ready state. Then, observe the status of the business pod. After the network is recovered, the business pod remains in the running state with a restart record, which meets the expectation.
root@master-node:~# kubectl get pods -owide
NAME READY STATUS RESTARTS AGE IP NODE NOMINATED NODE READINESS GATES
nginx 1/1 Running 1 11m 192.168.0.100 edge-node <none>           <none>
Finally, we use yurtctl to convert the OpenYurt clusters to native Kubernetes clusters. Similarly, you can see there is no impact on existing business during the conversion process.
yurtctl revert --yurtctl-servant-image=registry.cn-hangzhou.aliyuncs.com/openyurt/yurtctl-servant:v0.2.1As Alibaba's first cloud-native and open-source edge computing project, OpenYurt has been tested for a long time within Alibaba Group based on the commercial product ACK@Edge. It has been used in CDN, IoT, Hema Fresh, ENS, Cainiao, and many other scenarios. For edge scenarios, the project adheres to the native Kubernetes features and provides capabilities, such as edge node autonomy and cloud-edge-end unification O&M channel in the form of Addon. Thanks to the efforts of community members, we have released some open-source management capabilities of edge unitization. More edge management capabilities will be released in the future. Your participation and contribution are welcomed.
How Long Will It Take before Java Developers Can Utilize Serverless?

634 posts | 55 followers
FollowAlibaba Clouder - January 11, 2019
GXIC - June 11, 2019
GXIC - February 25, 2019
GXIC - January 7, 2019
GXIC - June 11, 2019
Hiteshjethva - October 31, 2019

634 posts | 55 followers
Follow Link IoT Edge
Link IoT Edge allows for the management of millions of edge nodes by extending the capabilities of the cloud, thus providing users with services at the nearest location.
Learn More Function Compute
Alibaba Cloud Function Compute is a fully-managed event-driven compute service. It allows you to focus on writing and uploading code without the need to manage infrastructure such as servers.
Learn More Elastic High Performance Computing Solution
High Performance Computing (HPC) and AI technology helps scientific research institutions to perform viral gene sequencing, conduct new drug research and development, and shorten the research and development cycle.
Learn More Quick Starts
Deploy custom Alibaba Cloud solutions for business-critical scenarios with Quick Start templates.
Learn MoreMore Posts by Alibaba Cloud Native Community