By Zhang Zhen, Senior Technical Expert at Alibaba Cloud
Every Kubernetes resource object includes two nested object fields comprising of the object specifications and the object status. The specification describes the desired state for the object, while the status describes the actual state.
This article introduces metadata, which is an integral part of Kubernetes. Metadata includes labels for identifying resources, annotations for describing resources, and OwnerReferences for describing the relationship between resources. The metadata is critical to the running of Kubernetes.
The first and most important item of metadata is a resource label. Resource labels are key-value metadata used for identifying objects. The following figure shows several common labels.
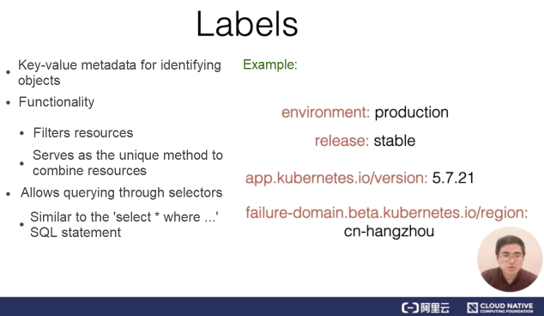
The first three labels are attached to pods, which are a type of object in Kubernetes. These labels identify the corresponding application environment, the maturity of the release, and the application version, respectively. As shown in the example of an application label, the label name contains a domain name prefix, which describes the labeling system and tool. In contrast, the last label is attached to a node. In this label, the version ID, which is a beta string, is added before the domain name.
Labels are used to filter and combine resources. Run SQL select statements to query resources by label.
The most common type of selector is the equality-based selector. Refer to the following figure for a simple example.
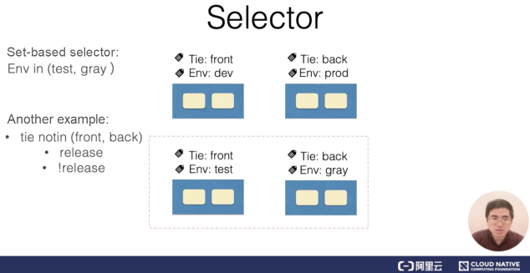
Assume that the system contains four pods, each of which has a label that identifies a system tier and environment. In this case, use the tie, front label to match the pods in the left sidebar. An equality-based selector contains multiple equality-based requirements that are in the logical "AND" relationship.
In the preceding example, the selector with the Tie = front and Env = dev requirements perform filtering to obtain all the pods that meet both requirements. These pods are shown in the upper-left corner of the figure. Another type of selector is the set-based selector. In this example, the selector filters out all the pods that meet the Env = test or Env = gray requirement.
In addition to the INSET operations, the selector performs NOTIN set operations. For example, if the selector filters pods based on the tie NOTIN (front,back) requirement, the selector obtains all the pods whose tier (that is, "tie" in this article) is neither front nor back. The selector may also perform filtering to obtain all the pods that contain a specific label. For example, if the label contains "release," the selector obtains all the pods that are labeled with "release." Set-based selectors and equality-based selectors may also use commas () to identify the logical "AND" relationship.
Annotations represent another important item of metadata. Generally, a system or tool uses annotations to store non-identifying information of resources and extend the spec and status descriptions of the resources. Here are several examples of annotations.
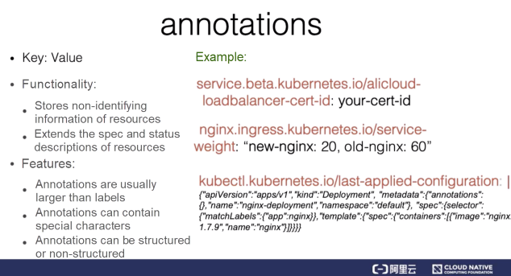
In the first example, the annotation stores the certificate ID of the Alibaba Cloud load balancer. An annotation may also contain a domain name prefix and version information. The second annotation stores the configuration information of the Nginx ingress layer. Observe that the annotation contains special characters such as a comma (,), which are not permitted in labels. The third annotation is commonly seen in resources after the kubectl apply command is run. The annotation value is structured and is actually a JSON string, which annotates the JSON-based description of the resource previously operated by kubectl.
OwnerReferences are the last item of metadata. Owners generally refer to set-based resources. For example, pod sets include ReplicaSets and StatefulSets, which will be described in subsequent articles.
Controllers for set-based resources create corresponding owned resources. For example, when the ReplicaSet controller creates a pod during an operation, the OwnerReference of the created pod points to the ReplicaSet controller that creates the pod. The OwnerReference allows users to conveniently find an object that creates a resource and implement cascading deletion.
First, run a kubectl command to connect to a Kubernetes cluster that has been created in Alibaba Cloud Container Service for Kubernetes (ACK). Then, let's take a look at how to view and modify metadata in a Kubernetes object. The metadata includes a label, an annotation, and the corresponding OwnerReference of a pod.
Let's begin with checking the current configuration of the cluster.
Step 1) Check the configuration of pods in the cluster. The output indicates that no pod exists.
kubectl get podsStep 2) Create two pods by using the preset respective YAML files for the two pods.
kubectl apply -f pod1.yamlkubectl apply -f pod2.yamlStep 3) Check the labels attached to the pods. With the --show-labels option, each of the two pods is labeled with a deployment environment and a tier.
kubectl get pods --show-labelsStep 4) You may also use another method to view detailed resource information. First, view the information about the first pod of nginx1. Then, output the information by using -o yaml. Observe that the metadata of this pod contains the labels field whose value has two labels.
kubectl get pods nginx1 -o yaml | lessStep 5) Modify the existing label of a pod by first changing the pod's deployment environment from the development environment to the test environment. Then, specify a pod name, and add the "test" value to the environment label to check whether the modification is successful. In this case, an error is reported, which indicates that the label already has a value.
kubectl label pods nginx1 env=testStep 6) To overwrite the existing label value, add the overwrite option. The labeling is successful, post this addition.
kubectl label pods nginx1 env=test -overwriteStep 7) Check the current label settings of the cluster. The label that indicates the deployment environment "test" is added to nginx1.
kubectl get pods --show-labelsStep 8) To remove a label from a pod, perform an operation similar to the operation for adding a label that is shown in (Step 5). The difference here is that the env value is not followed by an equal sign (=), but is instead followed by the label name and a minus sign (-), which indicates to remove the key-value (k:v) pair of the label.
kubectl label pods nginx tie-Step 9) Check the current label settings of the cluster again. Observe that the label is completely removed.
kubectl get pods --show-labels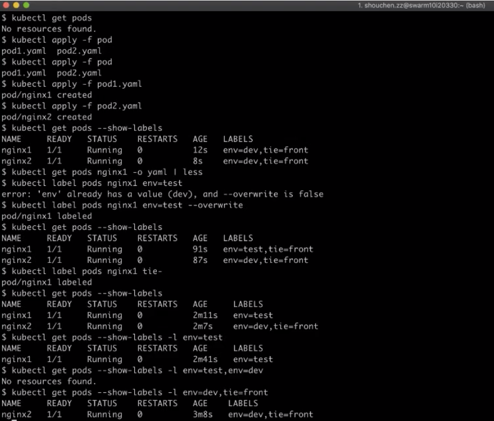
Step 10) Check the configured label value. Note that the pod of nginx1 excludes the tie = front label. After this pod label is removed, let's see how the label selector matches the pod. The label selector is specified by using the -l option. In this case, specify an equality-based label to perform filtering to obtain a pod whose deployment environment is test. The filtering result shows one pod.
kubectl get pods --show-labels -l env=testStep 11) If multiple equality-based requirements need to be specified, the "and" relationship is involved. If env is equal to dev, you'll not obtain any pods.
kubectl get pods --show-labels -l env=test,env=devStep 12) If env is equal to dev, but tie is equal to front, another pod can be hit. This pod is nginx2.
kubectl get pods --show-labels -l env=dev,tie=frontStep 13) Try out filtering pods by using a set-based label selector. This case still intends to match all the pods whose deployment environment is test or dev. Therefore, add single quotation marks (' ') here and specify all deployment environments in the brackets. In this way, the filtering result shows both the created pods.
kubectl get pods --show-labels -l 'env in (dev,test)Step 14) Let's try to add an annotation to a pod. Adding an annotation is similar to adding a label, except that the label command is replaced with the annotate command. The type and name are specified in the same way. In the end, the k:v pair of the label is replaced with the that of the annotation. Here, set the v parameter in k:v to any string, such as a space or a comma.
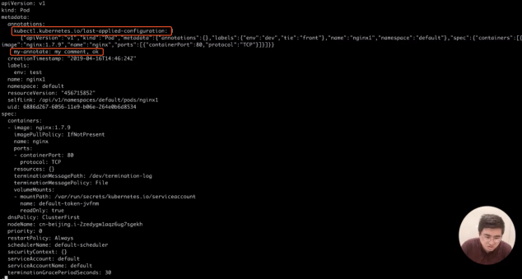
kubectl annotate pods nginx1 my-annotate='my annotate,okStep 15) Now, let's check some metadata of this pod. Note that the metadata of this pod includes the my-annotate annotation.
kubectl get pods nging1 -o yaml | lessAlso observe that when the kubectl apply command is run, the kubectl tool adds an annotation, which is also a JSON string.
Step 16) Next, let's see how the OwnerReference of the pod is generated. The original pods were all directly created through creating the pod resource. Here, we use another method where we create a pod by creating a ReplicaSet object. After creating the ReplicaSet object, view this ReplicaSet object in the following file by running the commands below.
kubectl apply -f rs.yamlkubectl get replicasets nginx-replicasets -o yaml |less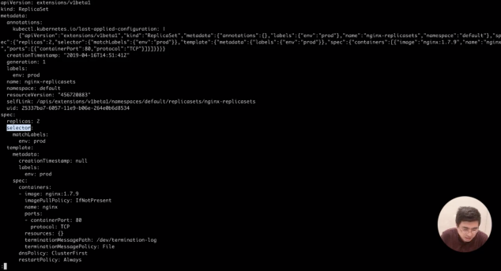
Step 17) The specification of this ReplicaSet mentions that two pods are to be created, and then the selector will match the pods by using the label that indicates the deployment environment is a production environment. Therefore, let's check the pod status in the cluster using the following command.
kubectl get pods 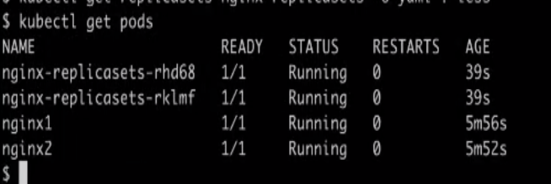
Step 18) Note that two more pods are created. After taking a closer look at both pods, it is observed that the pods created by ReplicaSet contain OwnerReferences, which points to a ReplicaSet type named nginx-replica sets.
kubectl get pods nginx-replicasets-rhd68 -o yaml | less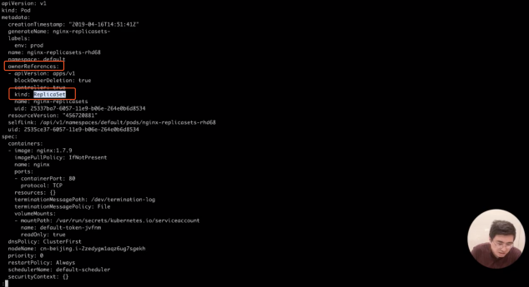
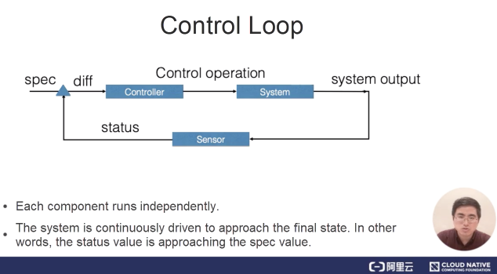
The concept of control loop is central to the controller mode. A control loop consists of three logical components: a controller, a controlled system, and a sensor that monitors the system.
Of course, these components are logical. External components control a resource object by modifying its specifications, and the controller compares the specifications and status values of this resource object to calculate a difference value. The difference value is then used to determine whether a control operation needs to be performed on the system. The control operation causes the system to generate a new output, which is to be reported as the status of the resource object by the sensor. Each component of the controller runs independently and continuously drives the current state of the system to approach the final state indicated by the specification.
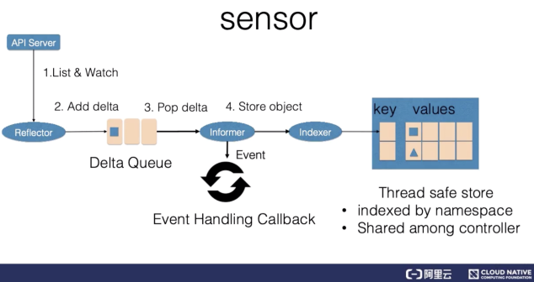
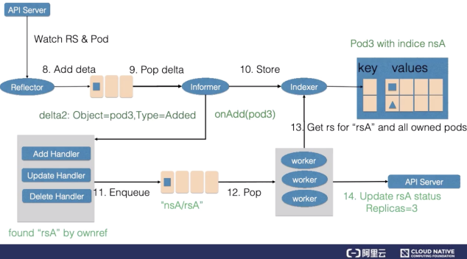
The logical sensor in a control loop includes three components: a reflector, an informer, and an indexer.
The reflector obtains resource data by using the list and watch mechanisms of the Kubernetes API server. Specifically, a list is used to perform a full update of system resources when the corresponding controller restarts and the watch is interrupted. Comparatively, the watch is used to perform an incremental resource update between list operations. Then, after obtaining the new resource data, the reflector inserts a delta record into the delta queue. The delta record includes the information and the event type of a resource object. The delta queue ensures that the same object has only one record in the queue to avoid repeated records when the reflector repeats the list and watch operations.
The informer component constantly outputs delta records from the delta queue and then delivers the resource object to the indexer so that the indexer records the resource object in the cache. By default, the cache is indexed by using the namespace of the resource and is shareable by the controller manager or multiple controllers. Finally, this event is sent to the callback function of the event.
The controller component in the control loop comprises event handler functions and workers. Event handler functions focus on resource addition, update, and deletion, and then determine whether to handle these events according to the logic of the controller. For an event to be handled, the controller inserts the namespace and name of the resource associated with the event into a work queue, and a worker in the subsequent worker pool handles the event. The work queue removes duplicates of stored objects to prevent the same resource from being handled by multiple workers.
While handling a resource object, a worker generally needs to obtain the latest resource data by using the resource name, in order to recreate or update the resource object or call other external services. If the handling fails, the worker re-adds the resource name to the work queue so that the resource object is handled again conveniently.
The following simple example demonstrates how a control loop works.
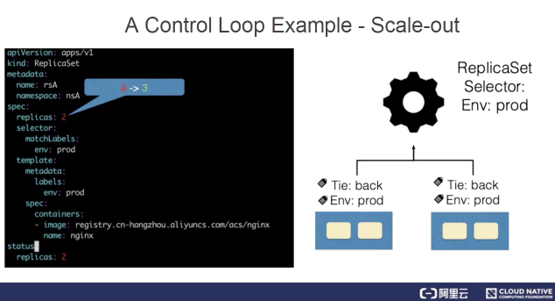
ReplicaSets represent a resource that describes the scaling of stateless applications. The ReplicaSet controller listens to ReplicaSets to maintain the desired number of states for an application. In addition, ReplicaSets match associated pods by using the selector. In this example, the number of replicas of ReplicaSet rsA is changed from 2 to 3.
First, the reflector watches the changes to ReplicaSet and pod resources. The reason for watching the changes to pods will be explained later. When a change to the ReplicaSet is detected, a record that indicates the rsA object and the update type is inserted into the delta queue.
The informer updates the new ReplicaSet to the cache and creates an index in the namespace field of the ReplicaSet, with the key set to nsA. Then, the informer calls the update callback function. After detecting the change to the ReplicaSet, the ReplicaSet controller inserts the nsA/rsA string into the work queue. The last worker in the work queue obtains the key of the nsA/rsA string from the work queue and retrieves the latest ReplicaSet data from the cache.
By comparing the specification and status values in the ReplicaSet, the worker finds that the ReplicaSet needs to be scaled up. Therefore, the worker for the ReplicaSet creates a pod and the OwnerReference of this pod points to ReplicaSet rsA.
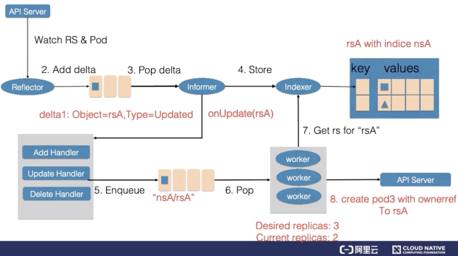
Next, the reflector watches a pod addition event and additionally adds an add-type delta record to the delta queue. In this way, the new pod record is stored in the cache through the indexer, and the add callback function of the ReplicaSet controller is called. The add callback function finds the corresponding ReplicaSet by checking OwnerReferences of pods and then inserts the string that contains the namespace and name of the ReplicaSet into the work queue.
After obtaining the new work items, the worker for the ReplicaSet retrieves the new ReplicaSet record from the cache and obtains all the pods created by the ReplicaSet. The status of the ReplicaSet is not up-to-date, which means that the number of created pods is not up-to-date. Therefore, the ReplicaSet updates the status, making the specification and the status consistent.
The controller mode of Kubernetes depends on declarative APIs. Another common type of API is the imperative API. An important question that arises here is why does Kubernetes use declarative APIs instead of imperative APIs to design the entire controller?
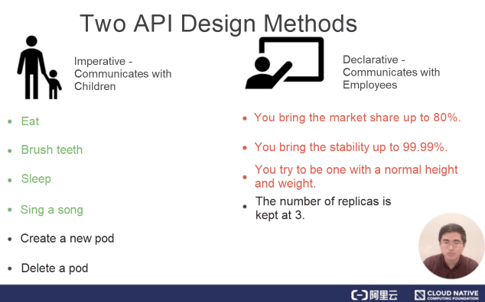
First, let's compare the differences between the two types of APIs in terms of interaction. In our daily life, a common imperative interaction mode is the way that parents communicate with their children. However, children have no idea about parents' intentions and therefore cannot understand their expectations. In this case, parents usually give commands for instructing children to take specific actions, such as eating and sleeping. In the container orchestration system, imperative APIs are executed by sending specific operations to the system.
A common declarative interaction mode is the way that a boss communicates with employees. Generally, the boss does not give a specific order or decision to employees. In fact, the boss may not be as clear as the employees about the operations to be performed. Therefore, the boss sets quantifiable business objectives for employees so that the employees give their subjective initiative into full play. For example, the boss requires a product to reach a market share of 80% without giving specific operation steps for achieving this goal.
Similarly, in the container orchestration system, you may maintain the number of replicas of an application instance to 3, instead of specifying whether to scale up a pod or delete an existing pod to ensure that the number of replicas is 3.
After understanding the differences between both interactive APIs, let's take a look at the issues regarding imperative APIs.
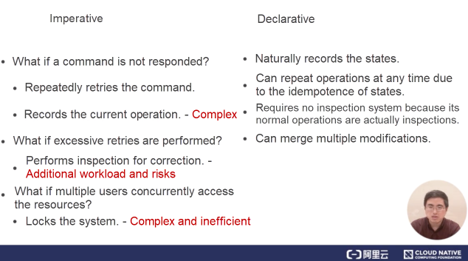
Errors are ubiquitous in large-scale distributed systems. If no response is received for an executed command, the caller may only try to recover from the error through repeated retries. However, blind retries may cause even greater problems. For example, when the original command is executed in the back end; but after one retry, a command operation for retry is performed additionally. To avoid retries, the system usually needs to record the to-be-executed command before execution, and redo the to-be-executed command in scenarios such as restart. In addition, during execution, the system needs to consider complex logical conditions such as the order of multiple commands and the overwriting relationship.
However, the inspection logic is different from the routine operation logic and is usually not fully covered in tests. As a result, the error handling mechanism is not rigorous enough, which leads to great operational risks. Therefore, inspections are triggered manually in many inspection systems.
If multiple users concurrently request to perform operations on the same resource and an error occurs during one of these operations, a retry is required. As a result, it is difficult to determine the exact operation that takes effect. Therefore, many imperative systems lock the system before operations are performed, to ensure that the final effective behavior in the entire system is predictable. However, locking reduces the operational efficiency of the entire system.
No additional operation data is needed. In addition, due to the idempotence of the states, operations may repeat at any time. During the running of a declarative system, normal operations are actually the inspections of the resource status, and therefore no additional inspection system is needed. In this way, the operation logic of the system is also tested and improved during daily operations, and the stability of the entire operation is ensured.
Lastly, the final state of a resource is definite, and therefore merge multiple modifications made to the state. In this way, concurrent access from multiple users is supported without locking the system.
Lastly, let's summarize the information about the controller mode.
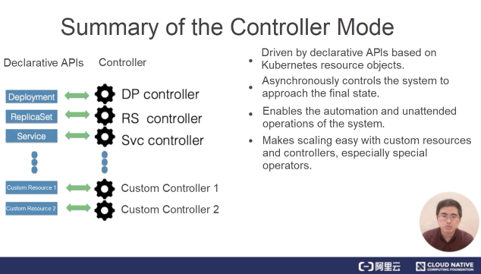
1) The controller mode used by Kubernetes is driven by declarative APIs. Specifically, it is driven by modifications made to resource objects in Kubernetes.
2) After describing Kubernetes resources, let's focus on controllers for the resources. These controllers asynchronously control the system to approach the specified final state.
3) These controllers run independently, which enables the automation and unattended operations of the system.
4) In Kubernetes, controllers and resources are customizable, and therefore the controller mode is extended with flexibility. Automate the maintenance of stateful applications by customizing resources and controllers. This is also the operator scenario that will be introduced later.
This article gives a comprehensive overview of the following aspects related to the application orchestration and management of Kubernetes:
Getting Started with Kubernetes | Pods and Container Design Modes
Get to Know Kubernetes | Application Orchestration and Management

634 posts | 55 followers
FollowAlibaba Developer - February 26, 2020
Alibaba Clouder - February 14, 2020
Alibaba Developer - April 1, 2020
Alibaba Cloud Native Community - November 15, 2023
Alibaba Developer - June 22, 2020
Alibaba Developer - June 18, 2020

634 posts | 55 followers
Follow Cloud-Native Applications Management Solution
Accelerate and secure the development, deployment, and management of containerized applications cost-effectively.
Learn More Container Service for Kubernetes
Alibaba Cloud Container Service for Kubernetes is a fully managed cloud container management service that supports native Kubernetes and integrates with other Alibaba Cloud products.
Learn More ACK One
Provides a control plane to allow users to manage Kubernetes clusters that run based on different infrastructure resources
Learn More Bastionhost
A unified, efficient, and secure platform that provides cloud-based O&M, access control, and operation audit.
Learn MoreMore Posts by Alibaba Cloud Native Community