This is the third section of the DataWorks workshop. In this section, you will learn how to process log data that has been collected into MaxCompute through DataWorks. That is, through this section, you will learn how to run a data flow chart, how to create a new data table, and how to configure periodic scheduling properties. Before you begin this section, make sure that you have read the previous section Data Acquisition with DataWorks.
You can refer to Data acquisition: log data upload to create data tables.
ods_log_info_d tableods_log_info_d. You can then click DDL Mode to type in the table creation SQL statements.The following are table creation statements:
CREATE TABLE IF NOT EXISTS ods_log_info_d (
  ip string comment 'IP address',
  uid STRING COMMENT 'User ID',
  time string comment 'time:yyyymmddhh:mi:ss',
  status string comment 'server return status code',
  bytes string comment 'the number of bytes returned to the Client',
  region string comment 'region,get from IP',
  method string comment 'HTTP request type',
  url string comment 'url',
  protocol string comment 'HTTP Protocol version number',
  referer string comment 'source ures',
  device string comment 'terminal type',
  identity string comment 'Access type crawler feed user unknown'
)
PARTITIONED BY (
  dt STRING
);dw_user_info_all_d tableThe method of creating a new report table is identical to that of a table statement as follows:
Create a copy table
CREATE TABLE IF NOT EXISTS dw_user_info_all_d (
  uid STRING COMMENT 'User ID',
  gender STRING COMMENT 'Gender',
  age_range STRING COMMENT 'Age range',
  zodiac STRING COMMENT 'Zodiac sign',
  region string comment 'region, get from IP',
  device string comment 'terminal type',
  identity string comment 'Access type crawler feed user unknown',
  method string comment 'HTTP request type',
  url string comment 'url',
  referer string comment 'source url',
  time string comment 'time:yyyymmddhh:mi:ss'
)
PARTITIONED BY (
  dt string
);The following are table creation statements:
Create a copy table
Create Table if not exists rpt_user_info_d(
  uid STRING COMMENT 'User ID',
  region string comment 'region, get from IP',
  device string comment 'terminal type',
  pv bigint comment 'pv',
  gender STRING COMMENT 'Gender',
  age_range STRING COMMENT 'Age range',
  zodiac STRING COMMENT 'Zodiac sign'
)
PARTITIONED BY (
  dt string
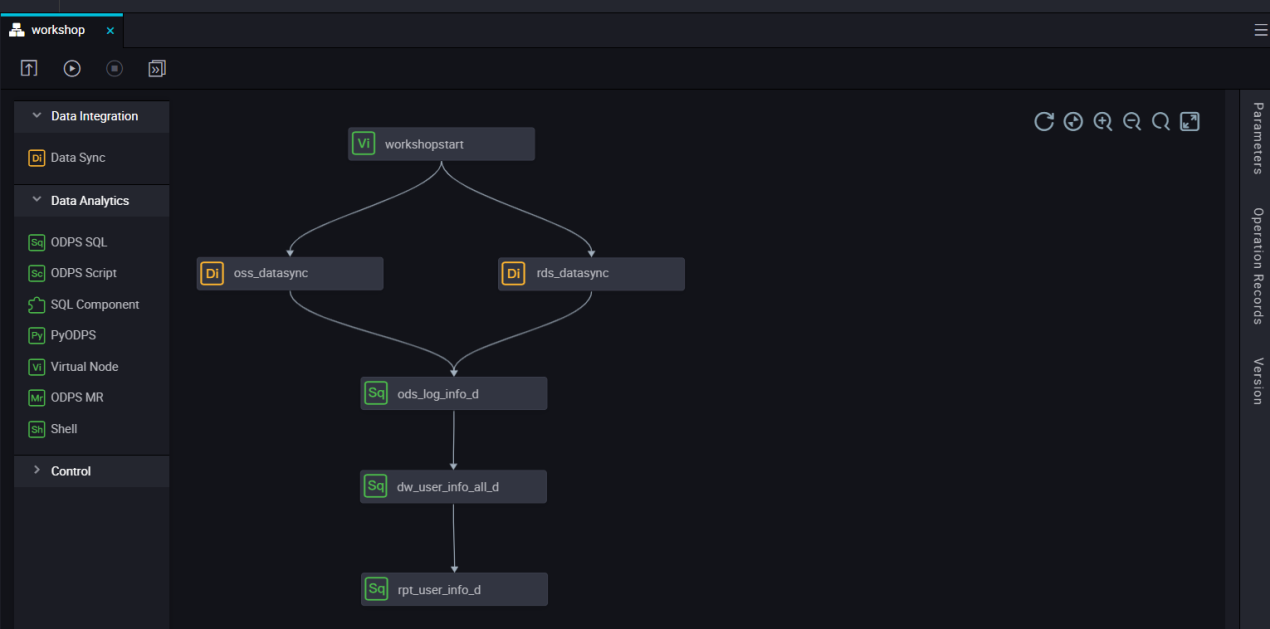
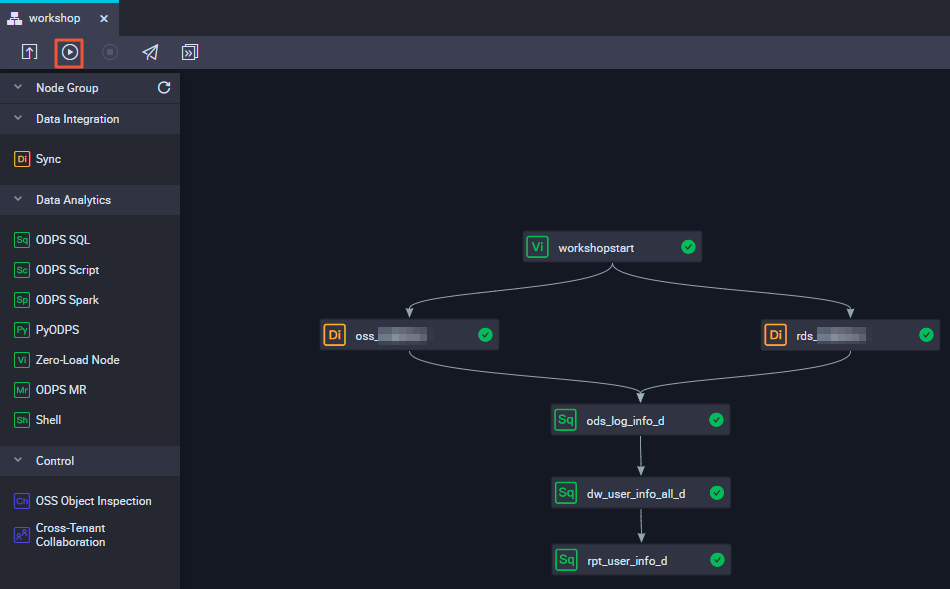
);Open the Workshop Business Flow and drag three ODPS SQL nodes named ods_log_info_d, dw_user_info_all_d, and rpt_user_info_d into the canvas, n, and configure dependencies.
1. Download ip2region.jar.
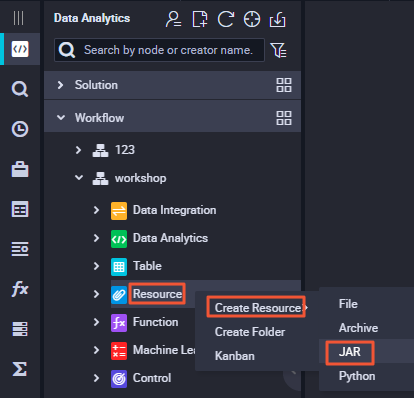
2. Right-click Resource, and select Create Resource > jar.
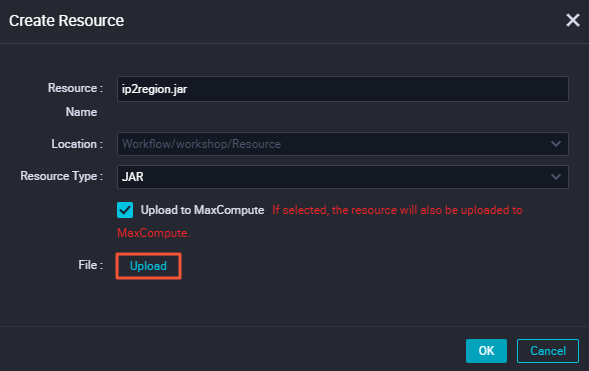
3. Click Select File, select ip2region.jar, which has been downloaded locally, and click OK.
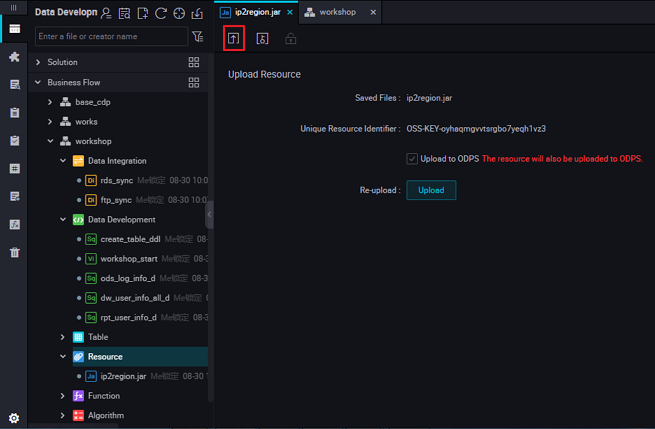
4. After the resource has been uploaded to dataworks, click Submit.
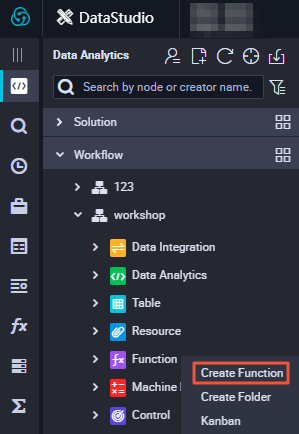
5. Right-click a function and select Create Function.
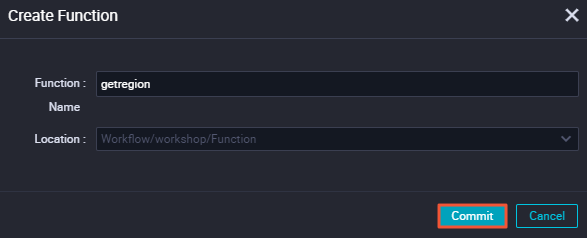
6. Enter the function name getregion, select the Business Flow to which you want to belong, and click Submit.
7. Enter the function configuration in the Registry Function dialog box, specify the class name, description, command format, and parameter description.
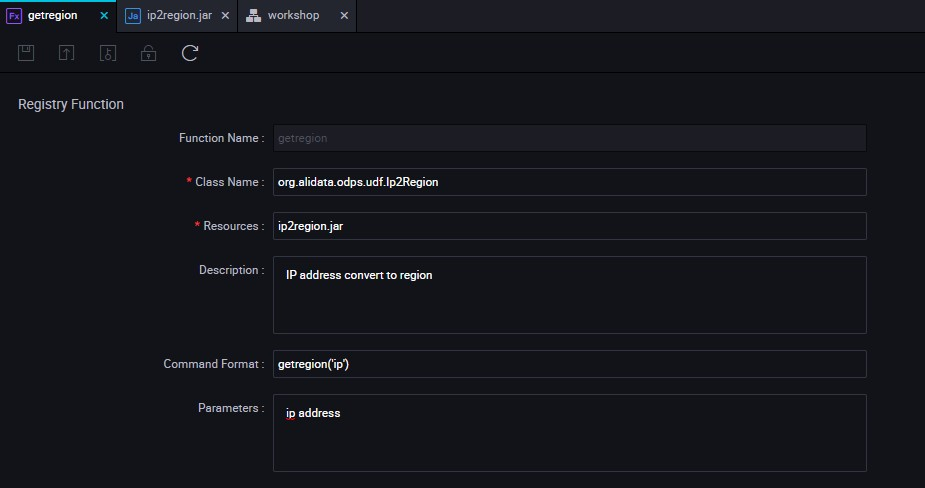
Here are the parameters you need to enter:
getregion
org.alidata.odps.udf.Ip2Region
ip2region.jar
IP address translation area
getregion ('IP')
IP Address
8. Click Save and submit.
ods_log_info_d Nodeods_log_info_d node to go to the node configuration page and write the processing logic.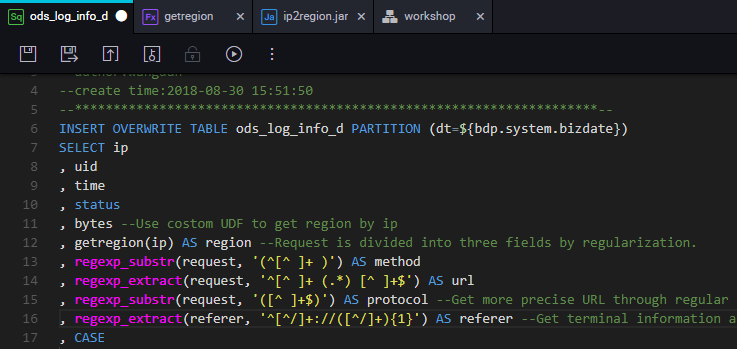
The SQL logic is as follows:
INSERT OVERWRITE TABLE ods_log_info_d PARTITION (dt=${bdp.system.bizdate})
SELECT ip
  , uid
  , time
  , status
  , bytes -- use a custom UDF to get a locale over IP
  , getregion (ip) as region -- the request difference is divided into three fields through the regular
  , regexp_substr(request, '(^[^ ]+ )') AS method
  , regexp_extract(request, '^[^ ]+ (.*) [^ ]+$') AS url
  , regexp_substr(request, '([^ ]+$)') AS protocol -- get more precise urls with regular clear refer
  , regexp_extract(referer, '^[^/]+://([^/]+){1}') AS referer -- Get terminal information and access form through agent
  , CASE
WHEN TOLOWER(agent) RLIKE 'android' THEN 'android'
    WHEN TOLOWER(agent) RLIKE 'iphone' THEN 'iphone'
    WHEN TOLOWER(agent) RLIKE 'ipad' THEN 'ipad'
    WHEN TOLOWER(agent) RLIKE 'macintosh' THEN 'macintosh'
    WHEN TOLOWER(agent) RLIKE 'windows phone' THEN 'windows_phone'
    WHEN TOLOWER(agent) RLIKE 'windows' THEN 'windows_pc'
    ELSE 'unknown'
  END AS device
  , CASE
    WHEN TOLOWER(agent) RLIKE '(bot|spider|crawler|slurp)' THEN 'crawler'
    WHEN TOLOWER(agent) RLIKE 'feed'
    OR regexp_extract(request, '^[^ ]+ (.*) [^ ]+$') RLIKE 'feed' THEN 'feed'
    WHEN TOLOWER(agent) NOT RLIKE '(bot|spider|crawler|feed|slurp)'
    AND agent RLIKE '^[Mozilla|Opera]'
    AND regexp_extract(request, '^[^ ]+ (.*) [^ ]+$') NOT RLIKE 'feed' THEN 'user'
    ELSE 'unknown'
  END AS identity
  FROM (
    SELECT SPLIT(col, '##@@')[0] AS ip
    , SPLIT(col, '##@@')[1] AS uid
    , SPLIT(col, '##@@')[2] AS time
    , SPLIT(col, '##@@')[3] AS request
    , SPLIT(col, '##@@')[4] AS status
    , SPLIT(col, '##@@')[5] AS bytes
    , SPLIT(col, '##@@')[6] AS referer
    , SPLIT(col, '##@@')[7] AS agent
  FROM ods_raw_log_d
  WHERE dt = ${bdp.system.bizdate}
) a;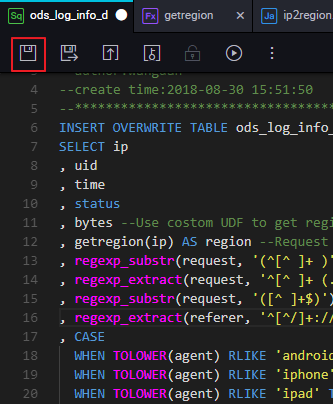
dw_user_info_all_d Nodedw_user_info_all_d node to go to the node configuration page and write the processing logic.The SQL logic is as follows:
INSERT OVERWRITE TABLE dw_user_info_all_d PARTITION (dt='${bdp.system.bizdate}')
SELECT COALESCE(a.uid, b.uid) AS uid
  , b.gender
  , b.age_range
  , b.zodiac
  , a.region
  , a.device
  , a.identity
  , a.method
  , a.url
  , a.referer
  , a.time
FROM (
  SELECT *
  FROM ods_log_info_d
  WHERE dt = ${bdp.system.bizdate}
) a
LEFT OUTER JOIN (
  SELECT *
  FROM ods_user_info_d
  WHERE dt = ${bdp.system.bizdate}
) b
ON a.uid = b.uid;rpt_user_info_d NodeThe SQL logic is as follows:
INSERT OVERWRITE TABLE rpt_user_info_d PARTITION (dt='${bdp.system.bizdate}')
SELECT uid
  , MAX(region)
  , MAX(device)
  , COUNT(0) AS pv
  , MAX(gender)
  , MAX(age_range)
  , MAX(zodiac)
FROM dw_user_info_all_d
WHERE dt = ${bdp.system.bizdate}
GROUP BY uid;1. Click Submit to submit the node tasks that have been configured in the Business Flow.
2. Select the nodes that need to be submitted in the Submit dialog box, and check the Ignore Warnings on I/O Inconsistency, click Submit.
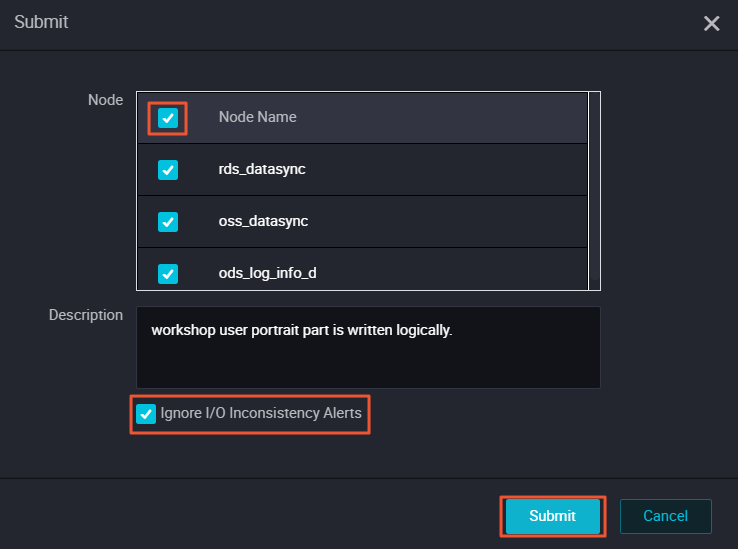
1. Click Run to verify the code logic.
2. Click Queries in the left-hand navigation bar.
3. Select New > ODPS SQL.
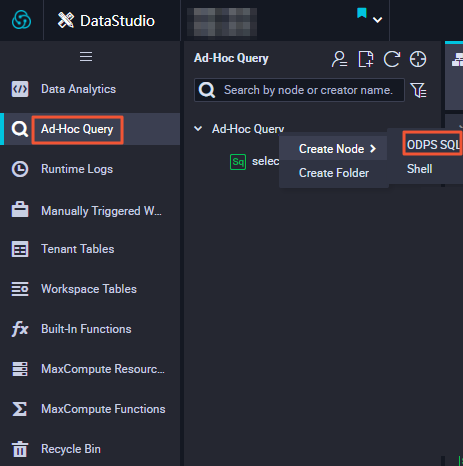
4. Write and execute SQL statements, Query Task for results, and confirm data output.
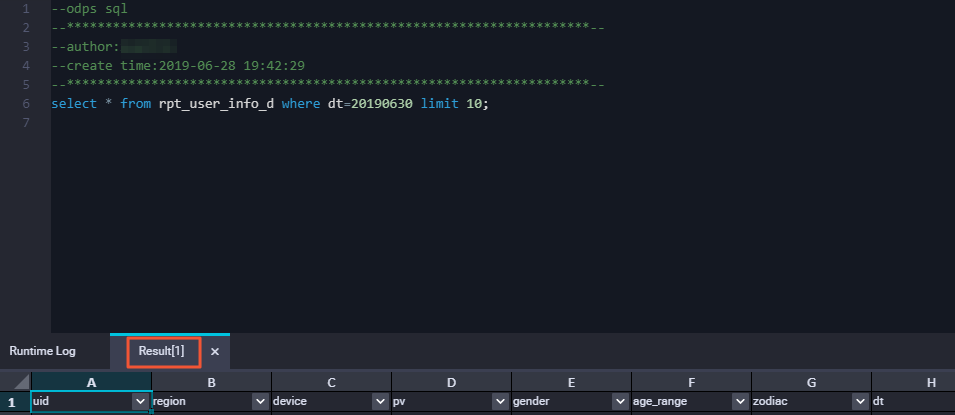
The query statement is as follows:
--- View the data in the data box
select * From glaswhere dt ''business day'' limit 10;After the Business Flow is submitted, it indicates that the task has entered the development environment, but the task of developing an environment does not automatically schedule, so the tasks completed by the configuration need to be published to the production environment. Before publishing to the production environment, test this task code.
1. Click Publish to go to the publish page.
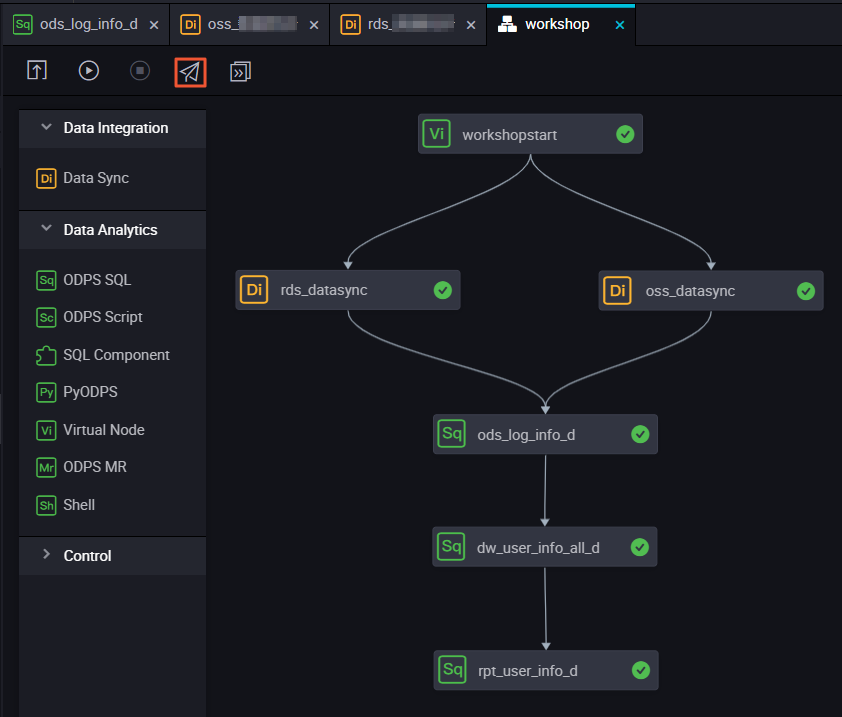
2. Select the task to publish and click Add To Be-Published List.
3. Enter the list of pending releases, and click Pack and publish all.
4. View published content on the Publish Package List page.
1. After the task has been published successfully, click Operation center.
2. Select Workshop Business Flows in the Task List.
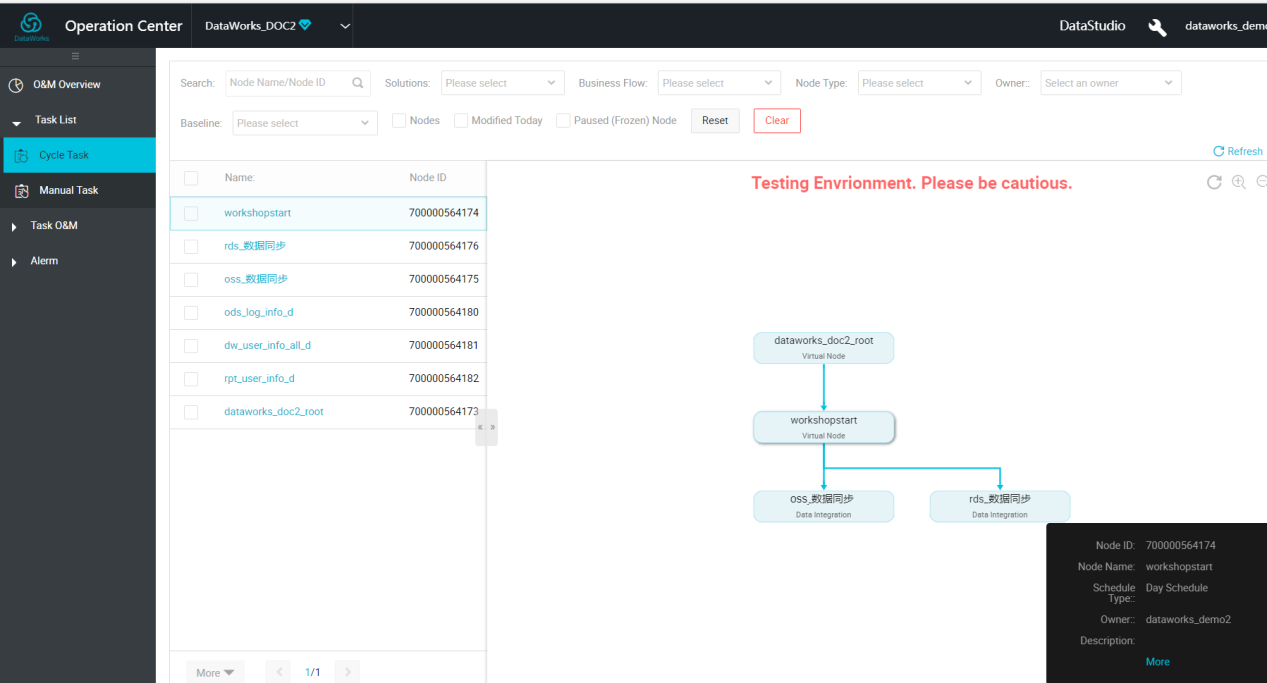
3. Right-click the workshop_start node in the DAG graph and select Patch Data > Current and downstream nodes.
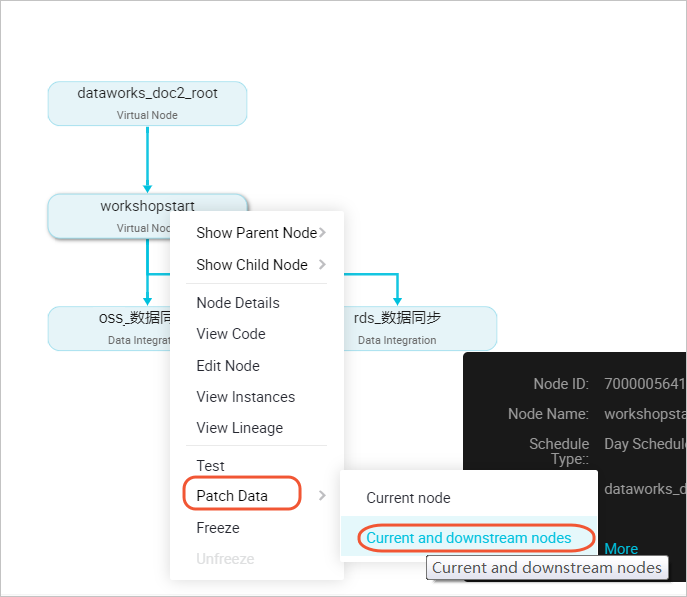
4. Check the task that needs to fill the data, enter the business date, and click OK.
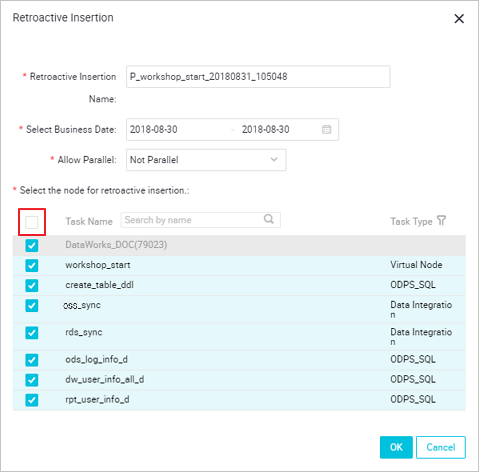
When you click OK, you automatically jump to the patch data task instance page.
5. Click Refresh until the SQL task runs successfully.

Now that you've learn the content of this section, you can continue to the last section of this workshop, which is Data Quality Monitoring with DataWorks.

2,593 posts | 793 followers
FollowAlibaba Clouder - January 6, 2021
Alibaba Clouder - May 12, 2021
Alibaba Clouder - April 11, 2018
Alibaba Clouder - September 3, 2019
JDP - March 19, 2021
Alibaba Cloud Community - March 29, 2022

2,593 posts | 793 followers
Follow MaxCompute
Conduct large-scale data warehousing with MaxCompute
Learn More DataWorks
A secure environment for offline data development, with powerful Open APIs, to create an ecosystem for redevelopment.
Learn More DataV
DataV
A powerful and accessible data visualization tool
Learn MoreMore Posts by Alibaba Clouder