By Qiu Congxian
Apache Flink is a distributed computing framework that naturally supports infinite stream data processing. In Flink, the Window operation can split infinite streams into finite streams, and is the core component for processing finite streams. Now, the Window operation in Flink can be either time-driven (referred to as the Time Window) or data-driven (Count Window).
The following code is two examples of using Window in Flink:


Let's take a look to how to use a practical example to see how to use Window-related APIs. Consider the following code. This code example is taken from flink-examples.

In the above example, you first extract time for each piece of data, perform keyby, and then call window(), evictor(), trigger(), and maxBy() in sequence. Let's focus on the window(), evictor(), and trigger() methods.
The input received by the window method is WindowAssigner. WindowAssigner is responsible for distributing each input data to the correct window. Note that a piece of data may be distributed to multiple windows at the same time. Flink provides several common WindowAssigners: Tumbling Window (elements between windows are not repeated), Sliding Window (elements between windows may be repeated), Session Window, and Global Window. If you need to customize your own data distribution policy, you can implement a class that inherits from the WindowAssigner.
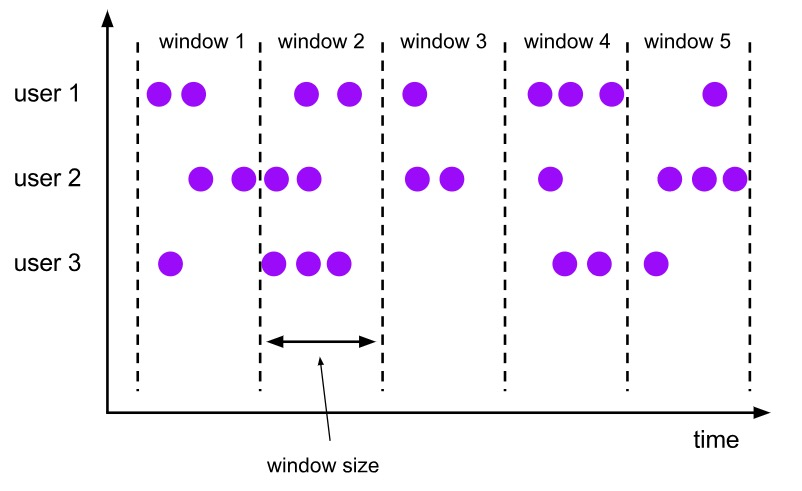
Tumbling Window
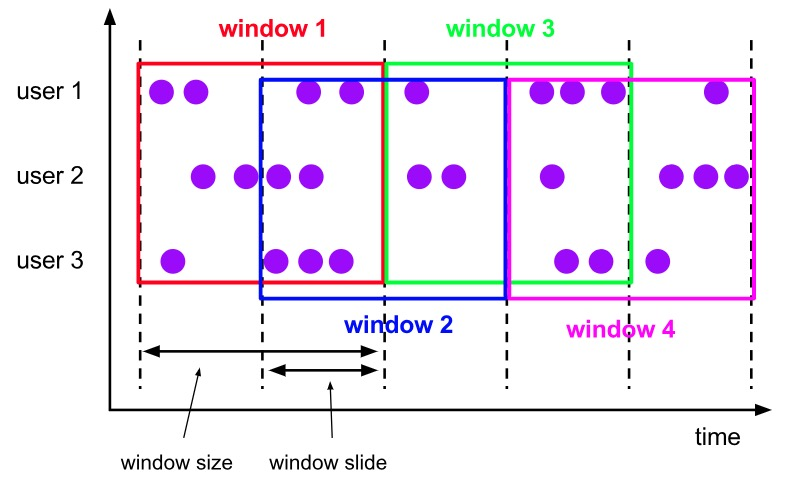
Sliding Window
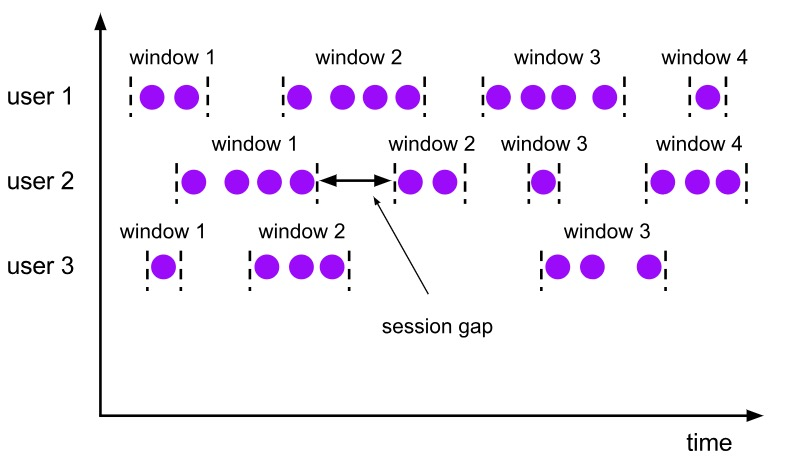
Session Window
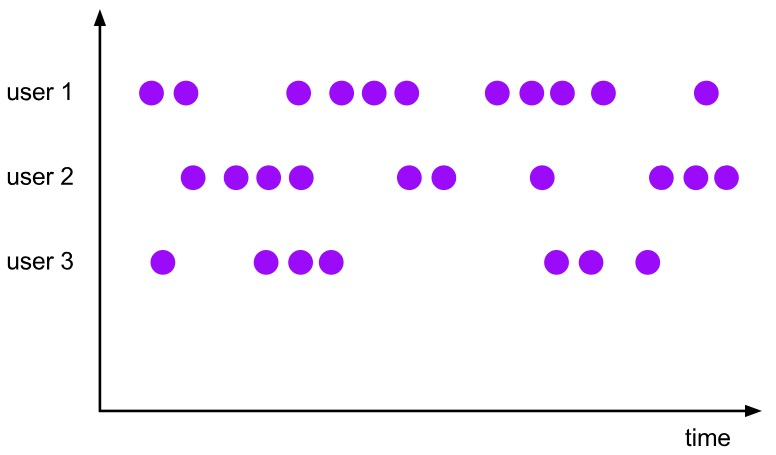
Global Window
Evictor is mainly used for custom operations on some data. Before executing the user code or after executing the user code, you can refer to two methods, evicBefore and evicAfter, of org.apache.flink.streaming.api.windowing.evictors.Evictor for more information. Flink provides the following three common Evictors:
Evictor is an optional method. If you do not select it, it will not be selected by default.
Trigger is used to determine whether a window needs to be triggered. Each WindowAssigner comes with a default trigger. If the default trigger cannot meet your needs, you can customize a class that inherits from the WindowAssigner. The interfaces of Trigger and their meanings are described in detail below:
The first three of the above interfaces will return a TriggerResult, which has the following options:
After learning about the above content, we still need to clarify two concepts for the time-driven window: Time and Watermark.
Time is a very important concept in the distributed environment. In Flink, Time can be divided into three types: Event-Time, Processing-Time, and Ingestion-Time. The relationship between the three can be seen from the following figure:
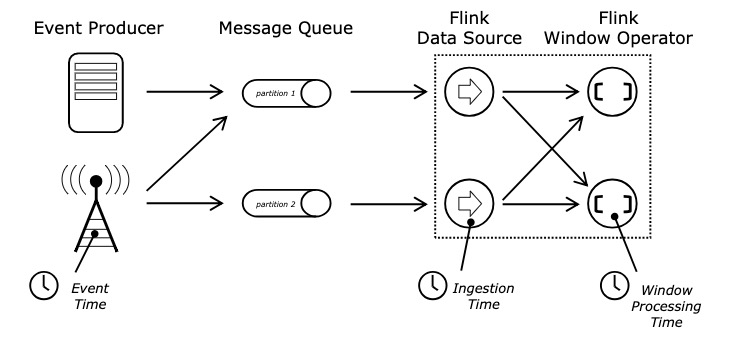
Event-Time, Ingestion-Time, and Processing-Time
In Flink, we can set the Time type in the following way:
env.setStreamTimeCharacteristic(TimeCharacteristic.ProcessingTime); // Set to use ProcessingTimeAfter learning about Time, we also need to know the concepts related to Watermark.
Let's take a look at an example: An app will record all click behaviors of users and return the logs in case of a bad network connection, it will first save the logs locally and delay the return. User A operated the App at 11:02 and User B operated the App at 11:03, but User A's network was unstable and returning the logs was delayed. As a result, we first received the message from User B and then received the message from User A on the server side, and the messages were out of order in terms of time.
How can we ensure that the Event-Time based window has already processed all the data when it is destroyed? This is what Watermark does. Watermark comes with a monotonically increasing timestamp t. Watermark(t) indicates that all data with a timestamp not greater than t has arrived, and will not come again in the future, so the window can be safely triggered and destroyed. The following figure shows an example of Watermark in a disordered data stream.

The above Watermark enables us to deal with disordered data, but in the real world we cannot obtain a perfect Watermark value - either it cannot be obtained, or it is too costly. Therefore, in actual work, we will use an approximate Watermark value - after generating Watermark(t), a small probability of receiving data before the timestamp t still exists. In Flink, this data is defined as "late elements". Similarly, we can specify the maximum latency allowed in the window (0 by default), which can be set using the following code.

After allowedLateness is set, the late data can also trigger the window to output. Using the side output mechanism of Flink, we can obtain this late data in the following way:

It should be noted that after allowedLateness is set, the late data may also trigger the window. For Session Windows, the windows may be merged, resulting in unexpected behaviors.
When discussing the internal implementation of Window, let's review the Window lifecycle using the following figure.
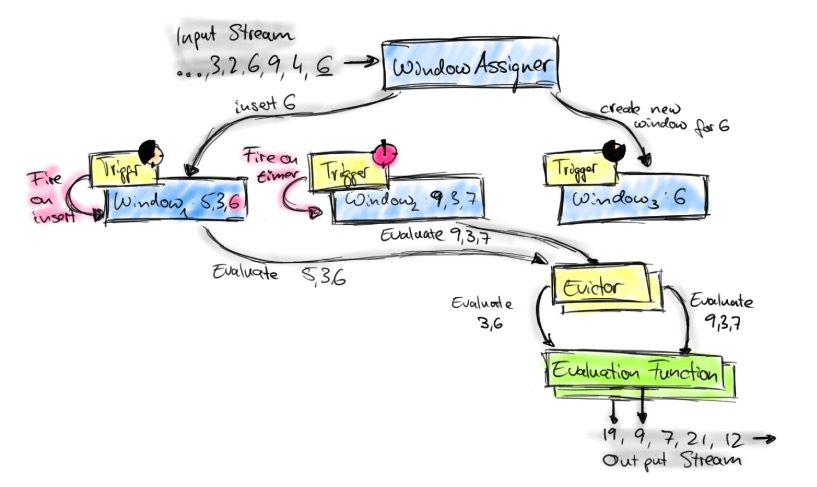
After each piece of data comes in, WindowAssigner will assign it to the corresponding Window. When the Window is triggered, the data will be handed over to Evictor (skip if no Evictor is set), and then the UserFunction will be processed. WindowAssigner, Trigger and Evictor have been discussed above. UserFunction is the user-written code.
In the whole process, one more issue needs to be discussed: the state storage in Window. Flink supports "Exactly Once" processing semantics. So what is the difference between state storage in Window and normal state storage?
From the interface, it can be considered that no difference exists between the two. However, in the Window scenario, each window belongs to a different namespace, while in the non-Window scenario, windows all belong to VoidNamespace, and finally the State/Checkpoint is used to ensure the "Exactly Once" semantics of the data. Let's extract a piece of code from org.apache.flink.streaming.runtime.operators.windowing.WindowOperator for explanation.
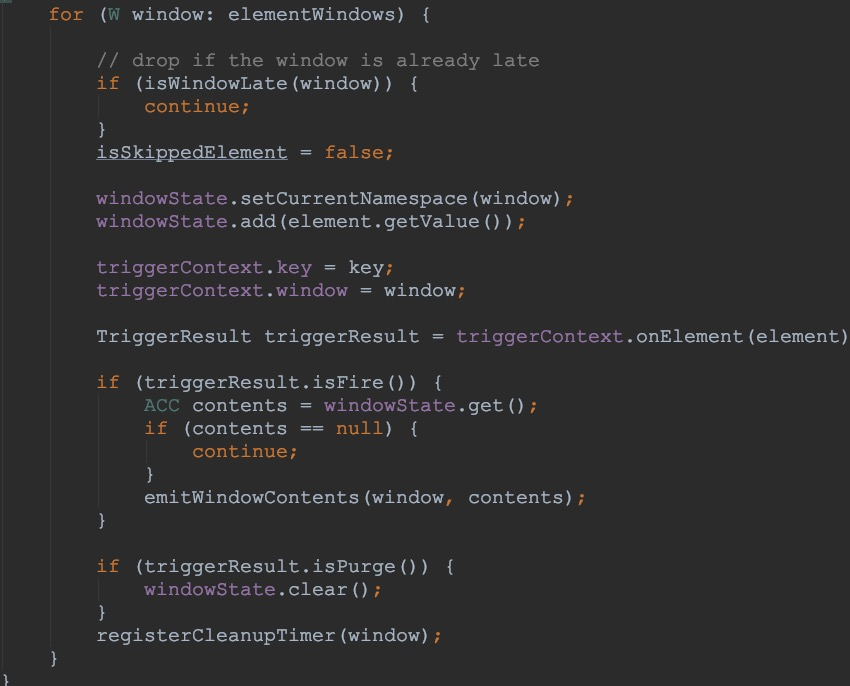
From the above, we know that the elements in Window are also maintained through state, and then the "Exactly Once" semantics are ensured by the Checkpoint mechanism.
At this point, all contents related to Time and Window have been explained, mainly including: Why Window is needed; Three core Window components, WindowAssigner, Trigger, and Evictor; How to process out-of-order data in Window, whether delay is allowed for out-of-order data, and how to process late data; Finally, we sort out the entire Window data process, and how to ensure the "Exactly Once" semantics in Window.

206 posts | 56 followers
FollowApache Flink Community - August 4, 2025
Apache Flink Community China - April 23, 2020
Apache Flink Community - April 11, 2025
Apache Flink Community - February 20, 2025
Apache Flink Community China - December 25, 2019
Apache Flink Community - March 24, 2025

206 posts | 56 followers
Follow Realtime Compute for Apache Flink
Realtime Compute for Apache Flink offers a highly integrated platform for real-time data processing, which optimizes the computing of Apache Flink.
Learn More Real-Time Livestreaming Solutions
Stream sports and events on the Internet smoothly to worldwide audiences concurrently
Learn More Real-Time Streaming
Provides low latency and high concurrency, helping improve the user experience for your live-streaming
Learn More Application Real-Time Monitoring Service
Build business monitoring capabilities with real time response based on frontend monitoring, application monitoring, and custom business monitoring capabilities
Learn MoreMore Posts by Apache Flink Community