By Dassi Orleando, Alibaba Cloud Tech Share Author. Tech Share is Alibaba Cloud's incentive program to encourage the sharing of technical knowledge and best practices within the cloud community.
OrientDB is an open source Java Multi-Model NoSQL database management technology that supports Graph, Document, Key-Value, GeoSpatial and Reactive models while managing queries with the well-known SQL syntax.
In this article, we'll cover some initial setup of OrientDB while building a Spring-Boot API with it on and Alibaba Cloud Elastic Compute Service (ECS) instance.
First, we need to create an ECS. For the sake of the demo, I will be using an Ubuntu one with 1 Core and 0.5 GB of memory. Log in via ssh/console as described into this guide:

Next, we need to install the available binary package, let's download the latest stable release of OrientDB (3.0.8 at the time of writing this article) corresponding to our operating system.
The command to use will be similar to this:
curl https://s3.us-east-2.amazonaws.com/orientdb3/releases/3.0.8/orientdb-3.0.8.tar.gz --output orientdb-3.0.8.tar.gzOnce downloaded, the zipped file called orientdb-3.0.8.tar.gz will be in the directory where you typed the curl command.
Now, we need to unzip that file and move its content to an opportune directory under the environment variable ORIENTDB_HOME. Here are the corresponding commands according to the current version: tar -xvzf orientdb-3.0.8.tar.gz to unzip the folder, cp -r orientdb-3.0.8 /opt to copy the entire folder to the /opt directory.
The content of /etc/environment will have these three lines:
JAVA_HOME=/usr/lib/jvm/java-8-oracle
ORIENTDB_HOME=/opt/orientdb-3.0.8
PATH="/usr/local/sbin:/usr/local/bin:/usr/sbin:/usr/bin:/sbin:/bin:/usr/games:/usr/local/games :$ORIENTDB_HOME/bin"
Knowing that you have Java (1.7 or higher) installed already + added a swap space to your Ubuntu.
Note: Don't forget to source this file after updated so that the new OrientDB executables get available in the terminal, the command is source /etc/environment
Finally, we need to edit the orientdb.sh file located in ORIENTDB_HOME/bin by filling the location (ORIENTDB_HOME) of OrientDB directory in lieu of ORIENTDB_DIR and also the system user we'd like to use instead of USER_YOU_WANT_ORIENTDB_RUN_WITH.
Now we've a fully working OrientDB installation with the following commands ready to be use:
Most of the time production environment required to have a very secured installation where any user will not be allowed to start/stop the database as willed, in OrientDB bin/orientdb.sh file there is the possibility to fill the administration user in place of USER_YOU_WANT_ORIENTDB_RUN_WITH then the filled user will be the only to have full right on our OriendDB most sensible commands.
To know more about OrientDB here's the official documentation link.
Let's test our installation by running the command: orientdb.sh start and access the portal (OrientDB Studio) at http://our_ecs_ip:2480 or http://localhost:2480 as shown in the following screenshot:
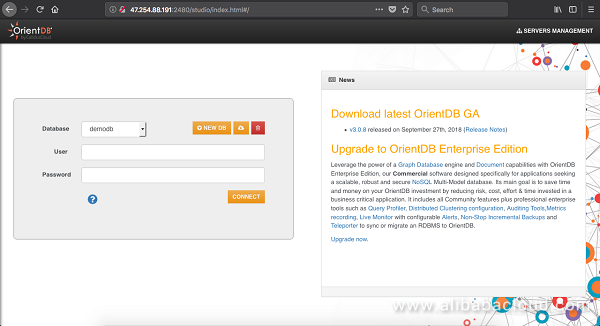
To connect yourself and access the dashboard, we need to define our users at the very end of the file $ORIENTDB_HOME/config/orientdb-server-config.xml as described here.
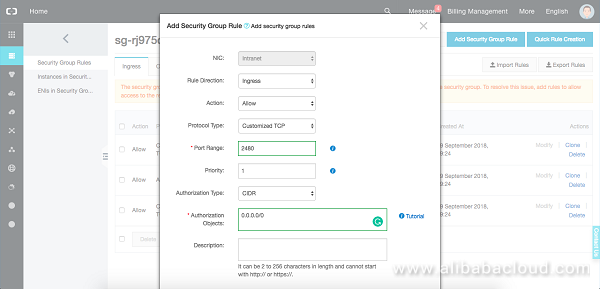
Here we can see that 47.254.88.191 is the IP address of the ECS used right now, you should configure your instance security group for your port 2480 (OrientDB Studio port) to be accessible (should be done well for a production environment) via the web, printed here the configuration for our testing instance:
OrientDB's multi-model capability allows to manage many types of database with the same engine, here we can manage:
One of the big innovation behind this it to be able to query both types with a single well known syntax which is SQL, the Document type of database is the one we'll be using for the Spring-boot API we're building.
From the OrientDB Studio home screen let's create a document database called alibabacloudblog as illustrated in the image bellow:
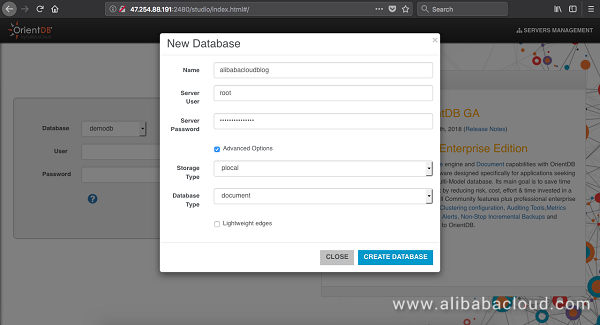
The next time we'll access the dashboard, we'll prior need to select the database from the home screen, provide the user credentials to use then hit Connect.
Regardless the database type, OrientDB gives the ability to work with three kinds of Schemas which are:
As stated at the beginning of this article, the end result is to have a fully working API (only some CRUD operations) where Spring-Boot and OrientDB are both in actions on Alibaba Cloud ECS.
Visit start.spring.io to generate the basic structure of a Spring-boot project with the Web dependency as follows:
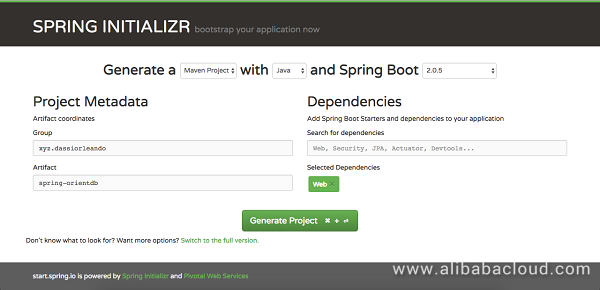
Now we've a fresh Maven project we can unzip and open with our favorite Java IDE.
OrientDB is entirely written in Java, meaning we can immediately use its Java API's without the need to add anymore drivers or adapters.
Let's add the following properties to the pom.xml of our project:
<properties>
   <project.build.sourceEncoding>UTF-8</project.build.sourceEncoding>
   <project.reporting.outputEncoding>UTF-8</project.reporting.outputEncoding>
   <java.version>1.8</java.version>

   <orientdb.version>3.0.5</orientdb.version>
</properties>
In the dependencies section we specify the OrientDB librabies depending of our use case:
<!-- OrientDB -->
<dependency>
   <groupId>com.orientechnologies</groupId>
   <artifactId>orientdb-core</artifactId>
   <version>${orientdb.version}</version>
</dependency>
<dependency>
   <groupId>com.orientechnologies</groupId>
   <artifactId>orientdb-client</artifactId>
   <version>${orientdb.version}</version>
</dependency>
<dependency>
   <groupId>com.orientechnologies</groupId>
   <artifactId>orientdb-object</artifactId>
   <version>${orientdb.version}</version>
</dependency>
<dependency>
   <groupId>com.orientechnologies</groupId>
   <artifactId>orientdb-graphdb</artifactId>
   <version>${orientdb.version}</version>
   <exclusions>
      <exclusion>
         <groupId>commons-logging</groupId>
         <artifactId>commons-logging</artifactId>
      </exclusion>
      <exclusion>
         <groupId>com.fasterxml.jackson.core</groupId>
         <artifactId>jackson-databind</artifactId>
      </exclusion>
   </exclusions>
</dependency>
Some OrientDB dependencies use cases:
Now there is even a Spring Data OrientDB built by orienttechnologies to make easy the configurations/querying of OrientDB from a Java/Spring application, it's based on your Spring Data model.
Let's create our custom configuration class OrientDBConfiguration, it's where we'll defined our database user credentials to use for the project while producing a database instance to use later in our queries.
The configuration class is as follows:
/**
 * Basic OrientDB configuration class
 * To configure and provide the bean to inject later for database interactions
 * @author dassiorleando
 */
@Configuration
public class OrientDBConfiguration {

    // The orientdb installation folder
    private static String orientDBFolder = System.getenv("ORIENTDB_HOME");

    /**
     * Connect and build the OrientDB Bean for Document API
     * @return
     */
    @Bean
    public ODatabaseDocumentTx orientDBfactory() {
        return new ODatabaseDocumentTx("plocal:" // or remote
                + orientDBFolder + "/databases/alibabacloudblog")
                .open("username", "userpwd");
    }

}
Notes: username and userpwd are respectively the username and password of the database user to use, these are configurable from one OrientDB configuration file that we've highlighted up here. plocal here is to specify we're trying to access a local instance of OrientDB hosted on the same server as our API, if it was a remote instance remote should have been used instead as follow:
return new ODatabaseDocumentTx("remote:server_ip/alibabacloudblog").open("admin", "admin");The database url is written according to a specific format depending if we're accessing a local, remote or memory database as stated here.
Here the Class (entity in a relational word) are being created automatically as the default database mode is Schemaless:
/**
 * To create an article
 * @param article
 * @return article
 */
public Article save(Article article) {
    // Specify to use the same db instance for this thread
    ODatabaseRecordThreadLocal.instance().set(db);

    // The Class will be automatically created into Orient Studio
    ODocument doc = new ODocument(Article.class.getSimpleName()); // The entity name is provided as parameter
    doc.field("title", article.getTitle());
    doc.field("content", article.getContent());
    doc.field("author", article.getAuthor());
    doc.save();

    return article;
}
It's pretty straightforward and just requires you to instantiate an ODocument, providing the necessary field to save and call the save() method.
Here is a concrete example of how the SQL can be perfectly used with OrientDB regardless the type of database we opted for, let's update an article based on its title:
/**
 * To update an article
 * @param article
 * @return boolean true if it was successfully updated
 */
public boolean update(Article article) {
    // Specify to use the same db instance for this thread
    ODatabaseRecordThreadLocal.instance().set(db);

    // Data
    String title = article.getTitle().trim();
    String content = article.getContent();
    String author = article.getAuthor();

    // The sql query
    String query = "update Article set content = '" + content +
            "', author = '" + author + "' where title = '" + title + "'";

    int resultInt = db.command(
            new OCommandSQL(query)).execute();

    if(resultInt != -1) return true;
    return false;
}The query of a single Article by its title can be done in this way with another basic SQL command:
/**
 * Find a single article by title
 * @param title
 * @return article if found null else
 */
public Article findOne(String title) {
    // SQL query to have the ones that match
    List<ODocument> results = db.query(
            new OSQLSynchQuery<ODocument>("select * from Article where title = '" + title + "'"));

    // For the sake of the test, pick the first found result
    if(!results.isEmpty()) {
        ODocument oDocument = results.get(0);
        return Article.fromODocument(oDocument);
    }

    return null;
}Now, accessing the list of all articles could be done in two ways, either with SQL or with a special database instance function as shown below:
/**
 * Find all saved articles so far
 * @return
 */
public List<Article> findAll() {
    // List of resulting article
    List<Article> articles = new ArrayList<>();

    // Load all the articles
    for (ODocument articleDocument : db.browseClass("Article")) {
        Article article = Article.fromODocument(articleDocument);

        articles.add(article);
    }

    return articles;
}Deleting an Article could be made with an SQL command also:
/**
 * Delete a single article by its title
 * @param title
 * @return boolean true if it was deleted successfully
 */
public boolean delete(String title) {
    title = title.trim(); // The title of the article to delete
    int resultInt =  db.command(
            new OCommandSQL("delete * from Article where title = '" + title + "'")).execute();

    if(resultInt != -1) return true;
    return false;
}Counting all the articles is a simple call as follow:
long size = db.countClass("Article");The use of SQL within OrientDB either with a Graph or a Document database is such a great feature especially because here it's internally incorporated into the engine, without the need of adding an additional driver.
The API need a front gate to serve the query, here we're using Spring RestController annotation to define a Rest controller. The full source code of the project is available on Github:
/**
 * Article controller for CRUD operations
 * @author dassiorleando
 */
@RestController
public class ArticleResource {
    private final Logger log = LoggerFactory.getLogger(ArticleResource.class);

    private final ArticleService articleService;

    public ArticleResource(ArticleService articleService) {
        this.articleService = articleService;
    }

    /**
     * To create an article
     * @param article
     * @return
     */
    @PostMapping("/article")
    public Article create(@RequestBody @Valid Article article) {
        log.debug("Create an article with the properties {}", article);
        return articleService.save(article);
    }

    /**
     * To update an article
     * @param article
     * @return
     */
    @PutMapping("/article")
    public boolean update(@RequestBody @Valid Article article) {
        log.debug("Update the article of title {} with the properties {}", article.getTitle(), article);
        return articleService.update(article);
    }

    /**
     * Get the list of all articles
     * @return
     */
    @GetMapping("/article")
    public List<Article> list() {
        log.debug("We just get the list of articles one more time");
        return articleService.findAll();
    }

    /**
     * We asynchronously find an article by his title
     * @param title
     * @return
     */
    @GetMapping("/article/{title}")
    public Article findByTitle(@PathVariable @NotNull String title) {
        log.debug("Load the article of title: {}", title);
        return articleService.findOne(title);
    }

    /**
     * Delete an article by its title
     * @param title
     */
    @DeleteMapping("/article/{title}")
    public boolean deleteById(@PathVariable @NotNull String title) {
        log.debug("Delete the article of title: {}", title);
        return articleService.delete(title);
    }
}A basic script is available to run your API on your ECS or locally on any Linux/Mac computer as a bash file (startup.sh), supposing the port 8080 is the one used. Here's the file content:
echo "RUN THE PROJECT IN THE SERVER/LOCAL"

echo "Compiling while skipping tests ..."
./mvnw clean install -DskipTests
echo "Compilation finished"

echo "Kill the process on port 8080, to undeploy the former version if existing"
sudo kill $(sudo lsof -t -i:8080)

echo "Let's deploy the new version silently"
nohup ./mvnw spring-boot:run &
Note: startup.sh needs to be executable.
Here's an example of SQL query from the OrientDB dashboard to have all the saved Articles:
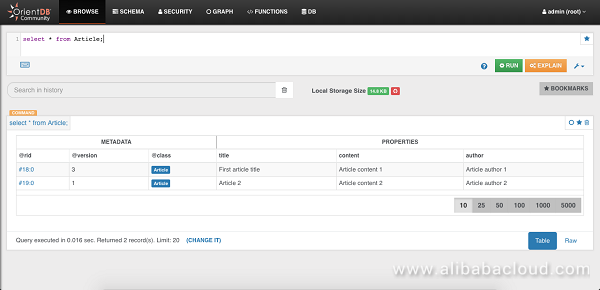
Clicking on the first column on a specific row will show us the full details of that Article plus the ability to update its content, change the fields type, add more fields and delete it from this view:

In this long article, we've seen how to build a Spring-Boot API using OrientDB as the database management system with its Java APIs and how to set it up all on an Alibaba Cloud ECS.
The full source code for this article can be found on Github.

2,593 posts | 793 followers
FollowAlibaba Clouder - September 7, 2020
Alibaba Clouder - April 13, 2019
Alibaba Clouder - September 29, 2019
Alibaba Clouder - June 5, 2019
Alibaba Clouder - August 2, 2018
Alibaba Cloud Native Community - June 4, 2025

2,593 posts | 793 followers
Follow Super App Solution for Telcos
Alibaba Cloud (in partnership with Whale Cloud) helps telcos build an all-in-one telecommunication and digital lifestyle platform based on DingTalk.
Learn More OpenAPI Explorer
OpenAPI Explorer allows you to call an API through its web interface or WebCLI, and view the entire process.
Learn More API Gateway
API Gateway provides you with high-performance and high-availability API hosting services to deploy and release your APIs on Alibaba Cloud products.
Learn More EMAS Superapp
Build superapps and corresponding ecosystems on a full-stack platform
Learn MoreMore Posts by Alibaba Clouder
colince December 4, 2018 at 2:12 pm
good article and thanks for sharing.