By Dassi Orleando, Alibaba Cloud Tech Share Author. Tech Share is Alibaba Cloud's incentive program to encourage the sharing of technical knowledge and best practices within the cloud community.
In this article, we'll be learning what is a federation in the Stellar network, its use case, how to actually benefit from it, and also how to deploy one into an Alibaba Cloud Elastic Compute Service (ECS) with Ubuntu installed.
Stellar is one of the most used Blockchain network right now in terms of market capitalization and adoption. According to CoinMarkerCap, at the time of writing, Stellar is the ranked 6 out of 100 cryptocurrencies.
To know more about this technology basic knowledges, the use cases, network structure, transaction fees, security, the currency symbol you should take a look at Stellar basics.
One of the main goals of new Blockchain technologies nowadays is to make their features more accessible to the rest of the word, meaning to peoples with not clear understanding of all the mechanic that is happening behind although they would like to (or need to) take advantage of this technology.
Bringing the Blockchain to the non-tech peoples to enhance the adoption is something being done from multiple angles, one of them is actually enabling peoples normally uniquely identified into the Blockchain by a Keypair (public & secret key both of them cryptographically linked) to transact just by using a Stellar address (email) instead of the long public key of 56 characters.
A Stellar address looks almost same like a normal email address, but with a simple addition here called the federation server link.
It's divided into two fragments disjointed by the symbol , the username and the second part which is the domain (stellar federation server link) in the form usernamedomain.tld:
From this definition we can clearly see that this address is federation server dependent while referring to an account in the entire stellar network and that it's possible to have for a single account as many stellar addresses as federation server currently available.
Note: The username is limited to printable UTF-8 characters, whitespace and the following characters excluded: <*,>.
Creating a federation address is a very straightforward process where one only needs to submit a basic form with a username/email he would like to be assigned to one of his specific public key, this needs to be done from a Stellar federation server you trust or either building yours.
Stellar is a decentralized network by principle, therefore creating a federation server is something any technical person can do. That said, you need to trust your federation server of choice before using it.
Some within the most popular are:
It's very important to use a federation server you actually trust especially one that a lot in the community are using is a good sign because this server is mapping your federation address with your account's public key. Just imagine someone is sending you 20k$ and your federation server is redirecting this big money to an account else than yours (bad mapping) on purpose or by mistake.
To see the Interstellar federation configurations, here is the link to view it with your browser: https://interstellar.exchange/.well-known/stellar.toml
We'll have something like this, pretty much similar to the one of all the other federation servers:

Let's suppose we know already to create a Stellar account, here's the one we're going to use for this tutorial: GDCHNM45XNVPRJWPTAJN5END4HHDBKYNTO5XV3IVM5UJQWX7N46X3RMR.
Let's create a Stellar federation address here are the steps:
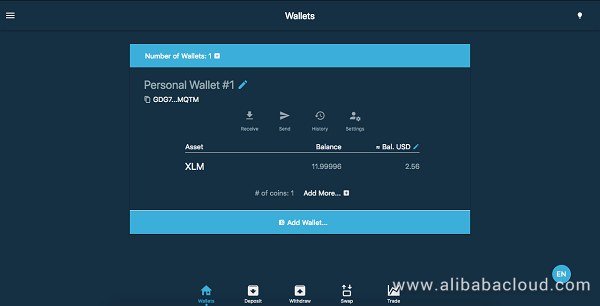
After being logged in, here is the screen I see with my stellar account I have added.

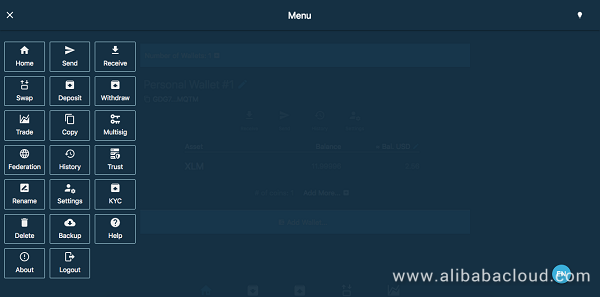
Click Federation, on the left menu

Edit federation address
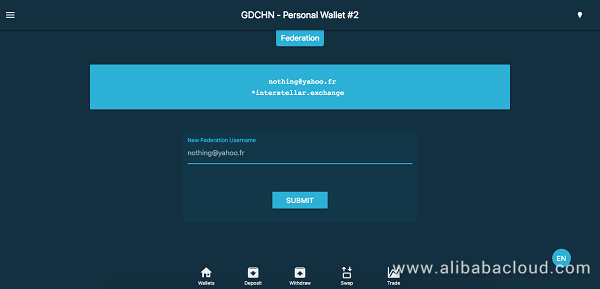
The next interface is just a simple form where we can submit our federation username, once done here is almost what will be shown on the top: a federation name that looks like an email created on the Interstellar federation server:

Meaning across the whole Stellar network, you can referrer to the account GDCHNM45XNVPRJWPTAJN5END4HHDBKYNTO5XV3IVM5UJQWX7N46X3RMR with the easier to grab name nothing@yahoo.fr*interstellar.exchange.
Let's assume that we've two Stellar accounts, the one we'll send the money to has a federation address we have submitted in the previous section.
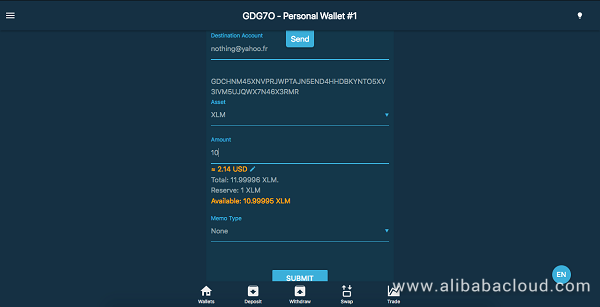
Next, from the dashboard to quickly access the sending form we need to click on the Send button. Here's the interface where we can fill the federation address corresponding to the account which will receive the money:

We can simply see how the corresponding account's public key has been fetched and shown below the federation name automatically. That's it.
Notes:
Let's suppose you don't trust anyone else than yourself. You can build your own federation server using this process. Technical (software developer) skills are needed to follow the whole process as it involves:
Note: you can purchase a domain name on Alibaba Cloud Domain.
In this article we're using an Alibaba Cloud ECS with Ubuntu installed to deploy a stellar federation server following the defined process. After having your server up and running, here are the steps to handle:
Here are the terminal commands to type in order to install MySQL, the last one is to configure and make it more secured on our ECS:
sudo apt-get update
sudo apt-get install mysql-server
mysql_secure_installationGo tools are required to run any Go program into a computer, let's get the latest stable Linux binary release from the official page here and unzip it into the appropriate folder then configure the environment variables. The latest version at the time of writing this article is Go 1.11.1.
Some terminal commands for these steps:
cd /usr/local : go into the right folder to install the binary
wget https://dl.google.com/go/go1.11.1.linux-386.tar.gz : to download our binary into the current directory
tar -C /usr/local -xzf go1.11.1.linux-386.tar.gz : unzip the downloaded binary
The full installation guide is available in the Go documentation.
The federation server is provided by Stellar, just pick one from the releases here, especially the latest according to your operating system (ours is Ubuntu then we took the Linux one).
Before running the server, you should know that by default it's using a configuration file named federation.cfg in the current working directory.
This configuration file must be written with the toml syntax and have some special and very important information relative to your database configuration, the port to use and the available queries that define how the federation and reverse-federation should work.
Example:
port = 8000

[database]
type = "mysql"
dsn = "dbuser:dbpassword@/dbname"

[queries]
federation = "SELECT account_id as id FROM Users WHERE username = ? AND domain = ?"
reverse-federation = "SELECT username as name, domain FROM Users WHERE account_id = ?"
It's the most used configuration, where every user owns a Stellar account without the need of any memo. Let's not forget to fill the right information for our database system we've installed up here.
In this tutorial, we focused on how the famous stellar federation address work, how to install one into our ECS, how it simplifies the money sending operation as now there is no need to always look for the very long correspondent's public key.
Building a Spring-Boot API with a Multi-Model Database (OrientDB) on Alibaba Cloud

2,593 posts | 790 followers
FollowAlibaba Cloud Blockchain Service Team - August 27, 2018
Wei Kuo - August 30, 2019
Alibaba Cloud Native - May 20, 2024
Hiteshjethva - December 12, 2024
Alibaba Cloud Community - April 9, 2024
Alibaba Cloud Community - October 7, 2023

2,593 posts | 790 followers
Follow ECS(Elastic Compute Service)
Elastic and secure virtual cloud servers to cater all your cloud hosting needs.
Learn More Simple Application Server
Cloud-based and lightweight servers that are easy to set up and manage
Learn More OSS(Object Storage Service)
An encrypted and secure cloud storage service which stores, processes and accesses massive amounts of data from anywhere in the world
Learn MoreMore Posts by Alibaba Clouder