Saat database MariaDB Anda berjalan di cloud pihak ketiga atau di infrastruktur Anda sendiri, Data Disaster Recovery (DBS) menyediakan layanan backup dan pemulihan terkelola tanpa perlu mengoperasikan alat backup secara manual. Topik ini menjelaskan cara mengonfigurasi jadwal backup logis untuk database MariaDB Anda, lalu memulihkan data dari jadwal tersebut ke database target.
Prasyarat
Sebelum memulai, pastikan Anda telah:
Membeli jadwal backup Data Disaster Recovery dengan Data Source Type diatur ke MariaDB dan Backup Mode diatur ke Logical Backup. Untuk detailnya, lihat Buat jadwal backup.
Memiliki akun database dengan izin untuk melakukan backup pada database sumber.
(Untuk cadangan inkremental) Binary logging diaktifkan pada database sumber. Untuk memverifikasi, jalankan perintah berikut pada instans MariaDB Anda. Jika
log_binmengembalikan nilaiOFF, aktifkan binary logging sebelum mengaktifkan cadangan inkremental.SHOW VARIABLES LIKE 'log_bin';
Konfigurasi jadwal backup
Masuk ke Konsol Data Management (DMS) V5.0.
Pada bilah navigasi atas, pilih Security and Specifications (DBS) > Disaster Recovery for Data (DBS) > Backup Plan.
Jika Anda menggunakan konsol DMS dalam mode simple, arahkan pointer ke ikon
 di pojok kiri atas, lalu pilih All Features > Security and Specifications (DBS) > Disaster Recovery for Data (DBS) > Backup Plan.
Pada halaman Backup Schedules, temukan jadwal backup yang ingin dikonfigurasi, lalu klik Configure Backup Schedule di kolom Actions.

Pada langkah Configure Backup Source and Destination, atur parameter yang dijelaskan dalam tabel berikut, lalu klik Next.
Sumber cadangan
Parameter Deskripsi Schedule Name Nama jadwal backup. Data Disaster Recovery menghasilkan nama secara otomatis. Masukkan nama deskriptif yang mudah dikenali. Nama tidak harus unik. Backup Mode Metode backup. Secara default diatur ke Logical Backup berdasarkan pilihan pembelian Anda. Database Location Cara mengakses database sumber. Opsi: No public network IP: Port's self-built database (accessed through the database gateway) — memerlukan parameter Gateway instance ID; konfigurasikan gateway database terlebih dahulu. User-Created Database with Public IP Address \<IP Address:Port Number\> — memerlukan Address dan Port Number. ECS-Hosted Database — memerlukan ECS Instance ID dan Port Number. Express Connect DB/VPN Gateway/Intelligent Gateway — memerlukan parameter Peer VPC; konfigurasikan virtual private cloud (VPC) terlebih dahulu. PolarDB — memerlukan parameter PolarDB Instance ID. Instance Region Wilayah tempat database sumber berada. Ditampilkan hanya jika Database Location diatur ke RDS Instance, PolarDB, ECS-Hosted Database, atau No public network IP: Port's self-built database (accessed through the database gateway). Database Type Jenis database sumber. Default: MySQL. Ditampilkan saat Database Location tidak diatur ke RDS Instance. Gateway instance ID ID gateway database. Ditampilkan hanya jika Database Location adalah No public network IP: Port's self-built database (accessed through the database gateway). Peer VPC VPC tempat database sumber berada. Ditampilkan hanya jika Database Location adalah Express Connect DB/VPN Gateway/Intelligent Gateway. ECS Instance ID ID instans Elastic Compute Service (ECS) yang menjalankan database sumber. Ditampilkan hanya jika Database Location adalah ECS-Hosted Database. PolarDB Instance ID ID kluster PolarDB yang akan dicadangkan. Address Titik akhir untuk menghubungkan ke database sumber. Jika aturan firewall dikonfigurasi pada server database, klik Set Whitelist untuk mendapatkan Blok CIDR yang digunakan oleh Data Disaster Recovery, lalu tambahkan ke daftar putih server. Ditampilkan saat Database Location adalah No public network IP: Port's self-built database (accessed through the database gateway), Express Connect DB/VPN Gateway/Intelligent Gateway, atau User-Created Database with Public IP Address \<IP Address:Port Number\>. Port Number Port untuk menghubungkan ke database sumber. Database Account Username akun yang digunakan untuk menghubungkan ke database sumber. Akun tersebut harus memiliki izin backup. Untuk database ApsaraDB RDS, izin read-only sudah cukup untuk backup; izin baca dan tulis diperlukan untuk backup dan pemulihan. Password Password untuk akun database. Setelah memasukkan kredensial Anda, klik Test Connection untuk memverifikasi konektivitas. Test Passed menandakan pengaturan valid. Jika muncul Test Failed, klik Check di sebelahnya dan perbaiki pengaturannya. Compliance warranty regarding cross-border data transfers Baca dan terima komitmen kepatuhan dengan mencentang kotak centang. Tujuan cadangan
Parameter Deskripsi Backup Storage Type Tempat penyimpanan data backup. DBS Storage (recommended): Data Disaster Recovery mengelola penyimpanan tanpa memerlukan bucket Object Storage Service (OSS). Ditagih berdasarkan volume data. Lihat Biaya penyimpanan. OSS For User: Memerlukan bucket OSS yang sudah ada (hanya kelas penyimpanan Standard). Lihat Buat bucket. Jika Anda memilih OSS For User, atur juga parameter OSS Bucket Name. Untuk volume data besar, paket penyimpanan subscription lebih hemat biaya dibandingkan penagihan pay-as-you-go. Storage Encryption Metode enkripsi untuk data yang disimpan. Encrypted (direkomendasikan): menggunakan AES-256 dengan enkripsi sisi server OSS. Non-encrypted: data disimpan tanpa enkripsi. 
Pada langkah Edit Backup Objects, pilih database atau tabel yang akan dicadangkan di bagian Available, lalu pindahkan ke bagian Selected. Klik Next.
Dengan backup logis, Anda dapat mencadangkan tabel individual, database individual, beberapa database, atau seluruh instans. Klik Select All di pojok kiri bawah bagian Available untuk memilih semua objek. Untuk granularitas cadangan yang didukung, lihat Jenis dan fitur database yang didukung. Database yang dibuat setelah jadwal backup dikonfigurasi tidak termasuk secara otomatis — tambahkan nanti di halaman Edit Backup Objects. Lihat Ubah objek backup.
Pada langkah Configure Backup Time, atur parameter berikut, lalu klik Next.
PentingUntuk pemulihan pada titik waktu, gunakan Periodic Backup dengan minimal satu cadangan penuh per minggu. Interval yang lebih panjang antar cadangan penuh berarti lebih banyak log biner yang harus diputar ulang selama pemulihan, sehingga meningkatkan Objektif Waktu Pemulihan (RTO) dan risiko kesalahan. Cadangan inkremental memerlukan binary logging yang diaktifkan pada database sumber — verifikasi hal ini sebelum mengaktifkannya (lihat Prasyarat).
Parameter Deskripsi Full-scale Backup Frequency Periodic Backup: menjalankan backup sesuai jadwal berulang. Single Backup: menjalankan satu kali backup. Full Data Backup Recurrence Hari dalam seminggu ketika Data Disaster Recovery menjalankan cadangan penuh. Pilih minimal satu hari. Diperlukan saat Full-scale Backup Frequency adalah Periodic Backup. Start At Waktu mulai cadangan penuh. Jadwalkan pada jam sepi untuk meminimalkan dampak pada database (contoh: 01:00). Jika backup sebelumnya masih berjalan saat waktu mulai jadwal berikutnya tiba, Data Disaster Recovery akan melewatkan eksekusi tersebut. Diperlukan saat Full-scale Backup Frequency adalah Periodic Backup. Incremental Backup Aktifkan untuk mencadangkan perubahan log biner antar cadangan penuh. Memerlukan binary logging yang diaktifkan pada database sumber. Ditampilkan hanya saat Full-scale Backup Frequency adalah Periodic Backup. Maximum Concurrent Threads for Full Data Backup Jumlah maksimum thread untuk cadangan penuh. Kurangi nilai ini untuk meminimalkan dampak pada kinerja database selama backup. Backup network speed limit Lebar pita jaringan maksimum untuk transfer backup, dalam MB/s. Nilai default 0berarti tidak terbatas. Ditampilkan hanya untuk database MySQL.Pada langkah Edit Lifecycle, konfigurasikan periode retensi untuk data cadangan penuh. Jika Anda mengaktifkan Incremental Backup pada langkah sebelumnya, konfigurasikan juga periode retensi untuk data cadangan inkremental.
Klik Precheck di pojok kanan bawah halaman.
Saat muncul Precheck Passed, klik Start Task. Jadwal backup aktif ketika statusnya berubah menjadi Running.
Jika terjadi kesalahan saat memulai jadwal backup, segera perbaiki. Lihat Bagaimana cara memperbaiki kesalahan pada jadwal backup yang abnormal? Jika masalah berlanjut, hubungi dukungan teknis di grup DingTalk (ID: 35585947).
Pulihkan database MariaDB
Memulihkan database menulis data ke database tujuan. Jika suatu objek dalam backup memiliki nama yang sama dengan objek di tujuan, Data Disaster Recovery mengganti nama objek yang dipulihkan dalam format <original_name>_dbs_<restore_task_ID>_<timestamp>. Lakukan uji coba pemulihan pada database non-produksi sebelum menerapkannya ke produksi.
Masuk ke Konsol DMS V5.0.
Pada bilah navigasi atas, pilih Security and Specifications (DBS) > Disaster Recovery for Data (DBS) > Backup Plan.
Jika Anda menggunakan konsol DMS dalam mode simple, arahkan pointer ke ikon
di pojok kiri atas, lalu pilih All Features > Security and Specifications (DBS) > Disaster Recovery for Data (DBS) > Backup Plan.Pada halaman Backup Schedules, temukan jadwal backup, lalu klik Manage di kolom Actions.
Pada halaman Configure Task, klik Restore Database di pojok kanan atas.
Pada langkah Set Time Restored To, atur parameter yang dijelaskan dalam tabel berikut, lalu klik Next.
Titik pemulihan
Parameter Deskripsi Task Name Nama tugas pemulihan. Data Disaster Recovery menghasilkan nama secara otomatis. Masukkan nama deskriptif yang mudah dikenali. Nama tidak harus unik. Time Range Available to Restore Rentang waktu dari titik waktu saat set cadangan penuh pertama dibuat hingga titik waktu saat set cadangan penuh terbaru dibuat. Dengan cadangan inkremental diaktifkan, Anda dapat memulihkan ke titik mana pun dalam rentang ini. Tanpa cadangan inkremental, Anda hanya dapat memulihkan ke titik saat cadangan penuh selesai. Restore To Titik waktu target untuk pemulihan. Harus berada dalam Time Range Available to Restore. Database tujuan
Parameter Deskripsi Database Location Lokasi database tujuan. Opsi: RDS Instance, User-Created Database with Public IP Address \<IP Address:Port Number\>, ECS-Hosted Database, Express Connect DB/VPN Gateway/Intelligent Gateway, No public network IP: Port's self-built database (accessed through the database gateway). Pastikan database tujuan sedang berjalan sebelum melanjutkan. Instance Region Wilayah tempat database tujuan berada. RDS Instance ID ID instans ApsaraDB RDS tujuan. Database Account Username akun yang digunakan untuk menghubungkan ke database tujuan. Akun tersebut harus memiliki izin tulis. Password Password untuk akun database tujuan. Compliance warranty regarding cross-border data transfers Baca dan terima komitmen kepatuhan dengan mencentang kotak centang. 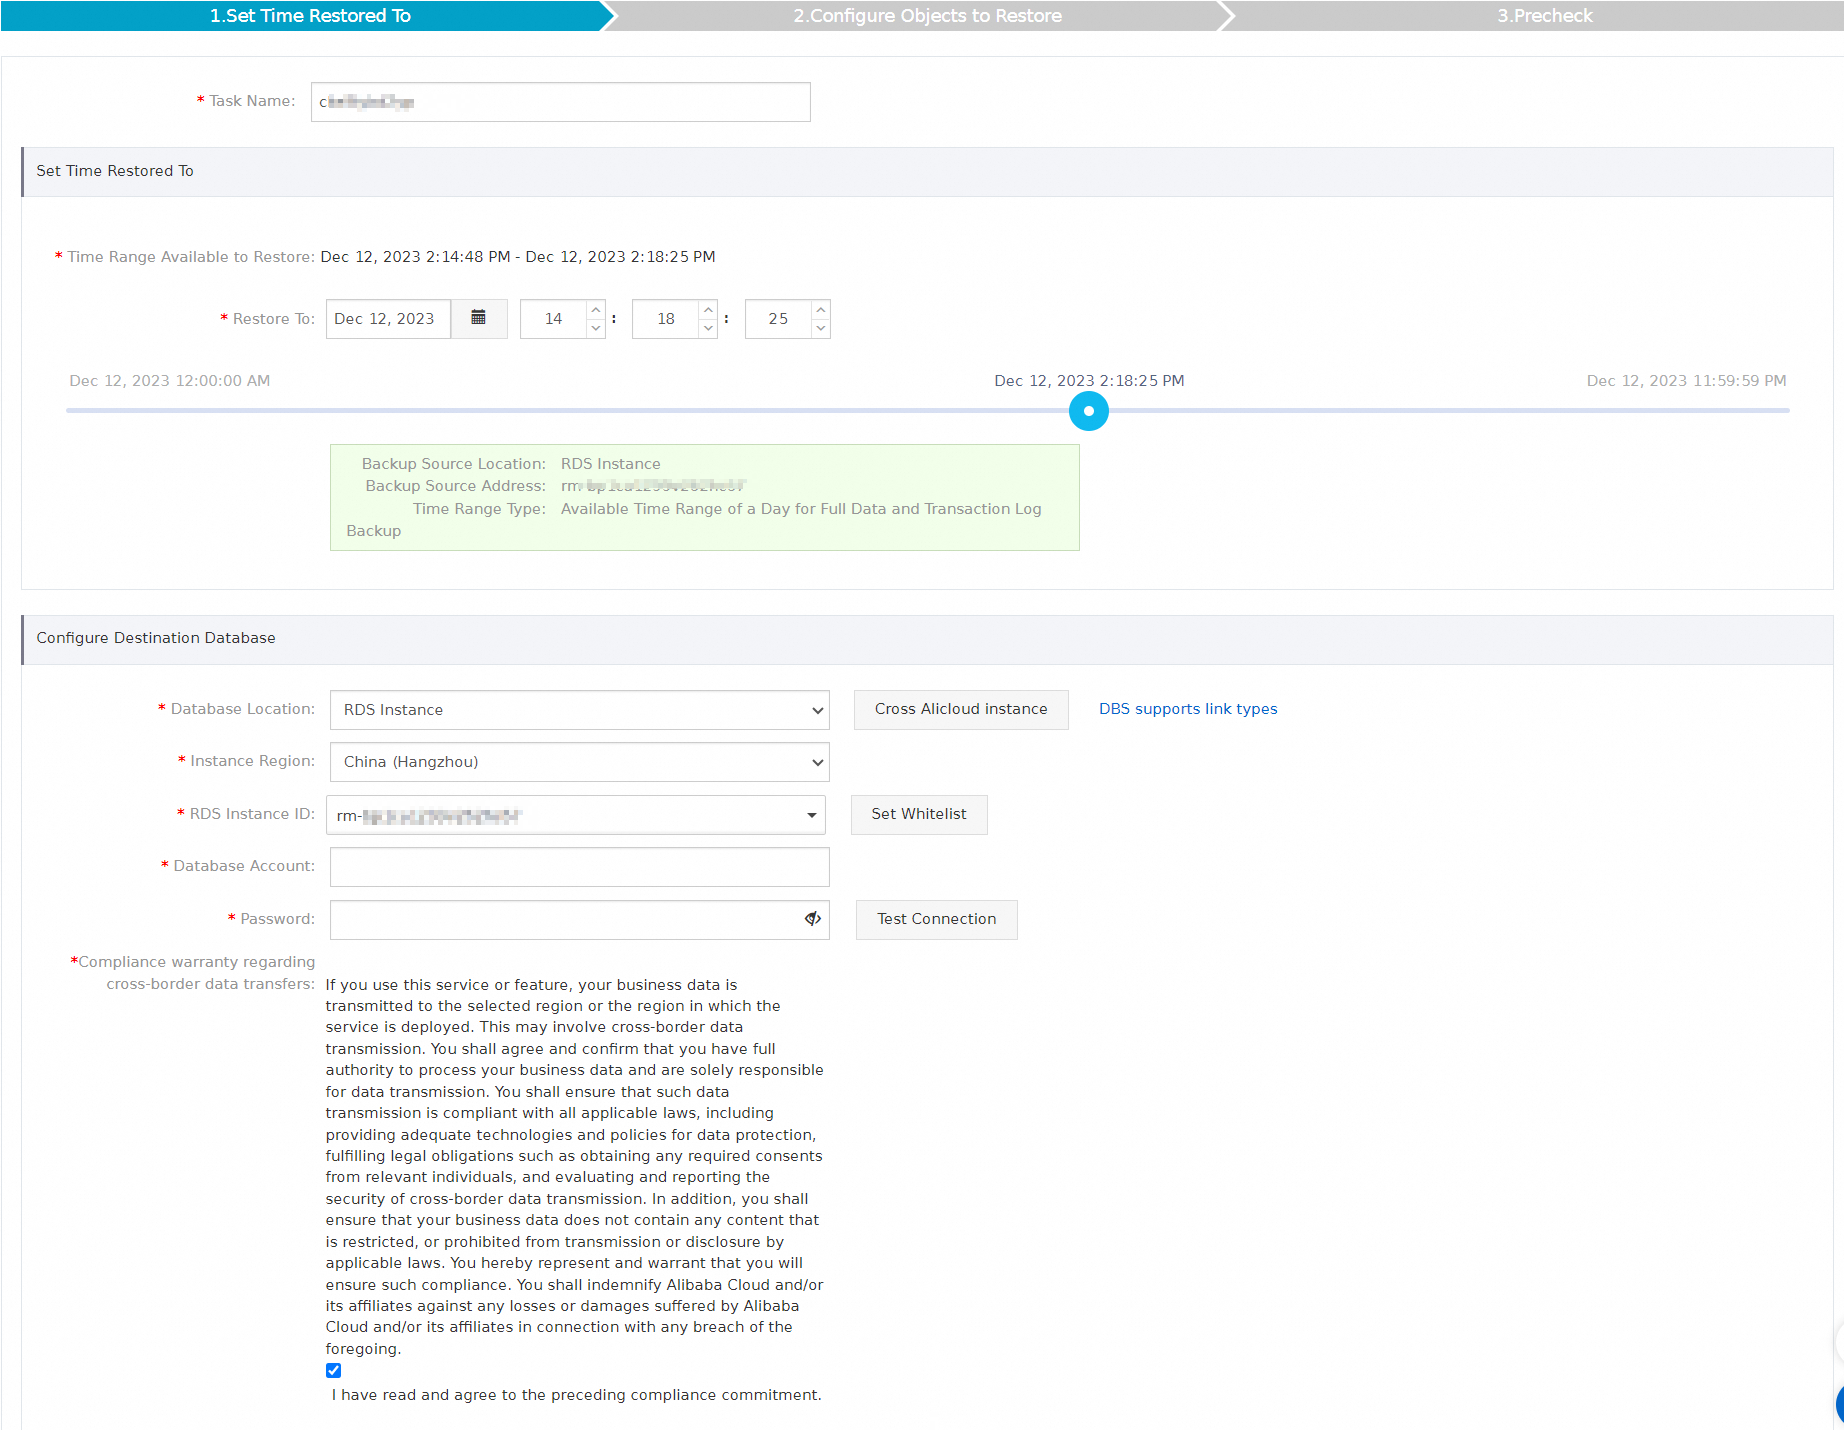
Pada langkah Configure Objects to Restore, atur parameter berikut, lalu klik Precheck.
Parameter Deskripsi Conflict Handling Secara default diatur ke Rename Object with the Same Name. Misalnya, jika tabel bernama job_infosudah ada di tujuan, tabel yang dipulihkan akan diganti namanya menjadijob_info_dbs_<restore_task_ID>_<timestamp>.Objects to Restore Pilih database atau tabel yang akan dipulihkan di bagian Available, lalu pindahkan ke bagian Selected. Data Disaster Recovery mendukung granularitas pemulihan tingkat tabel dan tingkat database untuk MariaDB, yang mengurangi jumlah data yang ditransfer dan mempersingkat RTO. Untuk detailnya, lihat Jenis dan fitur database yang didukung. Saat muncul Precheck Passed di kotak dialog Precheck, klik Start Task. Untuk memantau progres, klik Restore Tasks di panel navigasi kiri. Waktu pemulihan bergantung pada spesifikasi jadwal backup dan ukuran database — jadwal backup dengan spesifikasi lebih tinggi menyelesaikan pemulihan lebih cepat. Untuk data benchmark, lihat Uji kinerja backup logis dan backup fisik.
Referensi API
Anda juga dapat membuat dan mengelola jadwal backup melalui API:
CreateBackupPlan: buat jadwal backup.
CreateAndStartBackupPlan: buat, konfigurasi, dan mulai jadwal backup dalam satu panggilan.
Langkah berikutnya
Ubah pengaturan sumber, objek, atau strategi backup: Kelola jadwal backup
Tinjau penagihan untuk jadwal backup Anda: FAQ penagihan
Jeda jadwal backup yang tidak lagi diperlukan: Jeda atau mulai jadwal backup