You can use an Express Connect circuit to connect your on-premises data center to an Alibaba Cloud Virtual Private Cloud (VPC). This topic describes how to connect your on-premises data center to the VPC of Elastic Desktop Service (EDS) Enterprise, which allows clients to access cloud computers over the VPC.
Background
Express Connect is a fast and secure way to connect your on-premises data center to Alibaba Cloud. You can lease a dedicated line from a carrier to connect your data center to an Alibaba Cloud access point. This connection bypasses the public internet and provides higher security, better reliability, higher speeds, and lower latency. For more information, see Express Connect circuit connections.
The office network for Elastic Desktop Service (EDS) Enterprise is a private network based on Alibaba Cloud's Virtual Private Cloud (VPC). When you create an office network, you specify an IPv4 CIDR block, and the system creates a corresponding VPC based on that block.
Prerequisites
Before you begin, read Overview of solutions for accessing cloud computers over a VPC and complete the following preparations.
Before you apply for an Express Connect circuit, determine the access point, complete the site survey with the carrier, and understand the billing details.
Plan the CIDR blocks for your on-premises data center, office network (IPv4 CIDR block), and the peering IP addresses for the virtual border router (VBR).
The following table provides an example of network planning. Use values from your actual network plan.
Parameter
Address range
Office network IPv4
192.168.0.0/16
On-premises data center CIDR block
172.30.0.0/24
VBR peering IPs
Alibaba Cloud side: 10.0.0.1/30
Customer side: 10.0.0.2/30
Subnet mask: 255.255.255.252
Ensure that a Cloud Enterprise Network (CEN) instance is available. If not, create one. For more information, see Create a CEN instance.
Download and install the EDS client. For more information, see Use a software client.
Step 1: Apply for and connect an Express Connect circuit
To connect your on-premises data center to the office network VPC, you must apply for an Express Connect port and complete the physical connection. For more information, see Step 1: Apply for an Express Connect port and complete the circuit connection.
Step 2: Create a VBR and configure routes
After the Express Connect circuit is active, create a virtual border router (VBR) instance to act as a bridge between the circuit port and your on-premises data center.
Log on to the Express Connect console.
Create a VBR instance and configure a route on the VBR that points to your on-premises data center. For more information, see Step 2: Create a VBR.
Step 3: Attach VPC and VBR to CEN
Attach the office network VPC and the VBR to a transit router in your Cloud Enterprise Network (CEN) instance. CEN then automatically learns and distributes routes to enable communication between the office network VPC and your on-premises data center.
Attach the office network VPC to CEN
The following section uses the creation of a convenience office network as an example to describe how to add the VPC of an office network to a Cloud Enterprise Network (CEN). In practice, you can create a convenience office network or an AD office network as needed and add its VPC to a Cloud Enterprise Network. For more information, see Create and manage office networks based on convenience accounts or Create and manage office networks based on enterprise AD accounts.
Log on to the Elastic Desktop Service Enterprise console.
In the left-side navigation pane, choose .
In the top navigation bar, select a region.
Click Create Office Network. In the Create Office Network panel, configure the following parameters and click Next: Configure Account System.
The following table describes the parameters.
Parameter
Description
Example
Regions
The region where the office network is located.
China (Hangzhou)
Office Network Name
A custom name for the office network. For more information about the naming conventions, see the on-screen instructions.
test001
Office Network Type
To attach the office network to a CEN instance, you must select Advanced Office Network.
advanced office network
IPv4 CIDR Block
Specify an IPv4 CIDR block based on your requirements.
192.168.0.0/16
Connection Method
The method used to connect to cloud computers.
VPC
Attach to CEN
Select Yes. Select the ID of a CEN instance that belongs to the same account or a different account, and then follow the on-screen instructions to complete the verification.
This example uses the CEN instance ID prepared earlier under the same account, such as cen-ebr75yhfkm8eg3****.
On the Configure Account System page, set Account Type to Convenience Account and click Complete creation.
Attach the VBR to CEN
After you attach the office network VPC to CEN, CEN automatically creates a Basic Edition transit router. Then, connect the VBR instance to this transit router. The following steps show how to attach a VBR to a Basic Edition transit router. You can use either a Basic or Enterprise Edition transit router. For more information, see Transit router CIDR blocks.
Log on to the Cloud Enterprise Network console.
On the CEN Instance page, click the ID of the CEN instance that you want to manage.
On the tab, find the transit router for the target region, and in the Actions column, click Create Connection.
On the Connection with Peer Network Instance page, configure the following parameters to create the VBR connection.
Parameter
Configuration
Example
Instance type
Select the type of network instance.
Virtual Border Router (VBR)
Region
Select the region where the network instance to be connected is located.
China (Hangzhou)
Transit Router
The system automatically displays the transit router that has been created in the current region.
tr-m5ekrwb509owzxp5qd1****
Owner account
Select the type of account to which the network instance to be connected belongs.
In this example, select Current Account.
Network instance
Select the ID of the VBR instance to be connected.
This example uses the VBR instance that was previously created.
This example uses the VBR instance created in Step 2, for example, VBR-test.
Click OK.
Step 4: Configure VPC address or cloud service route
You can use one of the following solutions. Solutions 1 and 2 describe how to configure an enterprise network address. Solution 1 uses a fixed address and is simpler for end users because they do not need to configure a custom address.
Solution 1: Configure a fixed enterprise network address
Obtain the private gateway address of the office network.
Log on to the Elastic Desktop Service Enterprise console.
In the left-side navigation pane, choose .
On the Office Networks page, click the ID of the target office network.
In the Network Information section of the office network details page, copy the Private Gateway Address. You will use this address in a later step.
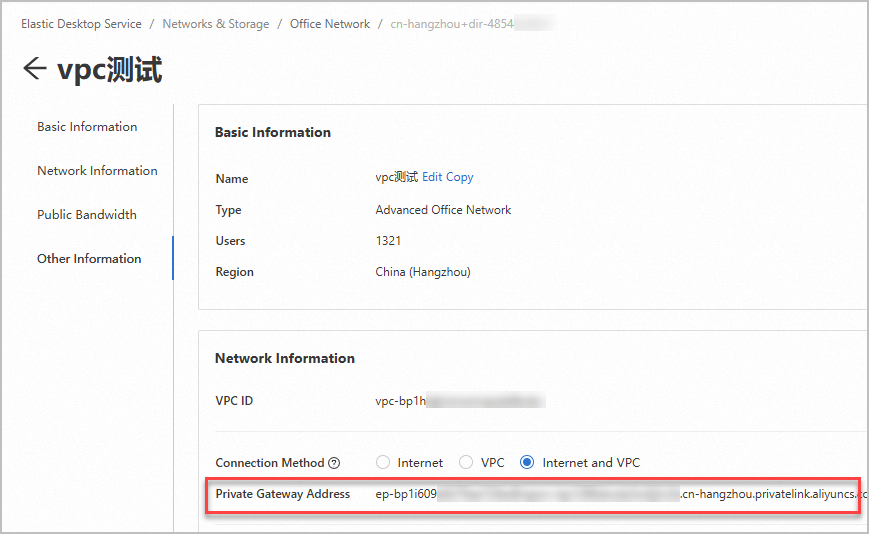
Configure a CNAME record on your enterprise DNS service to point
private.wuying.comto the private network gateway address of your office network.End users configure the network connection on their WUYING Terminals.
Open the Windows client.
In the upper-right corner of the logon page, click the icon and select Network Access Configuration.
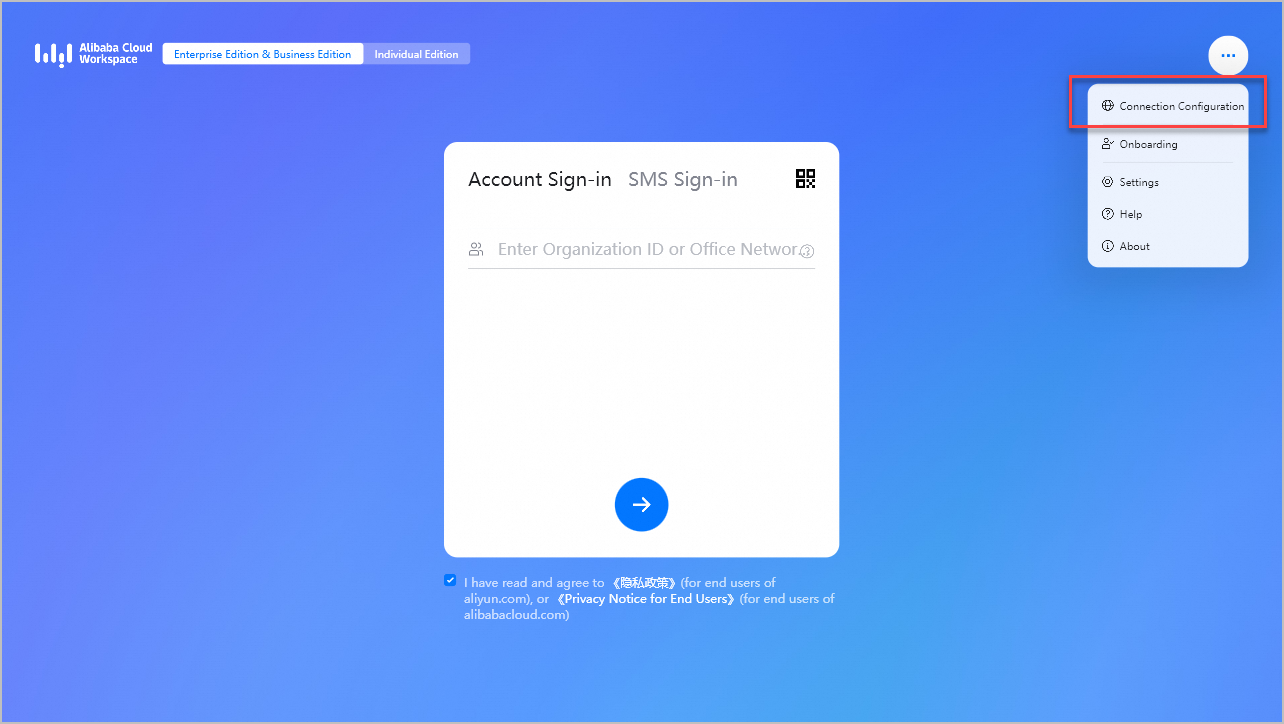
In the Network Access Configuration dialog box, complete the following configurations:
ImportantMake sure that the Windows client that you use is V7.7 or later. Otherwise, you cannot configure the enterprise private network address.
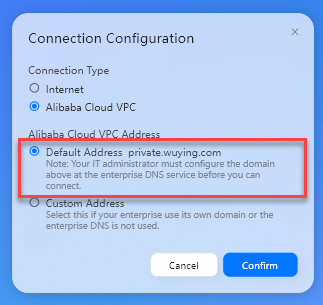
Connection Type: Select Enterprise Network.
Enterprise Network Address: Select Fixed Address.
Click OK.
Solution 2: Configure a custom enterprise network address
Obtain the private gateway address of the office network and provide it to your end users.
Log on to the Elastic Desktop Service Enterprise console.
In the left-side navigation pane, choose .
On the Office Networks page, click the ID of the target office network.
In the Network Information section of the office network details page, copy the Private Gateway Address. You will use this address in a later step.
End users configure the network connection on their WUYING Terminals.
Open the Windows client.
In the upper-right corner of the logon page, click the icon and select Network Access Configuration.
In the Network Access Configuration dialog box, complete the following configurations:
ImportantMake sure that you use Windows client V7.7 or later. Otherwise, you cannot configure an enterprise private network address.
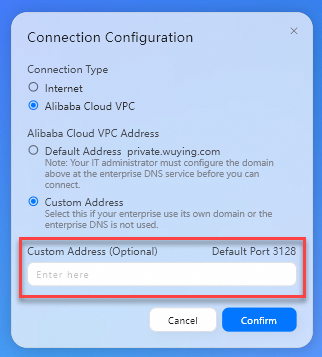
Connection Type: Select Enterprise Network.
Enterprise Network Address: Select Custom Address.
Custom Address: Enter the private gateway address of the office network that is provided by the administrator.
Click OK.
Solution 3: Cloud services
After a VBR instance is connected to a transit router, the associated on-premises network can access cloud services deployed on Alibaba Cloud through that transit router.
The following steps describe how to configure access to cloud services for a Basic Edition transit router. If you are using an Enterprise Edition transit router, follow the on-screen instructions. For more information, see Configure access to cloud services.
For the CIDR blocks required to access the cloud computer service, see Port requirements for the cloud computer service.
Log on to the Cloud Enterprise Network console.
On the CEN Instance page, click the ID of the CEN instance that you want to manage.
On the Basic Information > Transit Router tab, click the ID of the transit router in the region where the cloud service is deployed.
On the transit router details page, click the Cloud Services tab.
On the Cloud Services tab, click Set Cloud Service.
In the Set Cloud Service dialog box, configure the following parameters and click OK.
Parameter
Description
Service IP or CIDR block
Enter the IP address or CIDR block of the cloud service. Example: 100.118.28.0/24.
Service region
Select the region where the cloud service is deployed.
Service VPC
Select the VPC instance that is connected to the transit router.
Access region
Select the region where the VBR instance or CEN instance that needs to access the cloud service is located.
Description
Enter a description for the cloud service.
NoteRepeat this process for each IP address or CIDR block that the cloud service requires.
Step 5: Verify the VPC connection
Open the Windows client.
In the upper-right corner of the logon page, click the icon and select Network Access Configuration.
In the Network Access Configuration dialog box, set Connection Type to Enterprise Network.
On the logon page, enter the logon credentials that you received in the cloud computer allocation notification email (including your workspace ID or organization ID, username, and password), and click the next icon.
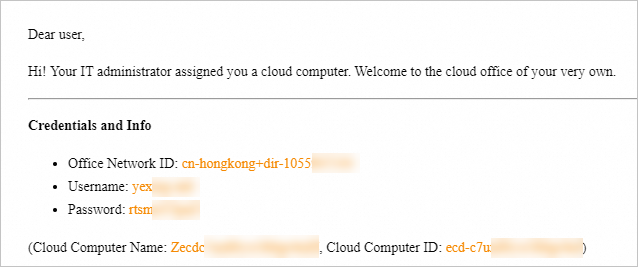
On the cloud resource list page of the client, find your cloud computer, and then turn it on and connect to it.
NoteIf a network request timeout error occurs, the network connection failed. Check your configuration. After you confirm that the configuration is correct, log on to the client again and connect to the cloud computer.