When you need precise protection against specific attacks—such as malicious API calls, suspicious requests, or high-frequency scanning—use custom rules to build tailored protection strategies with flexible match conditions and rule actions.
Key concepts
Custom rules: One of the protection modules in Core Web Protection. Before you enable this module, you must create a protection template. The system supports multiple protection templates.
Protection template: A collection of protection rules that defines specific rule content and scope. A protection template consists of three parts: template type, protection rules, and apply-to objects.
Template type: Specified when you create a protection template and cannot be changed afterward. Two template types are available:
Template type
Description
Applicable scenario
Default protection template
By default, the template applies to all protected objects and object groups, including newly added ones.
You can manually exclude specific objects by setting them to "Not Applied".
Only one default protection template can be created in the Custom Rules module.
Deploy general-purpose protection rules that need to be applied globally.
Custom protection template
You must manually specify the protected objects or object groups to which the template applies.
Deploy fine-grained protection rules for specific business scenarios, such as login or payment APIs.
Protection rule: Defines specific detection logic and response actions. A protection template can contain multiple protection rules. Each rule consists of three parts:
Match condition: Defines the characteristics of the requests to detect, such as request path or client IP address.
Protection rule type: Three detection dimensions are supported: Access Control, Rate Limiting, and Extension Execution.
Rule action: Defines the action to take when a rule is matched. Rule actions are prioritized from highest to lowest: Block, Strict CAPTCHA, CAPTCHA, JavaScript Validation, and Log.
NoteWhen a request matches multiple rules with the same rule action within the same protection module, one of the matching rules is selected at random.
Apply to: Specifies the target to which the protection template applies. You use this setting to apply protection rules to designated protected objects or protected object groups. A protected object or object group can be associated with multiple protection templates.
Protected object: The system automatically creates a protected object for each domain name or cloud service instance that is added to WAF.
Protected object group: You can add multiple protected objects to a protected object group for centralized management.
Procedure
Before you proceed, make sure that a protected object exists (your web business is added to WAF). If your business is not yet added, see Overview.
Log on to the Web Application Firewall 3.0 console. In the top navigation bar, select the resource group and region (Chinese Mainland or Outside Chinese Mainland) of your WAF instance. In the left-side navigation pane, choose .
Step 1: Configure the protection template type
In the Custom Rule section on the Core Web Protection page, click Create Template. In the Create Template panel, configure the following parameters.
Template Name: Enter a name for the template.
Save as Default Template: You can configure only one default template in the Custom Rules module, and you can set it only when you create a new template.
Yes: You do not need to configure Apply To. By default, the template applies to all protected objects and object groups, including newly added ones. You can manually exclude specific objects by setting them to "Not Applied".
No: You must configure Apply To to manually specify the protected objects or object groups to which the template applies.
Step 2: Add protection rules to the protection template
In the Rule Configuration section, click Create Rule, and configure the following parameters.
Rule Name: Enter a name for the rule.
Match Condition: Configure the request characteristics that the rule must match. Click Add Condition to add a condition. Each condition consists of Match Field, Logical Operator, and Match Content. The following table provides configuration examples:
NoteIf a rule contains multiple conditions, a request must match all conditions (logical AND) to trigger the rule. For more information about match fields and logical operators, see Match conditions.
To apply the same rule to multiple endpoints (URIs), we recommend that you use the Contains One of Multiple Values logical operator in a single rule (to create an OR relationship).
Match Field
Logical Operator
Match Content
Description
URI Path
Contains
/login.phpIf the request path contains
/login.php, the request matches this rule.IP
Belongs To
192.1.XX.XXIf the client IP address is
192.1.XX.XX, the request matches this rule.Protection Rule Type: Three types are supported: Access Control, Rate Limiting, and Extension Execution.
Access Control: Suitable for scenarios where you need precise control over specific types of requests.
Rate Limiting: Suitable for scenarios based on access frequency, such as anti-abuse or anti-brute-force attacks. This feature is supported only by subscription Enterprise Edition, Ultimate Edition, and pay-as-you-go instances.
Extension Execution: Suitable for personalized security control scenarios that require custom Lua scripts for complex business logic. Configure Extensions first.
Access Control
Configure access control rules to perform specified actions on individual requests that meet specific conditions.
Rate Limiting
Configure rate limiting rules to prevent excessive client access.
Rate detection conditions: When the number of times a single Statistical Object matches the rule within the specified Statistical Interval (Seconds) exceeds the configured Threshold (Times), the blacklist action is triggered.
Parameter
Description
Statistical Object
Select the object for which request frequency is calculated. Valid values:
IP: Calculates the request frequency from the same IP address.
Custom Header: Groups requests by the value of a custom request header (such as
Referer) and calculates the request frequency for each group with the same header value within the specified time period.Custom Parameter: Calculates the request frequency for requests that contain a specified URL parameter. For example, if the parameter is
user_id, WAF calculates the request frequency for requests that share the sameuser_idvalue.Custom Cookie: Calculates the frequency of HTTP requests that contain a specific cookie within a specified time period. For example, when the custom cookie name is User, the system counts the occurrences of each User value within that time period.
Session: WAF establishes a session identifier by setting a cookie named
acw_tcin the response, and calculates the client request frequency based on the value of this cookie.Account: Calculates the request frequency from the same account. You must configure User Identification on the Protected Objects page before you can configure this option. For more information, see Configure protected objects and protected object groups.
Statistical Interval (Seconds)
Specify the time window for counting requests, in seconds.
Threshold (Times)
Set the maximum number of times a Statistical Object can match the Match Condition within the Statistical Interval (Seconds).
Response code detection conditions: When the Quantity or Percentage (%) of responses with a specific Status Code exceeds the specified threshold, the blacklist action is triggered. After you enable response code detection, the statistical object must meet both the rate detection conditions and the response code feature conditions to trigger the blacklist action.
Parameter
Description
Status Code
Set the status code to be calculated.
Quantity
Set the maximum number of times the specified Status Code can appear in responses within the statistical period.
Percentage (%)
Set the maximum percentage of responses with the specified Status Code within the statistical period.
Blacklist action conditions: Add statistical objects that meet the preceding detection conditions to the blacklist. Within the Timeout Period, the action defined in Rule Action is executed for requests from the blacklisted object within the Apply To scope.
Parameter
Description
Apply To
Set the scope of the blacklist action. Valid values:
Current Match Condition: The action is applied only to requests that match the current rule's Match Condition.
Protected Object: The action is applied to all requests from the statistical object (such as an IP address) to the current protected object.
Timeout Period
Set the duration for which the blacklist action is effective. Unit: seconds. Valid values: 60 to 86400.
Extension Execution
Select from configured extension plugin rules to implement personalized security control.
NoteExtension Execution rules support only two rule actions: Block and Log.
Rule Action: Select the protection action to execute when a request matches the rule.
Parameter
Description
JavaScript Validation
WAF returns a JavaScript validation code to the client. A standard browser automatically executes this code. If the client completes the execution, WAF allows all requests from the client for a period of time (30 minutes by default). Otherwise, the requests are blocked.
Block
Blocks the request that matches the rule and returns a block response page to the client.
NoteWAF uses a unified default block response page. You can also customize the block response page by using the Custom Response feature.
Log
Does not block requests that match the rule, but logs the match. When you are testing a rule, you can first use Log mode to analyze WAF logs and verify that no legitimate requests are blocked, and then switch to another rule action.
CAPTCHA
WAF returns a slider CAPTCHA page to the client. If the client successfully completes the CAPTCHA, WAF allows all requests from the client for a period of time (30 minutes by default). Otherwise, the requests are blocked.
Strict CAPTCHA
WAF returns a slider CAPTCHA page to the client. If the client successfully completes the CAPTCHA, the request is allowed. Otherwise, the request is blocked. In this mode, each request from the client that matches this rule requires CAPTCHA verification.
NoteOnly pay-as-you-go instances and subscription Enterprise Edition and Ultimate Edition instances support CAPTCHA.
JavaScript Validation and CAPTCHA apply only to synchronous requests. For asynchronous requests, such as those sent by using XMLHttpRequest or the Fetch API, you must inject the Web SDK. Otherwise, these features do not work properly. For more information, see the JS validation and CAPTCHA sections in Bot management.
After you enable JavaScript Validation or CAPTCHA and the client passes verification, WAF sets a cookie named
acw_sc__v2(for JavaScript Validation) oracw_sc__v3(for CAPTCHA) in the response header by using Set-Cookie. The client includes this identifier in the Cookie header of subsequent requests.
Advanced Settings (Optional): The following advanced features are supported only by subscription Enterprise Edition, Ultimate Edition, and pay-as-you-go instances.
Parameter
Description
Canary Rule
Configure the proportion of objects across different dimensions to which the rule applies.
After you enable canary release, you must also configure Dimension and Canary Release Proportion. Valid values for Dimension include: IP, Custom Header, Custom Parameter, Custom Cookie, and Session.
NoteThe canary release takes effect based on the configured Dimension, not by randomly applying the rule to requests at the specified proportion. For example, when Dimension is set to IP and Canary Release Proportion is set to 10%, WAF selects approximately 10% of IP addresses. All requests from the selected IP addresses are subject to the rule, rather than applying the rule to 10% of all requests randomly.
Effective Mode
Permanently Effective (default): The rule is permanently effective when the protection template is enabled.
Fixed Schedule: The rule is effective only within a specified time period.
Recurring Schedule: The rule is effective only within a specified recurring time cycle.
Step 3: Configure the apply-to objects for the protection template
In the Apply To section, select the protected objects and protected object groups to which the template applies.
The apply-to behavior depends on the configuration in Step 1:
Set as default protection template: You do not need to configure apply-to objects. By default, the template applies to all protected objects and object groups, including newly added ones. You can manually exclude specific objects by setting them to "Not Applied".
Not set as default protection template: You must manually specify the protected objects and protected object groups to which the template applies.
You can manually adjust the apply-to status of protected objects or protected object groups both during and after template creation.
Protection rule configuration examples
The following configuration examples are for reference only. Before you deploy rules in a production environment, you must adjust them based on your actual business traffic and attack characteristics. Directly copying and applying the following examples may cause business disruption or ineffective protection.
Restrict admin panel access to specific IP addresses only
Block all access requests to the /wp-admin path, and allow only requests from the administrator IP address 192.1.XX.XX.
Match Condition:
Set Match Field to
IP, Logical Operator toNot Belong To, and Match Content to the administrator's allowlist IP192.1.XX.XX.Set Match Field to
URI Path, Logical Operator toContains, and Match Content to the web page path that you want to restrict access to:/wp-admin.
Protection Rule Type: Access Control.
Rule Action: Block.
Block malicious crawlers and scanners
When you configure custom rules, you can refer to the following common User-Agent (UA) patterns to help identify traffic types:
Security scanning tools: such as
sqlmap,nmap,nikto, and others (commonly used for vulnerability scanning).Automated scripts and libraries: such as
python-requests,Python-urllib,curl/,Wget/, and others (commonly used for script-based or non-browser access).Data scraping crawlers: such as
MJ12bot,AhrefsBot,SemrushBot, and others (used for SEO analysis or content scraping).Mainstream search engine bots: such as
Googlebot,Baiduspider, andbingbot.Mobile device identifiers: such as
Mobile,Android,iPhone, andiPad.
Relying solely on UA strings is not sufficient to identify malicious traffic—attackers often spoof their UA to appear as normal browsers. When you configure custom rules, we recommend that you combine IP reputation, access frequency, and WAF logs for comprehensive analysis to avoid blocking legitimate requests.
The following example blocks HTTP requests whose UA contains bot.
Match Condition: Set Match Field to
User-Agent, Logical Operator toContains, and Match Content to the UA patternbot.Protection Rule Type: Access Control.
Rule Action: Block.
Enable bot validation for website pages
Enable JavaScript validation for request paths that are being maliciously accessed (such as /index.php) to block automated attack tools while not affecting normal browser access.
For static pages, you can configure JavaScript validation or CAPTCHA rules to ensure that requests come from standard browsers that can execute JavaScript. These validation methods apply only to synchronous requests, not to asynchronous requests such as those sent by XMLHttpRequest or the Fetch API.
For backend API endpoints used for service-to-service communication, we recommend that you do not configure Run JavaScript Validation. Run JavaScript Validation requires a browser environment to execute, while API callers are typically server-side programs or automated scripts that cannot parse and execute JavaScript code. This will cause legitimate requests to be continuously blocked. We recommend that you exclude API endpoints from the scope of Run JavaScript Validation when you configure match conditions.
Match Condition: Set Match Field to
URI Path, Logical Operator toContains, and Match Content to/index.php.Protection Rule Type: Access Control.
Rule Action: Run JavaScript Validation or Run Slider CAPTCHA.
Rate limit API endpoints
Enable rate limiting for all endpoints except example.com/api/pay. The following example assumes that all API endpoint URIs contain the /api string.
Match Condition:
Set Match Field to
URI Path, Logical Operator toNot Equal To, and Match Content to/api/pay.Set Match Field to
URI Path, Logical Operator toContains, and Match Content to/api.
Protection Rule Type: Rate Limiting.
Statistical Object: IP.
Statistical Interval (Seconds): 10.
Threshold (Times): 5.
Apply To: Current Match Condition.
Timeout Period: 1800.
Rule Action: Block.
Deploy to a production environment
To avoid disrupting normal business operations, do not directly create and enable protection rules with Block actions in a production environment. We recommend that you follow these steps for deployment.
Analyze request characteristics: Use WAF Security reports and logs to identify characteristics of legitimate business requests and malicious attacks (such as IP addresses, User-Agent strings, headers, and URIs). If you plan to configure rate limiting rules, you must also determine the baseline request frequency of your normal business traffic.
Configure an allowlist: Before you create a custom rule template, we recommend that you create an allowlist rule to add trusted IP addresses to the allowlist. This prevents trusted requests from being blocked by new rules.
Test with canary release: After you create a custom rule, use one of the following methods to observe and test the rule before deploying it to the production environment.
Apply the rule to a non-production environment for testing.
Set Rule Action to Log.
Enable Canary Rule in Advanced Settings.
Analyze test results: After the rule has been running for a period of time, review security reports and logs to check whether requests that matched the rule are false positives.
Apply to production: After you confirm that the false positive rate is within an acceptable range, change the rule action to the target action and apply it to the production environment.
Monitor and optimize continuously: Continuously review security reports and logs. Dynamically adjust and optimize rules based on changes in business traffic and actual protection effectiveness.
Daily operations
Manage protection templates
Newly created protection templates are enabled by default. You can perform the following operations in the protection template list:
View the number of associated Protected Object/Group entries for a template.
Enable or disable a template by using the Status switch.
Create Rule for the template.
Edit, Delete, or Copy a protection template.
Click the
 icon to the left of the protection template name to view the rules contained in the template.
Manage protection rules
Newly created rules are enabled by default. You can perform the following operations in the rule list:
View information such as Rule ID and Rule Condition.
Enable or disable a rule by using the Status switch.
Edit or Delete a rule.
Quotas and limits
Only pay-as-you-go instances, subscription Enterprise Edition, and Ultimate Edition instances support CAPTCHA, Rate Limiting, and Advanced Settings.
A single protection rule can have a maximum of five Match Condition entries.
When you use logical operators such as Equals One of Multiple Values or Contains One of Multiple Values, you can enter a maximum of 50 match content values. To match more than 50 values, we recommend that you split them into multiple rules or use alternatives such as Contains or Regex Match.
FAQ
Why is my configured rule not taking effect?
If a configured rule is not taking effect as expected, check the following items in order:
Protected object is not associated: Verify that the custom rule template is correctly associated with specific Protected Object/Group entries (such as ALB instances or domain names). If no protected objects are added, the rule does not take effect.
Template and rule status: Verify that both the protection template and the specific rule are in the "Enabled" state. Confirm that both the template switch and the status switch of the rule are turned on. If either switch is turned off, the corresponding custom rule will not take effect.
Match condition accuracy: Verify whether the Match Field, Logical Operator, and Match Content can be correctly matched by requests. When you use regular expressions, make sure to escape special characters properly.
Other rules: Verify whether you have configured other protection rules or protection modules. For example, an allowlist rule may allow requests to pass through before the custom rule is evaluated.
How do I configure rate limiting when multiple domain names resolve to the same cloud service instance?
Rate limiting rules limit the request frequency of the same statistical object based on the protected object dimension. If a cloud service instance includes traffic from multiple domain names, the system aggregates the access frequency across all domain names when calculating statistics. To limit the access frequency for a specific domain name only, you can use one of the following methods:
Add the domain name as a protected object in WAF, and apply the rate limiting rule to this domain name object. For more information, see Configure protected objects and protected object groups.
In the Match Condition of the rate limiting rule, use the Host field to define the domain name for which you want to limit the access frequency.
What does the client experience when a request matches a rule under different Rule Action settings?
Rule Action is set to Log:
Does the user request reach the origin server after the rule is matched: Yes.
User experience after the rule is matched: Same as when WAF is not enabled.
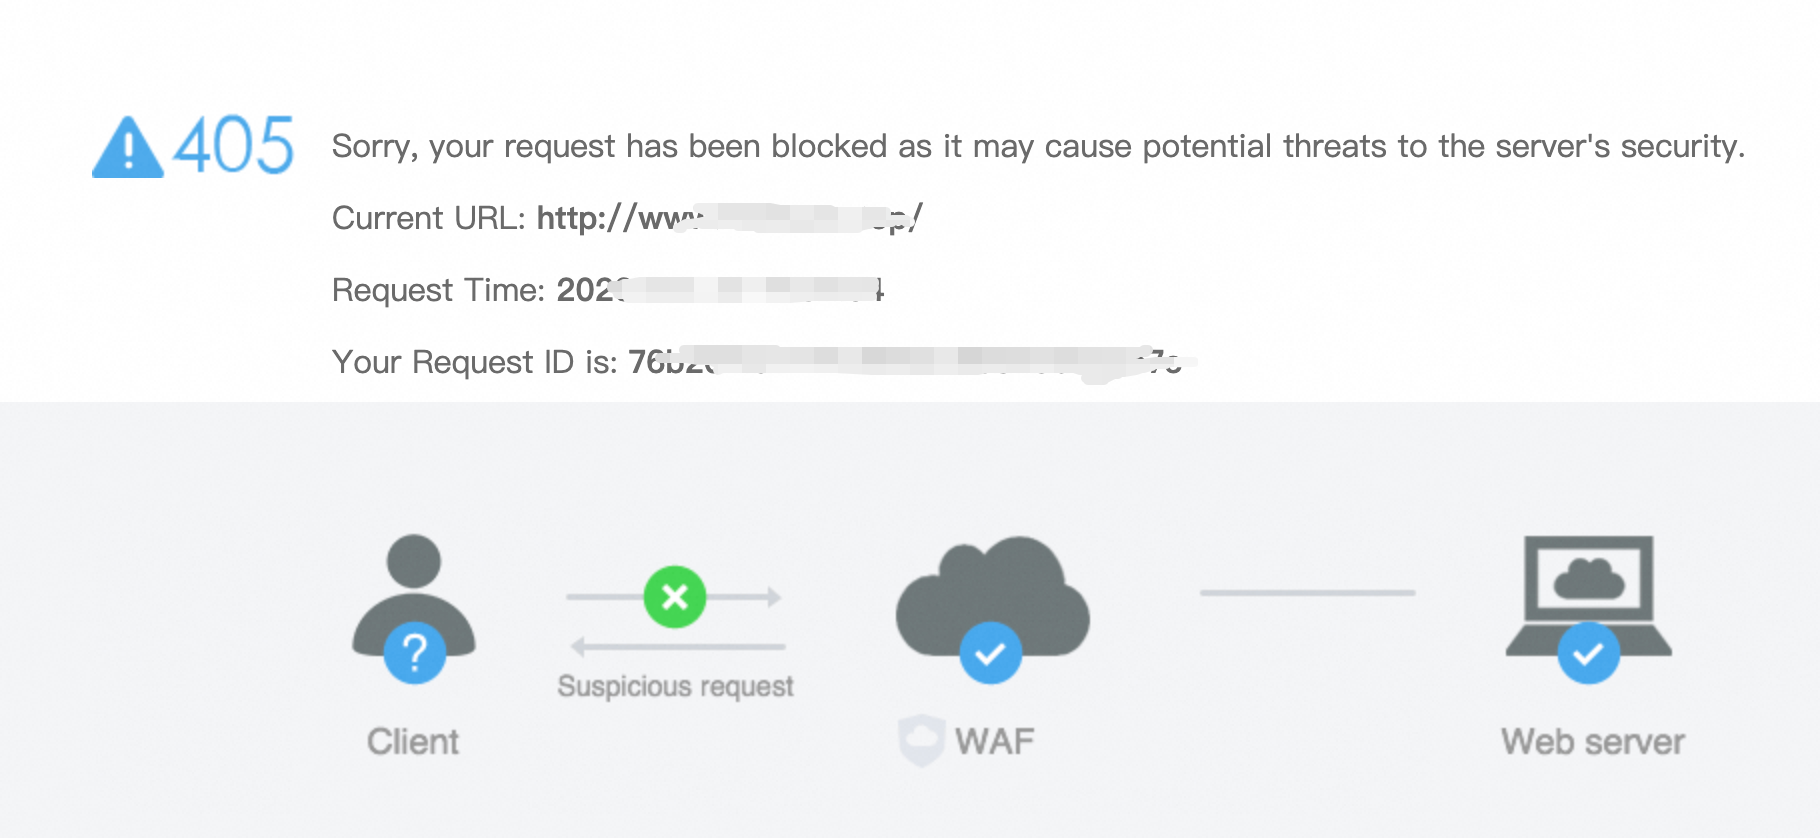
Rule Action is set to Block:
Does the user request reach the origin server after the rule is matched: No.
User experience after the rule is matched: By default, the following page is returned.
Rule Action is set to JavaScript Validation and the user passes verification (such as a regular browser):
Does the user request reach the origin server after the rule is matched: Yes.
User experience after the rule is matched: The validation process is transparent to the user. WAF delivers the validation identifier by setting
Set-Cookie: acw_sc__v2in the response header. The client automatically includes this cookie in subsequent requests. You can use browser developer tools to check whether theacw_sc__v2field exists in the request header to verify that validation is complete.After the request hits the rule and reaches the origin server (nginx), you can check the request header information in browser DevTools. The
acw_sc__v2value in the Cookie field is the anti-crawler Cookie.Server: nginx/1.24.0 (Ubuntu) Request Headers: Accept: text/html,application/xhtml+xml,application/xml;q=0.9,image/avif,image/webp,image/apng,*/*;q=0.8,application/signed-exchange;v=b3;q=0.7 Accept-Encoding: gzip, deflate Accept-Language: en-US,en;q=0.9 Cache-Control: max-age=0 Connection: keep-alive Cookie: acw_tc=781xxx...xxxcbbbeddae542c4d6c39a7ca710; _c_WBKFRo=2ih42xxx...xxxWvi1kCJT26frci; _nb_ioWEgULi=xxx; acw_sc__v2=1234cf0d46-35eb58cc5edc98xxx...xxxea4e10a0826333f3c Host: www.xxx.top If-Modified-Since: Mon, 23 Mar 2026 08:01:29 GMT If-None-Match: W/"69c0f359-267" Referer: http://www.xxx.top/ Upgrade-Insecure-Requests: 1
Rule Action is set to JavaScript Validation and the user fails verification (such as an automated attack tool):
Does the user request reach the origin server after the rule is matched: No.
User experience after the rule is matched: Clients that fail validation have their requests blocked. When accessing with a browser plugin that disables JavaScript, the page fails to load (showing a blank screen) due to validation failure, and the request header does not contain the
acw_sc__v2cookie.After the request is blocked,
Set-Cookiein the HTTP response header clears theacw_sc__v2Cookie (max-age=0), and theCookiefield in the request header containsacw_tc. Complete HTTP response and request headers:Response headers Cache-Control no-cache, no-store Connection keep-alive Content-Length 23670 Content-Type text/html; charset=utf-8 Date Mon, 23 Mar 2026 11:10:30 GMT Pragma no-cache Server Tengine Set-Cookie acw_sc__v2=; expires=Thu, 01 Jan 1970 00:00:00 GMT; max-age=0; path=/; HttpOnly Request Headers Accept text/html,application/xhtml+xml,application/xml;q=0.9,image/avif,image/webp,image/apng,*/*;q=0.8,application/signed-exchange;v=b3;q=0.7 Accept-Encoding gzip, deflate Accept-Language en-US,en;q=0.9 Cache-Control max-age=0 Connection keep-alive Cookie acw_tc=76b20f881xxx xxx798a274eb52ed
Rule Action is set to CAPTCHA/Strict CAPTCHA:
Does the user request reach the origin server after the rule is matched:
Requests that pass verification: Yes.
Requests that fail verification: No.
User experience after the rule is matched: By default, an Access Verification page is returned. After successful verification, the user is automatically redirected to the original page. If verification fails, an error message is displayed and the user remains on the current page. The user must refresh the page to retry verification.
The page title is Access Verification and contains a slider verification component, which prompts the user to hold and drag the slider all the way to the right to complete human-machine verification.
Why does the Body Parameter match field not work after I configure it in a custom rule?
This may occur if the match content you entered is too short. When you use the Body Parameter field, make sure the match content is at least 5 characters long. Otherwise, traffic cannot be detected.