You can configure whitelist rules to allow specific requests to bypass detection by some or all protection modules, such as web core protection rules, the IP blacklist, custom rules, and scan protection.
Key concepts
Whitelist: A feature in Web Application Firewall (WAF) that allows specific requests to bypass detection by some or all protection modules. You must create a whitelist protection template to enable this module. The system allows you to create multiple whitelist protection templates.
Whitelist protection template: A collection of whitelist rules that defines the content and scope of the rules. It consists of three parts: template type, whitelist rule, and applicable objects.
Template type: You must select a template type during creation. The type cannot be changed later. Two types of templates are available:
Template type
Description
Use cases
Default protection template
After you purchase WAF, the system automatically creates a default protection template that contains no rules.
By default, the template applies to all existing and future protected objects and protected object groups.
You can manually exclude objects by changing their status to "Not Applied".
You can create only one default protection template for the whitelist module.
Deploy general rules that need to be applied globally.
Custom protection template
You must manually assign the template to specific protected objects or protected object groups.
Deploy fine-grained rules for specific services, such as login or payment APIs.
Whitelist rule: Defines the specific detection logic and the bypassed modules. A template can contain multiple rules, and each rule consists of two parts:
Match condition: Defines the request characteristics to match, such as the request path or client IP address.
Bypassed modules: Defines which protection modules are bypassed by requests that meet the match condition.
Applicable objects: Specifies the targets for the template. By configuring applicable objects, you apply the whitelist rules to specified protected objects or protected object groups. A protected object or protected object group can be associated with multiple whitelist protection templates.
Protected object: For each domain name or cloud service instance added to WAF, the system automatically creates a protected object.
Protected object group: You can add multiple protected objects to a protected object group for centralized management.
Procedure
Before you begin, make sure that protected objects exist, which means you have added your web service to WAF. If you have not added your service, see Add a service to WAF.
Log on to the Web Application Firewall 3.0 console. In the top navigation bar, select the resource group and region (Chinese Mainland or Outside Chinese Mainland) of your WAF instance. In the left-side navigation pane, choose .
Step 1: Configure the template type
After you purchase WAF, the system creates a default protection template named user_default with no rules. If you do not have specific business requirements, such as configuring multiple templates or specifying applicable objects, you can use the user_default template directly. Click Edit and proceed to Step 2.
On the Whitelist page, click Create Template. In the Create Template - Whitelist panel, complete the following configurations.
Template Name: Enter a name for the template.
Save as Default Template: You can set only one default template for the whitelist module, and it can only be set when you create a new template.
Yes: You do not need to set Apply To. When the template is created, it applies to all protected objects and object groups by default. New objects are also automatically included. You can manually exclude specific objects by setting their status to "Not Applied".
No: You must set Apply To by manually specifying the protected objects or object groups.
Step 2: Add a whitelist rule
In the Rule Configuration area, click Create Rule, complete the following configurations, and then click OK.
Rule Name: Enter a name for the rule.
Match Condition: Define the request characteristics to match. Click Add Condition to add a condition. Each condition consists of a Match Field, a Logical Operator, and a Match Content. The following table provides configuration examples.
NoteIf a rule contains multiple conditions, a request must satisfy all of them (a logical AND relationship) to match the rule. For more information about match fields and logical operators, see Match conditions.
Match Field
Logical Operator
Match Content
Description
URI Path
Contains
/login.phpThe rule matches if the request path contains
/login.php.IP
Belongs to
192.1.XX.XXThe rule matches if the client IP address is
192.1.XX.XX.Bypassed Modules: Specify the protection modules that requests meeting the Match Condition can bypass. The following options are available:
Disable All Detections: Use this option to allow traffic that you fully trust.
Custom: Select specific protection modules to bypass.
All
Matching requests bypass all protection modules and are sent directly to the origin server.
Custom
If you select this option, select the protection modules to bypass from the following list.
Core Protection Rule
All rules
Bypasses detection for all Core Protection Rule.
Specific rule IDs
Bypasses detection for rules with specific IDs. Press Enter after you enter each rule ID.
You can enter up to 50 rule IDs, including those for major event protection.
Specific modules
Bypasses detection for specific types of rules. Select the rule types as needed.
Specific fields
Specify fields that the web core protection rule will ignore. You can add up to 10 fields.
Field type
Description
URI
You can configure all fields or specific fields.
When configuring a specific field, you can set a URL or URL Path.
Header
You can configure all fields or specific fields.
If you enter
qas a specific field, the actual effective content isheader.q.
Query string parameter
You can configure all fields or specific fields.
If you enter
qas a specific field, the actual effective content isqueryarg.q.
Cookie name
You can configure all fields or specific fields.
If you enter
qas a specific field, the actual effective content iscookie.q.
Body
You can only configure all fields.
For example, on an e-commerce site's search API, a user query containing special characters like
&or"might be blocked as a suspected attack by the web core protection rule, causing the search to fail.GET /search?q=phoneIn this example, set Field Type to Query String Parameter, Scope to Specified Fields, and enter
qfor Specified Fields. This allows the query field to be whitelisted without completely disabling the web core protection rule.IP Address Blacklist
All rules
Bypasses detection for all rules in the IP Address Blacklist module.
Specific rule IDs
Bypasses detection for rules with specific IDs. Press Enter after you enter each rule ID. You can enter up to 50 rule IDs.
Custom Rule
All rules
Bypasses detection for all rules in the Custom Rule module.
Specific rule IDs
Bypasses detection for rules with specific IDs. Press Enter after you enter each rule ID. You can enter up to 50 rule IDs.
Scanning Protection: Bypasses detection for all rules in the Scanning Protection module.
HTTP Flood Protection: Bypasses detection for all rules in the HTTP Flood Protection module.
Geo-blocking: Bypasses detection for all rules in the Geo-blocking module.
Website Tamper-proofing : Bypasses detection for all rules in the Website Tamper-proofing module.
Data Leakage Prevention: Bypasses detection for all rules in the Data Leakage Prevention module.
Protection for Critical Events: Bypasses detection for all rules in the Protection for Critical Events module.
Peak Traffic Throttling: Bypasses detection for all rules in the Peak Traffic Throttling module.
AI Application Protection: Bypasses detection for all rules in the AI Application Protection module.
Bot Management
All rules
Bypasses detection for all rules in the Bot Management module.
Specific rule IDs
Bypasses detection for rules with specific IDs. Press Enter after you enter each rule ID. You can enter up to 50 rule IDs.
Specific rules
Bypasses detection for specific rules configured by rule name. This supports rules from Bot Management for Web and Bot Management for App. If you are using the legacy Bot Management or have not configured corresponding web/app protection, this setting will not take effect.
Step 3: Set applicable objects
In the Apply To area, select the protected objects and protected object groups to apply the template to.
How the template is applied depends on the configuration in Step 1:
For a default template: You do not need to set applicable objects. When the template is created, it applies to all protected objects and object groups by default. New objects are also automatically included. You can manually exclude specific objects by setting their status to "Not Applied".
For a custom template: You must manually specify the protected objects and protected object groups to which the template applies.
You can manually adjust the application status of protected objects or object groups both during and after template creation.
Maintenance
Manage whitelist templates
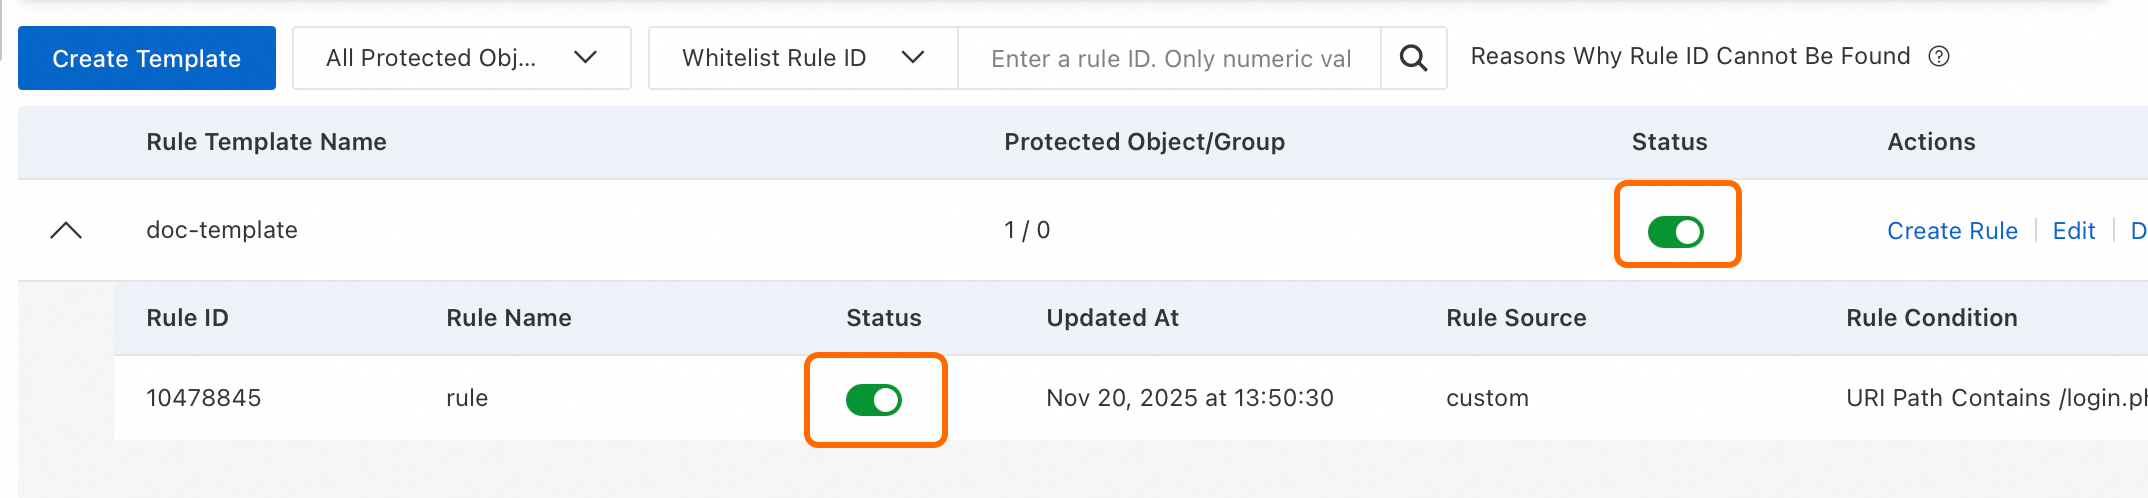
Newly created whitelist protection templates are enabled by default. You can perform the following operations in the template list:
View the number of Protected Object/Group associated with a template.
Enable or disable a template using the Status.
Create Rule for this template.
Edit, Delete, or Copy a template.
Click the
 icon to the left of a template name to view the rules it contains.
Manage whitelist rules
Newly created rules are enabled by default. You can perform the following operations in the rule list:
View information such as Rule ID and Rule Condition.
Enable or disable a rule using the Status switch.
Edit or Delete a rule.
FAQ
Why is my whitelist rule not working?
If a whitelist rule is not working as expected, verify the following settings in order:
Template and rule status: Ensure both the template and the rule are enabled.
Applicable objects: Confirm that the template is Effective.

Rule configuration: Review the whitelist rule configuration, paying close attention to the correctness of the match conditions to ensure they match the request.
What is the "AutoTemplate" template?
WAF automatically creates a whitelist protection template named AutoTemplate and adds a whitelist rule to it if either of the following occurs:
The intelligent whitelisting engine for web core protection rules is enabled and identifies a potential false positive through log analysis. For more information, see intelligent whitelisting engine.
You mark an event detected by the web core protection rule or bot management module as Suppress False Positive in the security reports. For more information, see Security reports.
Should I use the whitelist module to restrict WAF domain access by IP?
No. The Whitelist module described here is designed to bypass all or specific protection modules for requests that match specified criteria. To implement IP-based access control, please use the Custom Rule module. For detailed examples, see Restrict access to the admin backend to specific IPs.