Before you add a website to Web Application Firewall (WAF) in CNAME record mode, you must add the domain name that you want to protect. This topic describes how to perform this task.
Prerequisites
A WAF instance is purchased, and the number of domain names that are added to the WAF instance is less than the upper limit.
NoteThe maximum number of domain names that can be added to a WAF instance varies based on the specifications of the instance and the number of extra domain names that you purchase. For more information, see Extra domain package.
If your website is deployed on a server in the Chinese Mainland, you must ensure that the domain name of the website has a valid Internet Content Provider (ICP) filing while it is protected by WAF.
NoteChinese Mainland WAF instances periodically verify the ICP filing information for protected domain names. If an ICP filing expires, WAF performs administration on the associated domain name as required by law. This administration includes actions such as stopping request forwarding to the site and purging the domain name's configuration.
If the website is deployed on Alibaba Cloud, you must complete an ICP filing with Alibaba Cloud. For more information, see and ICP filing scenarios.
If the website is not deployed on Alibaba Cloud, you can contact Alibaba Cloud or another cloud service provider to complete an ICP filing.
Add a domain name
Log on to the WAF console. In the top navigation bar, select the resource group and the region in which the WAF instance is deployed. The region can be Chinese Mainland or Outside Chinese Mainland.
In the left-side navigation pane, choose .
On the Domain Names tab, click Website Access.
NoteOn the Add Domain Name page, the Access Mode parameter is set to CNAME Record by default.
Enter website information and click Next.
Configuration item
Description
Domain Name
Enter the domain name that you want to protect. You can enter an exact-match domain name, such as www.aliyundoc.com, or a wildcard domain name, such as *.aliyundoc.com. You can enter only one domain name.
If this is the first time you add the domain name, you must verify the ownership of the domain name. After the verification is successful, you can add the domain name.
To confirm that you own the domain name, you must complete an ownership verification. You can select one of the following two verification methods:
DNS record verification: At your DNS provider, manually add the TXT record provided by WAF. We recommend that you use this method.
File verification: Upload the verification file provided by WAF to the specified root directory of the origin server of the domain name. You must have the permissions to operate the origin server.
DNS record verification
In the verification section, click the Method 1: DNS Record Verification tab.
Add a TXT record at your DNS provider based on the Record Type, Host Record, and Record Value that are provided in the WAF console.
If you use Alibaba Cloud DNS, perform the following steps. If you use another DNS provider, perform similar operations in the system of the provider.
Log on to the Alibaba Cloud DNS console.
Wait for the TXT record to take effect. If you configure a TXT record for a domain name for the first time, the record takes effect in real time. If you modify a TXT record, the modification takes effect after 10 minutes. The time that is required for a modification to take effect is determined by the TTL that you specify for the DNS record. The default TTL is 10 minutes.
Return to the WAF console and click Click To Verify.
If Verification Successful is displayed, the domain name ownership is verified.
If Verification Failed is displayed, perform the following steps to troubleshoot the issue:
Check the TXT record: Make sure that the host record and record value are the same as the information provided in the WAF console. If they are different, delete the incorrect record, add the record again, and then perform the verification again.
Wait for the DNS record to take effect: A DNS record may not take effect immediately after it is configured. The time that is required for a DNS record to take effect is determined by the TTL that you specify for the DNS server. We recommend that you wait 10 minutes and then perform the verification again.
Use another verification method: If the verification still fails after multiple attempts, we recommend that you use "Method 2: File Verification".
File verification
In the verification section, click the Method 2: File Verification tab.
Click the link to download the verification file (① in the figure).
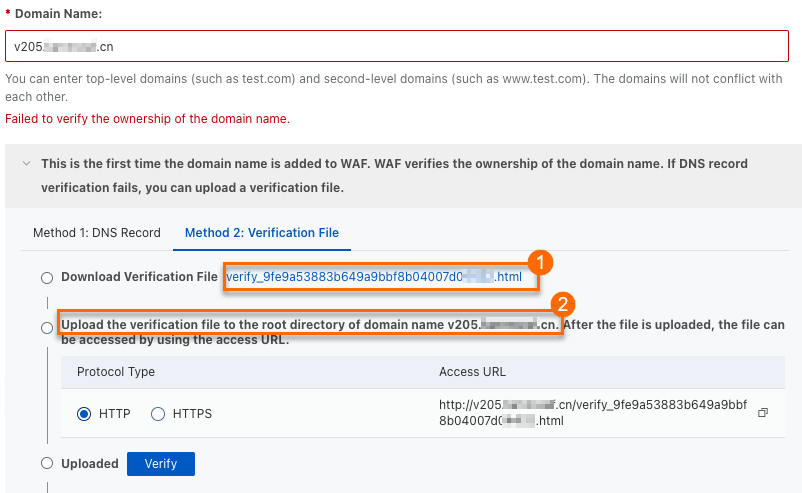 Important
The verification file is valid for only three days after it is downloaded. If you do not complete the file verification within the validity period, you must download the file again.
Do not perform any operations on the verification file, such as opening, editing, or renaming the file.
WAF accesses your origin server based on the selected protocol. Make sure that the security group or firewall rules of the origin server allow access from the corresponding port:
If you select HTTP, you must allow inbound traffic over TCP port 80 from 0.0.0.0/0.
If you select HTTPS, you must allow inbound traffic over TCP port 443 from 0.0.0.0/0.
Manually upload the verification file to the root directory of the origin server of the domain name that is specified in the console (② in the figure). The origin server can be an ECS instance, an OSS bucket, a CVM instance, a COS bucket, or an EC2 instance.
NoteIf you add a wildcard domain name, such as
*.aliyun.com, you must upload the verification file to the root directory ofaliyun.com.After the upload is complete, you can use the following methods to check whether the verification file is uploaded:
Return to the WAF console and click Click To Verify.
If Verification Successful is displayed, the domain name ownership is verified.
If Verification Failed is displayed, troubleshoot the issue based on the error message.
NoteA wildcard domain name can match subdomains at the same level and different levels. For example,
*.aliyundoc.comcan matchwww.aliyundoc.com,example.aliyundoc.com, andwww.example.aliyundoc.com.A second-level wildcard domain name can match the corresponding second-level primary domain name. For example,
*.aliyundoc.comcan matchaliyundoc.com.A third-level wildcard domain name cannot match the corresponding third-level primary domain name. For example,
*.example.aliyundoc.comcannot matchexample.aliyundoc.com.If both an exact-match domain name and a wildcard domain name that can match the exact-match domain name exist, the protection rules and forwarding configurations for the exact-match domain name take precedence.
Protection Resource
Select the type of protected resource to use. Valid values:
Public Cluster: This is the default value.
Exclusive Cluster: This option is available if you use an Exclusive WAF instance. An exclusive cluster supports custom business requirements. For more information, see Best practices for exclusive clusters.
Hybrid Cloud Cluster: Select this option if you use a hybrid cloud deployment. For more information, see Add a website to WAF (Hybrid Cloud WAF).
Protocol Type
Select the protocol that the website uses. Valid values:
HTTP
HTTPS
ImportantIf the website supports HTTPS encryption, select the HTTPS protocol. After you add the domain name, upload the certificate and private key file of the domain name. For more information, see Upload an HTTPS certificate.
If you select HTTPS, you can also enable the following features:
HTTP2 (This option is available only after you select HTTPS.)
If your website supports HTTP 2.0, you must enable this setting. The port for HTTP 2.0 is the same as the port for HTTPS. After you enable this setting, you need to only set the HTTPS port. For more information, see Does adding a website that uses HTTP 2.0 to WAF affect the origin server?.
NoteOnly WAF instances of the Pro, Ultimate, and Exclusive editions support HTTP2.
Origin Server Address
Specify the addresses of the origin server. You can specify IP addresses or a Domain Name (such As CNAME). After the website is added, WAF forwards filtered requests to the specified server addresses. The following items describe the settings:
IP address: Enter the public IP addresses of the origin server. The IP addresses must be accessible over the Internet.
You can enter multiple IP addresses. Press the Enter key after you enter each IP address. You can add up to 20 origin IP addresses.
NoteIf you specify multiple IP addresses, WAF automatically performs health checks and load balancing among these addresses.
WAF instances outside the Chinese mainland support only IPv4 addresses. WAF instances in the Chinese mainland support the following configurations:
Specify both IPv4 and IPv6 addresses
If you enable IPv4/IPv6 Origin Fetch Protocol Follow, requests from IPv6 addresses are forwarded to IPv6 origin servers, and requests from IPv4 addresses are forwarded to IPv4 origin servers. If you do not enable IPv4/IPv6 Origin Fetch Protocol Follow, requests are forwarded to both IPv4 and IPv6 origin servers. This means that both IPv4 and IPv6 requests may be forwarded to IPv4 or IPv6 origin servers.
ImportantIf you use origin fetch over IPv6, you must make sure that the IPv6 Status of the domain name in the Website Config list is Enabled. For more information, see Enable IPv6 protection.
Specify only IPv4 addresses
Both IPv4 and IPv6 requests are forwarded over IPv4. WAF forwards requests to the IPv4 origin server addresses that you specify.
Specify only IPv6 addresses
Both IPv4 and IPv6 requests are forwarded over IPv6. WAF forwards requests to the IPv6 origin server addresses that you specify.
Domain Name (such as CNAME): Enter the origin domain name of the server, such as the CNAME of an OSS bucket.
If you specify a domain name, origin fetch over IPv4 is supported. WAF forwards client requests to the IPv4 address that is resolved from the origin domain name.
ImportantThe origin domain name of the server cannot be the same as the domain name of the website that you want to protect.
If the address of your origin server is an OSS domain name, you must go to the OSS console to attach a custom domain name to the OSS domain name after you add the website. For more information, see Attach a custom domain name.
Destination Server Port
Add the service ports that the website uses for forwarding.
WAF uses the added ports to receive and forward traffic. Service traffic of the website domain name is forwarded only through the added service ports. For ports that are not added, WAF does not forward any access requests to the origin server. Therefore, enabling these ports does not pose any security threats to the origin server.
ImportantThe Protocol Type and Destination Server Port that you specify in the website information must be the protocol and port that the origin server uses to provide web services. Port translation is not supported. For example, if the origin server uses port 80 and the HTTP protocol to provide web services, you must specify the same port and protocol for the domain name. If you specify other ports, requests cannot be forwarded.
Default ports:
HTTP: Port 80 is used by default if you select the HTTP protocol.
HTTPS or HTTP2: Port 443 is used by default if you select the HTTPS protocol.
Custom ports: In the HTTP Port or HTTPS Port text box, enter a port and press the Enter key. Click View Port Range to query all supported ports.
NoteWAF Ultimate and Exclusive instances support up to 50 server ports, including ports 80, 8080, 443, and 8443. WAF Pro and Enterprise instances support up to 10 server ports.
For more information about the ports that are supported by public clusters, see Ports supported by WAF.
If you want to add a website to a WAF exclusive cluster, you can select custom ports only from the Server Port range that is specified on the Exclusive Cluster Configurations page. For more information, see Configure an exclusive cluster.
Load Balancing Algorithm
If you specify multiple origin server addresses, select a load balancing algorithm. Valid values:
IP hash: Requests from the same client are forwarded to the same origin server. This algorithm is suitable for scenarios in which session consistency is required. Load imbalance may occur.
Round-robin (default): Requests from clients are sequentially forwarded to origin servers in the list of origin servers. This algorithm is suitable for scenarios in which multiple origin servers are used and an even distribution of load among the origin servers is required.
Least time: The intelligent DNS resolution feature and the upgraded least-time back-to-origin algorithm are used to minimize the latency of the entire link from when service traffic is routed to a protection node to when the traffic is forwarded to an origin server.
NoteThe Least time algorithm is available only after you enable intelligent load balancing. For more information, see Intelligent load balancing.
After the settings take effect, WAF distributes origin fetch requests to multiple origin server addresses based on the specified load balancing algorithm to implement load balancing.
Is a Layer 7 proxy such as Anti-DDoS Proxy or CDN deployed in front of WAF?
Enable Traffic Mark
Specify whether to enable the traffic mark feature for WAF.
The traffic mark feature allows WAF to add or modify a custom field that you specify in the request header when WAF forwards a client request to the origin server. This field is used to mark that the request is forwarded by WAF and record the originating IP address or originating port of the client.
After you select Enable Traffic Mark, you must set the mark fields.
ImportantDo not enter standard HTTP header fields, such as User-Agent. Otherwise, the values of the standard header fields are overwritten by the custom field values.
If an attacker obtains the origin IP address information before the domain name is added to WAF and purchases another WAF instance to forward requests to the origin server, you can Enable Traffic Mark and set mark fields. After the origin server receives a request, we recommend that you check the fields. If the specified mark fields exist, access is allowed.
The following types of mark fields are available:
Click Add Mark to add a mark field. You can set up to five mark fields.
Back-to-origin Timeout Configuration
Resource Group
From the resource group list, select the resource group to which the domain name belongs.
NoteYou can use the Resource Management service to create resource groups and manage cloud resources based on dimensions such as business departments and projects. For more information, see Create a resource group.
If another user has configured the wildcard domain that corresponds to the domain name you entered in Step 4, you must configure a TXT record. Use the record type, domain name, and record value provided in the Notice dialog box.
For example, if you use Alibaba Cloud DNS, you can log on to the Alibaba Cloud DNS console and configure a TXT record based on the information in the Notice dialog box. For more information, see Add a DNS record.
Change the DNS record.
Follow the on-screen prompts to change the DNS record of the domain name to point it to WAF for protection. Then, click Next. For more information, see Change the DNS record of a domain name.
Complete the process.
Follow the on-screen prompts to add the back-to-origin IP addresses of WAF to the whitelist. Then, click Complete. Return to Domain Name List to return to the Website Config page. For more information, see Add the back-to-origin IP addresses of WAF to a whitelist.
Upload an HTTPS certificate
If you selected HTTPS for Protocol Type in Step 4, you must upload the domain name's HTTPS certificate to the WAF console. The certificate must be correct and valid for WAF to protect HTTPS requests to your website.
You can use one of the following methods to upload an HTTPS certificate:
Manually upload a certificate: You must prepare your website's certificate file and private key file.
The following content is required. When you upload the certificate, make sure that it has a complete certificate chain.
*.crt (public key file) or *.pem (certificate file)
*.key (private key file)
Select an existing certificate: You can select the domain name's certificate from your existing certificates in Digital Certificate Management Service. For more information, see What is Digital Certificate Management Service?.
Apply for a new certificate.
Log on to the WAF console. In the top navigation bar, select the resource group and the region in which the WAF instance is deployed. The region can be Chinese Mainland or Outside Chinese Mainland.
In the left-side navigation pane, choose .
In the Domain Names, find the domain name that you want to manage and click the
 icon in the Origin Server column.Note
The
icon appears in the Origin Server column only if you selected HTTPS as the Protocol Type when you added the domain name.In the Upload Certificate (or Update Certificate) dialog box, select an Upload Method to upload an HTTPS certificate.
NoteIf you have uploaded a certificate, the Update Certificate dialog box is displayed. The configurations in the Update Certificate dialog box are the same as those in the Upload Certificate dialog box.
Manual Upload: Enter a Certificate Name. Then, copy the content of the domain name's certificate file and private key file and paste the content into the Certificate File and Private Key text boxes.
The following items describe the Certificate File parameter:
If the certificate is in the PEM, CER, or CRT format, you can use a text editor to open the certificate file and copy the content.
If the certificate is in a format other than PEM, CER, or CRT, such as PFX or P7B, you must convert the certificate file to the PEM format. Then, you can use a text editor to open the file and copy the content. For more information about how to convert certificate formats, see Convert an HTTPS certificate to the PEM format.
Make sure that you upload a complete certificate chain. If the domain name has multiple certificate files, you must combine the content of the files and then paste the combined content into the Certificate File text box.
Select Existing Certificate: From the Certificate list, select the certificate that you want to upload.
The Certificate list displays certificates issued by SSL Certificate Service. You can select a certificate for the current domain name from the list. Click Certificate Management Service to go to the SSL Certificate Service console and manage your certificates.
Purchase Certificate: Click Apply Now to go to the Purchase Certificate page of Digital Certificate Management Service and apply for a certificate for the domain name.
After you follow the on-screen prompts to configure a certificate for the domain name, the certificate is automatically uploaded to WAF.
NoteYou can apply for only paid DV certificates. If you want to apply for other types of certificates, go to the SSL certificate purchase page. For more information, see Purchase a commercial certificate.
Click OK.
Next steps
After you add the domain name, WAF starts protecting your website traffic. You must also complete the following configurations to enhance your website's protection.
Configuration type | Description | References |
Website protection settings | WAF provides multiple protection modules to help you defend against different types of security threats. The Protection Rules Engine and HTTP Flood Protection modules are enabled by default to defend against common web application attacks, such as SQL injection, XSS, and webshell uploads, and CC attacks. You must manually enable other protection modules and configure protection rules. | |
Alert settings | By configuring alert rules, you can enable WAF to send you alert notifications when attack events or unusual traffic are detected in website requests. This helps you stay informed of the security status of your services. | |
Log service settings | By enabling the log service, you can enable WAF to collect and store log data of your website services for query and analysis. By default, Simple Log Service for WAF stores full logs of your website for 180 days to help you meet classified protection compliance requirements. |
Related operations
View and manage added domain names
After you add a domain name, you can view it in the Domain Names list on the Website Access page. From there, you can perform the following operations as needed:
Upload an HTTPS certificate: If your domain name supports HTTPS, make sure that you upload the correct certificate and private key to WAF. This ensures that WAF can protect HTTPS requests. In the Origin Server column, you can click
 to upload the HTTPS certificate and private key for the domain name.
 For more information, see Upload an HTTPS certificate.
Enable IPv6 protection: To protect IPv6 service traffic for your website, you can turn on the IPV6 switch for the domain name in the Quick Access column.
For more information, see Enable IPv6 protection.
Enable the log service: After you turn on the Log Service switch for the domain name in the Quick Access column, Simple Log Service for WAF collects the full logs of your website. You can use these logs for queries, analysis, dashboard displays, and alert configurations. For more information, see Quickly use Simple Log Service for WAF
NoteSimple Log Service is a value-added service of WAF. You must activate the service before you can use it. For more information, see Step 1: Activate Simple Log Service for WAF.
To configure protection resources for a domain name, click the
 icon next to Protection Resource in the Quick Access column.
 The following types of protected resources are available:
Shared Cluster and Shared IP Address (default)
Shared Cluster and Exclusive IP Address: For more information about exclusive IP addresses, see Exclusive IP address for a domain name.
Shared Cluster with Global Load Balancing Protection: For more information about global load balancing, see Intelligent load balancing.
Exclusive Cluster: For more information about exclusive clusters, see Configure an exclusive cluster.
View attack monitoring reports: In the Attack Monitoring column, click View Report to go to the Security Report page and view the mitigation reports for the domain name. For more information, see WAF security reports.
Set mitigation policies: In the Actions column, click Configure Protection to go to the Website Protection page. On this page, set mitigation policies for the Web Security, Bot Management, and Access Control/Throttling modules. For more information, see Overview of website protection.
Edit a domain name: In the Actions column, click Edit to modify website information, such as the protocol type, server address, and server port. You cannot modify the domain name.
Delete a domain name: In the Actions column, click Delete to delete the domain name.
WarningBefore you delete a domain name, change its DNS record to point to the origin IP address of the server. Otherwise, WAF can no longer forward traffic to the domain name after it is deleted.
After you add a domain name to WAF, make sure that its ICP filing information is valid. To comply with laws and regulations, WAF periodically checks the domain names added to it. If an ICP filing expires and is not renewed in time, the domain name's status changes to "not filed". In this case, WAF automatically stops forwarding traffic for the domain name. You must perform the following operations:
Complete the ICP filing for the domain name.
Go to the Website Config page. On the Domain Names tab, find the domain name with the completed ICP filing and click Add to Protection Again in the Actions column.
Manage ICP filings for domain names
After you add a domain name to WAF, make sure that its ICP filing information is valid. WAF periodically checks the domain names added to it. If an ICP filing expires and is not renewed in time, the domain name's status changes to "not filed". In this case, WAF automatically stops forwarding traffic for the domain name. You must perform the following operations:
Complete the ICP filing for the domain name.
Go to the Website Config page. On the Domain Names tab, find the domain name with the completed ICP filing and click Add to Protection Again in the Actions column.
How do I check the DNS status of an added domain name?
You can view the DNS status of your domain names in the list of added domain names. This helps you identify domain names with DNS resolution risks and modify DNS settings based on the causes of the exceptions displayed in the console.

DNS Status | Action |
Normal DNS resolution | The DNS of the domain is resolved to WAF as expected. No action is required. |
Abnormal DNS resolution, using A record for onboarding | You need to delete the A record of the added domain name, re-add a CNAME record, and point the record value to the CNAME address that is provided by WAF. For more information, see Change the domain's DNS record. |
Abnormal DNS resolution, using incorrect WAF IP | You need to delete the A record of the added domain name, re-add a CNAME record, and point the record value to the CNAME address that is provided by WAF. For more information, see Change the domain's DNS record. |
Abnormal DNS resolution, using incorrect CNAME address | You must modify the CNAME record to point the domain name to the CNAME that is provided by WAF. For more information, see Change the domain's DNS record. |
Unknown DNS resolution, proxy enabled for the domain | A Layer 7 proxy is enabled in front of WAF. You must check whether the origin server address that is configured in the proxy is the CNAME address that is provided by WAF. If it is correct, you can ignore this alert. |
DNS check timed out | Click the |
No DNS record, please add to WAF | You need to add a CNAME record and enter the CNAME address that is provided by WAF as the record value. For more information, see Change the DNS settings for a domain name. |
DNS not resolved to WAF, please add to WAF | You need to modify the CNAME record and enter the CNAME address that is provided by WAF as the record value. For more information, see Change the domain's DNS record. |
 icon to re-run the DNS status check.
FAQ
For more information, see the Website Config section in FAQ about WAF 3.0.