This guide introduces how to integrate the short-form drama solution into an iOS project.
Source code
This solution requires the Professional Edition of the ApsaraVideo Player SDK. Refer to Obtain a license to acquire your license, then submit a ticket or contact Alibaba Cloud sales to request the source code.
Environment requirements
Category | Requirement | ||||||
Development environment | Xcode 14.0 or later. Use the latest official version. | ||||||
System version | A physical device that runs iOS 10 or later. Note
| ||||||
CocoaPods | CocoaPods 1.9.3 or later. | ||||||
Prerequisites
You have obtained a Player SDK license and License Key for the Professional Edition. To associate the license to your application, refer to Associate a license.
Run the demo
After downloading the demo source code, navigate to the
Exampledirectory.In the Example directory, run the
pod install --repo-updatecommand to automatically install the required SDK dependencies.Open the
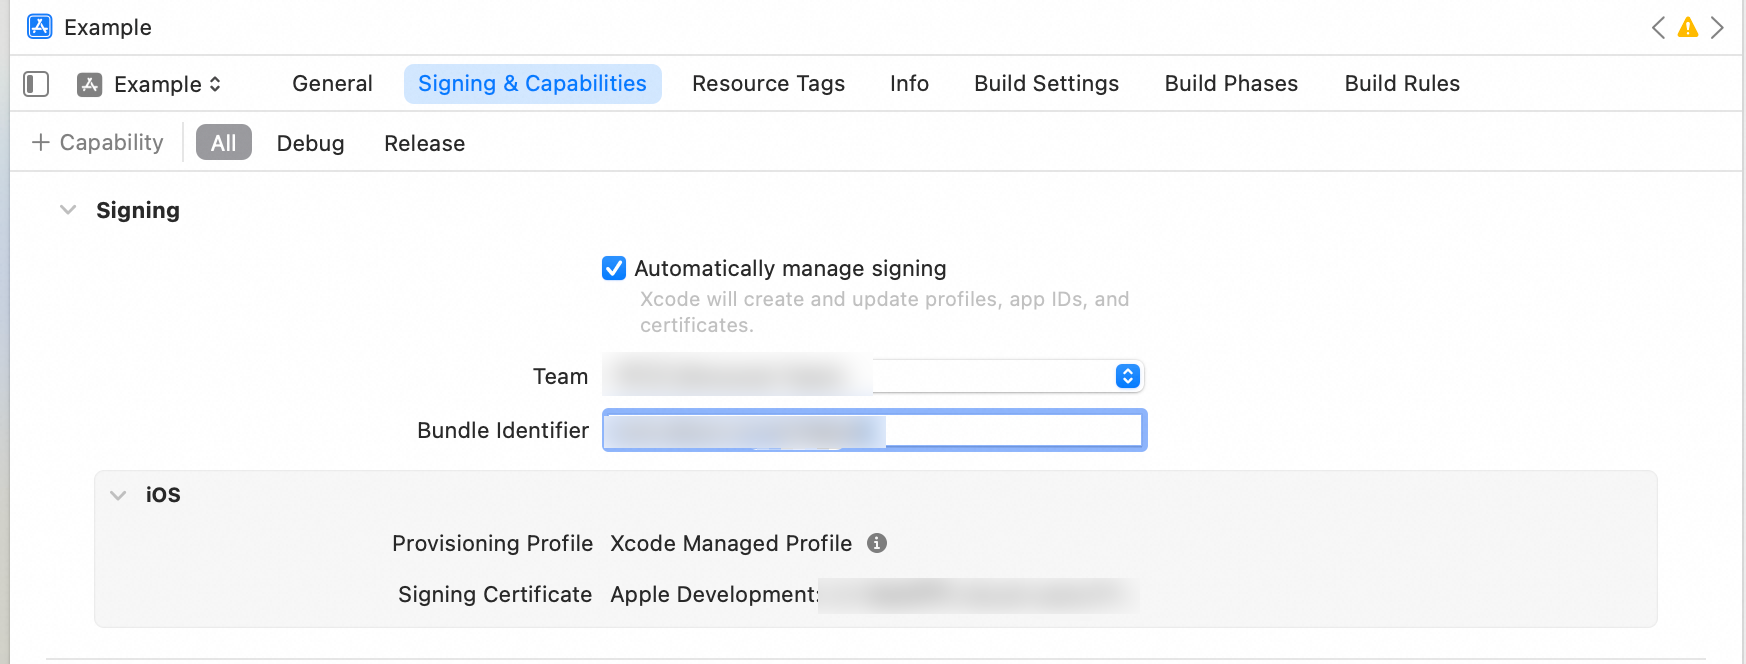
AlivcPlayerDemo.xcworkspaceproject file. On the Signing & Capabilities tab, modify the Team and Bundle Identifier.Team: Your Apple Developer ID.
Bundle Identifier: Your application's unique package ID.
Place the license certificate into the
Example/AlivcPlayerDemo/directory and rename the file tolicense.crt. Then, open theExample/Info.plistfile and enter the LicenseKey as the value of the AlivcLicenseKey field.Build and run the demo on a physical device.
Integrate the component
The following sections describe how to use the AUIShortVideoList component and its public APIs to implement the list playback feature.
Preparations
Integrate the license for ApsaraVideo Player SDK.
For more information, see Integrate a license.
Copy the AUIFoundation (AUI basic component), AUIShortVideoList (basic component for list playback), and AUIPlayer.podspec (framework configuration file) modules to your project.
Configure the Podfile.
Modify the relative path based on where the dependency libraries are stored in your project. After you modify the Podfile, run the
pod install --repo-updatecommand in the same directory as the Podfile to update the third-party library dependencies.ImportantUse the latest version of ApsaraVideo Player SDK. For more information, see Release notes.
# Pod Example install! 'cocoapods', :deterministic_uuids => false source 'https://github.com/CocoaPods/Specs.git' platform :ios, '9.0' target 'Your ProjectName' do # The type of SDK to use. # TODO: Replace 'x.x.x' in this line with a specific version number. For more information and version numbers, see the documentation link provided above. pod 'AliPlayerSDK_iOS', '~> x.x.x' # In-module dependencies (You can customize the version by modifying the AUIPlayer.podspec file.) pod "AUIPlayer/AliPlayerSDK_iOS", :path => "../" # You can adjust the SDKs used based on your business needs by adding the SDKs you want to use, or by modifying the AliPlayerSDK_iOS version in AUIPlayer.podspec. # pod "AUIPlayer/AliVCSDK_Standard", :path => "../" # AUI basic component (required) pod "AUIFoundation/All", :path => "../AUIBaseKits/AUIFoundation" # List playback component pod "AUIPlayer/AUIPlayerKits", :path => "../" # You can customize the version of third-party libraries. pod 'SDWebImage', '5.18.1' end post_install do |installer| installer.pods_project.build_configurations.each do |config| config.build_settings['CLANG_WARN_DOCUMENTATION_COMMENTS'] = 'NO' config.build_settings['CLANG_WARN_QUOTED_INCLUDE_IN_FRAMEWORK_HEADER'] = 'NO' end endNoteIf your project uses a different version of a third-party library that conflicts with the one in the source code, use your project's version.
Configure the project.
If you have a Swift project that needs to use Objective-C libraries, you must configure a bridging header in the project's Build Settings. This ensures that Swift can correctly access and use the Objective-C interfaces in the AUIShortVideoList module.
Set the bridging header.
In the project's Build Settings, find the SWIFT_OBJC_BRIDGING_HEADER setting and point it to your bridging header file.
<YourProjectName>/<YourProjectName>-Bridge-Header.hImport the Objective-C interfaces.
In the bridging header file, import the Objective-C interfaces that you want to expose to Swift.
#import "AUIShortVideoList.h"You can refer to the
AUIPlayer-Bridge-Header.hfile in the AUIShortVideoList module for more examples.
Build and run the project
After the configuration is complete, build and run the project to ensure that the AUIShortVideoList component is correctly integrated.
NoteAfter integration, it is recommended to create a
git commit. This saves the latest commit ID of the component, providing a crucial reference point for future updates and a clear record of code changes.For integration issues, see Integration FAQ.
After integrating the AUIShortVideoList component, you can copy the following code into your project.
How to use
Use AUIShortVideoListViewController
The following two methods show how to initialize and push AUIShortVideoListViewController to quickly run the feature:
Use UINavigationController for navigation.
Objective-C
// Create an array of video information.
NSArray<AUIShortVideoInfo *> *videoInfoList = [[NSArray alloc] init];
// Initialize AUIShortVideoListViewController and pass in the video data.
AUIShortVideoListViewController *vc = [[AUIShortVideoListViewController alloc] initWithData:videoInfoList];
// Use UINavigationController to push the new view controller.
[self.navigationController pushViewController:vc animated:YES];
Swift
// Create an array of video information.
let info = Array<AUIShortVideoInfo>() // Add a data source.
// Initialize AUIShortVideoListViewController and pass in the video data.
let vc = AUIShortVideoListViewController(data: info)
// Use UINavigationController to push the new view controller.
self.navigationController?.pushViewController(vc, animated: true)
Use a modal (Modal) transition.
Objective-C
// Create an array of video information.
NSArray<AUIShortVideoInfo *> *videoInfoList = [[NSArray alloc] init];
// Initialize AUIShortVideoListViewController and pass in the video data.
AUIShortVideoListViewController *vc = [[AUIShortVideoListViewController alloc] initWithData:videoInfoList];
// Set the modal presentation style (optional).
vc.modalPresentationStyle = UIModalPresentationFullScreen;
// Present the new view controller modally.
[self presentViewController:vc animated:YES completion:nil];
Swift
// Create an array of video information. let info = Array<AUIShortVideoInfo>() // Add a data source. // Initialize AUIShortVideoListViewController and pass in the video data. let vc = AUIShortVideoListViewController(data: info) // Set the modal presentation style. vc.modalPresentationStyle = .fullScreen // Optional. Set the style as needed. // Present the new view controller modally. self.present(vc, animated: true, completion: nil)NoteIf you present the view controller modally without a
UINavigationController, you may need to customize the internal navigation logic and provide a custom back button to ensure proper dismissal.
You can also implement the AUIShortVideoDataProviderDelegate delegate to register data callbacks and customize how video data is loaded.
Integrate UINavigationController
Starting with Xcode 11 and iOS 13, SceneDelegate was introduced to manage the UI lifecycle, which was previously handled by AppDelegate. AppDelegate now only manages the app lifecycle and new Scene Sessions.
AppDelegate.m (For iOS 12 and earlier)
#import "MyViewController.h"
#import "AlivcPlayerDemoConfig.h"
#import "AVTheme.h"

- (BOOL)application:(UIApplication *)application didFinishLaunchingWithOptions:(NSDictionary *)launchOptions {
    [UIApplication sharedApplication].statusBarStyle = UIStatusBarStyleLightContent;
    self.window = [[UIWindow alloc] initWithFrame:[UIScreen mainScreen].bounds];
    // Override point for customization after application launch.

    // Only dark mode is supported.
    AVTheme.supportsAutoMode = NO;
    AVTheme.currentMode = AVThemeModeDark;

    // Create a root view controller. You can customize it.
    MyViewController *mainViewController = [MyViewController new];
    // Use the encapsulated AVNavigationController.
    AVNavigationController *nav =[[AVNavigationController alloc]initWithRootViewController:mainViewController];
    // Use the system's UINavigationController.
//  UINavigationController *nav = [[UINavigationController alloc]initWithRootViewController:mainViewController];
    [self.window setRootViewController:nav];
    [self.window makeKeyAndVisible];
    return YES;
}
SceneDelegate.m (For iOS 13 and later)
#import "MyViewController.h" #import "AlivcPlayerDemoConfig.h" #import "AVTheme.h" - (void)scene:(UIScene *)scene willConnectToSession:(UISceneSession *)session options:(UISceneConnectionOptions *)connectionOptions { // Use this method to optionally configure and attach the UIWindow `window` to the provided UIWindowScene `scene`. // If using a storyboard, the `window` property will automatically be initialized and attached to the scene. // This delegate does not imply the connecting scene or session are new (see `application:configurationForConnectingSceneSession` instead). // Override point for customization after application launch. [UIApplication sharedApplication].statusBarStyle = UIStatusBarStyleLightContent; UIWindowScene *windowScene = (UIWindowScene *)scene; self.window = [[UIWindow alloc]initWithWindowScene:scene]; self.window.frame = windowScene.coordinateSpace.bounds; // Only dark mode is supported. AVTheme.supportsAutoMode = NO; AVTheme.currentMode = AVThemeModeDark; // Create a root view controller. MyViewController *mainViewController = [MyViewController new]; AVNavigationController *nav =[[AVNavigationController alloc]initWithRootViewController:mainViewController]; // UINavigationController *nav = [[UINavigationController alloc]initWithRootViewController:mainViewController]; [self.window setRootViewController:nav]; [self.window makeKeyAndVisible]; }SceneDelegate.m (For iOS 13 and later)
func scene(_ scene: UIScene, willConnectTo session: UISceneSession, options connectionOptions: UIScene.ConnectionOptions) {
    UIApplication.shared.statusBarStyle = UIStatusBarStyle.darkContent;
    let windowScene = scene as! UIWindowScene;

    self.window = UIWindow(windowScene: windowScene);
    self.window?.frame = windowScene.coordinateSpace.bounds;

    let myViewController = MyViewController();

    let nav = AVNavigationController(rootViewController: myViewController );
    // Use the system's UINavigationController.
    // let nav = UINavigationController(rootViewController: myViewController );

    self.window?.rootViewController = nav;
    self.window?.makeKeyAndVisible();
    guard let _ = (scene as? UIWindowScene) else { return }
}
Retrieve data
Data structure
The AUIShortVideoList component uses the NSArray<AUIShortVideoInfo *> data structure. AUIShortVideoInfo is a data class that stores video information. The data structure is as follows:
Field | Type | Description | Notes |
videoId | int | The unique ID of the video. | Uniquely identifies each video. |
url | String | The video source URL. | Can be any supported video format, such as MP4 or M3U8. |
coverUrl | String | The video thumbnail. | |
author | String | The video author. | |
title | String | The video title. | |
type | String | The video type. | Corresponds to the |
Initialize the component
To ensure that the AUIShortVideoList component runs properly, pass the NSArray<AUIShortVideoInfo *> data source when you initialize AUIShortVideoListViewController.
Objective-C
// In the current view controller, create an array of video information and initialize the controller.
NSArray<AUIShortVideoInfo *> *videoInfoList = [[NSArray alloc] init];
AUIShortVideoListViewController *vc = [[AUIShortVideoListViewController alloc] initWithData:videoInfoList];
// Use UINavigationController to push the new view controller.
[self.navigationController pushViewController:vc animated:YES];
Swift
// In the current view controller, create an array of video information and initialize the controller.
let info = [AUIShortVideoInfo]() // Add a data source.
let vc = AUIShortVideoListViewController(data: info)
// Use UINavigationController to push the new view controller.
self.navigationController?.pushViewController(vc, animated: true)
Customize data loading
In addition to passing a data array directly, you can also implement the AUIShortVideoDataProviderDelegate protocol for custom data loading:
Initialize the component through a delegate. Implement the data delegate during initialization.
Objective-C
// In the current view controller, initialize the controller and pass in the data provider.
AUIShortVideoListViewController *videoListVC = [[AUIShortVideoListViewController alloc] initWithDataProvider:self];
// Use UINavigationController to push the new view controller.
[self.navigationController pushViewController:videoListVC animated:YES];
Swift
// In the current view controller, initialize the controller and pass in the data provider.
let videoListVC = AUIShortVideoListViewController(dataProvider: self)
// Use UINavigationController to push the new view controller.
self.navigationController?.pushViewController(videoListVC, animated: true)
Implement the AUIShortVideoDataProviderDelegate protocol to customize data loading and refreshing:
@protocol AUIShortVideoDataProviderDelegate <NSObject>
@required
- (void)loadData:(id _Nullable)controller; // Load data.
@optional
- (void)refreshData:(id _Nullable)controller;// Refresh data (optional).
@end
Update the data list
After fetching video data, use the following methods to update the view controller's data list:
Append data
/**
* @brief Appends new video data to the current video list.
*
* @param videoInfoList The new list of video data. This can be empty.
*                      If the provided data list is not empty, the data is appended to the end of the existing video list.
*                      If the provided data list is empty, the current list is not modified.
*/
- (void)appendVideoInfoList:(NSArray<AUIShortVideoInfo *> * _Nullable)videoInfoList;
Reset data
/**
* @brief Resets the current video list to the specified new video data list.
*
* @param videoInfoList The new list of video data. This can be empty.
*                      Replaces the current video list with the provided data list.
*                      If the provided data list is empty, the current video list is cleared.
*/
- (void)resetVideoInfoList:(NSArray<AUIShortVideoInfo *> * _Nullable)videoInfoList;
Data fetching examples
You can obtain the NSArray<AUIShortVideoInfo *> data source through network requests or data conversion.
Network request
Objective-C
// Request additional data. AUIShortVideoListConstants.defaultVideoInfoListURL is the request URL. You can replace it with your own request URL.
- (void)loadData:(id)controller {
    __weak typeof(self) weakSelf = self;  // Weak reference to self.
    [AUIShortVideoListDataManager requestVideoInfoList:AUIShortVideoListConstants.defaultVideoInfoListURL completed:^(NSArray<AUIShortVideoInfo *> * _Nullable data, NSError * _Nullable error) {
        if (error) {
            __strong typeof(weakSelf) strongSelf = weakSelf; // Strong reference to self.
            [AVToastView show:[NSString stringWithFormat:@"Unable to retrieve short video list, error: %@", error.localizedDescription]
                        view:strongSelf.view
                    position:AVToastViewPositionMid];
            return;
        }

        // Call the appendVideoInfoList: method of the corresponding child view controller.
        if (controller && [controller respondsToSelector:@selector(appendVideoInfoList:)]) {
            [controller appendVideoInfoList:data];
        }
    }];
}
Swift
// Request additional data. AUIShortVideoListConstants.defaultVideoInfoListURL is the request URL. You can replace it with your own request URL.
func loadData(_ controller: Any?) {
    weak var weakSelf = self  // Weak reference to self.
    AUIShortVideoListDataManager.requestVideoInfoList(AUIShortVideoListConstants.defaultVideoInfoListURL) { (data: [AUIShortVideoInfo]?, error: Error?) in
        if let error = error {
            guard let strongSelf = weakSelf else { return } // Strong reference to self.
            AVToastView.show("Unable to retrieve short video list, error: \(error.localizedDescription)", view: strongSelf.view, position: .mid)
            return
        }

        if let myController = controller as? AUIShortVideoListViewController {
            // Successful cast, use myController.
            if  myController.responds(to: #selector(myController.appendVideoInfoList(_:))) {
                myController.appendVideoInfoList(data)
            }
        }
    }
}
Data conversion
Objective-C
// Convert the dictionary array to a video information model array.
NSArray<NSDictionary *> *responseArray = (NSArray<NSDictionary *> *)responseObject;
NSMutableArray<AUIShortVideoInfo *> *videoInfoArray = [NSMutableArray arrayWithCapacity:responseArray.count];
for (NSDictionary *dict in responseArray) {
    // Initialize the AUIShortVideoInfo model object and add it to the array.
    AUIShortVideoInfo *videoInfo = [[AUIShortVideoInfo alloc] initWithDict:dict];
    [videoInfoArray addObject:videoInfo];
}
Swift
let responseArray = responseObject as? [[AnyHashable : Any]]
var videoInfoArray = [AnyHashable](repeating: 0, count: responseArray?.count ?? 0) as? [AUIShortVideoInfo]
for dict in responseArray ?? [:] {
    guard let dict = dict as? [AnyHashable : Any] else {
            continue
    }
    // Initialize the AUIShortVideoInfo model object and add it to the array.
    let videoInfo = AUIShortVideoInfo(dict: dict)
    videoInfoArray?.append(videoInfo)
}
Integration FAQ
Playback issues such as a black screen
Check your ApsaraVideo Player SDK license configuration. For more information, see Integrate a license.
Error: "Sandbox: rsync.samba(56557) deny(1) file-read-data"
In Build Settings, set User Script Sandboxing to NO.
Compilation and runtime errors
If your project already contains the same third-party library, adjust the version of that library in the AUIPlayer.podspec file to ensure compatibility and avoid conflicts.
Third-party dependency not found
If you cannot find a third-party dependency after modifying the Podfile, run pod install --repo-update in the directory where the Podfile is located.
Slow dependency installation
If installation is slow, you can add Alibaba Cloud's Pod repository to your Podfile:
source 'https://github.com/CocoaPods/Specs.git'
source 'https://github.com/aliyun/aliyun-specs.git'
Switch player versions
If you do not want to use the player dependency in AUIPlayer.podspec, see Quick integration.
Build scenarios
The AUIShortVideoList component supports low-code integration and can be used to build various short-form video list features. Refer to the examples in AUIPlayerScenes, such as AUIShortDramaList (Short-form drama theater) and AUIShortDramaFeeds (Short-form drama feeds).
Short-form drama theater
Overview
AUIShortDramaList is a scenario-specific module built on the AUIShortVideoList component. It provides a drama detail page and a recommendations page, supporting nested two-level navigation and shared player instances.
Integration
Before you build the short-form drama theater scenario, ensure that you have completed the integration preparation for the AUIShortVideoList component.
Copy the AUIShortDramaList module to your project.
Configure the Podfile.
Add a reference to the AUIShortDramaList module and its dependencies in your project's Podfile.
# Pod Example
install! 'cocoapods', :deterministic_uuids => false
source 'https://github.com/CocoaPods/Specs.git'

platform :ios, '9.0'

target 'Your ProjectName' do

  # Short-form drama scenarios (including theater and feeds). The two modules can be integrated separately.
  pod "AUIPlayer/AUIPlayerScenes", :path => "../"
  # Short drama theater scenario
#  pod "AUIPlayer/AUIPlayerScenes/AUIShortDramaList", :path => "../"

end

post_install do |installer|
  installer.pods_project.build_configurations.each do |config|
      config.build_settings['CLANG_WARN_DOCUMENTATION_COMMENTS'] = 'NO'
      config.build_settings['CLANG_WARN_QUOTED_INCLUDE_IN_FRAMEWORK_HEADER'] = 'NO'
  end
end
Modify the path based on the storage location of the dependency libraries in your project.
NoteIf the version of a third-party library used in your project conflicts with the version that the AUIShortDramaList source code depends on, use the version from your project.
Configure the project.
If you have a Swift project that needs to use Objective-C libraries, you must configure a bridging header in the project's Build Settings. This ensures that Swift can correctly access and use the Objective-C interfaces in the AUIShortDramaList module.
Set the bridging header.
In the project's Build Settings, find the SWIFT_OBJC_BRIDGING_HEADER setting and point it to your bridging header file.
<YourProjectName>/<YourProjectName>-Bridge-Header.hImport the Objective-C interfaces.
In the bridging header file, import the Objective-C interfaces that you want to expose to Swift.
#import "AUIShortDramaList.h"You can refer to the
AUIPlayer-Bridge-Header.hfile in the AUIShortVideoList module for more examples.
Build and run the project.
After the configuration is complete, build and run the project to ensure that the AUIShortDramaList component is correctly integrated.
How to use
You can expose the ViewController for external navigation. For the specific call logic, see the following examples.
Objective-C
- (void)openShortDramaList {
    AUIShortDramaListViewController *vc = [[AUIShortDramaListViewController alloc] init];
    [self.navigationController pushViewController:vc animated:YES];
}
Swift
func openShortDramaList() {
    let vc = AUIShortDramaListViewController()
    navigationController?.pushViewController(vc, animated: true)
}
Retrieve data
The AUIShortDramaList module uses the NSMutableArray<AUIShortDramaInfo *> data structure. AUIShortDramaInfo is a data class that stores short drama episode data. The data structure is as follows:
Field | Type | Description | Notes |
dramaId | NSInteger | Unique series ID | |
title | NSString * | Series title | |
cover | NSString * | Series thumbnail | |
firstDrama | AUIShortVideoInfo * | First episode | This is the first item from the |
dramas | NSMutableArray<AUIShortVideoInfo *> * | List of episodes | This list can be used as a data source for the |
You can obtain the final NSMutableArray<AUIShortDramaInfo *> data source through network requests or data conversion:
The code for AUIShortDramaListViewController provides an example of how to obtain data. This class implements the AUIShortVideoDataProviderDelegate data request delegate interface and provides the following two main methods:
@protocol AUIShortVideoDataProviderDelegate <NSObject>
@required
- (void)loadData:(id _Nullable)controller; // Load data.
@optional
- (void)refreshData:(id _Nullable)controller; // Refresh data (optional).
@end
Use the requestDramaInfoList method provided in AUIShortDramaListDataManager to make a network request and obtain the final
NSMutableArray<AUIShortDramaInfo *>data source. The obtained data is stored in the internal dramaInfoList object for subsequent view display and processing.
Short-form drama feeds
Overview
AUIShortDramaFeeds is a scenario-specific module for a short-form drama feeds stream that is built on the AUIShortVideoList component. It provides a tabbed feeds interface that supports nested tabs, up/down/left/right swipe gestures for playback, and shared player instances.
Integration
Before you build the short-form drama feeds scenario, ensure that you have completed the integration preparation for the AUIShortVideoList and AUIFoundation components.
Copy the AUIShortDramaFeeds module to your project.
Configure the Podfile.
Add a reference to the AUIShortDramaFeeds module and its dependencies in your project's Podfile.
# Pod Example
install! 'cocoapods', :deterministic_uuids => false
source 'https://github.com/CocoaPods/Specs.git'

platform :ios, '9.0'

target 'Your ProjectName' do

  # Short-form drama scenarios (including theater and feeds). The two modules can be integrated separately.
  pod "AUIPlayer/AUIPlayerScenes", :path => "../"
  # Short-form drama feeds scenario
#  pod "AUIPlayer/AUIPlayerScenes/AUIShortDramaFeeds", :path => "../"

end

post_install do |installer|
  installer.pods_project.build_configurations.each do |config|
      config.build_settings['CLANG_WARN_DOCUMENTATION_COMMENTS'] = 'NO'
      config.build_settings['CLANG_WARN_QUOTED_INCLUDE_IN_FRAMEWORK_HEADER'] = 'NO'
  end
end
Modify the path based on the storage location of the dependency libraries in your project.
NoteIf the version of a third-party library used in your project conflicts with the version that the AUIShortDramaFeeds source code depends on, use the version from your project.
Configure the project.
If you have a Swift project that needs to use Objective-C libraries, you must configure a bridging header in the project's Build Settings. This ensures that Swift can correctly access and use the Objective-C interfaces in the AUIShortDramaFeeds module.
Set the bridging header.
In the project's Build Settings, find the SWIFT_OBJC_BRIDGING_HEADER setting and point it to your bridging header file.
<YourProjectName>/<YourProjectName>-Bridge-Header.hImport the Objective-C interfaces.
In the bridging header file, import the Objective-C interfaces that you want to expose to Swift.
#import "AUIShortDramaFeeds.h"For more examples and guidance, see the
AUIPlayer-Bridge-Header.hfile in the AUIShortVideoList module.
Build and run the project.
After the configuration is complete, build and run the project to ensure that the AUIShortDramaFeeds component is correctly integrated.
How to use
You can expose the ViewController page for external navigation. For the specific call logic, see the following examples.
Objective-C
- (void)openShortDramaFeeds {
    AUIShortDramaFeedsViewController *vc = [[AUIShortDramaFeedsViewController alloc] init];
    [self.navigationController pushViewController:vc animated:YES];
}
Swift
func openShortDramaFeeds() {
    let vc = AUIShortDramaFeedsViewController()
    navigationController?.pushViewController(vc, animated: true)
}
Retrieve data
The AUIShortDramaFeeds module uses the NSArray<AUIShortVideoInfo *> data structure. AUIShortVideoInfo is a data class that stores video information. For more information, see the section of AUIShortVideoList component.
Core features
This component is built using the ApsaraVideo Player SDK, leveraging multiple player instances (AliPlayer), preloading (MediaLoader), and pre-rendering. It utilizes core capabilities such as preloading, pre-rendering, HTTPDNS, and encrypted playback to improve playback start time, stability, and security. For more details, see Advanced features.
Preloading
Using a sliding window strategy, the component dynamically starts and stops preloading tasks for videos. The underlying SDK intelligently adjusts task priority based on network conditions to ensure the currently playing video and upcoming videos receive more network resources. This improves start-up speed and reduces buffering, providing a smooth experience even when scrolling quickly. For more, see Preloading.
Pre-rendering
The component pre-renders the first frame of upcoming videos in the background, reducing black screens and making playback feel seamless. Starting from V6.16.0, the Player SDK supports forced pre-rendering. For more, see Pre-rendering.
Multi-instance player pool
A globally shared, configurable player instance pool is implemented. Through optimized API calls and thread resource management, it achieves optimal performance and resource efficiency in terms of thread management, CPU utilization, and memory usage. This optimization reduces lag during scrolling, making the playback experience smoother.
Picture-in-Picture with auto-play next episode
The global PiPVC and DisplayLayer technology ensures continuous rendering and uninterrupted instance switching when changing episodes in Picture-in-Picture (PiP) mode. This achieves a seamless, non-disruptive viewing experience and is an engineered implementation of the best practices for PiP playback.
HTTPDNS
HTTPDNS provides faster and more stable DNS resolution. By replacing traditional DNS, it reduces lookup times, improving video loading speed and stability. Since V6.12.0, HTTPDNS is enabled by default. For more, see HTTPDNS.
Video encryption
Short-form dramas are typically 1-3 minute MP4 videos. Since V6.8.0, the Player SDK supports proprietary MP4 encryption, providing security for your video content. For more information, see Alibaba Cloud proprietary cryptography.
To play a privately encrypted MP4 video, the following conditions must be met:
When the privately encrypted MP4 video is passed to the player, the application must append
etavirp_nuyila=1to the video URL. For example, if the original video URL ishttps://example.aliyundoc.com/test.mp4, the URL passed to the player must behttps://example.aliyundoc.com/test.mp4?etavirp_nuyila=1.The UID associated with your app's license must be the same as the UID used to encrypt the MP4 video.
You can verify a privately encrypted video as follows:
The meta information must contain the
AliyunPrivateKeyUritag.The video cannot be played directly with ffplay.
Adaptive H.265 playback
If hardware decoding of an H.265 stream fails and an H.264 backup stream is available, the player will automatically switch to the H.264 stream. If no backup is available, it will fall back to software decoding for H.265. For more, see Adaptive H.265 playback.
Adaptive bitrate streaming
The Player SDK supports adaptive bitrate streaming for HLS and DASH. You can switch bitrates by calling the player's selectTrack method, enabling automatic video quality adjustment based on network conditions. For more information, see Adaptive bitrate switching.