Implement the floating player feature at the application layer by calling the Player SDK in conjunction with system APIs. This topic provides recommendations for choosing a solution, along with specific technical details for Android and iOS platforms.
Overview
In mobile applications, floating player refers to a video player that appears as a small, floating window on top of other apps, allowing users to continue watching videos while browsing other content. This feature is typically used on e-commerce, short videos, and online education platforms, providing users with a more convenient multitasking experience.
There are two ways to implement the floating player:
Picture-in-Picture (PiP)
Floating Window
These two methods differ in terms of technical implementation, platform support, permission requests, and user interaction.
Additionally, this feature has been integrated into the short-form drama solution, working in synergy with the auto-play next episode feature. For more information, see Short-form drama solution.
Implementation methods
PiP
Definition
A method natively supported by the operating system. The player shrinks into a floating window, usually docked to a corner of the screen, allowing the user to browse other apps or pages simultaneously.
Characteristics
The small window can float above the home screen or other apps (subject to system support).
The window is usually not freely draggable or resizable. Interaction is controlled by the system.
Relies on native OS capabilities (such as Android 8.0+, iOS 14+).
Applicable scenarios
Suitable for business scenarios with high requirements for compatibility and app store review, or those that need to leverage system capabilities as much as possible.
Reference
It is recommended to first refer to the PiP implementation in the ApsaraVideo Player API-Example project and adapt it to your business needs. For details, see the
PictureInPicturemodule in the API-Example-Android or API-Example-iOS project.
Floating Window
Definition
A custom solution implemented by the application. The player appears as a freely draggable and resizable small window that overlays other interfaces.
Characteristics:
Supports custom window styles and interactions (such as dragging and resizing).
Requires special permissions on Android, and some systems or devices may have restrictions.
Not recommended for the iOS platform due to the risk of being rejected by Apple's review process.
Applicable scenarios:
Suitable for scenarios requiring highly customized small window interactions or as an alternative when native PiP is not supported (mainly for Android).
Reference
It is recommended to first refer to the floating window implementation in the ApsaraVideo Player API-Example project and adapt it to your business needs. For details, see the
FloatWindowmodule in the API-Example-Android or API-Example-iOS project.
Solution selection
If the platform supports native PiP, the PiP solution is recommended to simplify development, improve compatibility, and increase the likelihood of passing app store reviews.
If a custom small window experience is required or native PiP is unavailable, consider the floating window solution, but be aware of permission requests and platform compliance risks.
For the iOS platform, we recommend using the official PiP feature. Custom floating window is not recommended.
For all function-related code and implementation details, refer to the API-Example project and adapt and extend it according to best practices.
The specific implementation can be combined with the reference below and the corresponding API-Example-Android or API-Example-iOS source code.
Android
The Android system supports both floating window and PiP methods.
Floating window
A floating window is a type of floating view in the Android system that can be displayed on top of other apps. It can be freely dragged, resized, and closed, and is commonly used for reminders, notifications, and advertisements.
In the Android system, each window corresponds to a Window object, and a floating window is a special type of Window. Typically, a floating window can be implemented using PopupWindow from the View system.
PopupWindow is a class that inherits from WindowManager.LayoutParams, which has motion capabilities. Therefore, its position, size, and display mode can be manipulated. You can use PopupWindow to implement a custom floating window without affecting other applications and without requiring an Activity transition.
Follow these steps:
Declare the floating window permission in the
AndroidManifest.xmlfile.<uses-permission android:name="android.permission.SYSTEM_ALERT_WINDOW" />In the Activity or Service where the floating window is to be displayed, create a WindowManager and a PopupWindow. Then, set their properties, such as display position, size, and content.
// Create the layout.
View layout = View.inflate(this, R.layout.float_window, null);
// Create the manager.
WindowManager wm = (WindowManager) this.getSystemService(Context.WINDOW_SERVICE);
// Create the floating window.
PopupWindow mPopupWindow = new PopupWindow(layout,
                                           WindowManager.LayoutParams.WRAP_CONTENT,
                                           WindowManager.LayoutParams.WRAP_CONTENT);
// Set the display position.
mPopupWindow.showAtLocation(parentView, Gravity.LEFT | Gravity.TOP, x, y);
// Make it clickable and focusable.
mPopupWindow.setTouchable(true);
mPopupWindow.setFocusable(true);
// Set the background color.
mPopupWindow.setBackgroundDrawable(new ColorDrawable(Color.TRANSPARENT));
Set click events, drag listeners, and other interactions for the controls within the floating window layout.
mPopupWindow.setOnTouchListener(new View.OnTouchListener() { int lastX, lastY; int paramX, paramY; @Override public boolean onTouch(View v, MotionEvent event) { // Get the current touch point coordinates relative to the screen. int x = (int) event.getRawX(); int y = (int) event.getRawY(); switch (event.getAction()) { case MotionEvent.ACTION_DOWN: lastX = x; lastY = y; paramX = mPopupWindow.getLayoutParams().x; paramY = mPopupWindow.getLayoutParams().y; break; case MotionEvent.ACTION_MOVE: int dx = x - lastX; int dy = y - lastY; mPopupWindow.update(paramX + dx, paramY + dy, -1, -1); break; } return false; } });ImportantOn Android 6.0 and later, you need to dynamically request the floating window permission. However, even with the permission, this feature is still not supported on some Android 8.0 devices.
PiP
Starting from Android 8.0 (API 26), Android introduced the ability to launch an Activity in PiP mode. PiP is a special type of multi-window mode, most commonly used for video playback. In this mode, users can pin a video to a small window in a corner of the screen while navigating between apps or browsing content on the home screen.
PiP utilizes the multi-window mode APIs available in Android 7.0 to create a fixed video overlay window. To add PiP functionality to your app, you need to register the Activity that supports PiP, switch the Activity to PiP mode as needed, and ensure that UI elements are hidden and video continues to play when the Activity is in PiP mode.
The PiP window appears at the top of the screen, typically in a corner chosen by the system.
For information on Android system support for the PiP feature, see Android documentation.
Follow these steps:
Declare support for PiP for your Activity in the
AndroidManifest.xmlfile.<activity android:name="VideoActivity" android:supportsPictureInPicture="true" android:configChanges= "screenSize|smallestScreenSize|screenLayout|orientation" ... />By default, the Android system does not automatically provide PiP support for apps. If you want to support PiP in your app, you can register the video Activity in your
AndroidManifest.xmlfile and set theandroid:supportsPictureInPictureattribute totrue.Additionally, when registering an Activity that supports PiP, you also need to specify that the Activity handles layout configuration changes. This prevents your Activity from restarting during PiP mode transitions if a layout change occurs, providing a smoother user experience.
ImportantLow-RAM devices may not be able to use PiP mode. Before your app uses PiP, be sure to check for its availability by calling hasSystemFeature(PackageManager.FEATURE_PICTURE_IN_PICTURE).
Switch the Activity to PiP mode.
The most common ways to enter PiP mode are:
Triggered by a button click
onClicked(View), onOptionsItemSelected(MenuItem), and so on.
@Override
public void onActionClicked(Action action) {
    if (action.getId() == R.id.lb_control_picture_in_picture) {
    	// Triggered from a button.
        enterPictureInPictureMode();
        return;
    }
    ...
}
Triggered by intentionally leaving the app, such as by pressing the Home button
onUserLeaveHint()
To enter PiP mode, the Activity must call
enterPictureInPictureMode(). You can make the app automatically switch to PiP mode when the user presses the Home or Recents button by overridingonUserLeaveHint().@Override public void onUserLeaveHint () { // Triggered by intentionally leaving the app. if (iWantToBeInPipModeNow()) { enterPictureInPictureMode(); } }Triggered from a back action, such as by pressing a Back button
onBackPressed()
@Override
public void onBackPressed() {
    super.onBackPressed();
    // Triggered from a back action.
    enterPictureInPictureMode();
}
Handle UI elements in PiP mode.
When an Activity enters or exits PiP mode, the system calls the
Activity.onPictureInPictureModeChanged()method or theFragment.onPictureInPictureModeChanged()method.You should override these callbacks to redraw your Activity's UI elements. Note that in PiP mode, the Activity is displayed in a small window, users cannot interact with the app's UI elements, and details in the small window may be difficult to see. A video playback Activity with a minimal UI provides the best user experience.
Support smoother animations when exiting PiP mode.
When an Activity exits PiP mode, you can add exit animations for UI elements to improve the transition's smoothness and visual appeal.
Add controls.
In PiP mode, users may not be able to interact with the application's UI elements. Therefore, you might consider adding simple controls to the PiP window to allow users to perform basic actions such as play/pause or next/previous episode.
Disable seamless resizing for non-video content.
In PiP mode, video content usually needs to maintain its aspect ratio without being stretched or cropped. However, for non-video content like text and images, you may need to disable seamless resizing to prevent the content from becoming unreadable or distorted in the small window. Disabling seamless resizing can ensure that non-video content remains visible and usable in PiP mode.
Continue playing video in PiP mode.
When an Activity switches to PiP mode, the system puts the Activity in a paused state and calls the Activity's
onPause()method. However, video playback should continue in PiP mode, not pause.In Android 7.0 and later:
Pause video playback when the system calls the Activity's
onStop()method.Resume video playback when the system calls the Activity's
onStart()method.
This way, you do not need to check if the application is in PiP mode in the
onPause()method. You can continue playing the video.If you must pause video playback in the
onPause()implementation, check if the application is in PiP mode by callingisInPictureInPictureMode()and handle the playback state accordingly. Sample code:@Override public void onPause() { // If called when in PiP mode, do not pause playback. if (isInPictureInPictureMode()) { // Continue playback. ... } else { // Use existing playback logic for paused Activity behavior. ... } }
iOS
There are four ways to implement the PiP feature:
PiP solution based on a shared
AVSampleBufferDisplayLayerand global frame delivery (Recommended)In complex scenarios such as short-form dramas, if you need to implement PiP and features such as auto-playing the next episode, use
AVSampleBufferDisplayLayerto receive and display video frames in the PiP window.NoteFor a detailed code example, see the SampleBufferDisplayLayer module in PipDisplayLayer. This project is an Objective-C sample project for the ApsaraVideo Player SDK for iOS. It is designed to help developers quickly learn and use the PiP solution based on a shared
AVSampleBufferDisplayLayerand global frame delivery.Built-in WKWebView
If you use WKWebView for video playback in your application, it already has a built-in PiP feature.
Use AVPlayerViewController
If your player requirements are not high, you can use AVPlayerViewController. It already provides PiP functionality. Simply set the
allowsPictureInPicturePlaybackproperty toYESto display the PiP button in the player interface.Custom player wrapped with AVPictureInPictureController
If you use a custom player and want to enable PiP, you can wrap the player with
AVPictureInPictureControllerfor an easy implementation.AVPictureInPictureControlleralready handles the animation effects internally. Note that you need to implement the PiP button yourself; the system provides an API (pictureInPictureButtonStartImage) for the PiP icon.
Floating window
You can create a new window using the UIWindow type, add the video player's view to it, and control the window's position and size with gestures to achieve a floating PiP effect.
Apple's design guidelines explicitly discourage the use of floating windows in applications. Using a floating window may lead to your app being rejected during review or removed from the App Store. You must also consider user experience and privacy protection issues.
PiP
The PiP feature was introduced in iOS 9, but in previous versions, it was only available on iPad. Starting with iOS 14, iPhone users can also use PiP.
There are two methods for PiP on iOS:
For iOS 14 and later

In iOS 14, you can achieve PiP by initializing
AVPictureInPictureControllerwith the system-providedAVPlayer. This allows the PiP effect to appear when the application is sent to the background or when navigating to a secondary screen. This solution is suitable for scenarios with less demanding player requirements.For iOS 15 and later

In iOS 15 and later, you can use
AVSampleBufferDisplayLayerto create anAVPictureInPictureControllerfor seamless PiP playback. This solution is typically used to implement PiP with a custom player. The ApsaraVideo Player SDK supports this feature. For more details, see Picture-in-Picture (PiP).
Follow these steps:
The implementation for iOS 15 solution is very similar to the iOS 14 solution. This topic uses the iOS 14 solution as an example:
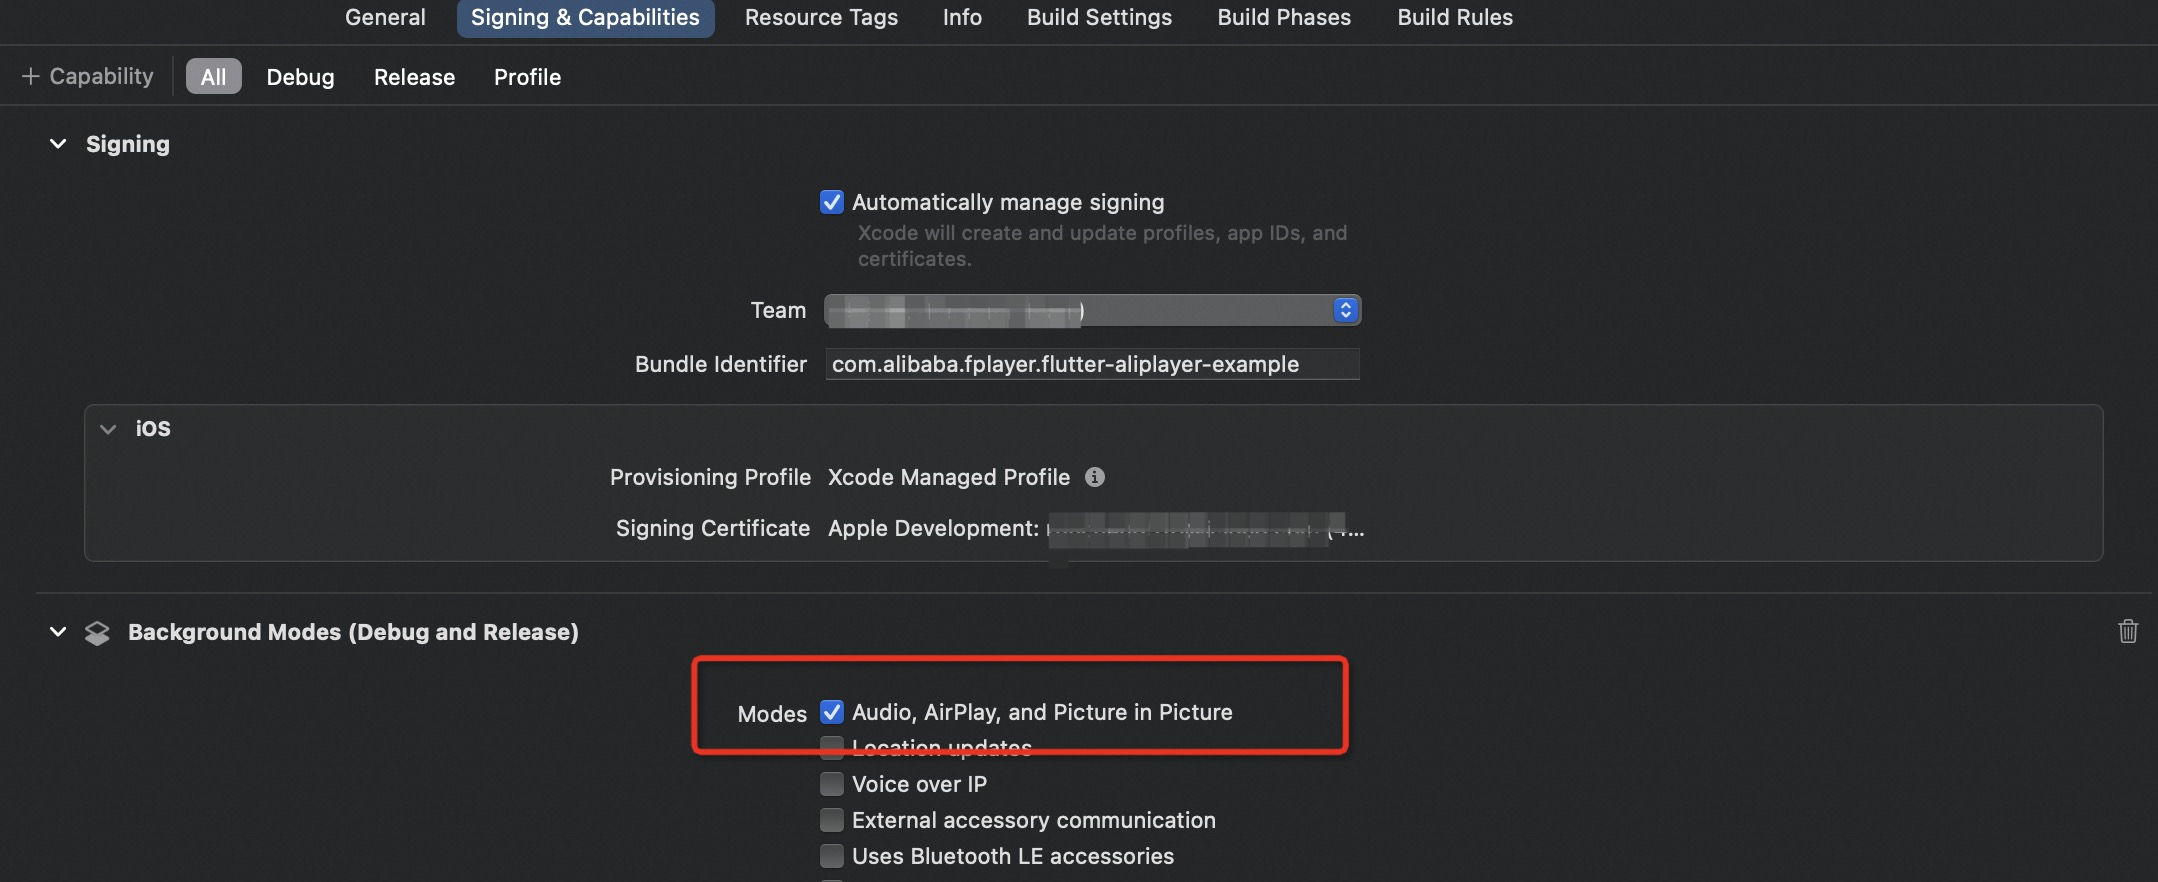
Enable background mode.
Import the framework #import <AVKit/AVKit.h> and create an
AVPictureInPictureController.// 1. Check if PiP is supported. if ([AVPictureInPictureController isPictureInPictureSupported]) { // 2. Enable permissions. @try { NSError *error = nil; [[AVAudioSession sharedInstance] setCategory:AVAudioSessionOrientationBack error:&error]; [[AVAudioSession sharedInstance] setActive:YES error:&error]; } @catch (NSException *exception) { NSLog(@"AVAudioSession error occurred"); } self.pipVC = [[AVPictureInPictureController alloc] initWithPlayerLayer:self.player]; self.pipVC.delegate = self; }Start or stop PiP.
if (self.pipVC.isPictureInPictureActive) {
    [self.pipVC stopPictureInPicture];
} else {
    [self.pipVC startPictureInPicture];
}
Set the
AVPictureInPictureControllerDelegate.// PiP is about to start. - (void)pictureInPictureControllerWillStartPictureInPicture:(AVPictureInPictureController *)pictureInPictureController; // PiP has started. - (void)pictureInPictureControllerDidStartPictureInPicture:(AVPictureInPictureController *)pictureInPictureController; // Failed to start PiP. - (void)pictureInPictureController:(AVPictureInPictureController *)pictureInPictureController failedToStartPictureInPictureWithError:(NSError *)error; // PiP is about to stop. - (void)pictureInPictureControllerWillStopPictureInPicture:(AVPictureInPictureController *)pictureInPictureController; // PiP has stopped. - (void)pictureInPictureControllerDidStopPictureInPicture:(AVPictureInPictureController *)pictureInPictureController; // Restore UI for PiP stop. - (void)pictureInPictureController:(AVPictureInPictureController *)pictureInPictureController restoreUserInterfaceForPictureInPictureStopWithCompletionHandler:(void (^)(BOOL restored))completionHandler;ImportantHold a global reference to the PiP controller. You can retain it in
pictureInPictureControllerWillStartPictureInPictureand release it inpictureInPictureControllerDidStopPictureInPicture.Sometimes, the PiP controller might be opened through other means than clicking the PiP button. You can check for and close it in the
viewWillAppearmethod.If a PiP window is already active and you want to start a new one, wait for the current one to close before starting the new one to prevent unknown errors, as closing PiP is an animated process.
Creating an
AVPictureInPictureControllerand starting PiP at the same time might fail. If you encounter this, start PiP later.