Alibaba Cloud issues a real-time invoice or a monthly invoice depending on your payment method. Learn how to download invoices and manage your Tax ID.
Invoice types
Alibaba Cloud issues one of two invoice types based on your payment method and account type:
Invoice type | Applies to | Generation rule | Availability |
real-time invoice | Users who pay by credit card or digital wallet | Automatically generated after you pay for each order or bill. | Available for download after 12:00 on the 3rd of the following month. |
monthly invoice | Users under credit control | The previous month's invoice is generated on the 6th of each month. | Available for download immediately after generation and automatically sent to your registered email address. |
Real-time invoices are generated after payment but available for download only after 12:00 on the 3rd of the following month. For immediate proof of payment, check your order details.
Get an invoice
Credit card and digital wallet users
New console
Log on to the Expenses and Costs console and choose Invoices.
Click the Download Invoice tab.
Select the month, then find and download the invoice.
Legacy console
Log on to the Expenses and Costs console and choose Payment Details.
On the Paid tab, download the invoice for the paid bill.
Credit control users
Monthly invoices are generated on the 6th of each month and automatically sent to your registered email. You can also download them manually:
New console
Log on to the Expenses and Costs console and choose Invoices.
Click the Download Invoice tab to download the monthly invoice.
Legacy console
Log on to the Expenses and Costs console and go to Account Overview.
In the Recent Documents section in the lower-right corner, view and download monthly invoices from the last three months.
You can also go to the Overview of Monthly Bill page to download invoices for settled monthly bills.
If you receive a refund during the month, the system generates a corresponding negative invoice. Be sure to check for this invoice.
To request a reissue of an invoice, submit a ticket.
Configure email delivery for invoices
To send monthly invoice emails to additional addresses, configure recipients in the Message Center.
Log on to the Message Center and click Common Settings in the left-side navigation pane.
In the upper-right corner, click Manage Contacts. Your registered email address is displayed in the list by default.
Click Add Receiver. In the dialog box that appears, enter the Name and Email, and select the Notification Type that you want to receive. The system automatically sends a verification message to the specified email address. The new contact becomes active after email verification.
Alternatively, return to the Common Settings page and go to the Service Messages tab. In the Notification Type list, find the invoice-related notification, click Edit, and then add a new Contact.
Add your Tax ID information
Common tax ID types:
Term | Applies to | Description |
Business Registration Number | Businesses | An identification number assigned by the business registration authority when a company is established. |
National Identification Number | Individuals | An identification number used by an individual. |
Tax Identification Number (TIN) | Businesses and Individuals | An identification number assigned by the tax authority after a business or individual registers for income tax. |
SST, GST, or VAT registration number | Businesses | An identification number assigned by the tax authority after a business registers for indirect taxes. |
If your country or region requires a Tax ID for consumption tax, VAT, or similar indirect taxes, register your tax information on the Tax ID page.
Add or update your Tax ID
Both consoles share the same backend. The new console is recommended.
New console
Log in to the Expenses and Costs console and choose Invoices in the left-side navigation pane.
Click the Tax ID tab.
In the billing account selector at the top of the page, choose the billing account whose Tax ID you want to add or update.
The page shows the Country/Region and Company Name bound to the billing account and adjusts Tax ID field labels accordingly (for example, GST No. for Singapore and India, VAT No. for EU and the UK, SST No. for Malaysia).
In the Tax ID field, enter the Tax ID issued by the tax authority in your country or region.
In the tax certificate field, click Upload and select the certificate file that matches the Tax ID.
Click Submit.
Legacy console
Log in to the User Center and go to the Tax Settings page.
Enter your Tax ID and upload the tax certificate.
Click Submit.
The Country/Region and Company Name fields are bound to your billing account entity and cannot be changed on the Tax ID page. To update them, contact your account manager or submit a ticket.
Tax certificate requirements
The tax certificate that you upload must meet the following requirements:
File format: JPEG, PNG, or PDF.
File size: 5 MB or less.
Content: The certificate must be clearly readable and must show the company name, the Tax ID, and the issuing authority. The information on the certificate must match the values that you enter on the Tax ID page.
Certificate type: The certificate must match the Tax ID type for your country or region. For example, upload a GST registration certificate for a GST No., or a VAT registration certificate for a VAT No.
What to expect after you submit
Review: The Alibaba Cloud tax team reviews the Tax ID and certificate. You can continue using Alibaba Cloud services during the review.
Notification: The result is sent to the Message Center. You can also return to the Tax ID page to see the Tax ID currently on file for the billing account.
If the review is rejected: Follow the instructions in the Message Center notification, correct the Tax ID or upload a compliant certificate, and submit again.
Effect on invoices: After approval, new invoices include the registered Tax ID. Previously issued invoices are not updated automatically; submit a ticket to request a reissue.
Update an existing Tax ID
To update a Tax ID or tax certificate that you have already submitted, return to the Tax ID page and do one or more of the following:
In the Tax ID field, enter the new Tax ID directly.
In the tax certificate field, click Delete to remove the existing file, then click Upload to upload a new certificate.
Click Submit. The updated information goes through the same review process, and the result is sent to the Message Center.
Country and region notes
The Tax ID page adjusts field labels and required certificate types based on your billing account's country or region. For countries and regions with additional registration rules or invoice requirements:
If your country or region is not listed, follow the field labels on the Tax ID page and upload a matching certificate. For questions about format or registration requirements, submit a ticket.
Tax processing strictly depends on the information that you provide. An incorrect Tax ID may result in additional taxes, penalties, or interest charges for Alibaba Cloud. Alibaba Cloud reserves the right to seek compensation for these costs.
If you do not provide a Tax ID, Alibaba Cloud treats your purchases as Business-to-Consumer (B2C) transactions. These transactions may then be subject to taxes such as Value-Added Tax (VAT).
United Kingdom
Netherlands
Indonesia
Japan
Malaysia
Nigeria
Tax collection rules vary by country and region:
Most countries and regions: When you have registered the Tax ID for your country/region with Alibaba Cloud, Alibaba Cloud does not charge tax.
The following countries and regions: Regardless of whether you have provided a Tax ID, Alibaba Cloud charges applicable taxes in accordance with local tax regulations. Providing a Tax ID is still necessary to ensure the accuracy and compliance of invoice information.
Modify invoice information
You can modify the company name, address, or Tax ID that appears on your invoices. The modification process depends on whether the change applies to future invoices or to invoices that have already been generated.
Modify information for future invoices
Invoice content is derived from the billing address information in your account. To change the company name or address on future invoices, update your account's billing address. After the update, all new orders and bills will display the updated company name and address. Invoices that have already been generated are not affected.
To update your billing address:
Log on to the Account Console.
On the Basic Information page, update the Organization Name, Street Address, City, and other relevant fields in the Contact Information section.
Save your changes.
If you have completed Individual Real-Name Registration or Enterprise Verification, you cannot modify the Organization Name field through the Account Console. In this case, submit a support ticket to request the change. The support team will guide you through the identity re-verification process.
To add or update a Tax ID for future invoices, see the Add your Tax ID information section on this page.
Modify information on historical invoices
If you need to change the company name or address on invoices that have already been generated, you should submit a support ticket.
Before you submit the ticket, complete the following steps:
Update your company information in the Account Console by following the steps in the Modify information for future invoices section above.
Prepare the following information to include in your ticket:
Reason for modifying the invoice information, with a detailed explanation
Type of modification: Company Name, Company Address, or both
Updated company name as it now appears in the Account Console
Updated company address as it now appears in the Account Console
Original company name as displayed on the invoice
Original company address as displayed on the invoice
New company name you want to appear on the invoice
New company address you want to appear on the invoice
Billing period covered by the invoices to be modified
Effective date of the new company name
Supporting documentation that proves the effective date of the new company name (for example, a business registration certificate or legal name change document)
Submit a support ticket with the information listed above.
After the modification is approved and processed, the updated invoices will be sent to you through the support ticket.
Modification requests are subject to review. Ensure all required information is provided in your initial submission to avoid delays.
Modify Tax ID on historical invoices
Modification of the Tax ID on historical invoices is generally not supported.
To update the Tax ID on future invoices, go to the Tax ID Management page in the Billing Management console to add or update your Tax ID. All invoices generated after the update will display the new Tax ID. For detailed steps, see the Add your Tax ID information section on this page.
How tax is calculated
To view tax information, go to the Billing Details page in the legacy console or the My Orders and Overview of Monthly Bill pages in the new console.
Alibaba Cloud calculates tax per order or bill, rounds to two decimal places, then sums the results. The total may differ slightly from multiplying the pre-tax total by the tax rate.
For example, consider a customer in a region with a 9% tax rate who receives two bills for 9.00 currency units each in a given month:
Amount due | Tax rate | Amount due × Tax rate | Rounding adjustment | Tax |
9 | 0.09 | 0.81 | 0 | 0.81 |
9 | 0.09 | 0.81 | 0 | 0.81 |
The total tax shown on the customer's positive invoice for the month is 0.81 + 0.81 = 1.62 currency units.
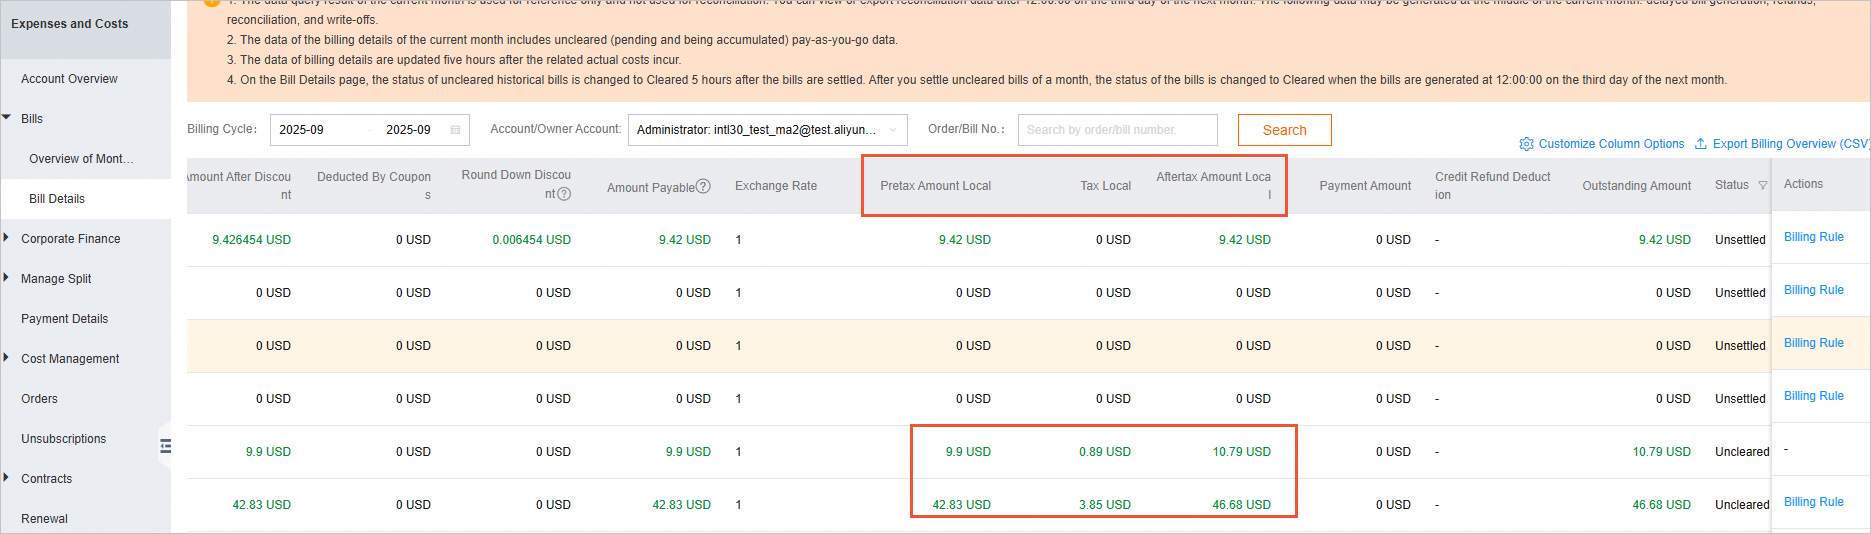
The total tax on the customer's positive invoice for this month is 0.89 + 3.85 = 4.74.
Amount due | Tax rate | Amount due × Tax rate | Rounding adjustment | Tax |
9.9 | 0.09 | 0.891 | 0.001 | 0.89 |
42.83 | 0.09 | 3.8547 | 0.0047 | 3.85 |
Related topics: