The Wide Column model is similar to the data model of Bigtable or HBase and is suitable for various scenarios such as the storage of metadata and big data. A single data table can store petabyte-level data and supports tens of millions of queries per second (QPS). This topic describes how to use the Wide Column model in the Tablestore console.
For information about how to get started with the Wide Column model by using the Tablestore CLI, see Get started with the Wide Column model.
Prerequisites
Tablestore is activated and an instance is created. For more information, see Activate Tablestore and create an instance.
Procedure
Step 1: Create a data table
Create a data table to store business-related data.
For information about sample scenarios and table schemas, see Sample scenarios.
-
Go to the Instance Management page.
Log on to the Tablestore console.
In the top navigation bar, select a resource group and a region.
-
On the Overview page, click the instance name or click Instance Management in the Actions column.
-
On the Instance Details tab, click Create Table.
-
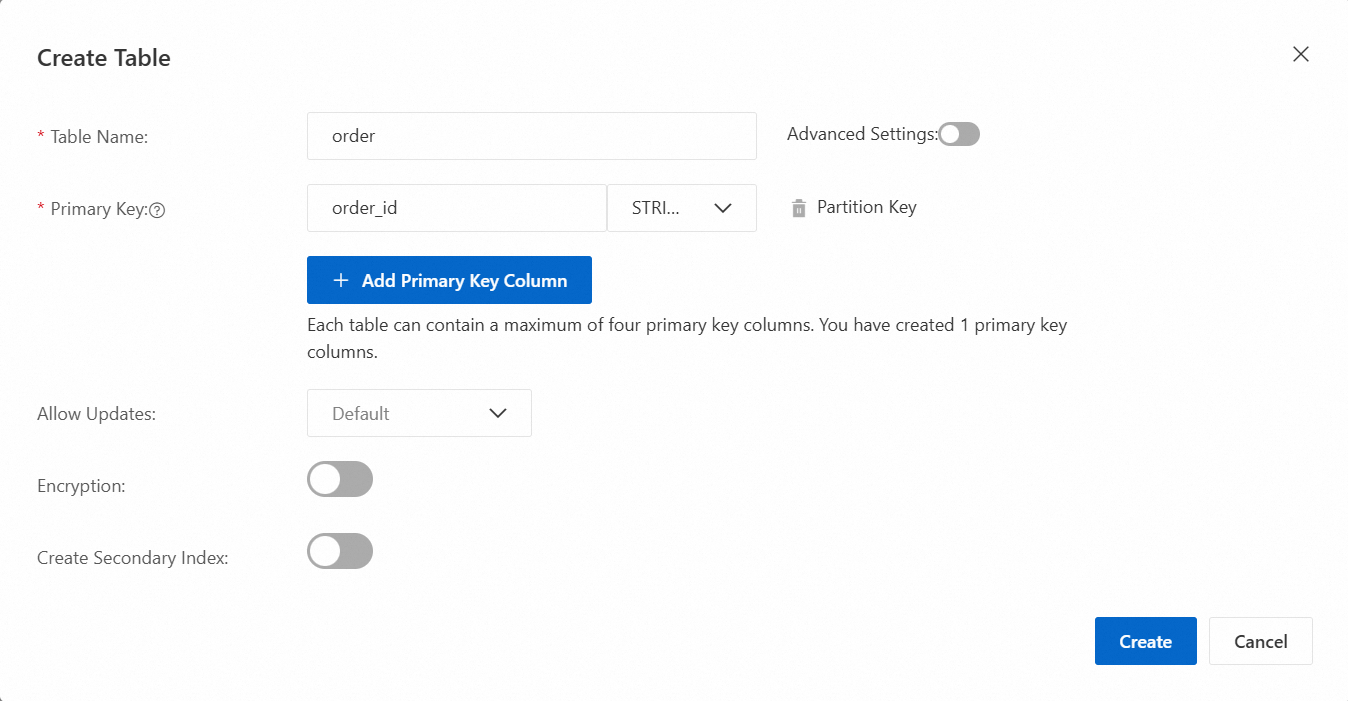
In the Create Table dialog box, set Table Name to order and configure the primary key.
-
Click Create.
After the data table is created, you can view it in the Tables section. If the new table is not displayed, click the
 icon to refresh the table list.
Step 2: Read and write data
On the Instance Details tab, in the Tables section, click Query in the Actions column of the data table. Then, read and write data on the Query Data page.
Insert a single row of data
If you want to insert multiple rows of data, repeat the steps multiple times.
-
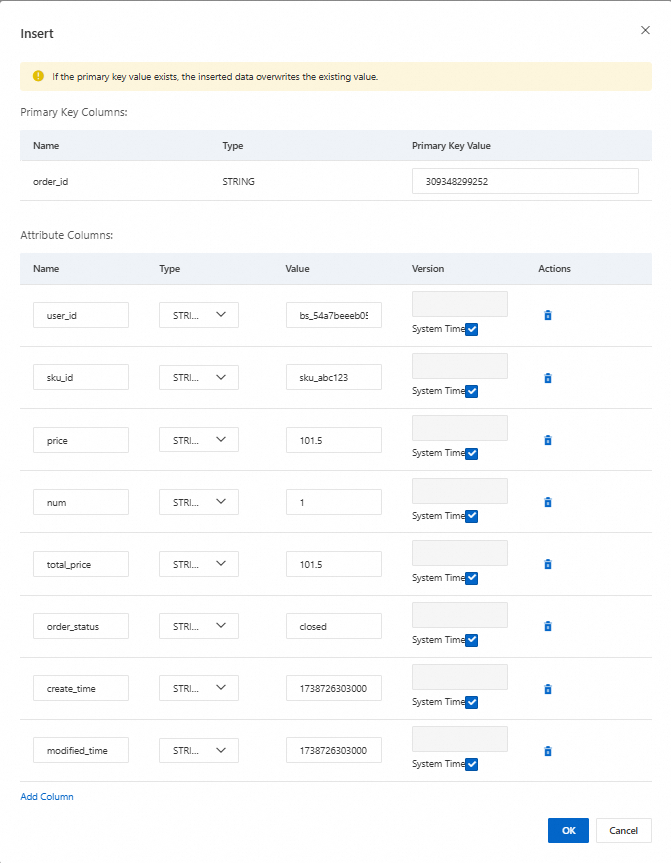
On the Query Data tab, click Insert.
-
In the Insert dialog box, enter the primary key values. Click Add Column multiple times, and set the Name, Type, and Value for each attribute column.
-
Click OK.
Update a single row of data
You can update the data of an existing row. In this example, the after-sales status of an order is updated and a new attribute column named comments is added. The comments attribute column is of the String type.
-
On the Query Data tab, select the row you want to update and click Update.
-
In the Update dialog box, make the required updates.
-
Add an attribute column: Click Add Column, set Name to
comments, set Type to STRING, and set an Value as needed. -
Update an attribute column: Set the operation to Update and modify the value of the
order_statusattribute column.

-
-
Click OK.
Read data
You can read a single row of data or data whose primary key value is within a specific range in the Tablestore console based on your business requirements.
You can execute SQL statements to query and analyze data in the table. For more information, see SQL query.
Read data whose primary key value is within a specific range
-
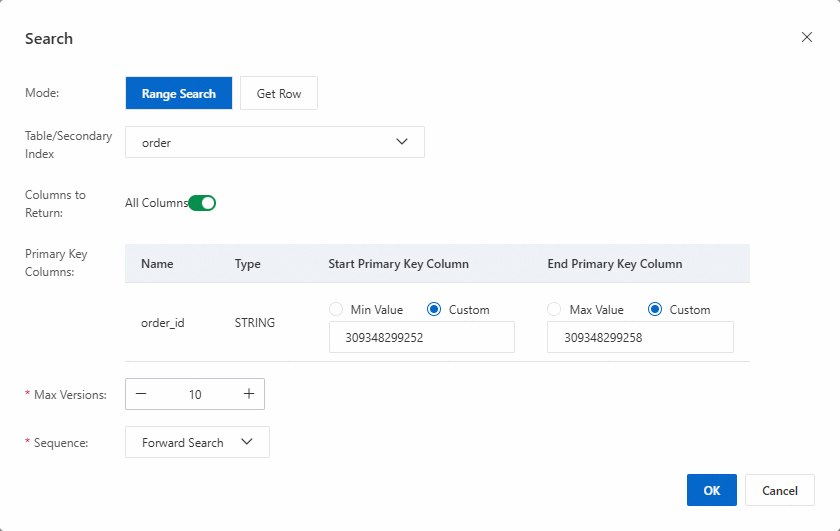
On the Query Data tab, click Search.
-
In the Search dialog box, set Mode to Range Search.
-
By default, all columns are returned. To return specific attribute columns, turn off the Get All Columns switch and enter the names of the columns, separated by commas.
Specify the Start Primary Key Column and End Primary Key Column parameters for each primary key column and retain the default settings for other parameters.
NoteIf you set Mode to Range Search, the range that is specified by the start value and the end value in the right primary key column takes effect only when the start value and the end value are the same within each leftmost primary key column. If the start value and the end value in a leftmost primary key column are different, the range that is specified by the start value and the end value in the right primary key column does not take effect.
The range is a left-open, right-closed interval.
-
Click OK.
The system displays the row that meets the query conditions. If no rows meet the query conditions, the response is empty.
Read a single row of data
-
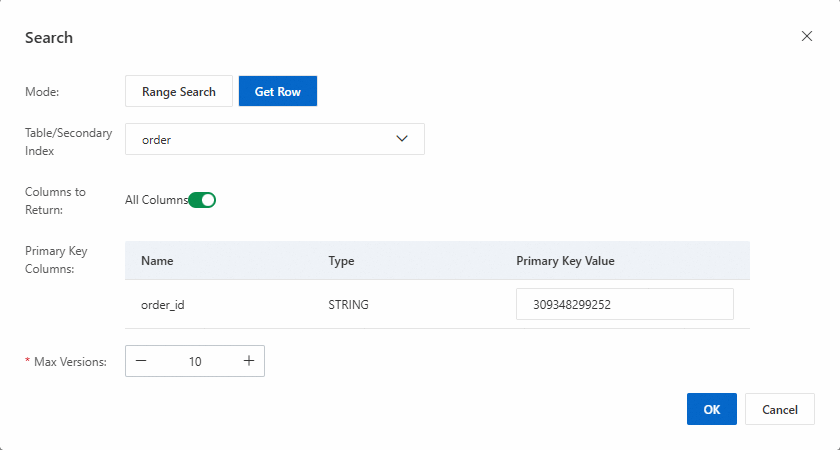
On the Query Data tab, click Search.
-
In the Search dialog box, set Mode to Get Row.
-
By default, all columns are returned. To return specific attribute columns, turn off the Get All Columns switch and enter the names of the columns, separated by commas.
-
Enter the primary key Value for the target row. Leave the other parameters as default.
The integrity and accuracy of the primary key value affect the query results.
-
Click OK.
The system displays the row that meets the query conditions. If no row meets the query conditions, the response is empty.
Delete data
The data that you delete cannot be restored. Proceed with caution.
-
On the Query Data tab, select the rows you want to delete and click Delete.
-
In the Delete dialog box, click OK.
Sample scenarios
The order system is a very common system that is used in various industries nowadays. For example, it is used by e-commerce platforms to store orders, by banks to store transaction records, and by telecom operators to store bills. In this example, an order table in the order system is used to describe how to create a data table and read and write data in the data table. The name of the order table is order. The following table describes the schema of the table.
Column name | Data type | Description |
order_id (primary key column) | String | The ID of the order. In this example, hashing is performed by using the order ID generation algorithm to prevent hotspot data. |
user_id | String | The ID of the customer. |
sku_id | String | The ID of the product. |
price | Double | The purchase price of the product. |
num | Integer | The quantity of purchased products. |
total_price | Double | The total amount of the order. |
order_status | String | The status of the order. |
create_time | String | The time when the order was created. The value is a 64-bit timestamp in milliseconds. |
modified_time | String | The time when the order was modified. |
FAQ
References
You can use secondary indexes or search indexes to accelerate data queries. For more information, see Secondary index and Search index.