HTTP transmits data in plaintext, making it vulnerable to eavesdropping and tampering. Modern browsers also flag HTTP sites as "Not Secure." This guide shows you how to install an SSL certificate on a Windows Internet Information Services (IIS) server to enable HTTPS, and how to verify the installation.
If you have questions, contact your account manager for assistance.
Prerequisites
Before you begin, make sure that:
-
Your certificate is valid. You have an SSL certificate issued by a trusted certificate authority (CA). If the certificate has expired or is about to expire, renew it first.
-
Your certificate covers the right domains. The certificate must match all domains you want to secure:
-
An exact-match certificate (for example,
example.com) protects only that specific domain. It does not protectwww.example.comor any subdomain. -
A wildcard certificate (for example,
*.example.com) protects first-level subdomains such aswww.example.comanda.example.com, but not the root domainexample.comor multi-level subdomains such asa.b.example.com.
To protect multi-level subdomains, the Bound Domains field must contain the exact domain (such as
a.b.example.com) or a matching wildcard (such as*.b.example.com). To add or change domains, purchase a commercial certificate or modify bound domains. -
-
You have administrator access. Log on with the
Administratoraccount or an account with administrator privileges. DNS Resolution: The domain name resolves to the server's public IP address.
-
DNS resolves to your server. The domain's DNS record points to the server's public IP address.
-
Your OS version is supported. These instructions apply to Windows Server 2008 R2 and later. The UI may vary between versions — adjust the steps as needed.
Step 1: Prepare the SSL certificate
-
Go to the SSL Certificate Service console. In the Actions column for the target certificate, click Download Certificate. On the Download tab, select IIS as the Server Type and download the certificate.
-
Extract the downloaded certificate package:
-
If the package contains a certificate file (
.pfx) and a password file (.txt), keep both files. You will need them during deployment. > Important: The system generates a new password each time you download the certificate. This password is only valid for the certificate file downloaded in the same session. -
If the package contains only a
.pemcertificate file, convert it to.pfxformat using the certificate toolkit. For details, see Convert the format of a certificate. > Note: If you used a tool such as OpenSSL or keytool to generate the Certificate Signing Request (CSR) when applying for the certificate, the private key is stored locally and is not included in the downloaded package. If you lose the private key, you cannot use the certificate — you must purchase a new certificate and generate a new CSR and private key.
-
-
Upload the certificate file to the server.
-
Drag the certificate file from the Workbench directory to the
C:drive or another local drive for storage.
The following steps use an Alibaba Cloud Elastic Compute Service (ECS) instance as an example. For other server types, refer to their official documentation.
ImportantWhen you disconnect from or exit the instance, Workbench automatically clears all files from the Redirected drives and folders directory. This directory is for file transfer only — do not use it for permanent storage.
-
Step 2: Open port 443
Open port 443 in the security group
If your server is hosted on a cloud platform, the security group must allow inbound traffic on port 443 (TCP). Otherwise, HTTPS is inaccessible from the internet. The following steps use Alibaba Cloud ECS. For other platforms, see their official documentation.
-
Log on to the ECS console. Select the region of the target instance. On the Instances page, find the instance.
-
Click the instance name to open the details page. Go to Security Groups > Internal Inbound Rules and check for a rule with these settings: Action = Allow, Protocol Type = TCP, Destination Port Range = HTTPS (443), Authorization Object = All IPv4 Addresses.
-
If this rule does not exist, add a security group rule.
Open port 443 in the Windows firewall
-
Log on to the Windows server. Click Start and open Control Panel.
-
Go to System and Security > Windows Firewall > Check firewall status.
-
If the firewall is off, no further action is needed — proceed to Step 3: Import the SSL certificate in MMC.
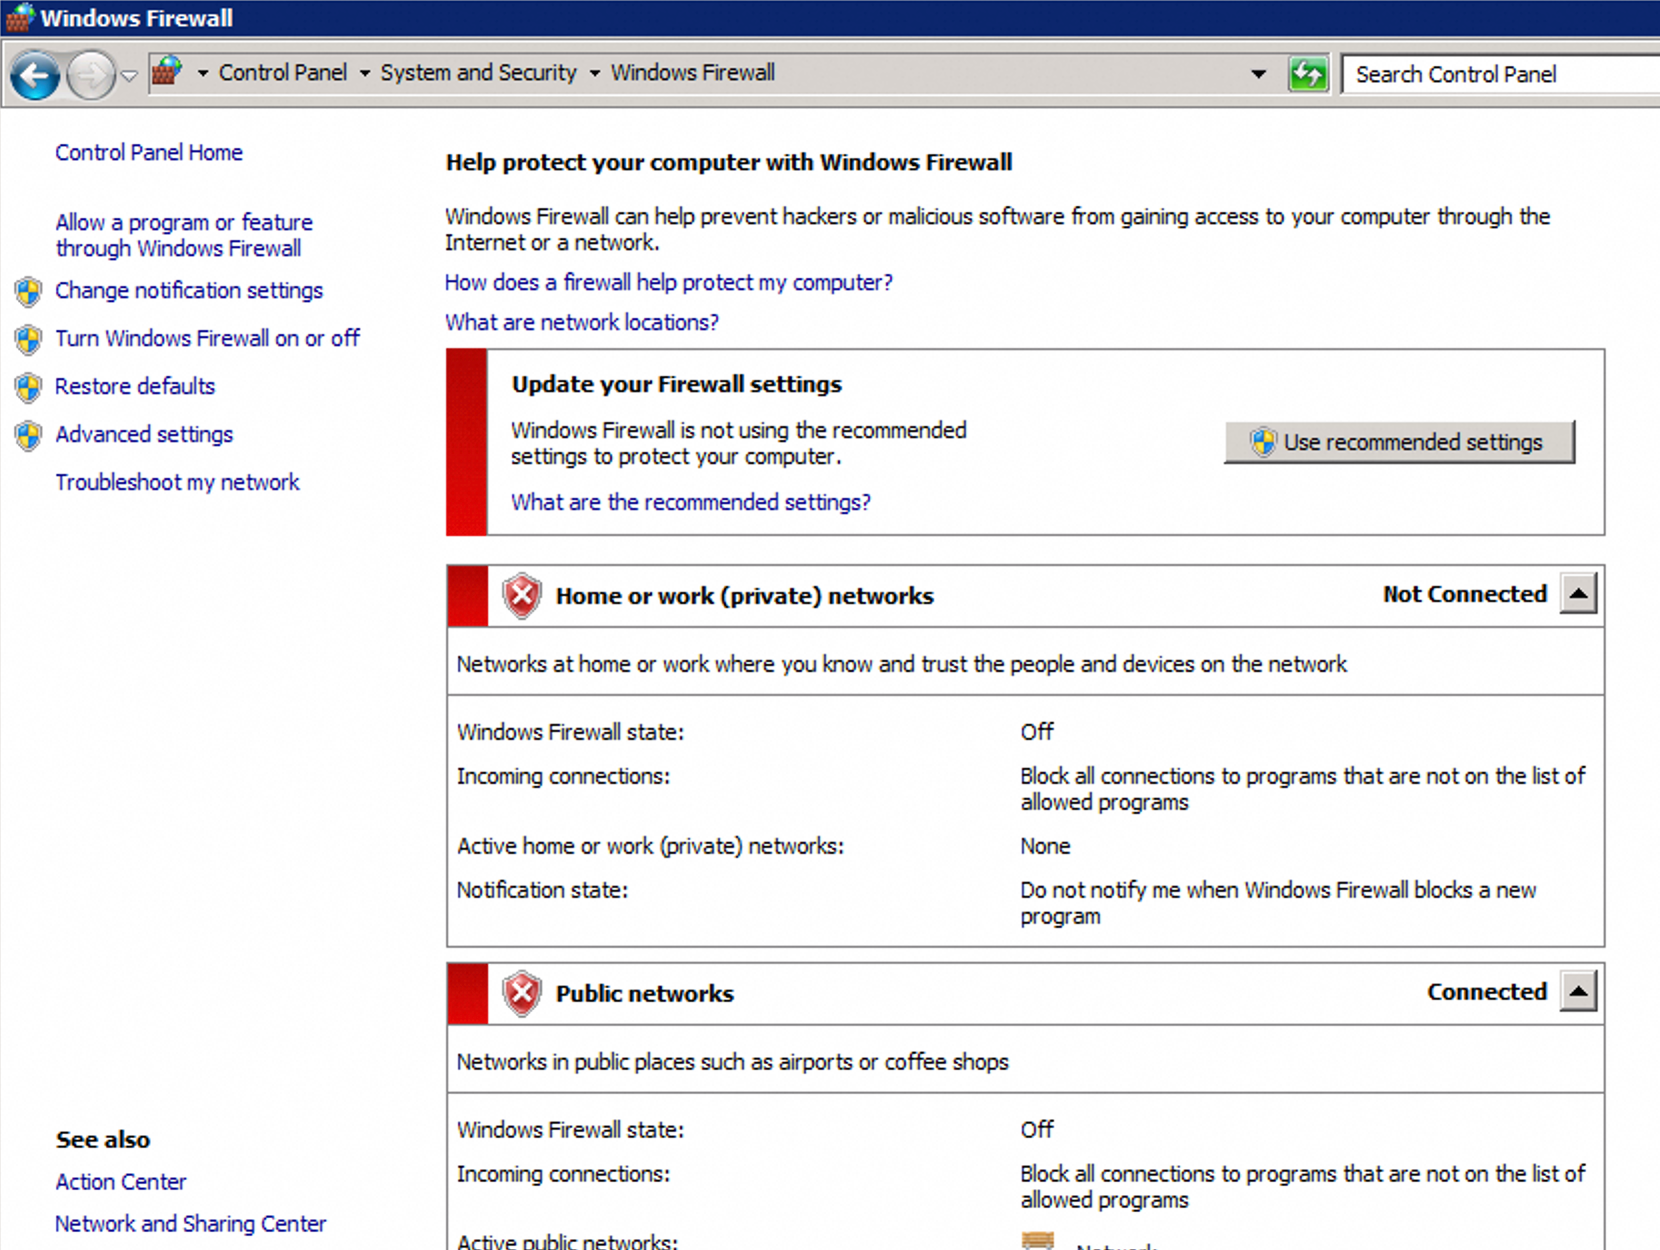
-
If the firewall is on, go to Advanced settings > Inbound Rules and check for a rule where Protocol = TCP, Local Port = 443, and Action = Block. If this rule exists, right-click it, select Properties, go to the General tab, change the setting to Allow the connection, and click Apply.
Step 3: Import the SSL certificate in MMC
-
Click Start, search for Run, and open it. Enter
mmcand click OK. -
In the MMC console, add the Certificates snap-in:
-
In the Certificates snap-in dialog box, select Computer Account and click Next.
-
In the Select Computer dialog box, select Local computer (the computer this console is running on) and click Finish.
-
Click OK.
In the Add or Remove Snap-ins dialog box, select Certificates from the Available snap-ins list and click Add.
-
-
In the left navigation pane, expand Console Root > Certificates (Local Computer). Right-click Personal and go to All Tasks > Import.
In the left navigation tree, right-click Certificates (Local Computer) and select All Tasks > Import.
-
Follow the Certificate Import Wizard:
-
Password: Open the
.txtpassword file, copy its content, paste it into the Password field, and click Next. -
Certificate Store: Select Automatically select the certificate store based on the type of certificate and click Next.
-
Completing the Certificate Import Wizard: Click Finish. When the The Import Was Successful message appears, click OK.
-
Step 4: Bind the certificate in IIS Manager
Windows Server 2012 R2 and later
-
Click the
 Start icon, then go to Server Manager > Tools > IIS Manager.
 -
In the Connections pane, expand the server node, click Sites, and select the target website. In the Actions pane, click Bindings.
-
In the Site Bindings dialog box, click Add.
-
In the Add Site Binding dialog box, configure the settings based on your scenario and click OK.
Single website or multiple websites sharing one certificate
Use this configuration when you have one website, or when multiple websites use the same certificate.
-
Type: Select https.
-
IP address: Select the server's IP address. If the server has only one IP address, leave this as All Unassigned.
-
Port: Keep the default value of 443.
Port 443 is the standard HTTPS port. If you use a non-standard port, users must include it in the URL (for example,
https://domain.com:8443). -
Host name: Enter the domain to secure, such as
domain.com. -
Require Server Name Indication: Leave this unchecked for a single-site setup.
-
SSL certificate: Select the certificate you imported.
Multiple websites, each with its own certificate (recommended: SNI)
Server Name Indication (SNI) lets you host multiple HTTPS-enabled websites on a single IP address and port. This is the recommended approach for Windows Server 2012 R2 and later.
In the example below, two websites (web01 and web02) share the same IP address and port 443. Select Require Server Name Indication for each site. If you omit this, IIS shows the error: "At least one other site is using the same HTTPS binding."


For each website:
-
Type: Select https.
-
IP address: Keep the default All Unassigned if the server has one IP address.
-
Port: Keep the default value of 443.
-
Host name: Enter the site's domain name (for example,
example1.comorexample2.com). -
Require Server Name Indication: Select this checkbox.
-
SSL certificate: Select the certificate that corresponds to the site.
After you configure all sites, you may see a warning: The default SSL site has not been created... This means older browsers that do not support SNI (such as Internet Explorer on Windows XP) will encounter errors. To support these browsers, set up a default SSL site as a fallback:
The default SSL site handles requests from non-SNI-compliant browsers. Configure it as a blank page or redirect page. If your users do not use legacy browsers, ignore this warning.
-
In IIS Manager, expand the server node and click Sites. Select Default Web Site or add a new website. In the Actions pane, click Bindings.
-
Click Add. Configure the binding as follows and click OK.
-
Type: Select https.
-
IP address: Select the server's IP address.
-
Port: Keep the default 443.
-
Host name: Leave this blank.
-
Require Server Name Indication: Leave this unchecked.
-
SSL certificate: Select any imported certificate.
-
Multiple websites, each with its own IP address
This approach requires you to modify DNS records — the entry IP address changes from a single IP to multiple IPs. This may affect live services. Assess the business impact before proceeding.
-
Create a secondary Elastic Network Interface (ENI) and attach it to the ECS instance. For details, see Create and use an ENI.
-
Create elastic IP addresses (EIPs) and associate them with the secondary ENI. The public-to-private IP mapping is shown below.
-
At your DNS provider, point each domain to its corresponding public IP address — for example,
example1.comto106.xx.xx.198andexample2.comto101.xx.xx.50. -
In IIS Manager, configure each website as follows:

 For each website:
-
Type: Select https.
-
IP address: Enter the site's private IP address (for example,
192.168.1.211for Web01). -
Port: Keep the default value of 443.
-
SSL certificate: Select the certificate that corresponds to the site.
IIS website SSL certificate IP address (private) Public IP address Web01 Certificate for example1.com192.168.1.211106.xx.xx.198Web02 Certificate for example2.com192.168.1.212101.xx.xx.50 -
-
Click Close in the Site Bindings dialog box.
-
(Optional) Apply TLS best practices using IIS Crypto:
-
Download IIS Crypto GUI from https://www.nartac.com/Products/IISCrypto/Download.
-
Run the downloaded file. On the Schannel homepage, click Best Practices, click OK, then click Apply. Restart the server when prompted.
-
Windows Server 2008 R2
-
Click Start, then go to Administrative Tools > IIS Manager.
-
In the Connections pane, expand the server node, expand Sites, and click the target website. In the Actions pane, click Bindings.
-
In the Site Bindings dialog box, click Add.
-
In the Add Site Binding dialog box, configure the settings based on your scenario.
Single website
-
Type: Select https.
-
IP address: Select the server's IP address. If the server has only one IP address, keep the default All Unassigned.
-
Port: Keep the default value of 443. If you use a non-standard port, users must include it in the URL (for example,
https://domain.com:8443). -
SSL certificate: Select the certificate you imported.
Multiple websites
Windows Server 2008 R2 does not support Server Name Indication (SNI). Each HTTPS-enabled website must be bound to a unique IP address, and each IP address must have a unique certificate.
This approach requires you to modify DNS records — the entry IP address changes from a single IP to multiple IPs. This may affect live services. Assess the business impact before proceeding.
-
Create a secondary Elastic Network Interface (ENI) and attach it to the ECS instance. For details, see Create and use an ENI.
-
Create elastic IP addresses (EIPs) and associate them with the secondary ENI.
-
At your DNS provider, point each domain to its corresponding public IP address.
-
In IIS Manager, configure each website:
For each website:-
Type: Select https.
-
IP address: Enter the site's private IP address.
-
Port: Keep the default value of 443.
-
SSL certificate: Select the certificate that corresponds to the site.
IIS website SSL certificate IP address (private) Public IP address Web01 Certificate for example1.com192.168.1.211106.xx.xx.198Web02 Certificate for example2.com192.168.1.212101.xx.xx.50 -
-
Click Close in the Site Bindings dialog box.
Some Windows Server 2008 systems may report the error
One or more intermediate certificates in the certificate chain are missing. See the FAQ for the fix. -
Set the TLS policy. Windows Server 2008 R2's default TLS configuration may not be trusted by modern browsers, apps, or mini programs. If you see errors such as
ERR_SSL_VERSION_OR_CIPHER_MISMATCHorUnsupported protocolafter deployment, apply TLS best practices:-
Download IIS Crypto GUI from https://www.nartac.com/Products/IISCrypto/Deprecated.
-
Run the downloaded file. On the Schannel tab, click Best Practices, click OK, then click Apply. Restart the server when prompted.
-
(Optional) Set up HTTP to HTTPS redirection
Redirecting HTTP traffic to HTTPS ensures all connections use encryption.
-
In IIS Manager, expand the server node, click Sites, and select the target site. Check the site's home view for the URL Rewrite module. If it is not present, download and install it from https://www.iis.net/downloads/microsoft/url-rewrite. Close and reopen IIS Manager after installation. On the download page, click the x86 installer or x64 installer link for your system architecture to download.
-
Double-click URL Rewrite. In the Actions pane, click Add Rule(s).
-
Select Inbound Rules > Blank Rule and click OK.
-
In the Edit Inbound Rule dialog box, configure the rule as follows. Keep the defaults for any parameters not listed.
Parameter
Setting
Name
Enter a descriptive name, such as HTTP to HTTPS Redirect.
Match URL
Requested URL
Select Matches the Pattern.
Using
Select Regular Expressions.
Pattern
Enter
(.*).Ignore case
Select the checkbox.
Conditions
Logical grouping
Select Match All.
Conditions (Add a condition)
Condition input
Enter
{HTTPS}.Check if input string
Select Matches the Pattern.
Pattern (condition)
Enter
^OFF$.Ignore case
Select the checkbox.
Action
Action type
Select Redirect.
Redirect URL
Enter
https://{HTTP_HOST}/{R:1}.Append query string
Select the checkbox.
Redirect type
Select Permanent (301) for production, or Found (302) for testing.
-
In the Actions pane, click Apply.
-
In the Connections pane, click the server and then click Restart. Verify that HTTP requests automatically redirect to HTTPS.
Go back to the server home page, and in the Manage Server section of the Actions pane, click Restart to restart the IIS server and apply the configuration.
Step 5: Verify the deployment
-
Open a web browser and navigate to
https://<your-domain>— replace<your-domain>with your actual domain. -
If a padlock icon appears in the address bar, the certificate is installed correctly.
Starting from Chrome 117, the
 padlock icon has been replaced with a new
  icon. Click it to view the certificate details.
-
If you encounter an access error or the padlock does not appear, clear your browser cache or try again in a private (incognito) window.
If the issue persists, see the FAQ below or the SSL certificate deployment troubleshooting guide.
Going live
Before deploying to production, apply these best practices:
-
Run as a non-administrator user. Create a dedicated, low-privilege system account for the application. Never run the application with administrator privileges.
For improved security, consider terminating SSL at the gateway layer by deploying the certificate on a Server Load Balancer (SLB) or a reverse proxy such as Nginx. The gateway handles HTTPS termination and forwards decrypted HTTP traffic to the backend.
-
Keep credentials out of your code. Never hard-code passwords or sensitive data in configuration files. Use environment variables, Vault, or a cloud key management service to inject credentials at runtime.
-
Enforce HTTPS. Redirect all HTTP traffic to HTTPS to prevent man-in-the-middle attacks.
-
Disable legacy TLS protocols. Disable SSL v3, TLS 1.0, and TLS 1.1. Enable only TLS 1.2 and TLS 1.3.
-
Monitor certificate expiration. After deployment, enable domain monitoring. Alibaba Cloud checks certificate validity periods and sends renewal reminders before expiration. For details, see Purchase and enable public domain name monitoring.
FAQ
Why is my website still not accessible over HTTPS after installing the certificate?
Check the following in order:
-
Port 443 is blocked. The security group or Windows firewall may be blocking port 443. Follow the steps in Step 2: Open port 443.
-
Domain mismatch. The domain you're accessing is not covered by the certificate's Bound Domains. Verify the certificate covers the exact domain you're using.
-
Wrong or outdated certificate. The certificate file in use may be stale. Download the latest certificate and re-import it.
-
Certificate missing on upstream services. If your domain uses a Content Delivery Network (CDN), Server Load Balancer (SLB), or Web Application Firewall (WAF), the certificate must also be installed on those services. See Certificate deployment locations when traffic passes through multiple Alibaba Cloud services.
-
Multi-server deployment incomplete. If the domain resolves to multiple servers, the certificate must be installed on all of them.
For more help, see Resolve certificate deployment issues based on browser error messages and the SSL certificate deployment troubleshooting guide.
How do I fix the "One or more intermediate certificates in the certificate chain are missing" error on Windows Server 2008 R2?
This error appears on older operating systems whose certificate stores lack the modern root certificates required to validate your certificate chain. Fix it by manually installing the missing root certificate.
-
Identify the correct root certificate. Log on to the Digital Certificate Management Service consoleCertificate Management Service console. Go to Certificate Management > SSL Certificate Service and open the certificate's details page. Check the Certificate Chain Information section for the certificate issuer and issuance date: For details on selecting the correct root, see [Announcement] Replacement of DigiCert root certificates. For example, for the Rapid brand, the root certificate is under the DigiCert_DV_OV_ROOT category. Select Digicert_Global_Root_G2_DV_OV (New - Cross-signed Root).
-
Issued after December 1, 2024: download Digicert_Global_Root_G2_DV_OV (New - Cross-signed Root).
-
Issued before December 1, 2024: download DigiCert_Global_Root_G2_DV_OV (Old - Transitional).
-
-
Download the root certificate. Go to Download and install root certificates and download the file identified above.
-
Install the root certificate.
-
Upload the root certificate file to your server.
-
Double-click the file to open the Certificate Import Wizard.
-
Follow the prompts and place the certificate in the Trusted Root Certification Authorities store for Local Computer.
-
How do I update an existing SSL certificate in IIS?
Import the new certificate and update the site binding to use it.
-
Import the new certificate. Follow Step 3: Import the SSL certificate in MMC to import the new
.pfxfile into the Local Computer > Personal store. -
Update the binding. In IIS Manager, open the site's Bindings, select the
httpsbinding, click Edit, choose the new certificate from the SSL certificate dropdown, and click OK. -
Verify. Open your site in a new private browser window. Click the security icon in the address bar to confirm the certificate details (such as the expiration date) are correct.
To confirm the new certificate is active:
-
Click the site information icon to the left of the browser address bar, and in the popup panel click Connection is secure to view the certificate details.
-
In the browser address bar, click the lock icon, go to the connection security details page, and click Certificate is valid to view the certificate details.
-
On the General tab of the certificate viewer, check the Valid from and Valid to dates to confirm they match the new certificate's validity period.
Why can't I see my .pfx file in the Certificate Import Wizard?
The file browser defaults to showing only .cer files. Change the file type filter in the bottom-right corner from "X.509 Certificate" to All Files (*.*) to see your .pfx file.
I lost the password for my .pfx file. Can I recover it?
No — lost .pfx passwords cannot be recovered. Download the certificate again from the SSL Certificate Service console. Each download generates a new .pfx file and a matching password file.
How do I check whether my Windows Server is 32-bit or 64-bit?
Via Command Prompt: Run wmic os get osarchitecture. The output shows 64-bit or 32-bit.
Via the ECS console: If the server is an Alibaba Cloud ECS instance, the architecture is listed on the instance details page. Log on to the ECS console. In the instance list, find the target instance and hover over the icon in the Operating System column to view the OS version (for example, Windows Server 2008 R2 Enterprise 64-bit).