If your manually deployed SSL certificate isn't working or your browser shows a security warning, work through the checks below to find and fix the problem.
Quick checklist
Scan this list before diving into the detailed steps. Most deployment failures are caused by one of the following:
Port 443 is open in your server's firewall or security group
The certificate file path and name in the web server config match what's on disk
The web server was restarted after the config change
The certificate hasn't expired and its status is Issued
The certificate's Bound Domains match the domain you're serving
The certificate and private key were generated together (matching key pair)
The certificate is in X.509 format, PEM-encoded (
.crtor.pem)The certificate chain is complete (server cert + intermediate cert + root cert)
The certificate file directory has read permissions for the web server process
DNS points to the correct IP address
1. Check if port 443 is open
HTTPS traffic uses port 443. If this port is blocked, browsers can't establish a secure connection.
If you're using an Alibaba Cloud ECS instance, check the security group rules:
Go to the ECS console Security Groups page.
Verify that port 443 allows inbound traffic.
For details on managing security group rules, see Manage security groups.

If you're using Web Application Firewall (WAF), verify that WAF isn't blocking external access to port 443:
Log on to the Web Application Firewall 3.0 console. From the top menu bar, select the resource group and region (Chinese Mainland or Outside Chinese Mainland) for the WAF instance.
In the left navigation pane, click Onboarding.
On the CNAME Record tab, confirm that external access to port 443 is allowed.

2. Check the web server configuration
3. Check certificate validity and status
Log on to the Certificate Management Service console.
In the left navigation pane, choose Certificate Management > SSL Certificate Management.
On the SSL Certificate Management page, locate your certificate and check:
Status is Issued
Bound Domains lists the correct domain


If the certificate has expired, renew it. For renewal steps, see SSL Certificate Renewal and Expiration Handling.
If you're using a self-signed certificate, the browser will show a warning because self-signed certificates aren't trusted by default. To check the trust status in Google Chrome:
Open the site in Chrome.
Click the
 icon in the address bar. No warning icon means the browser trusts the certificate. A red
  icon means it doesn't.
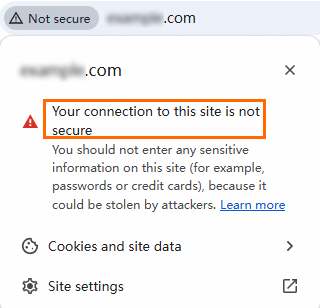
Click the icon for details. If the certificate isn't trusted, the certificate information window shows a warning.
If you're using a commercial certificate, confirm it was issued by a trusted Certificate Authority (CA). To verify in Chrome:
Click the
 icon in the address bar.
Click Connection is secure.
Click Certificate (Valid). A trusted CA-issued certificate shows no warning.

In the certificate information window, find the Issuer field and confirm the common name (CN) and organization name (O) match a well-known CA.

4. Verify DNS resolution
If DNS doesn't point to the correct server IP, HTTPS connections go to the wrong host and the certificate won't match.
Log on to the Alibaba Cloud DNS console.
On the Authoritative DNS Resolution page, under the Authoritative Domain Names tab, click the domain name to open the Settings page.

Click Add Record and verify the Record Value matches your server's IP address. If it doesn't match, click Edit to update it.

DNS changes can take time to propagate. If you recently updated DNS settings, clear the local DNS cache and retry.
Clear the DNS cache
Windows
Press
Win+R, entercmd, and press Enter to open the command prompt.Run the following command:
ipconfig /flushdnsThe message "Successfully flushed the DNS Resolver Cache." confirms success.
macOS
Open the Terminal application (press
Command+Space, type Terminal, and press Enter).Run the following commands:
# dscacheutil interacts with the system's caching service
sudo dscacheutil -flushcache

# Restart mDNSResponder, the background process responsible for DNS services
sudo killall -HUP mDNSResponder
You may be prompted to enter the administrator password.
Linux
The command depends on the DNS caching service your system uses:
DNS service | Command |
|
|
|
|
|
|
|
|
|
|
These commands require administrator permissions. After clearing the cache, the system fetches the latest DNS records from the upstream server.
5. Clear the browser cache
Browsers can cache old certificate data. Clear the browser cache and revisit the site, or open the site in incognito mode (Chrome) or InPrivate mode (Microsoft Edge) to bypass the cache.

6. Verify the certificate chain
Why this matters: Browsers verify the full chain from the root certificate down to your server certificate. A missing intermediate certificate causes untrusted certificate warnings, especially on Android browsers that don't support fetching intermediate certificates via Authority Information Access (AIA) URLs.
The certificate chain must be ordered as follows:
-----BEGIN CERTIFICATE-----
Website certificate
-----END CERTIFICATE-----

-----BEGIN CERTIFICATE-----
CA intermediate certificate
-----END CERTIFICATE-----

-----BEGIN CERTIFICATE-----
CA root certificate
-----END CERTIFICATE-----
The chain order is website certificate > CA intermediate certificate > CA root certificate. An intermediate certificate chain can have multiple layers.
View the certificate chain in Chrome
Click the
icon in the address bar, then click Connection is secure.In the pop-up window, click Certificate is valid.
Click Details and check the Certification hierarchy.
Complete a missing certificate chain
If you requested the certificate from Alibaba Cloud, download the certificate file again. The downloaded PEM file already contains the server certificate and the intermediate certificate.
On Windows, manually open the certificate, locate the intermediate certificate, export it in Base64 format, and append the exported content to your certificate file.
For information on downloading root and intermediate certificates, see Download and install root certificates and Download SSL Certificate.
Root certificates for certificates issued by trusted CAs are pre-installed in mainstream browsers (Google Chrome, Mozilla Firefox, Microsoft Edge), operating systems (Windows, macOS), and mobile devices (iOS, Android). For apps, Java clients, older browsers, and IoT devices, manually download and install a root certificate that matches the type of your server certificate.
7. Confirm the private key matches the certificate
Why this matters: When you generate a Certificate Signing Request (CSR), a private key is created at the same time. Only the matching private key works with that certificate. Uploading a mismatched private key causes the HTTPS handshake to fail.
To verify the match on a Linux system:
Log on to your ECS instance and go to the certificate installation directory:
# Replace /ssl with your actual certificate installation path
cd /ssl
Get the MD5 hash of the certificate's public key:
# Replace your_certificate.pem with your actual PEM file name
sudo openssl x509 -in your_certificate.pem -noout -pubkey | openssl md5
Get the MD5 hash of the private key's public key:
# Replace your_private_key.key with your actual private key file name
sudo openssl rsa -in your_private_key.key -pubout | openssl md5
Compare the two MD5 hashes. If they match, the private key corresponds to the certificate.

If the private key is lost or corrupted, generate a new key pair and request a new certificate.
8. Check browser compatibility
9. Verify certificate file directory permissions
The web server process must be able to read the certificate files. If permissions are too restrictive, the server can't load the certificate.
To check and set permissions on a Linux server:
View the directory permissions:
The first character (
d) indicates a directoryThe next three characters (
rwx) are the owner's permissions: read, write, executeThe middle three (
r-x) are group permissions: read, executeThe last three (
r-x) are permissions for other users: read, execute
# Replace /ssl with your actual certificate directory path
sudo ls -ld /ssl
The output looks similar to
drwxr-xr-x, where:
Confirm read (
r) and execute (x) permissions exist for the user or group running the web server. The execute permission on a directory allows users to enter it (for example, withcd).(Optional) To update permissions, run:
# Replace /ssl with your actual certificate directory path
sudo chmod 750 /ssl
The
750permission grants the owner read, write, and execute access; the group read and execute access; and no access to other users.
Website implementations vary. Review your web server and application log files for SSL-related error messages to identify the root cause. If the issue persists, contact your account manager.