To share services from a VPC that is deployed in one VPC with another VPC under the same Alibaba Cloud account, you can add the NLB instance as a service resource. Then, use PrivateLink to establish a network connection between the two VPCs. This allows private access to the NLB resource across VPCs.
Scenario example
This topic uses the following scenario. A company uses Alibaba Cloud account A to create VPC1 and VPC2 in the China (Hangzhou) region. The company creates ECS instances ECS01 and ECS02 in VPC1, and ECS instances ECS03 and ECS04 in VPC2. Different Nginx services are deployed on ECS03 and ECS04. The business requirement is for the ECS instances in VPC1 to privately access the services deployed on the ECS instances in VPC2.
Create an NLB instance in VPC2. The instance must be available in Zone G and Zone K in the China (Hangzhou) region. Then, create a backend server group named RS1 and add the ECS03 and ECS04 instances to the NLB backend server group. Create an endpoint service and add the NLB instance as a service resource. Create an endpoint in VPC1. Once the endpoint is created and connected to the endpoint service, the ECS instances in VPC1 can privately access the services deployed on the ECS instances in VPC2.

Limits
When you create an endpoint service, you must select a region that supports both PrivateLink and NLB.
The zones where an endpoint is deployed must be a subset of the zones where the associated endpoint service is deployed. For this reason, you should deploy service resources in as many zones as possible within a region. This allows endpoints in different zones to access the service.
Preparations
You have created VPC1 and VPC2 in the China (Hangzhou) region. For each VPC, you have created one vSwitch in Zone G and one vSwitch in Zone K. For more information, see Create a VPC and a vSwitch.
You have created ECS01 in Zone G and ECS02 in Zone K within VPC1 to send requests. You have also created ECS03 in Zone G and ECS04 in Zone K within VPC2 to receive and process requests. Nginx services are deployed on ECS03 and ECS04.
For more information about how to create an ECS instance, see Create an instance on the Custom Launch tab.
The following sample commands show how to deploy test applications on ECS03 and ECS04:
You have created a security group in VPC1 and added the required security group rules. For more information, see Create a security group.
The security group used in VPC2 is the default security group that is created when you create ECS03 and ECS04.
The following table describes the network planning for the two VPCs. The CIDR blocks of VPC1 and VPC2 can overlap.
Property | VPC1 | VPC2 |
Region | China (Hangzhou) | China (Hangzhou) |
CIDR block |
|
|
Zone of the vSwitch |
|
|
Server IP address |
|
|
Step 1: Create a private NLB instance
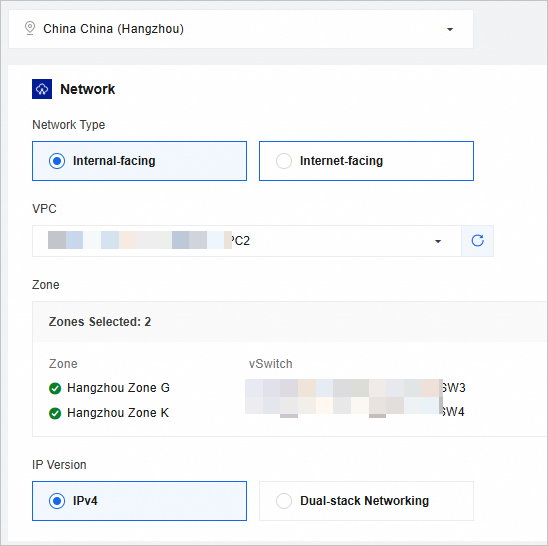
First, create an internal-facing NLB instance to act as the service resource.
Log on to the NLB console. In the top navigation bar, select the China (Hangzhou) region. Then, click Create NLB.
On the Create Network Load Balancer page, create an internal-facing NLB instance in VPC2.
Step 2: Create a server group for the NLB instance and add backend servers
Create a server group and add backend servers to receive client requests that are forwarded by the NLB instance.
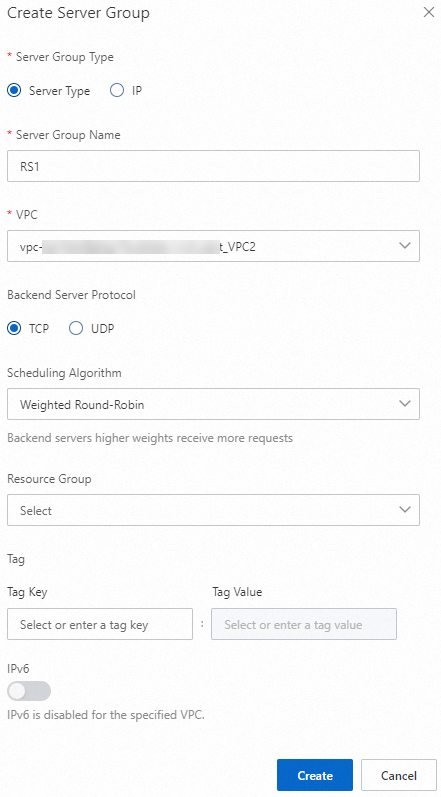
Create a server group named RS1 to route client requests to the backend servers.
Log on to the NLB console. In the navigation pane on the left, click Server Groups. On the Server Group page, click Create Server Group.
In the Create Server Group dialog box, configure the parameters.
For more information about the parameter settings, see NLB server groups.
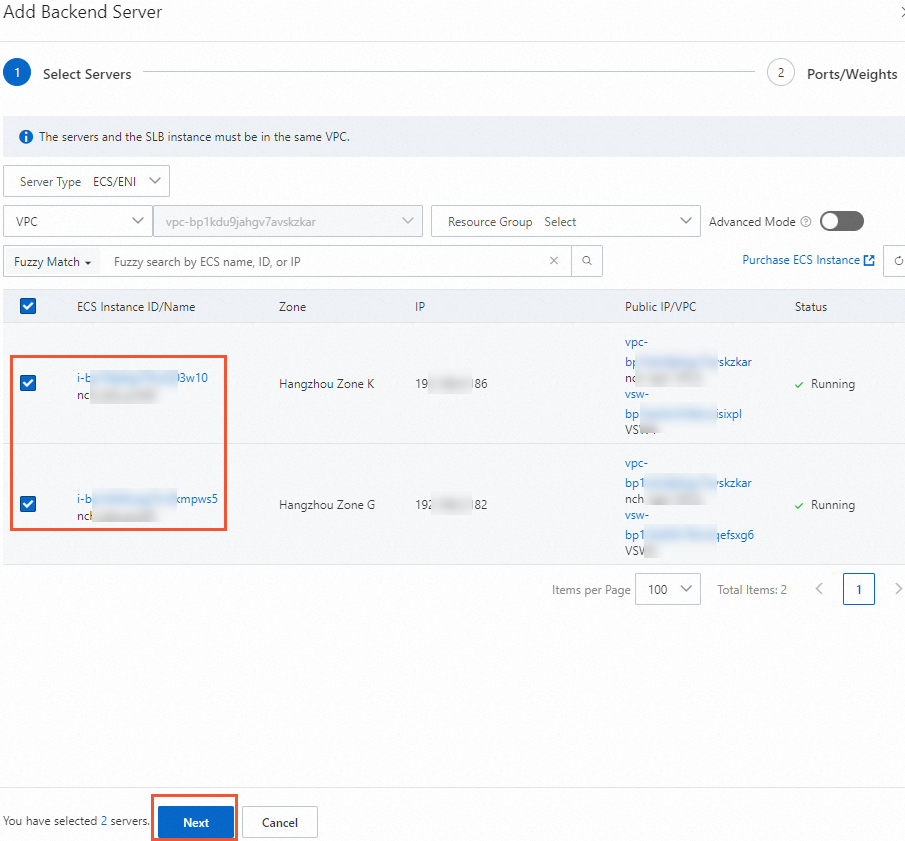
Add ECS03 and ECS04 to the RS1 server group as backend servers to process requests from the NLB instance.
On the Server Groups page, click the ID of the server group that you created.
Click the . Select ECS03 and ECS04 as backend servers. Then, click Next.
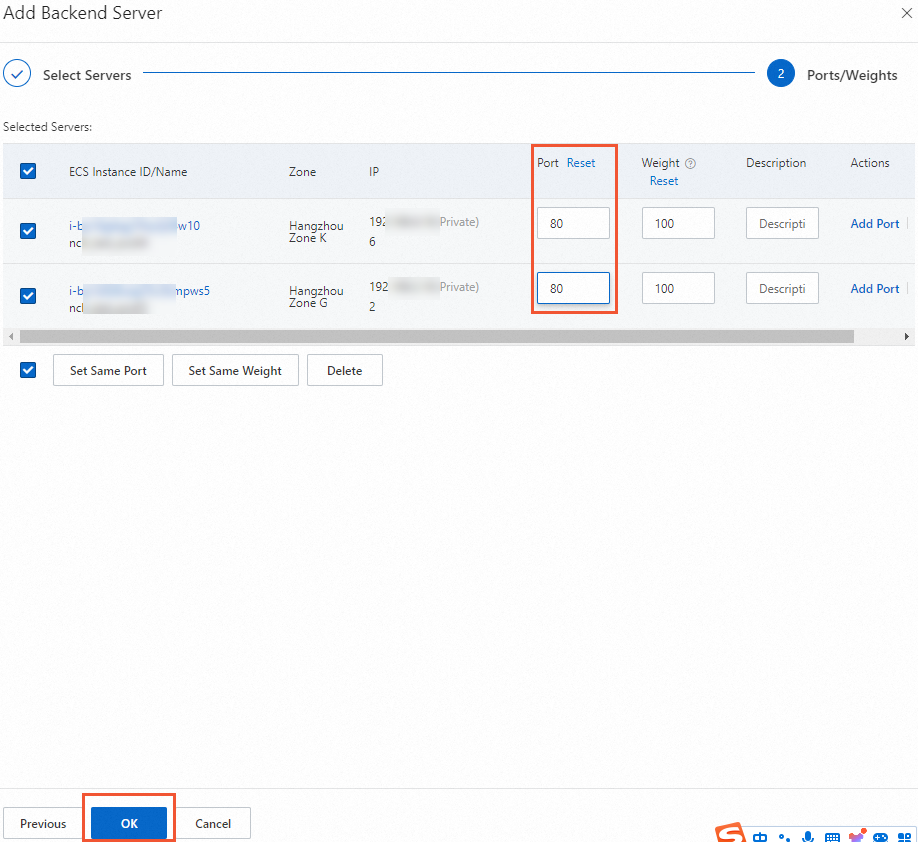
Set the port and weight for ECS03 and ECS04. In this example, set the port to 80 and use the default weight of 100.
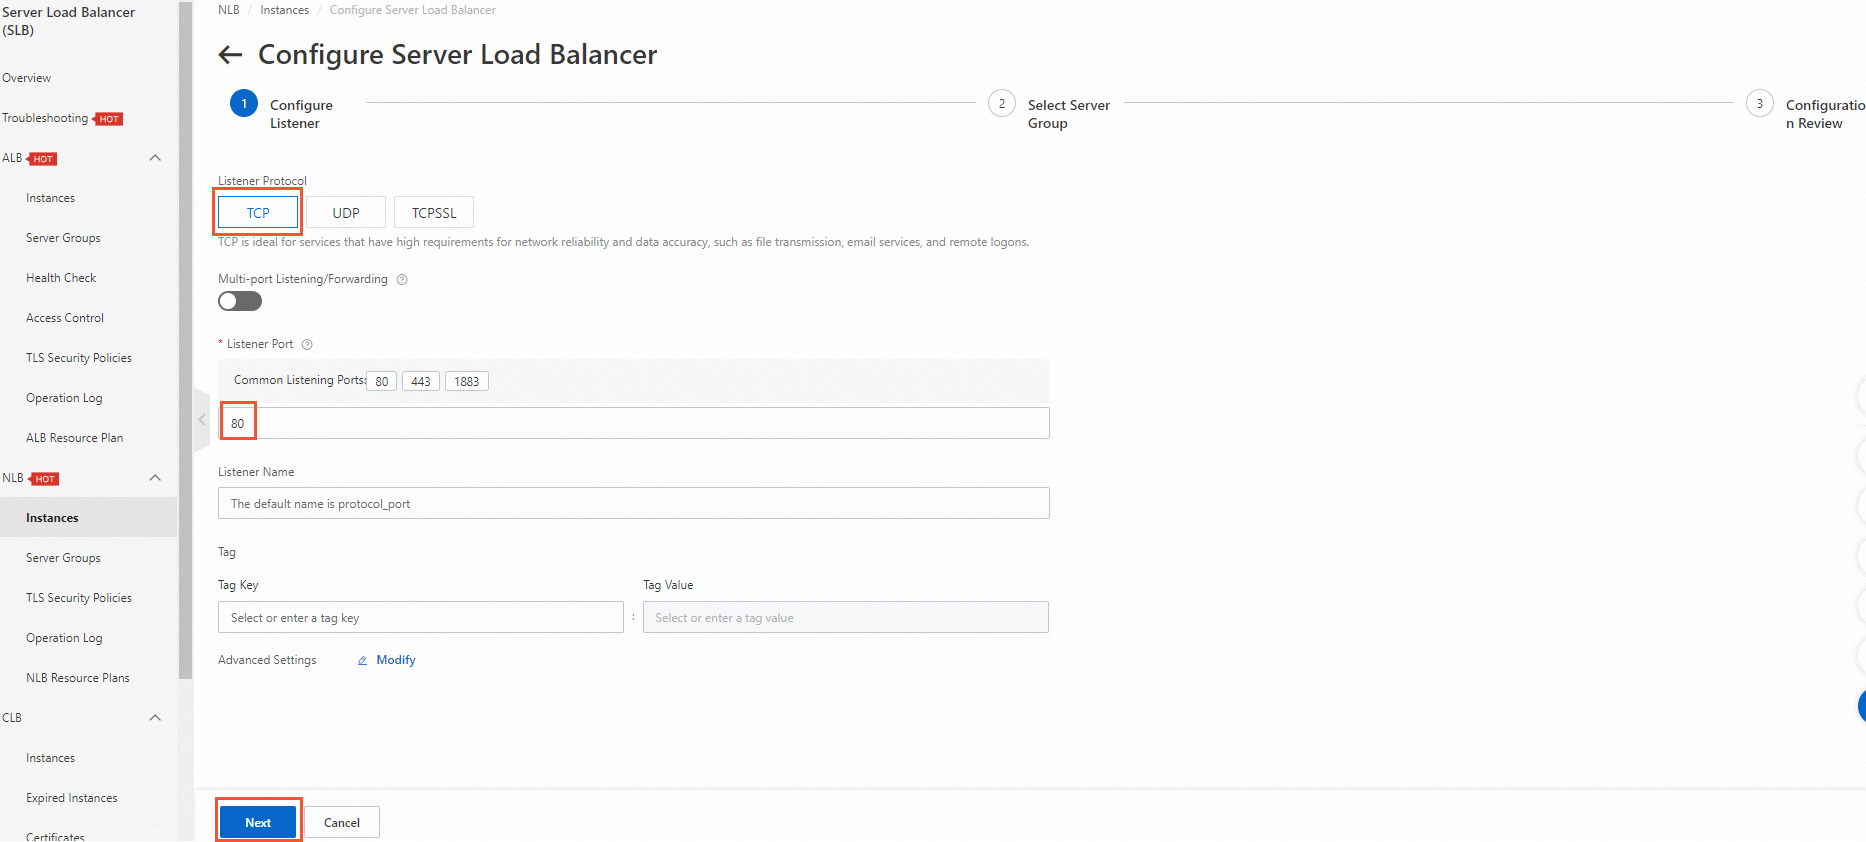
Step 3: Configure a listener
Configure a listener for the NLB instance. The listener checks for connection requests and distributes them to backend servers based on the specified scheduling algorithm to balance the traffic load.
Find the target NLB instance and click Create Listener in the Actions column.
On the Configure Listener page, select TCP as the listener protocol, set the listener port to 80, and then click Next.
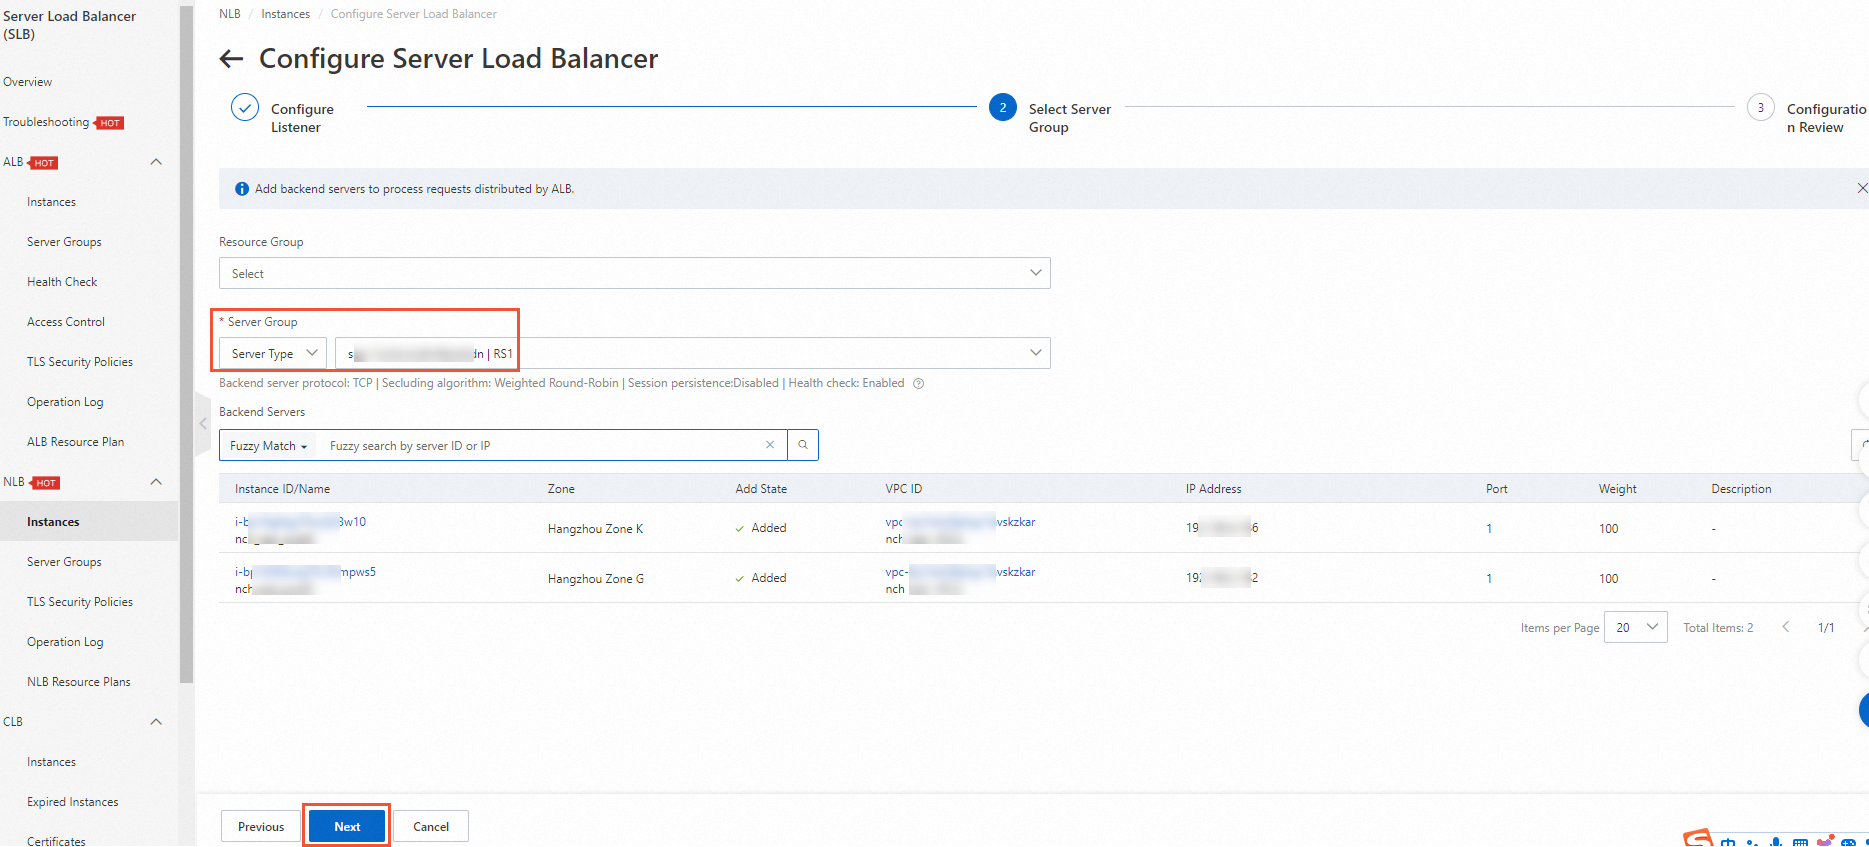
On the Select Server Group page, select the RS1 server group that you created and click Next.
On the Configuration Review wizard page, confirm the configurations and click Submit.
In the Load Balancer Business Configuration Wizard dialog box, click OK and return to the Instances page.
If the health check status of the listener is Normal, the backend servers ECS03 and ECS04 can process requests that are forwarded by the NLB instance.
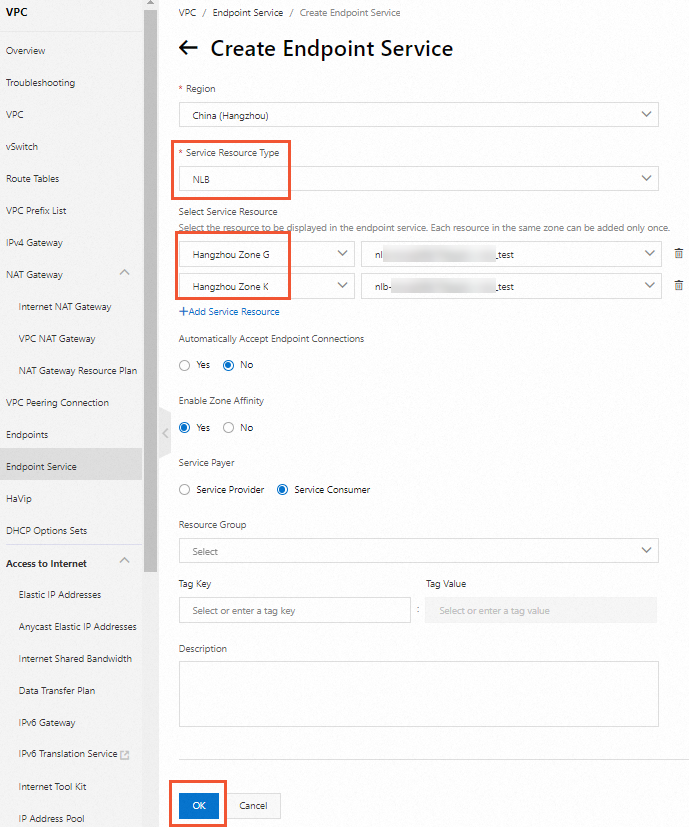
Step 4: Create an endpoint service
Create an endpoint service to establish a private connection.
Log on to the Endpoint Service console. In the top navigation bar, select the China (Hangzhou) region. Then, click Create Endpoint Service.
On the Create Endpoint Service page, add the NLB instance that you created as a service resource. Keep the default values for other parameters.
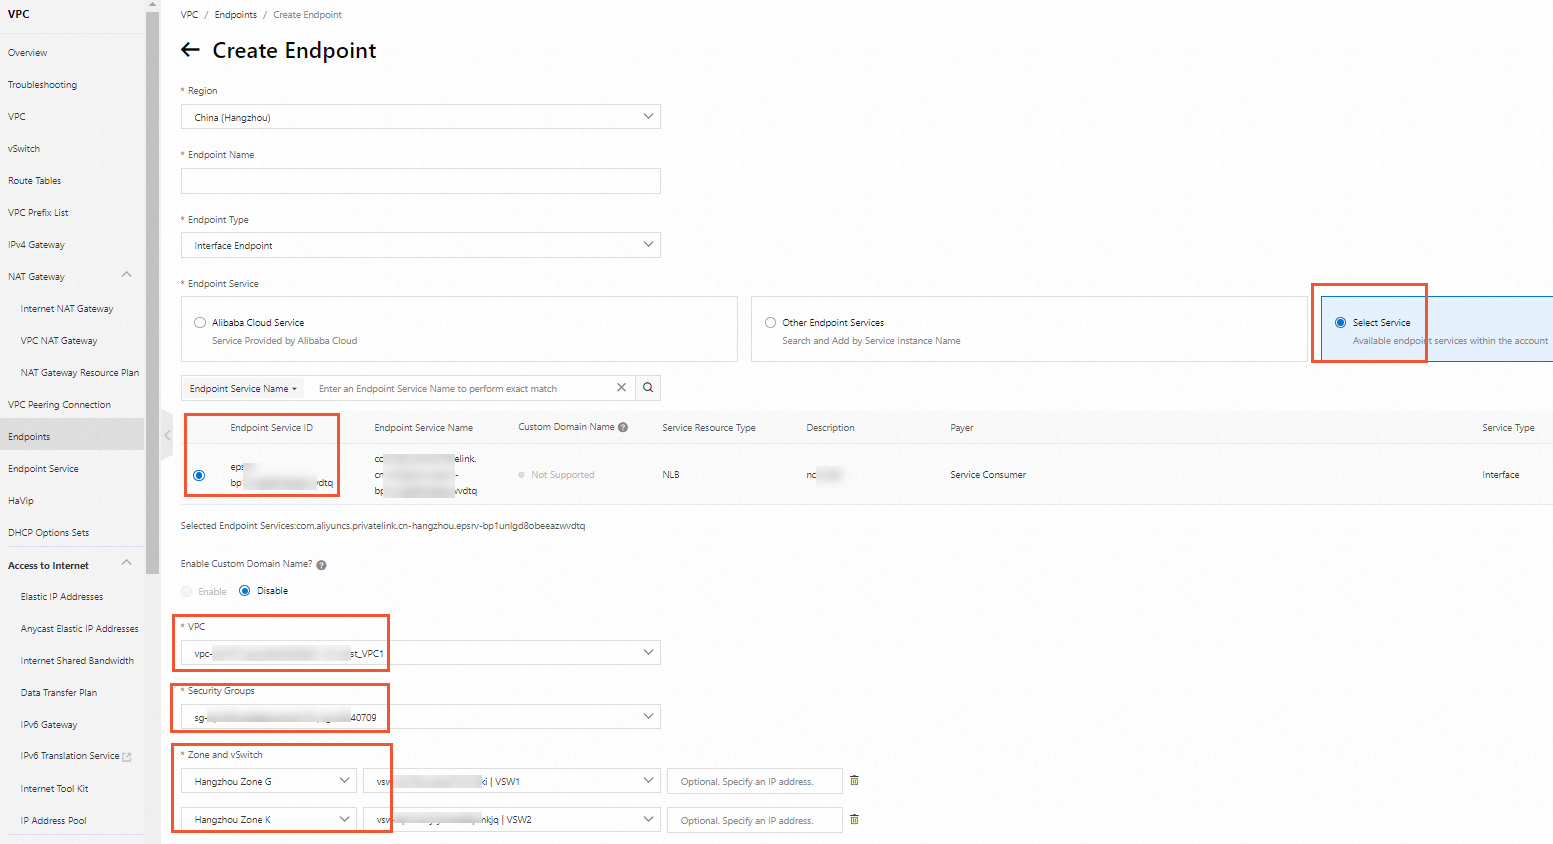
Step 5: Create an endpoint
Create an endpoint in VPC1 and associate it with the endpoint service.
Log on to the Endpoint console. In the top navigation bar, select the China (Hangzhou) region. Then, click Create Endpoint.
On the Create Endpoint page, associate the endpoint with the endpoint service that you created. Select VPC1, the appropriate security group, zones, and vSwitches. Keep the default values for the other parameters and click Create.
(Optional) Step 6: Accept the connection request
An endpoint can connect to an endpoint service only after the endpoint service accepts the connection request from the endpoint. After the connection is established, resources in VPC1 can access the endpoint service through the endpoint. In this example, the endpoint service is configured to automatically accept connection requests. Therefore, you can skip this step.
Step 7: Test results
After you complete the preceding steps, private communication is enabled between VPC1 and VPC2. The following steps describe how to test the network connectivity.
Remotely log on to the ECS01 and ECS02 instances in VPC1.
This example uses an Alibaba Cloud Linux operating system.
After you log on to the ECS instances in VPC1, you can use one of the following methods to test the connectivity between the VPCs.
Access the service deployed in VPC2 using the endpoint service domain name. The domain name supports automatic switchover between zones to ensure high availability. If a zone becomes unavailable, traffic is automatically routed to a healthy zone.
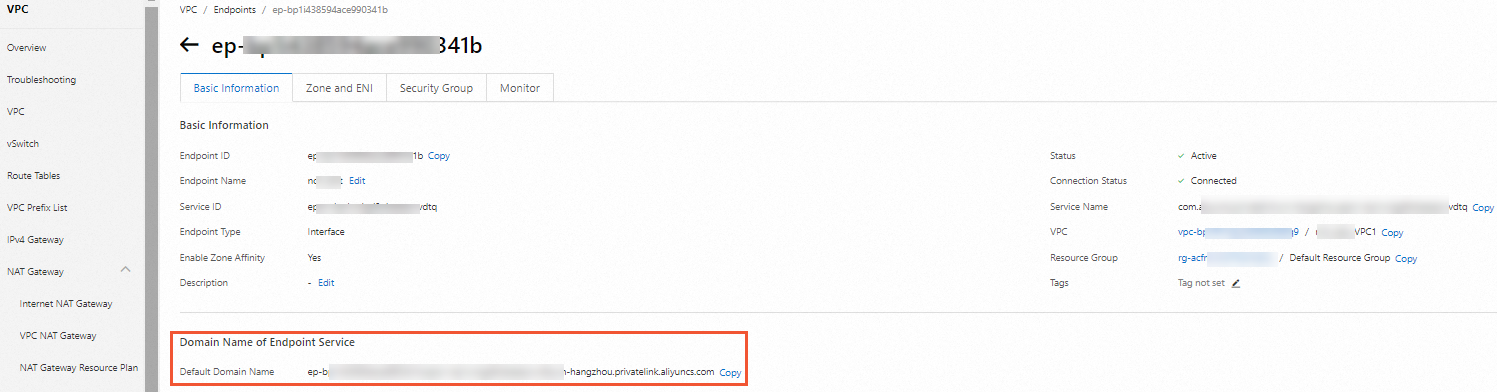
On the endpoint details page, view the generated endpoint service domain name.
Run the
curlcommand to test the connectivity.
Access the service deployed in VPC2 using a zone-specific domain name or an IP address.
On the endpoint details page, click the Zones And ENIs tab to view the generated zone domain names and IP addresses.

Run the
curlcommand to test the connectivity.
References
CreateVpcEndpoint: creates an endpoint.
CreateVpcEndpointService: creates an endpoint service.
AttachResourceToVpcEndpointService: adds a service resource to an endpoint service.
EnableVpcEndpointConnection: accepts endpoint connection requests.