As your business grows, your server's compute resources (vCPUs and memory), storage resources (system disk capacity), and network resources (data transfer quota and public bandwidth) may no longer meet your requirements. You can upgrade the configuration of your Simple Application Server by selecting a suitable plan.
Limitations
-
Only upgrades are supported. You cannot downgrade a plan.
-
You can only upgrade an entire plan. You cannot upgrade individual resources, such as the system disk, memory, or bandwidth, separately.
-
You cannot upgrade an instance across instance families or cloud disk types.
-
You cannot upgrade an instance across the following instance families: General-purpose, CPU-optimized, Multiple Public IP, International, Storage-optimized, and previous generation.
-
For previous generation plans, you cannot upgrade across cloud disk types. For example, you cannot upgrade from an SSD cloud disk to an ESSD cloud disk.
-
-
You cannot upgrade an instance if its current plan is already the highest configuration available for its instance family.
If you are using a previous generation plan, you cannot upgrade it if the current plan is already the highest configuration available for its cloud disk type.
Impacts
|
Item |
Description |
|
System disk |
If the plan upgrade involves resizing the system disk, you must also resize the partition and file system after the upgrade to make the new capacity available. |
|
Bandwidth and data transfer |
|
|
Workloads |
The server restarts during the upgrade. We recommend that you perform the upgrade during off-peak hours. |
|
Other |
The server's public and private IP addresses, operating system, firewall, snapshots, custom images, and expiration date remain unchanged. |
Billing
When you upgrade a plan, the system calculates the price difference between the old and new plans, which you must pay. The actual price difference is displayed on the upgrade page.
Before you begin
Before you upgrade, we recommend that you create a snapshot of your Simple Application Server's cloud disk to back up your data. For more information, see Create a snapshot.
An upgrade failure can lead to data loss. We strongly recommend that you create a snapshot to back up your data before you begin the upgrade. The snapshot creation process takes time, so please wait for it to complete.
Procedure
Before you upgrade, review the configurations of the following General-purpose plans that use ESSD cloud disks to select a target plan that meets your business needs. Plan configurations vary by instance family. The plans that are available for upgrade are displayed on the upgrade page in the console.
|
Instance family |
vCPU |
Memory |
ESSD system disk |
Peak bandwidth |
|
General-purpose |
2-core |
2 GB |
40 GB |
200 Mbps |
|
General-purpose |
2-core |
4 GB |
50 GB |
200 Mbps |
|
General-purpose |
4-core |
8 GB |
70 GB |
200 Mbps |
|
General-purpose |
4-core |
16 GB |
80 GB |
200 Mbps |
Step 1: Upgrade the plan
-
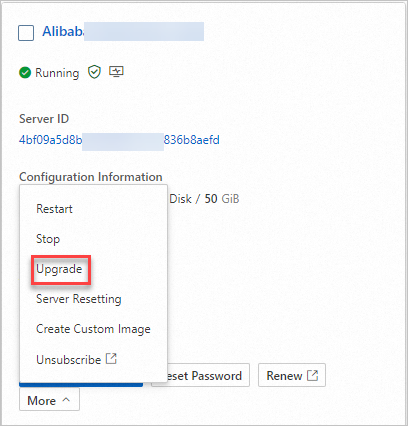
Go to the Servers page in the Simple Application Server console.
-
On the server card, choose .
NoteIf the Upgrade button is disabled, the current plan is already the highest configuration and cannot be upgraded. For more information, see Q2: Why is the Upgrade button disabled?.
-
In the Precautions dialog box, read the notes and click Go to the Upgrade page..
-
In the Plan Configuration section, select the plan to which you want to upgrade.
You can view the configuration fee in the lower-right corner of the page.
-
In the Terms of Service section, carefully read and agree to the terms of service.
-
Click Buy Now. On the Pay for your order. page, confirm the order details and complete the payment as prompted.
Return to the Simple Application Server console. The server automatically restarts after the upgrade. The upgrade is complete when the server status changes to Running.
Step 2: Resize partition and file system
If your plan upgrade involves resizing the system disk (which means the system disk capacity changes), you must resize the partition and file system to make the new capacity available. Otherwise, skip this step.
Linux
In this example, the system disk capacity is 40 GB before the upgrade and 50 GB after the upgrade.
The default device name for the system disk in a Simple Application Server instance is /dev/vda.
-
Connect to the upgraded Linux server.
For more information, see Connect to a Linux server.
-
View the cloud disk and partition information on the server.
-
Run the following command to view the cloud disk information of the server.
sudo fdisk -luBecause the data disk is not affected by the configuration upgrade, this example focuses on the system disk (
/dev/vda). The following information is shown in the figure: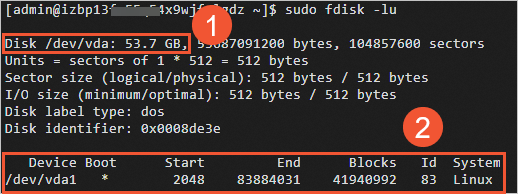
-
Area ①: The capacity of the system disk (
/dev/vda) after the upgrade. -
Area ②: The
Devicecolumn shows the partition name of the system disk. TheSystemcolumn shows the partition type of the cloud disk.Linuxindicates that the partition type is Master Boot Record (MBR). The default partition name of the system disk on a Simple Application Server instance is/dev/vda1, and the default partition type is MBR.
-
-
Run the following command to view the partition information.
df -ThThe default file system type of the system disk partition (
/dev/vda1) in a Simple Application Server instance isext4. The query result shows that the file system size is still 40 GB, which is the pre-upgrade size. This indicates that you need to resize the partition and the file system.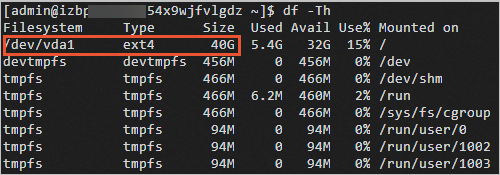
-
-
Resize the partition.
-
Run the following command to install the growpart utility.
The command that you need to run varies based on the operating system:
Alibaba Cloud Linux 2/3, CentOS 7 and later
sudo yum install -y cloud-utils-growpartDebian 9 and later, Ubuntu 14 and later
-
Update the software sources.
sudo apt-get update -
Install cloud-guest-utils.
sudo apt-get install -y cloud-guest-utils
-
-
Run the following command to resize the partition.
NoteIn the command, a space is required between
/dev/vdaand1. The number1is the partition number.sudo growpart /dev/vda 1The following figure shows a sample result. If an error is reported when you run this command, troubleshoot the issue manually. For more information, see FAQ.

-
-
Resize the file system.
The default file system type of the system disk partition (
/dev/vda1) on a Simple Application Server instance is ext4. This step describes how to resize an ext4 file system.-
Run the command that corresponds to your file system type to resize the file system.
-
ext4 file system
sudo resize2fs /dev/vda1 -
xfs file system
sudo xfs_growfs /dev/vda1
-
-
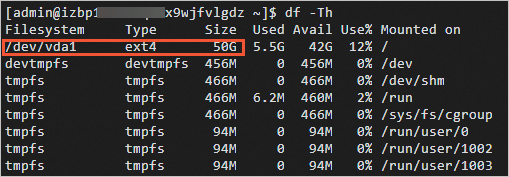
Run the following command to check the result.
df -ThThe query result shows that the file system size is 50 GB, which indicates that the resize is successful. After the resize is complete, check whether your data is intact.
-
If the resize is successful and the applications on the server run as expected, the operation is complete.
-
If the resize fails, roll back the disk by using the snapshot that you created. For more information, see Roll back a disk by using a snapshot.
-
-
Windows
In this example, the server runs the 64-bit Windows Server 2012 R2 operating system. The system disk (C: drive) is 40 GB before the upgrade and 60 GB after the upgrade.
-
Connect to the upgraded Windows server.
For more information, see Connect to a Windows server.
-
In the lower-left corner of the Windows desktop, right-click the Start
 icon and then click Disk Management.
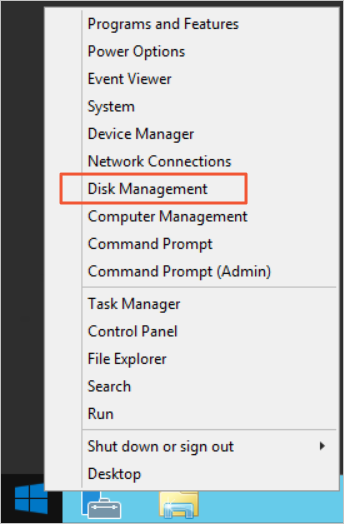
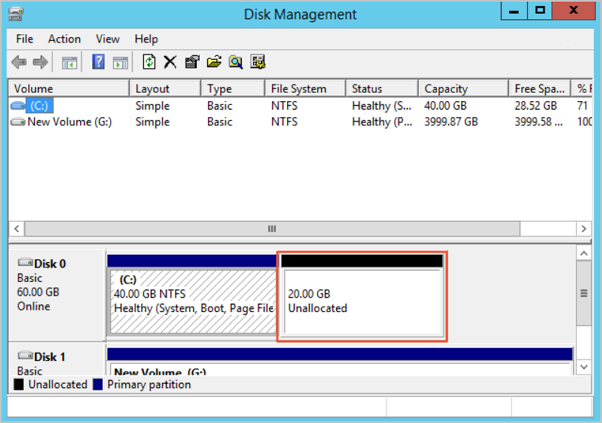
As shown in the following figure, the Disk Management window displays the unallocated capacity of the system disk after the upgrade.
-
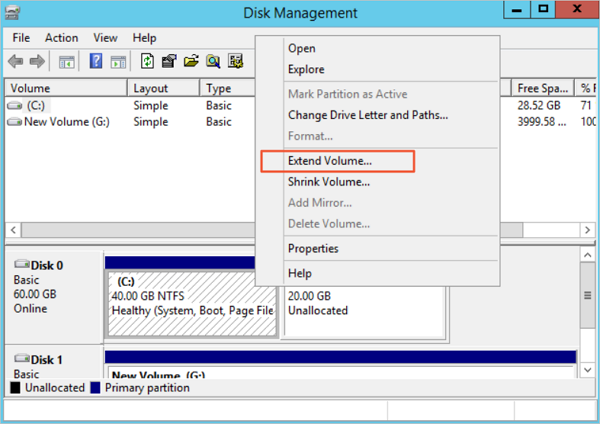
Right-click the primary partition of Disk 0 and select Extend Volume.
-
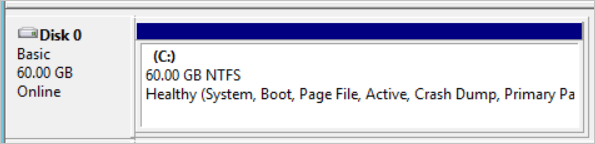
In the Extend Volume Wizard, follow the wizard, accepting the default settings to extend the volume.
After you complete the operation, the new space is automatically added to the original volume, as shown in the following figure.
After the resize is complete, check whether your data is intact.
-
If the resize is successful and the applications on the server run as expected, the operation is complete.
-
If the resize fails, roll back the disk by using the snapshot that you created. For more information, see Roll back a disk by using a snapshot.
-
FAQ
Q1: Can I upgrade individual resources in a plan, such as the system disk or bandwidth, separately?
Q2: Why is the Upgrade button disabled?

A2: You cannot upgrade a plan that uses an SSD cloud disk or ESSD cloud disk if the plan is already the highest-tier configuration available.
Related documentation
-
If your system disk has insufficient storage space, you can attach a data disk as an alternative to upgrading your plan. For more information, see Attach a data disk.
-
You can resize a data disk if its storage space becomes insufficient. For more information, see Resize a data disk.